Views: 19
Uniview EZStation Setup Guide v2, This guide will focus on the installation and functions of the Uniview EZStation Video Management Software. Thank you for choosing Spy Monkey for your Uniview Security System needs. Please contact us if you have any questions or feedback. No part of this manual may be copied, reproduced, translated, or distributed in any form or by any means without the prior consent in writing from Spy Monkey. The information presented in this guide from the latest publicly available information gathered in September 2020. The configurations and interface may vary as the software is further developed but the operational concepts should remain similar and relevant.
Information
Uniview’s EZStation Video Management Software is designed to provide the following options for a more convenient experience with your Uniview Security System.
System Requirements
The following system requirements should be met to install and configure the EZStation software and its capabilities:
Download
The EZStation installers can be downloaded from the following links:
Installation
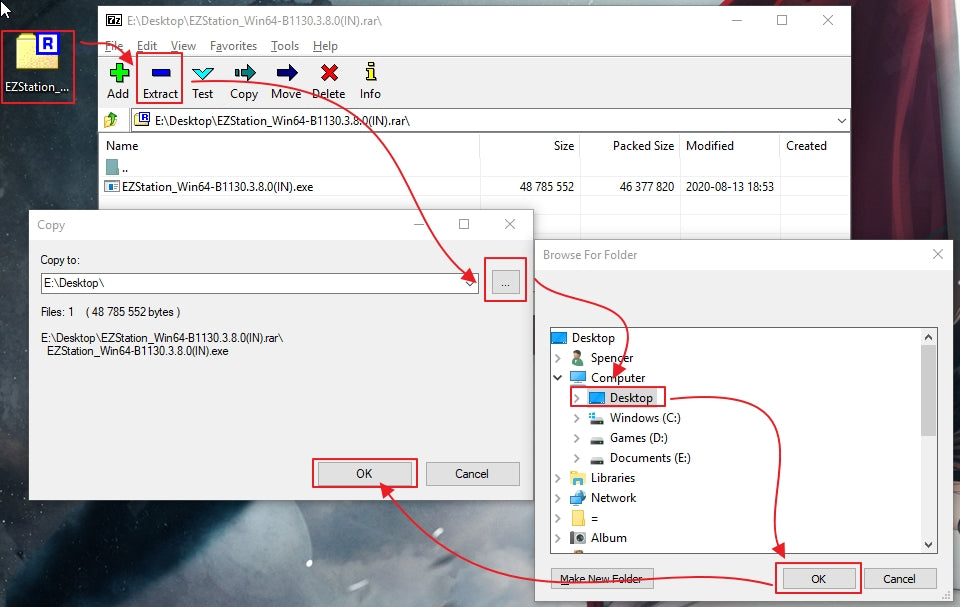
Once EZStation has been downloaded from the sources above, you will need to extract the installer from its archive. You can do this using any archive software such as WinZip, 7-Zip, and etc.
In the screenshot below, I am using an open-sourced archive software (7-Zip) to extract the downloaded EZStation archive to my desktop. It may not look exactly similar to your setup but the concept is similar.
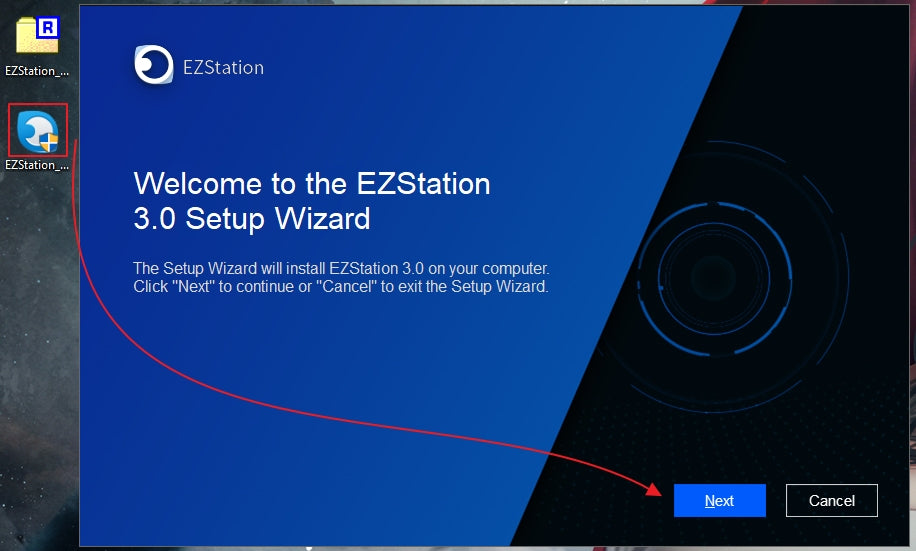
Once the installer has been extracted, launch it by double-clicking or by clicking it and pressing Enter. Proceed with the installation as you would with other programs.
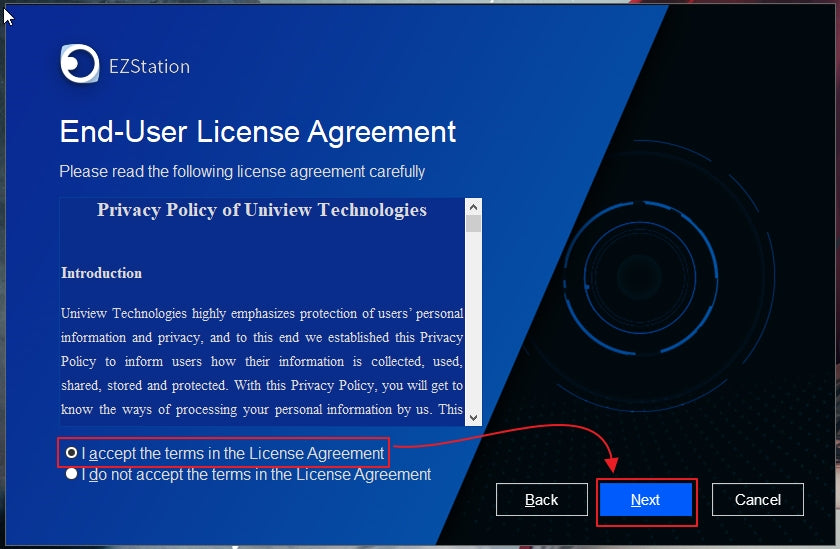
Like with any other forms of legal agreement, reading and reviewing would be a good practice.
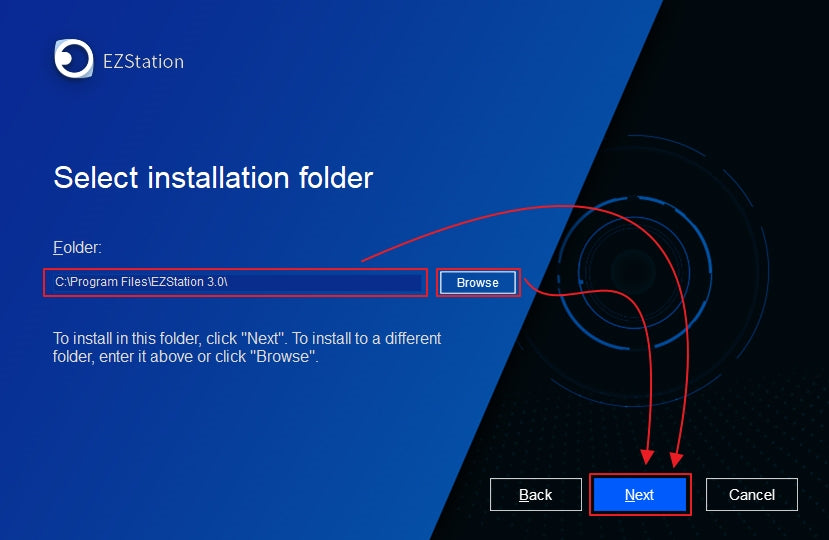
Choose where to install the EZStation software. You can specify the directory directly, or Browse.
Continue until the software has been installed, then click Finish. A shortcut to access EZStation has been created on your desktop and Start menu.
Uniview EZStation Setup Guide v2
Also Read : New Uniview Ezview Firmware Software Download
Configuration
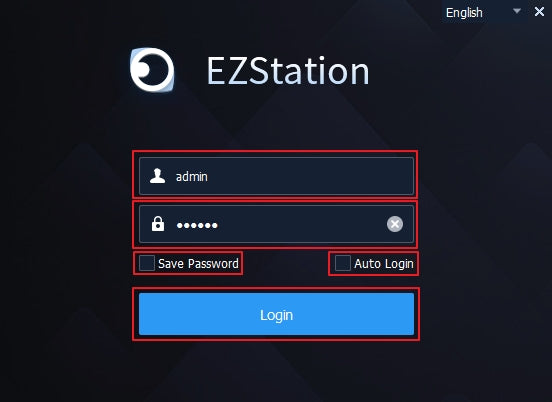
Once installed, launch EZStation using either the shortcut on your desktop or the one in your start menu. You will be prompted to log in, the initial (default) password is 123456. In the screenshot below, I did not check Save Password and Auto Login because the first thing I will do is change the default login details. It is strongly recommended to change the password of the super-administrator account (admin), please see User Management for more information on how to update login details.
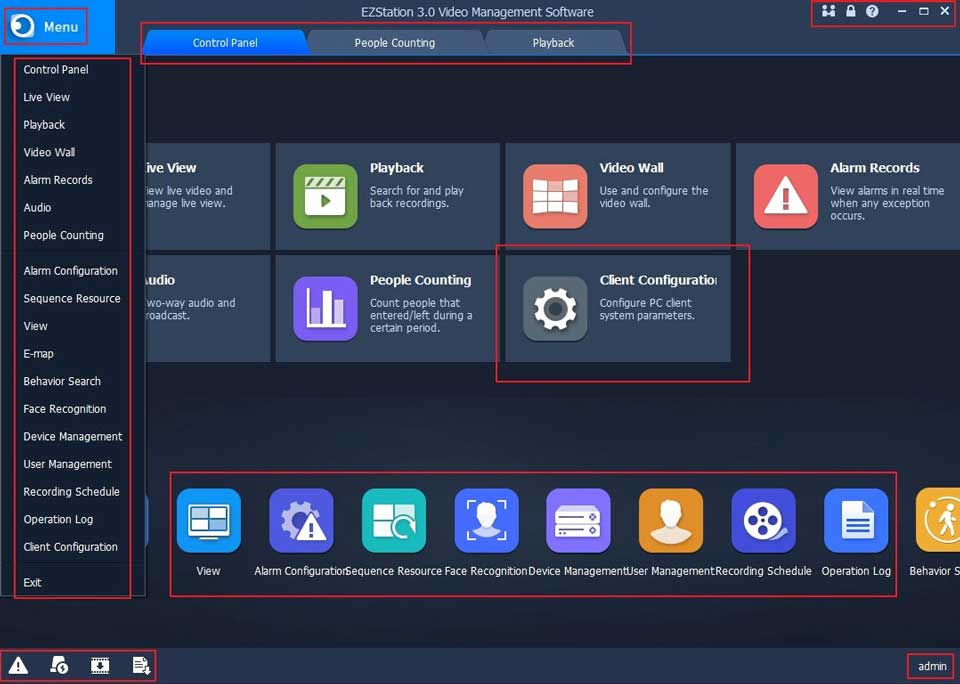
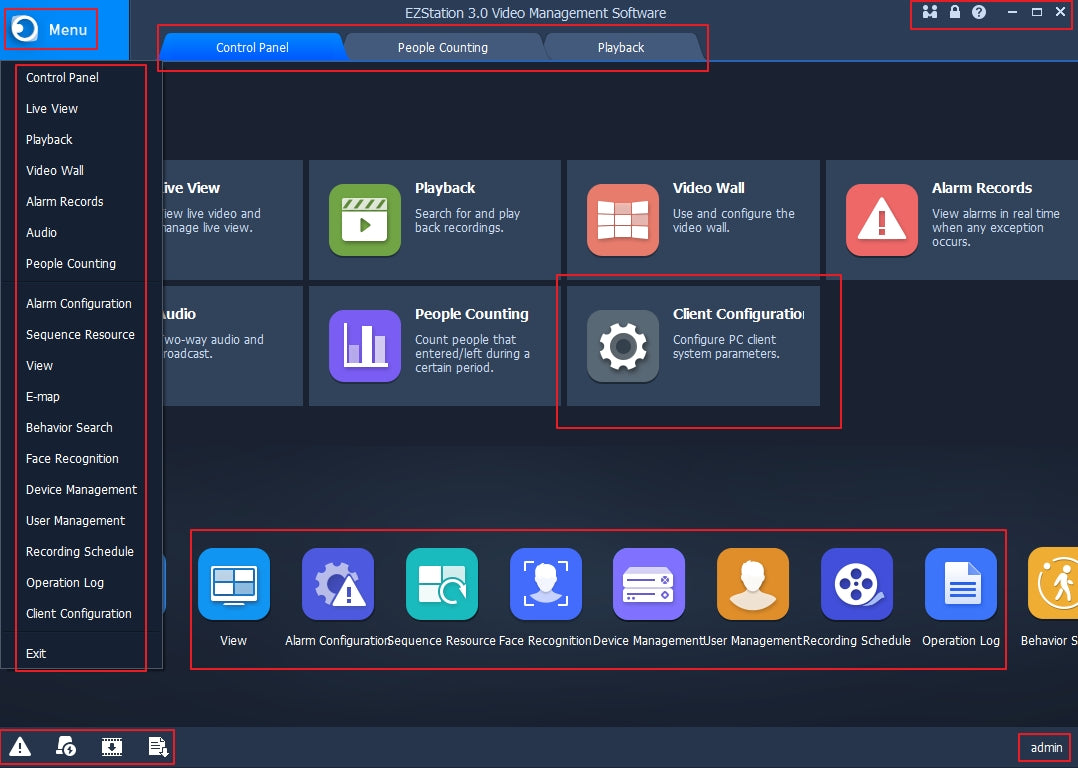
Once logged in, you will be on the control panel. We will go over each feature from the left to the right starting from the top.
Live View
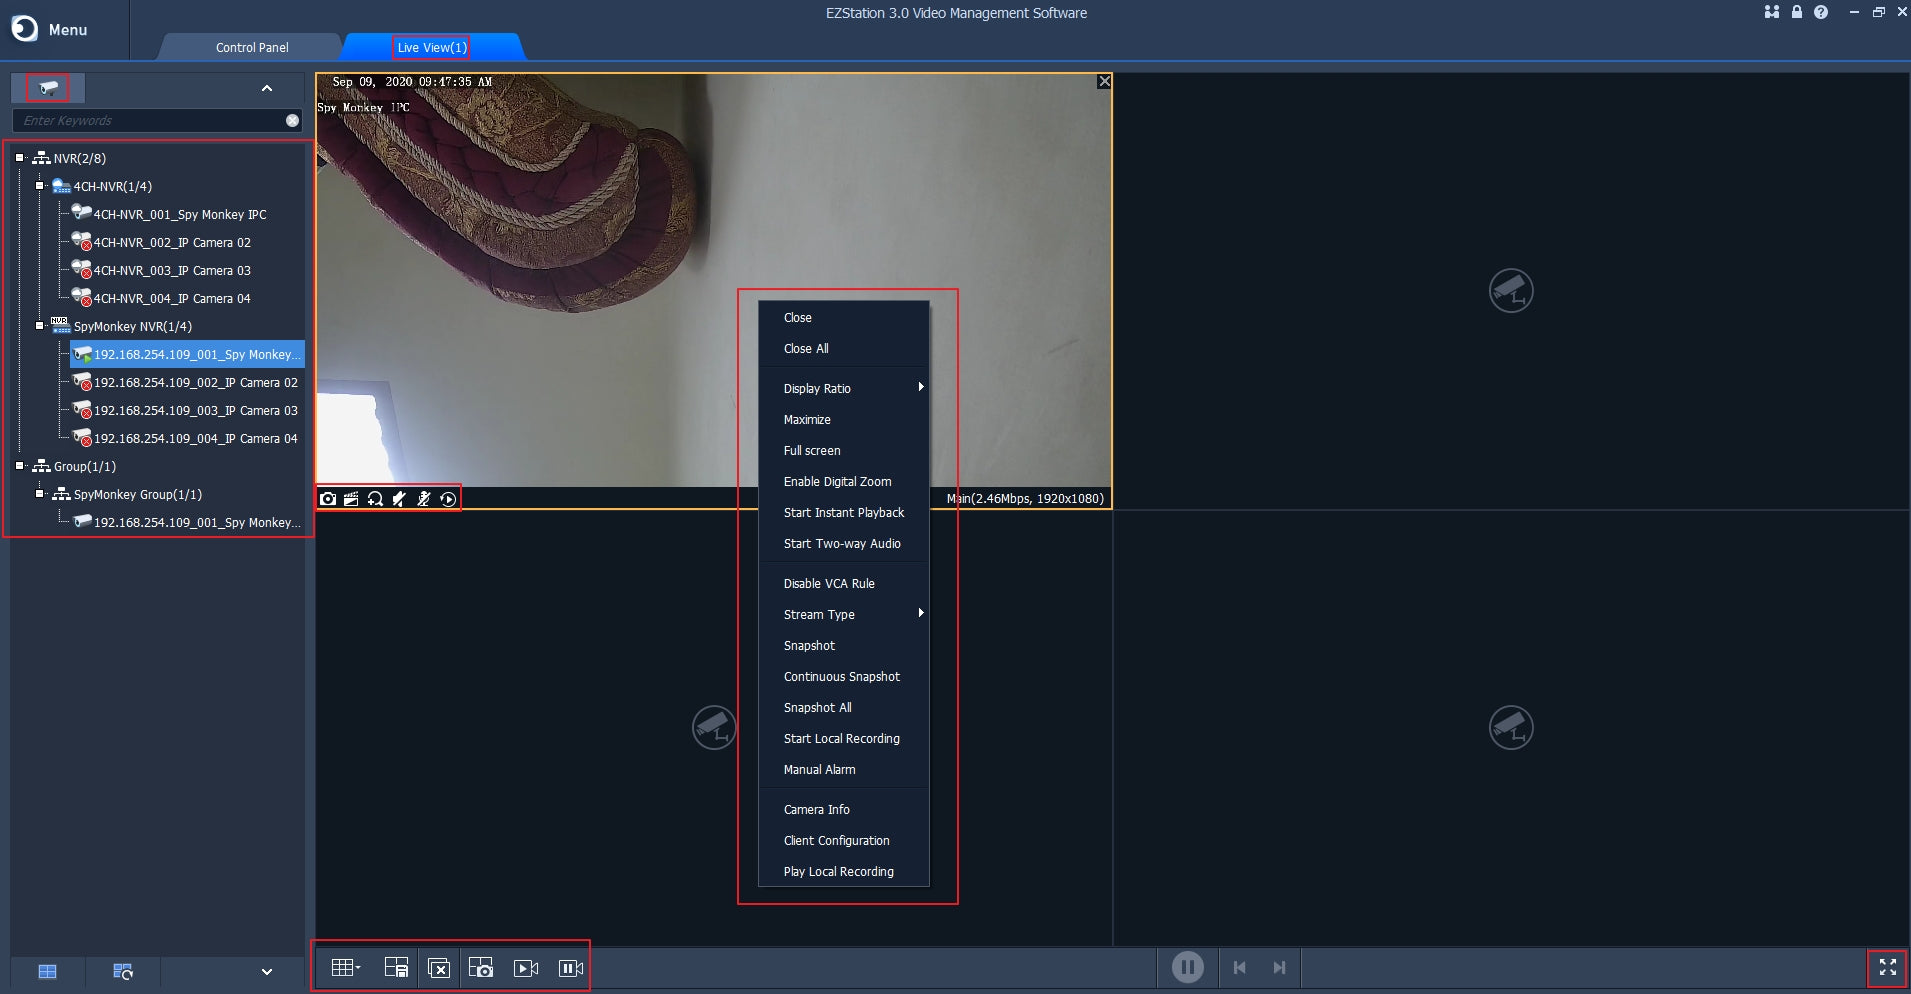
In Live View, you will be able to monitor the live feeds of several cameras based on your preferences. In this section, we will go through each feature from left to right starting from the top of the tab.
Navigation: Control Panel > Common > Live View
Playback
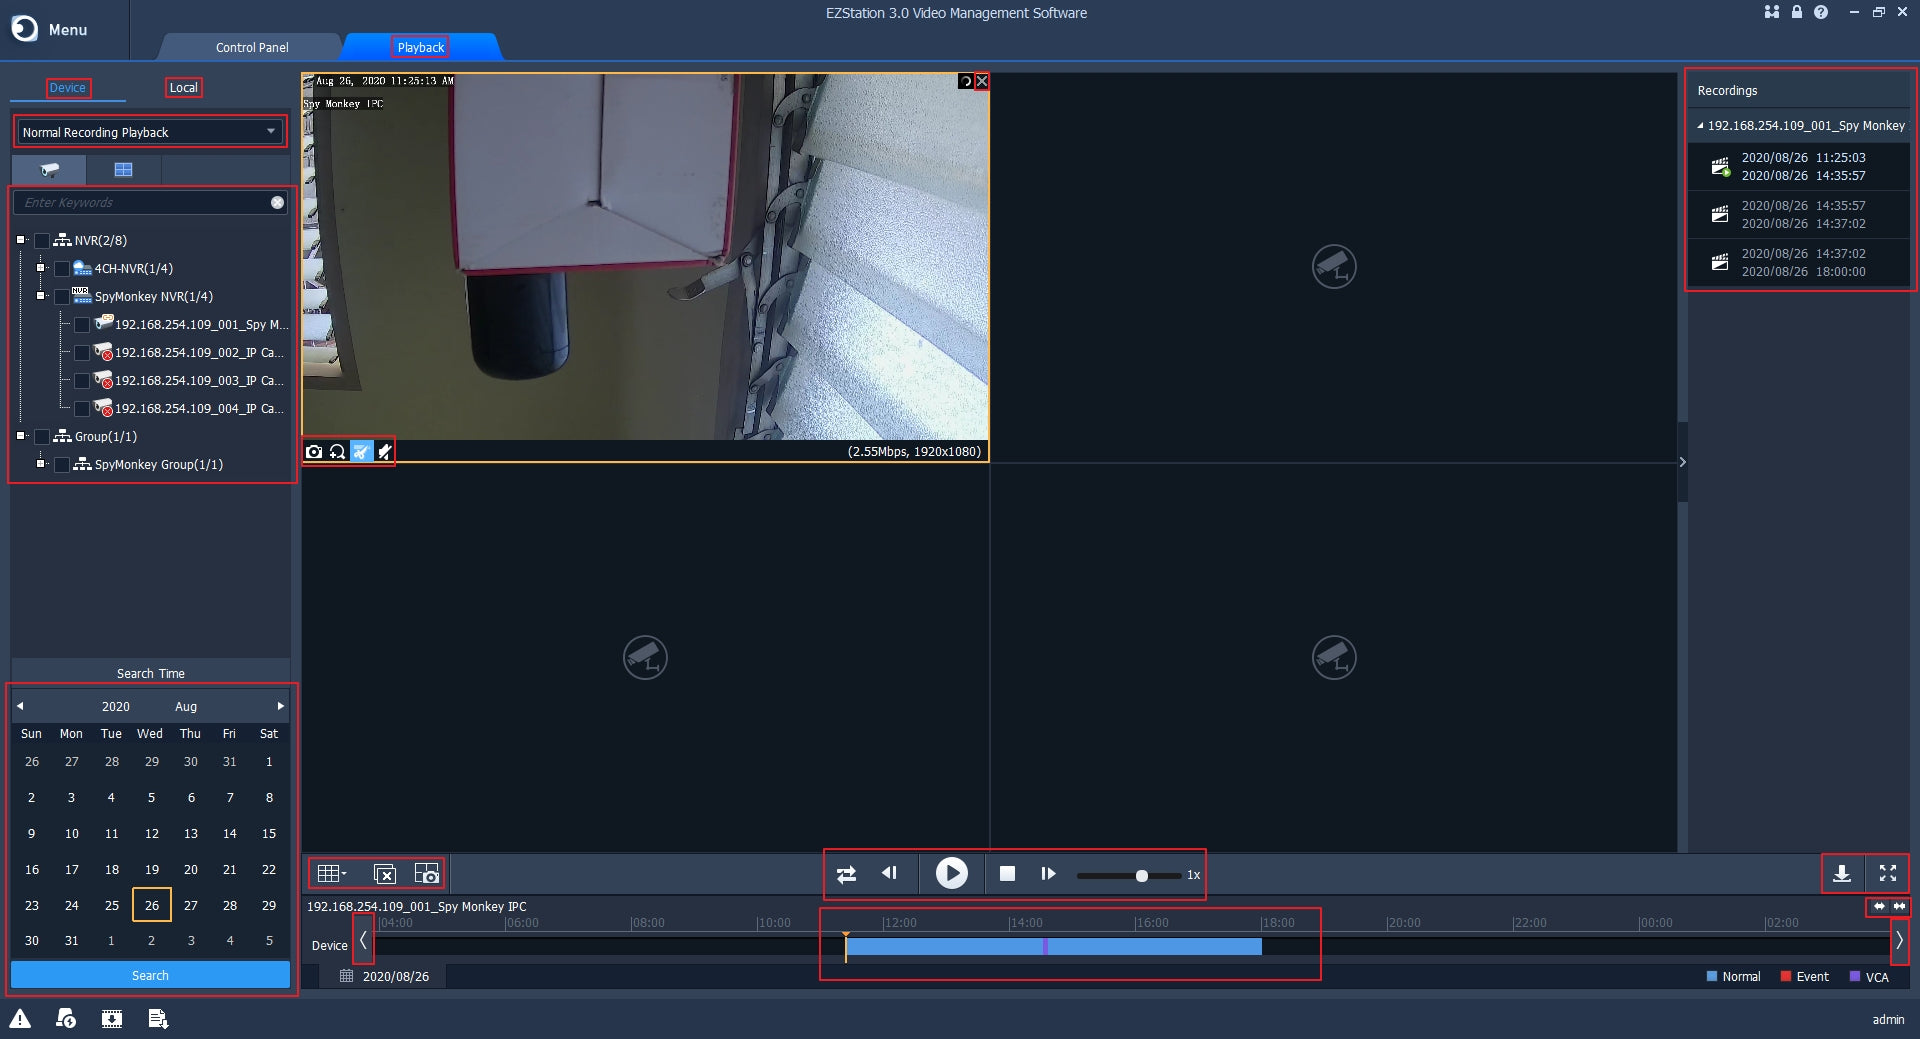
Navigation: Control Panel > Common > Playback
In Playback, you will be able to search, view, and download playback footage from the devices added on the EZStation. The permission levels of each user can also be set up from here. We will go through each feature left to right starting at the top.
User Management
Navigation: Control Panel > Basic > User Management
In User Management, you will be able to create, modify, and manage user accounts that can access the EZStation. The permission levels of each user can also be set up from here. We will go through each feature left to right starting at the top.
Device Management
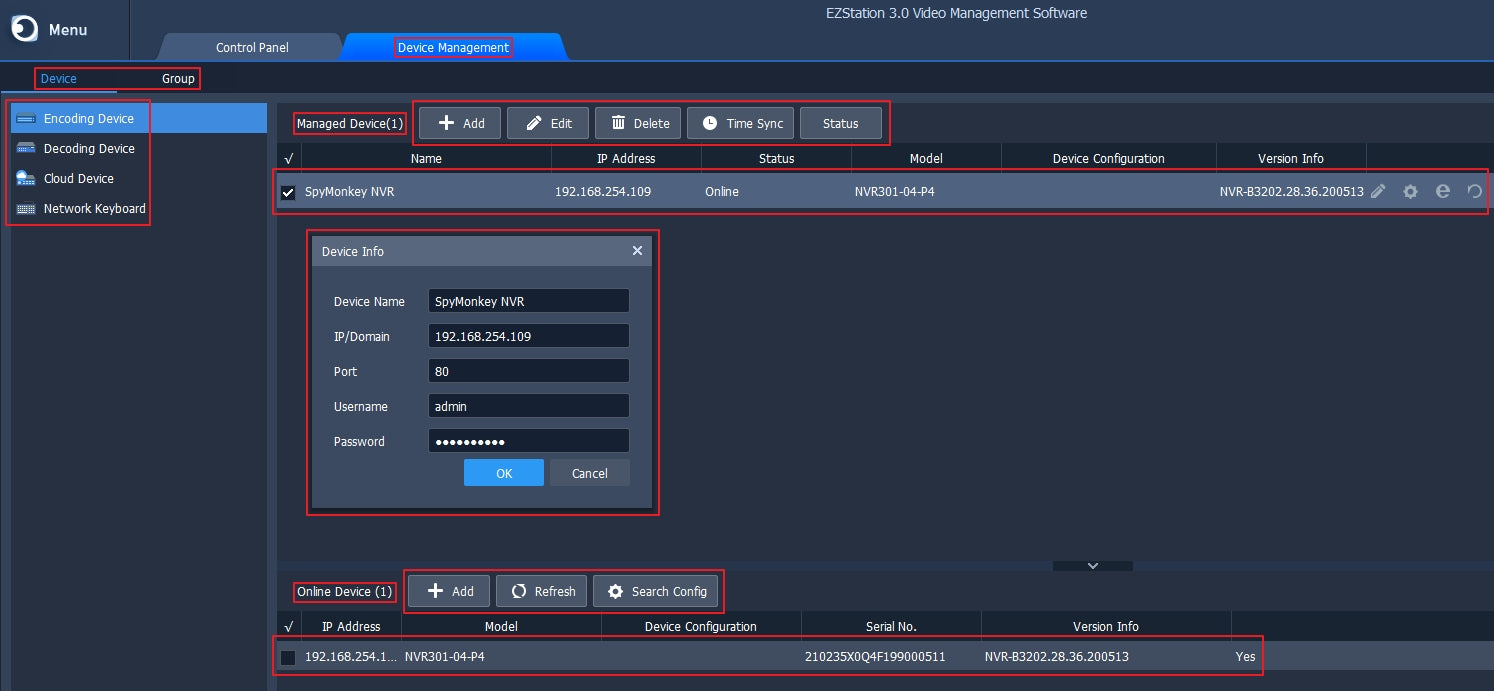
In Device Management you will be able to search, add, and manage the devices to and in your EZStation. You will also be able to assign and manage camera groups. In this section, we will go through each feature from left to right starting from the top of the tab.
Navigation: Control Panel > Basic > Device Management
Device: The Device tab allows you to search, add, and manage the devices to and in your EZStation. You may also connect your EZCloud account to include the devices accessible through it to the EZStation.
Group: The Group tab allows you to assign and manage camera groups. Cameras can be organized, imported, and managed from various sources including local networks via connected NVRs or via the EZCloud account.
EZCloud
This guide will focus on the EZCloud service. Thank you for choosing Spy Monkey for your Uniview Security System needs. Please contact us if you have any questions or feedback. No part of this manual may be copied, reproduced, translated, or distributed in any form or by any means without the prior consent in writing from Spy Monkey. The information presented in this guide from the latest publicly available information gathered in September 2020. The configurations and interface may vary as the firmware is further developed but the operational concepts should remain similar and relevant.
Introduction
Uniview’s EZCloud is a network platform that is provided for all Uniview service users which enables them to watch videos remotely. EZCloud does not generate any content by itself but it enables registered Users to watch live videos or recordings of locations installed with surveillance devices connected to EZCloud or to log in to these surveillance devices directly. EZCloud allows Users to add or delete the connected surveillance devices as needed. EZCloud service features include:
Register
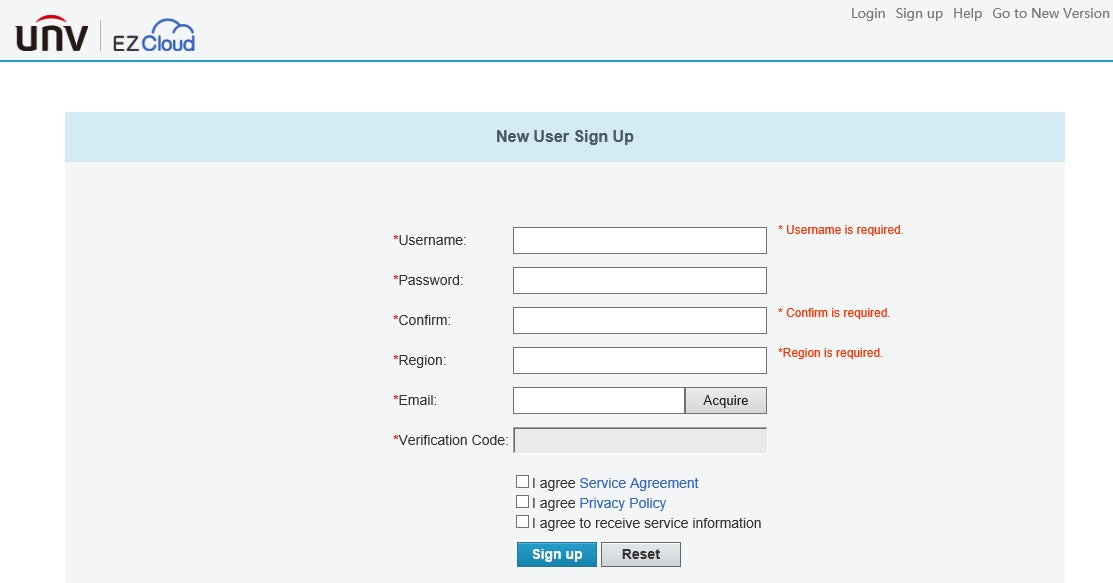
To fully utilize the EZCloud features, it is ideal that one should first create an EZCloud account. To register, go to https://en.ezcloud.uniview.com/Register.aspx
Once an account has been created and verified, you will now be able to add and manage devices and organizations.
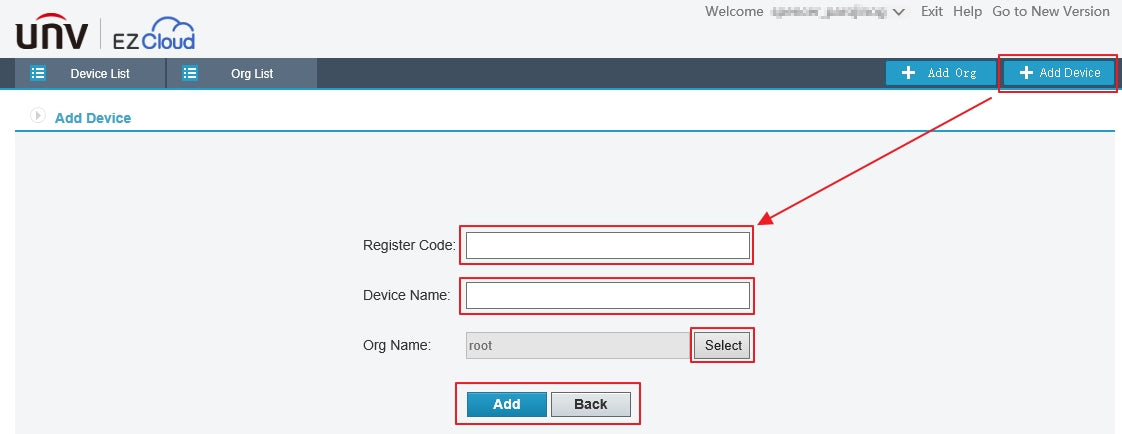
Adding Devices
Before any device can be managed to EZCloud, it should first be added. We do this by first enabling the EZCloud feature on our security system. In this guide, we will be configuring this feature by remotely accessing our Network Video Recorder on a computer browser. If you are would like to learn more about accessing your NVR remotely, please see this guide: Setting up using Remote Browser Interface
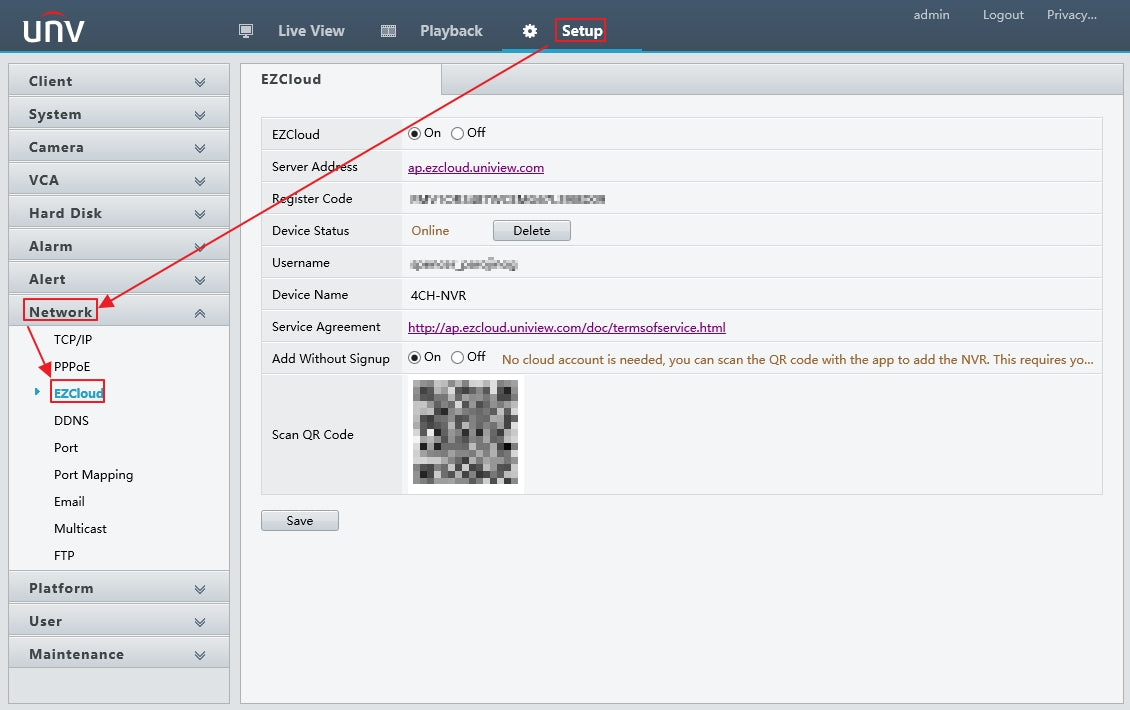
Navigation: Setup > Network > EZCloud
EZCloud: If not already enabled, click On to enable the feature.
Server Address: Open this website on another tab for convenience.
Register Code: This code will be the identifier of the device. It will be used when adding the device to the EZCloud account.
Device Status: Displays the current EZCloud status of the device.
Username: Displays the username of the EZCloud account.
Device Name: Displays the device name given by the EZCloud account.
Service Agreement: Contains a link to the Service Agreement document.
Add Without Signup: Enables or disables the ability to access the NVR without signing up for an EZCloud account.
Scan QR Code: Most useful for connecting your device with the EZView app.
Connecting to EZCloud
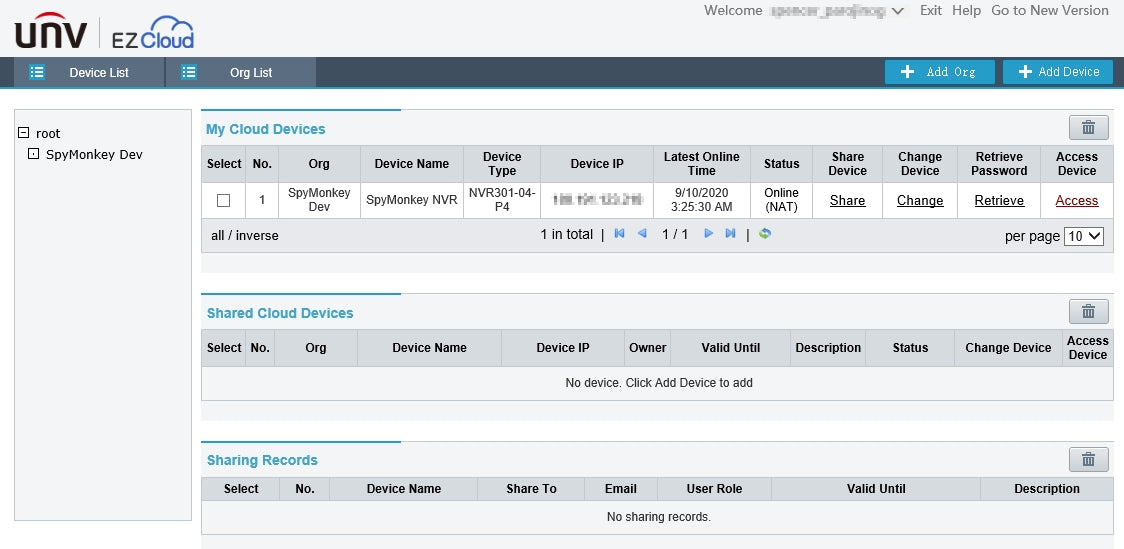
Device List: This tab allows you to manage and interact with the devices added to the EZCloud account. Several actions can be performed on each device.
Share: Opens a window where you can choose a device to share with another EZCloud user, until when their permission lasts, and what user rights level they will have.
Change: Used to change the name or organization of a device.
Retrieve: Used to recover access to devices whose passwords are lost or forgotten.
Access: Used to gain remote access to the configurations and interface of a device.
Organization List: This tab allows you to manage and interact with the organizations on your EZCloud account. Here you will be able to assign devices to organizations for convenience and ease of access.
