Views: 30
Tuya Devices Firmware Update
Why can’t I add a version for my custom firmware?
Tuya Devices Firmware Update Your account does not own the target firmware or your account is not authorized for the OTA firmware update. After your account is authorized by the firmware owner, you can add new versions for the firmware.
Why can’t I find the firmware key in firmware management?
Check whether the firmware key was created with the current account. If not, the account does not have permission to view the firmware key.
Read Next : How to update the firmware? YI Smart Camera
Can devices that have no location information receive an OTA firmware update?
- For devices in mainland China: If the app is not allowed to access the location, the device connected to this app may not receive OTA firmware updates.
- For devices outside mainland China: The country code of a user’s app account is used as the endpoint to receive OTA firmware updates. If the country code does not fall within the specified target regions, the device may not receive OTA firmware updates.
Update Firmware
This topic describes how to deploy full or incremental updates to devices, which is used to deploy firmware updates to end devices via OTA.
Background
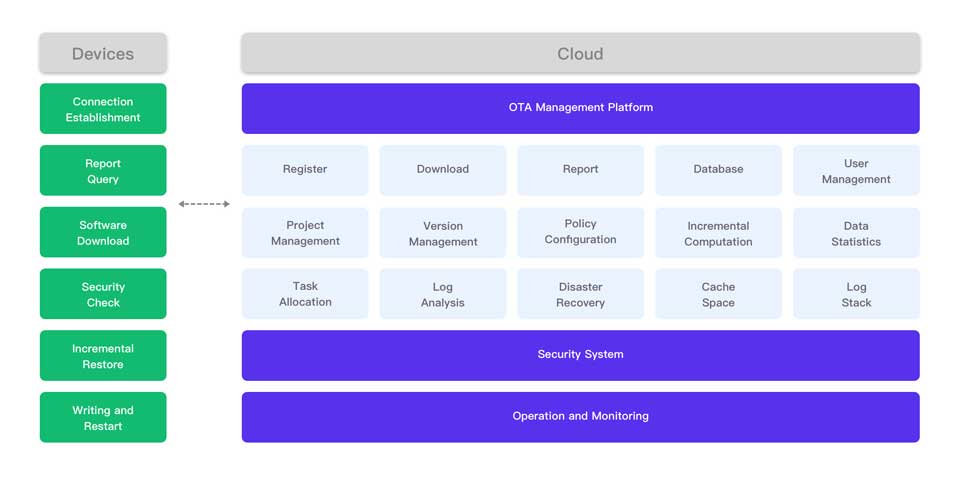
For the MCU SDK or TuyaOS based devices that have been delivered, you can deploy firmware updates to them over the air (OTA) without flashing firmware.
The microcontroller board on the product must support OTA firmware updates.
Terms
| Term | Explanation |
|---|---|
| Custom firmware | The custom firmware that a developer uploads to the Tuya IoT Development Platform. It is maintained by the developer. |
| Tuya firmware | The firmware officially provided and maintained by Tuya. |
| Manufacturer firmware | The firmware that a developer of the Tuya IoT Development Platform obtains through OEM Product or Copy Product. It is maintained by the firmware manufacturer. |
| Firmware type | There are three types of firmware: production firmware, user area firmware, and firmware updates.
|
| Firmware owner | The developer account that has permission to manage the firmware.
|
| Tuya standard chip | The chips that are adapted to Tuya’s host program. You can use Tuya’s host to flash firmware to Tuya standard chips. |
| Channel ID | Used for firmware updates only. The channel ID is used to identify types of firmware to perform updates on different firmware. |
| Canary release | Canary release is a development strategy in which a new version of firmware is deployed to a small subset of users first, and the base version remains deployed for normal operations on the same stage. Once the new version is accepted, the update is rolled out to the rest of the users. |
Prerequisites
You have created at least one product. For more information, see Create Products.
Full updates
There are three types of firmware that can be updated via OTA.
- Type 1: The released Tuya firmware or manufacturer firmware.
- Type 2: Custom firmware.
- Type 3: Firmware on TuyaLink-based devices.
Procedure
Type 1: The released Tuya firmware or manufacturer firmware
- Log in to the Tuya IoT Development Platform.
- In the left navigation bar, choose Product > Device > Firmware Update.
For Tuya firmware or manufacturer firmware, an update can be deployed only when a new firmware version is provided by Tuya or the manufacturer.
- Change to the target product and select the firmware.
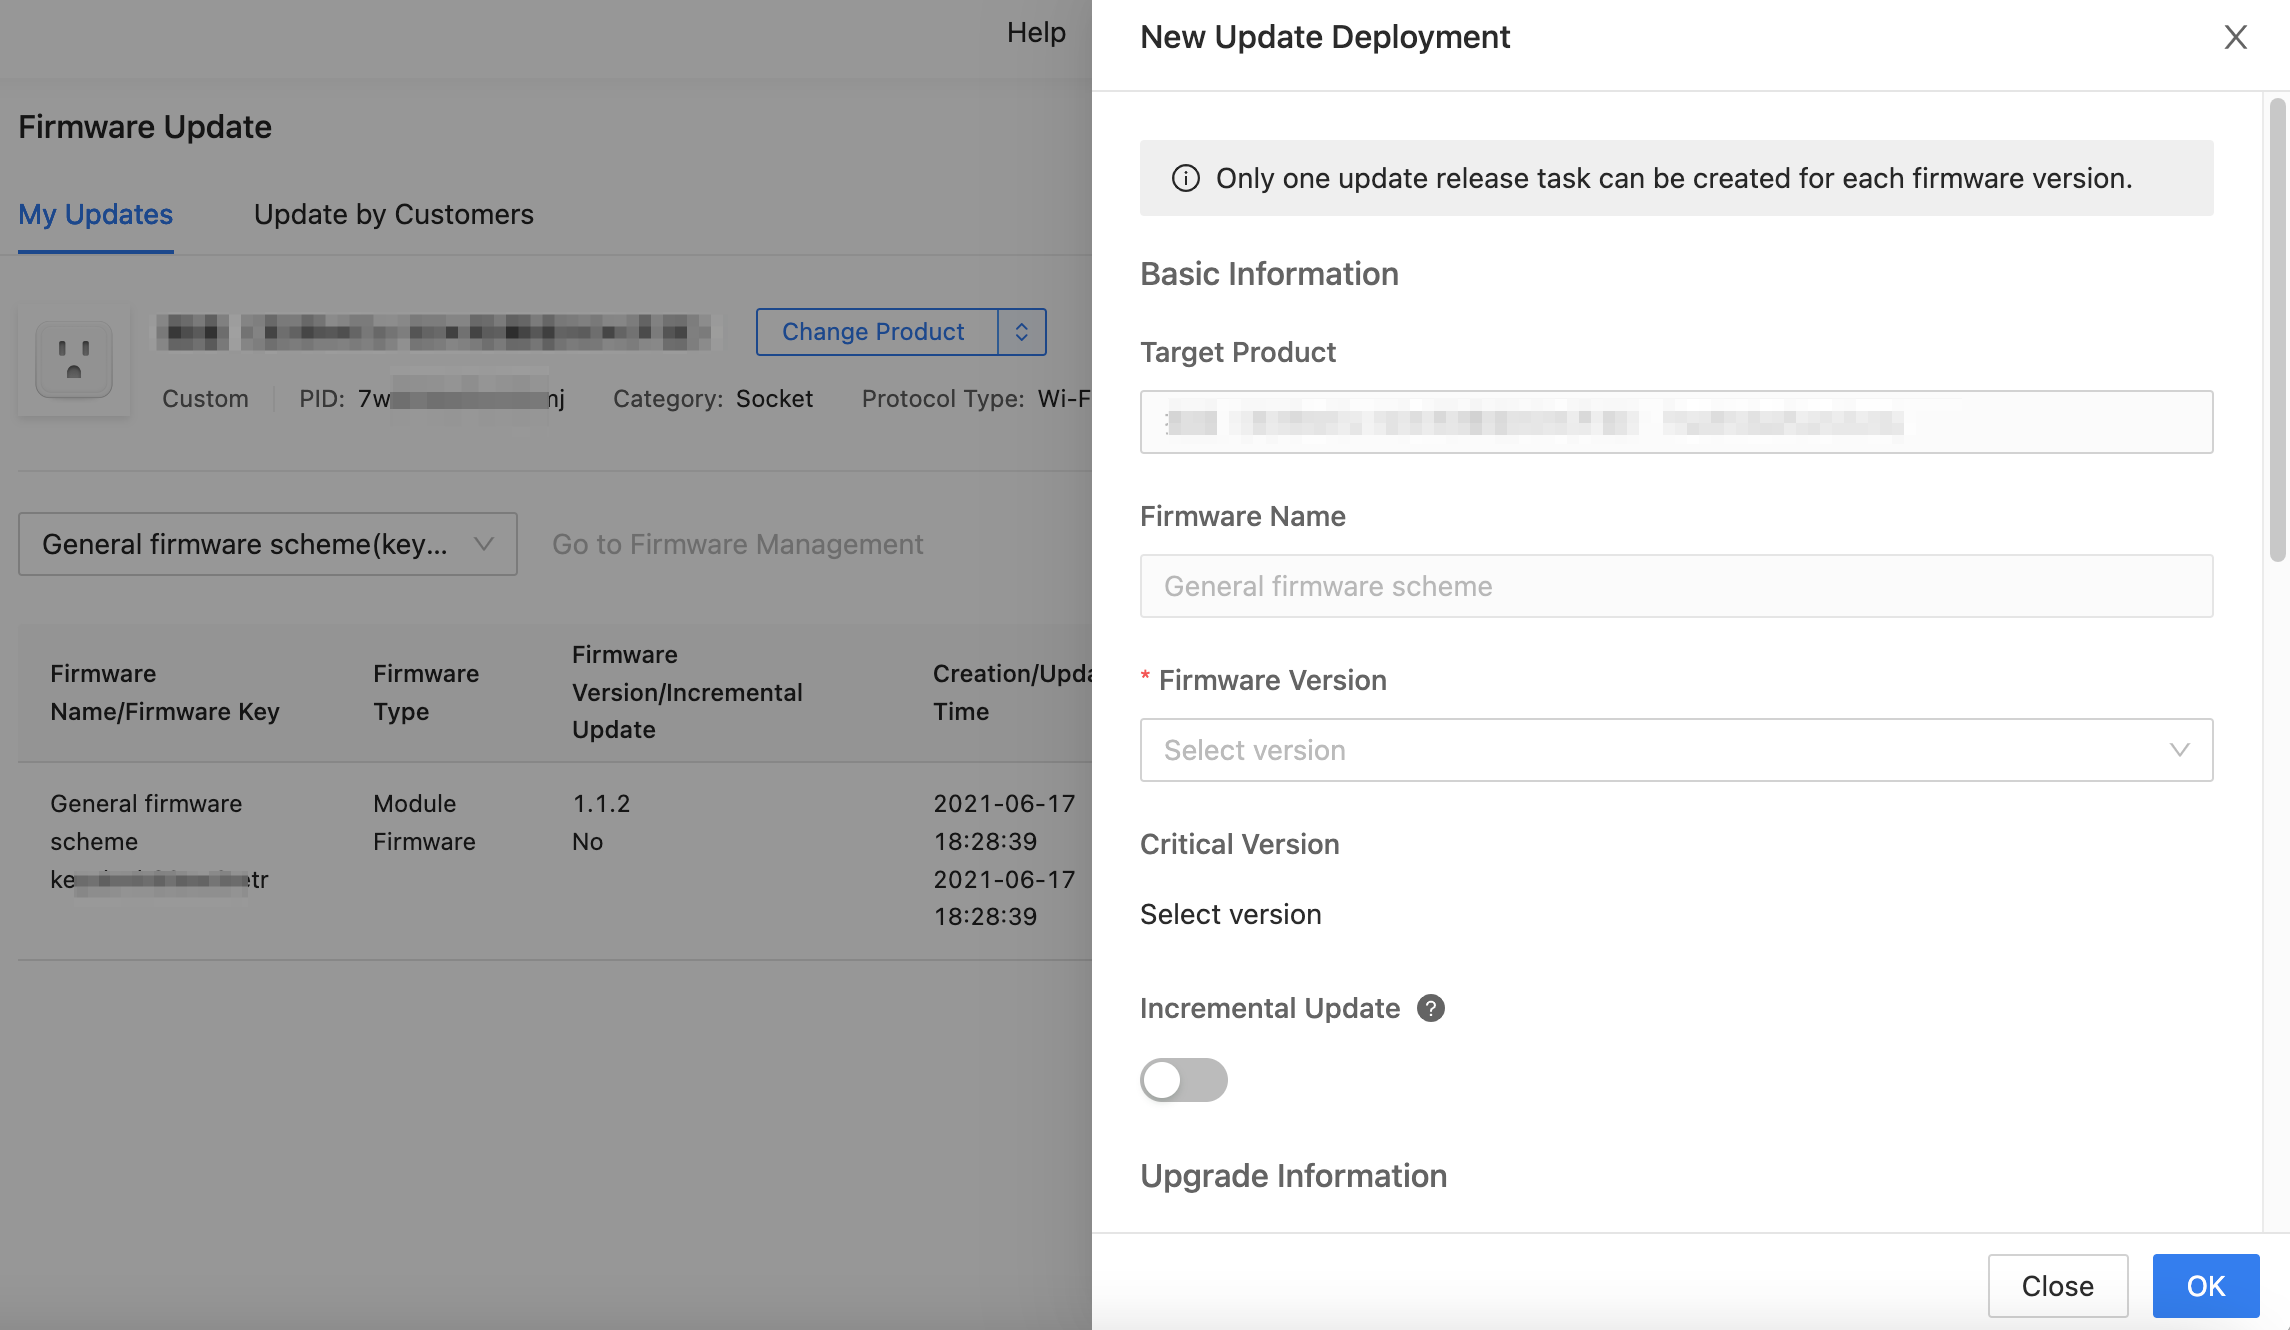
- Click New Update Deployment and complete the required settings.
Parameter classification Parameter Description Basic Information Target Product The product that the current firmware is associated with. Firmware Name The name of the current firmware. Firmware Version The firmware version to update to. Only the firmware version that has not been deployed for an update can be selected. Critical Version Specify whether the current firmware version is a critical version. - Yes: A firmware version that users must update to.
- No: A firmware version that users can skip.
Upgrade Information Update Method - Update notification: Users receive a firmware update notification on the app and choose whether to install updates.
- Forced update: Users receive a firmware update notification on the app and have no option but to update the firmware.
- Check for updates: Users will not receive a firmware update notification on the app, but need to manually check for new updates.
Auto Update Automatic update is determined by the auto update setting on the Tuya IoT Development Platform and on the app together. Note: One product may have different firmware, so make sure to select the correct firmware and firmware version.
- Off: Turn off automatic update. The update method you selected will be performed.
- On: Turn on automatic update. The update will be installed in either of three methods, namely update notification, forced update, and check for updates.
Description Enter the description of the update in Chinese and English. The description will be displayed on the app. Remarks Enter the remarks about the update. Publishing Scope Settings Update Version Enter one or more firmware versions to update from. All versions earlier than the firmware version set in Basic Information are selected by default. Update Region The countries or regions where the firmware update will be rolled out. For China, you can select a specific city. All regions are selected by default. - After the configuration is set, click OK. A record will be generated.
- Click Common Verification Device to add devices under test (DUTs). This allows you to add a bunch of devices used for test purposes. Each time you perform a test, you can quickly select DUTs from the list.
- You can select the data center where the device is deployed in the top right corner of the page.
- You can add devices by using the app account. After your app account is verified, under your account, all the devices associated with the PID will be added to the allowlist.
For security purposes, your app account must be verified first.
- Verify firmware update deployment.
- Click Verify in the Firmware Update column. You can verify deployment to different data centers by changing the data center in the top right corner of the page.
- You can add a DUT by selecting a device from the allowlist or by entering a device ID. If you choose Add by Device ID, the firmware update will be delivered to the specified device.
- Click Verify Update to check the result.
- Click Verify in the Firmware Update column. You can verify deployment to different data centers by changing the data center in the top right corner of the page.
- Deploy an OTA firmware update.
After successful verification, you can click Release to deploy an OTA firmware update to devices. Due to the iteration of the firmware update feature, the legacy release process is also available.
The new process of releasing OTA updates appears by default. You can click Switch to Old Process to use the legacy release process. The legacy process will be retired in the future. Tuya will notify developers of such changes beforehand.
New OTA firmware update release
- Click Release to enter the deployment process.
- In Release Rule Settings, you can choose Grey Released to roll out the firmware update to a specified percentage of devices in a specific data center.
- Data centers are isolated from each other. You can switch to another data center and deliver the firmware update to that data center.
- Grayscale by proportion: Allows you to specify the percentage allocation of devices that will be exposed to the update. In the first rounds of deployment, it is recommended to set a small proportion, such as 5%. You can then examine the results, and if things go smoothly, gradually increase deployment to 100% of devices.
- Pause: You can pause and resume the deployment as needed.
- Key Metrics: Give you an overview of the deployment.
- Total Number of Upgradable Devices
- Number of Specified Devices to Update
- Number of Devices Performing Updates
- Number of Successfully Updated Devices
- Data Analytics: Shows the distribution of update status and update installation.
- Data Trend: Shows the number of devices that initiate the update as well as those that install the update successfully.
- Details of Updated Devices: Allows you to check the update details by device ID.
Legacy OTA firmware update release
- Click Release to enter the deployment process.
- Click Switch to Old Process.
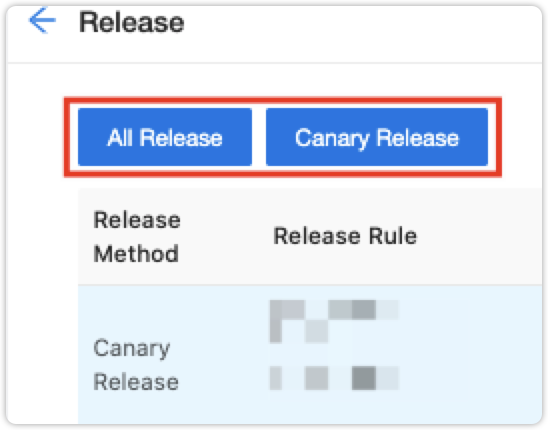
- After you click Gray released or Full amount released, a request for releasing an update will be submitted. Tuya will verify firmware security. If your firmware is verified, Tuya will deliver the firmware update to the target devices as you requested.
- After the firmware update is verified on the DUT, you can deploy an OTA firmware update.
- You can deploy the update to different data centers.
- Canary Release and All Release are supported, and release time can be set. For canary release, one or more regions and versions can be selected, and the quantity can be defined.
- After you submit a deployment request, your firmware will be reviewed within 24 hours. Consider the review time when you schedule the deployment. If your firmware has been reviewed, there is no review process any more.
Type 2: Custom firmware
Only the owner of the custom firmware can create a firmware version.
- Log in to the Tuya IoT Development Platform.
- In the left navigation bar, choose Product > Device > Firmware Update.
- Select firmware with My Custom Firmware in the Firmware Source column.
- Click New Update Deployment to set update rules.
- Firmware Version: Select an existing firmware version.
- Add Firmware Version: Click this button to create a firmware version if no firmware version is available or a firmware version has been deployed.
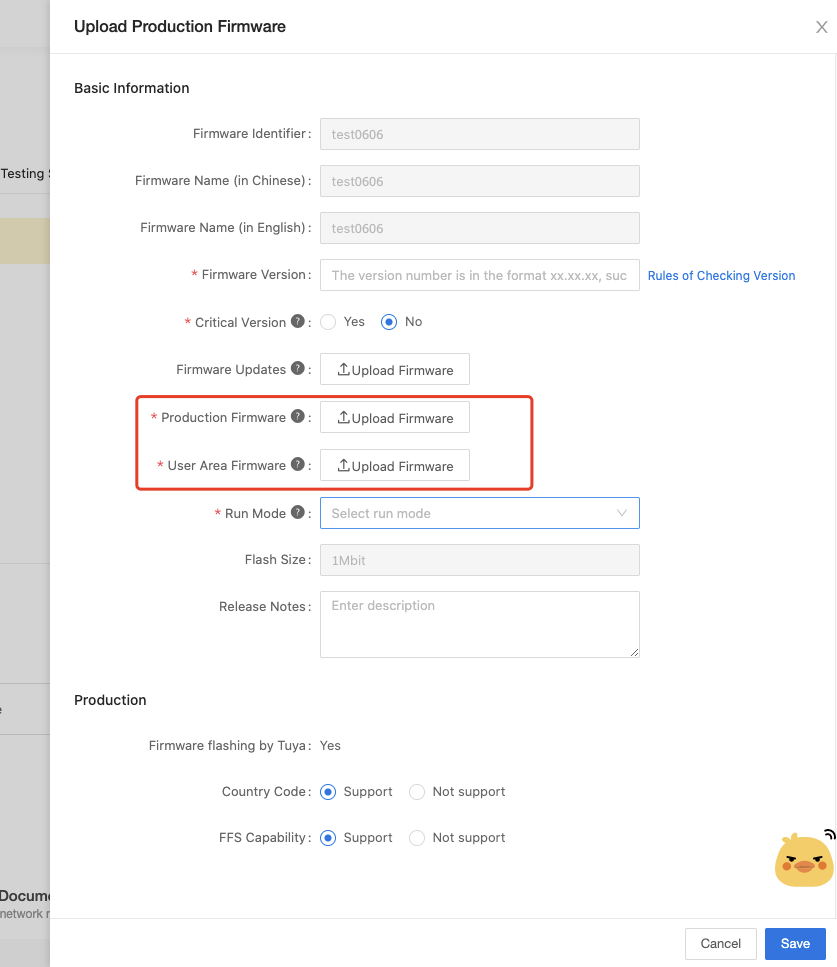
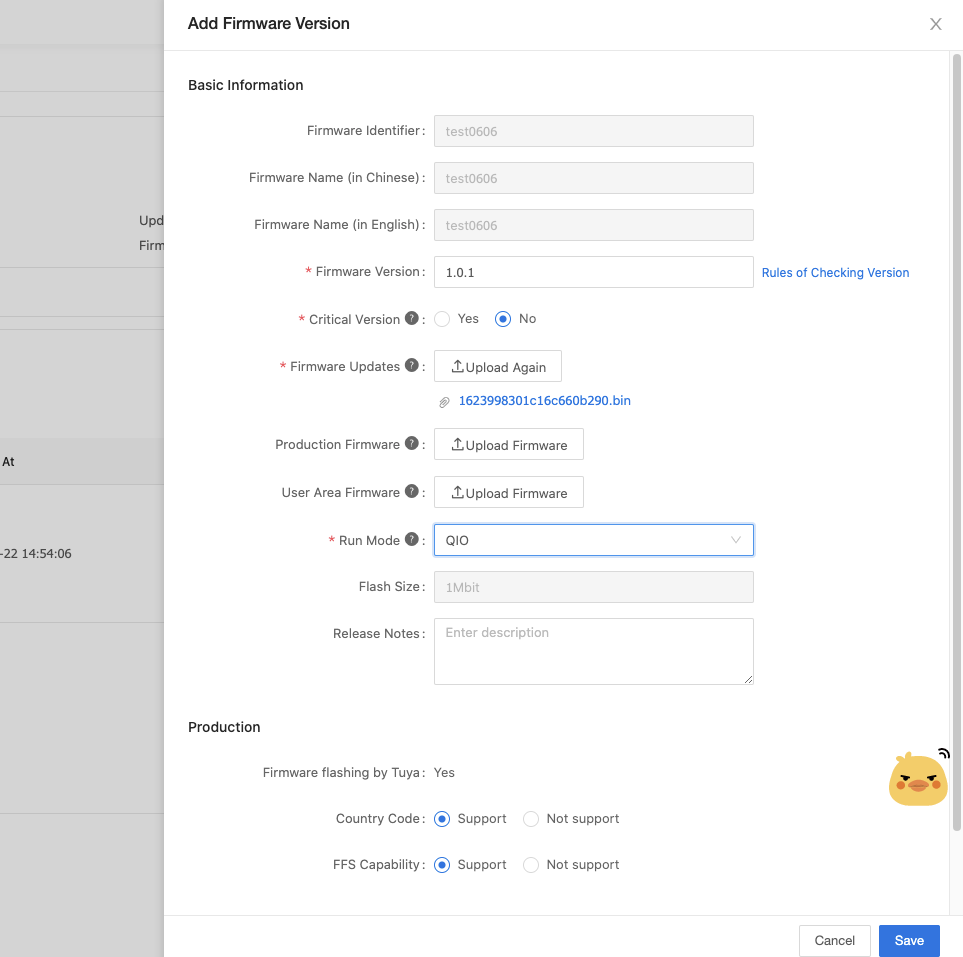
Parameter Description Basic Information You can upload a firmware version to update to. If this new version is planned for production, both production firmware and user area firmware can be uploaded. Production This configuration is used for production and authorization. - Run Mode: According to the SPI Flash mode, you can select
QIOfor the Tuya modules by default. This option only applies to firmware flashed by Tuya. - Country Code: It is supported by default.
- FFS Capability: It is supported by default.
- Run Mode: According to the SPI Flash mode, you can select
- Click Only Save or Save & Enable.
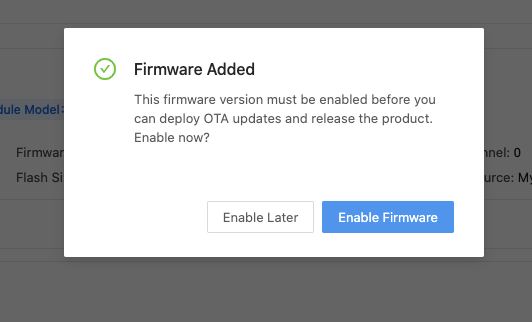
After you complete the basic information and upload the firmware, the firmware is not enabled by default. To update the firmware via OTA, click Save & Enabled.
You can set the Update Deployment Scope to specify which product this firmware update applies to.
- Deploy a firmware update.
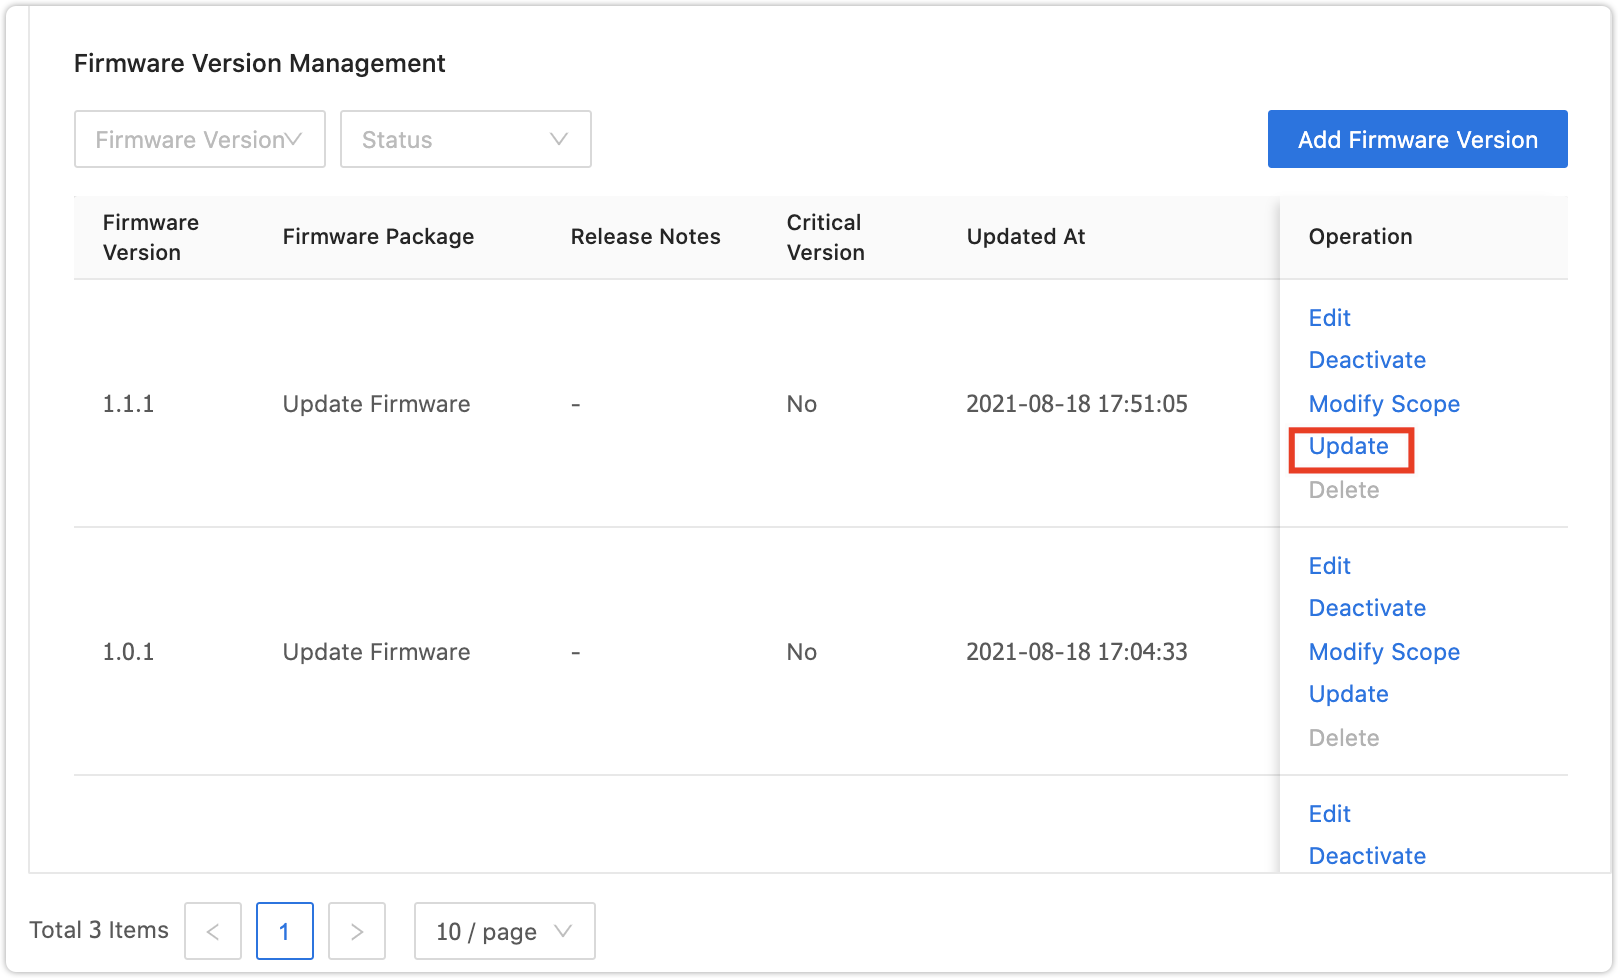
- Click Update on the Firmware Version Management page, or in the left-side navigation pane, choose Product > Device > Firmware Update and select the firmware.
- Select the target product, enter the parameters, and then click OK.
- Click Update on the Firmware Version Management page, or in the left-side navigation pane, choose Product > Device > Firmware Update and select the firmware.
- Follow Steps 6, 7, and 8 in Type 1 above to deploy an OTA firmware update.
Type 3: Firmware on TuyaLink-based devices
This section applies to products that are developed with the TuyaLink solution and the Open Protocol.
- Log in to the Tuya IoT Development Platform.
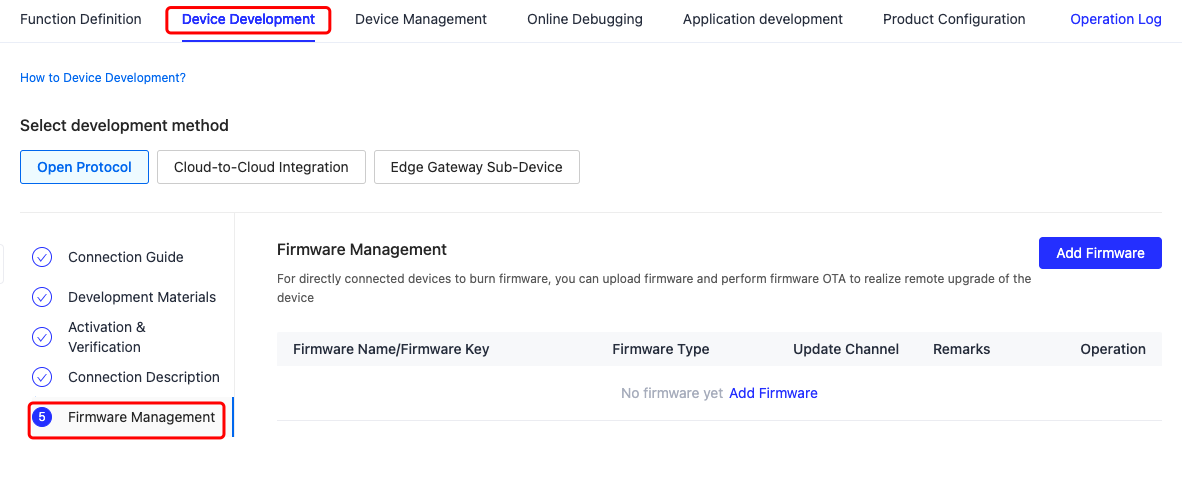
- In the left navigation bar, choose Product > Development.
- Find the target product and click Develop.
- Under the Device Development tab, choose Firmware Management and click Add Firmware. Complete the required configuration and upload a firmware version.
- Save and enable the firmware version.
- The next steps are the same as Type 1 and Type 2.
TuyaLink-based devices do not support incremental updates.
Incremental updates
OTA firmware update allows you to update a device remotely. Typically, a full update package is sent to the target device for installation. A large package requires more bandwidth for transmission and more memory for storage. For resource-constrained devices, such as NB-IoT and Cat.1, the smaller incremental updates make OTA firmware updates more feasible.
Applicability
This feature applies to firmware that integrates with Tuya’s incremental update SDK. NB-IoT and Cat.1 devices are the typical use cases. Matter-certified devices also apply.
Terms
| Term | Explanation |
|---|---|
| Target Version | The firmware version to update to. |
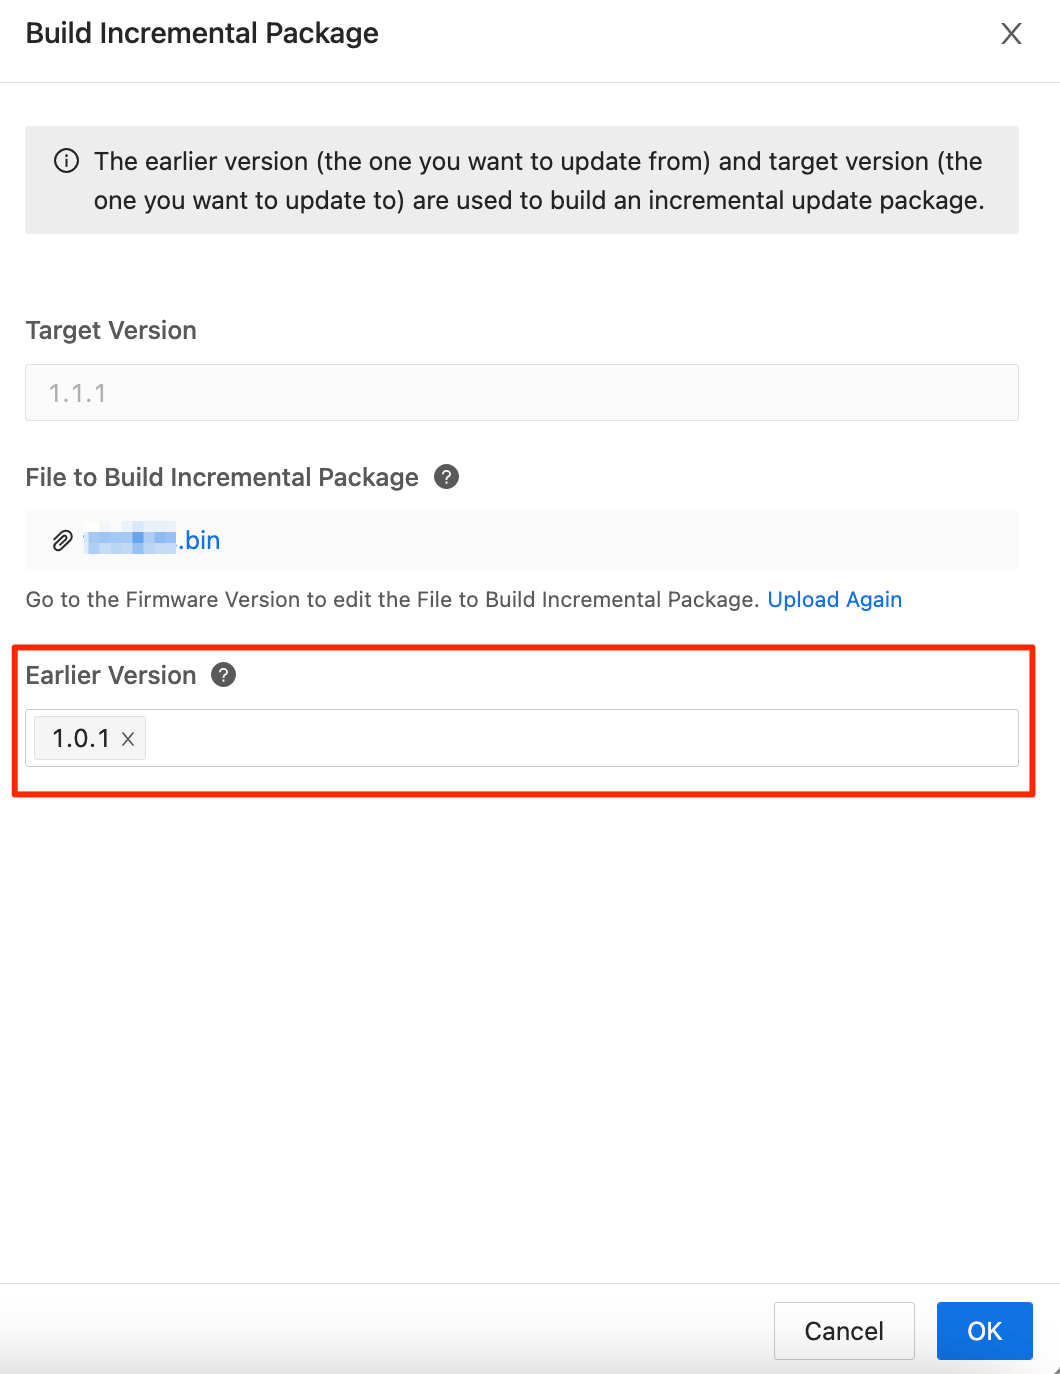
| Earlier Version | The firmware version to update from. |
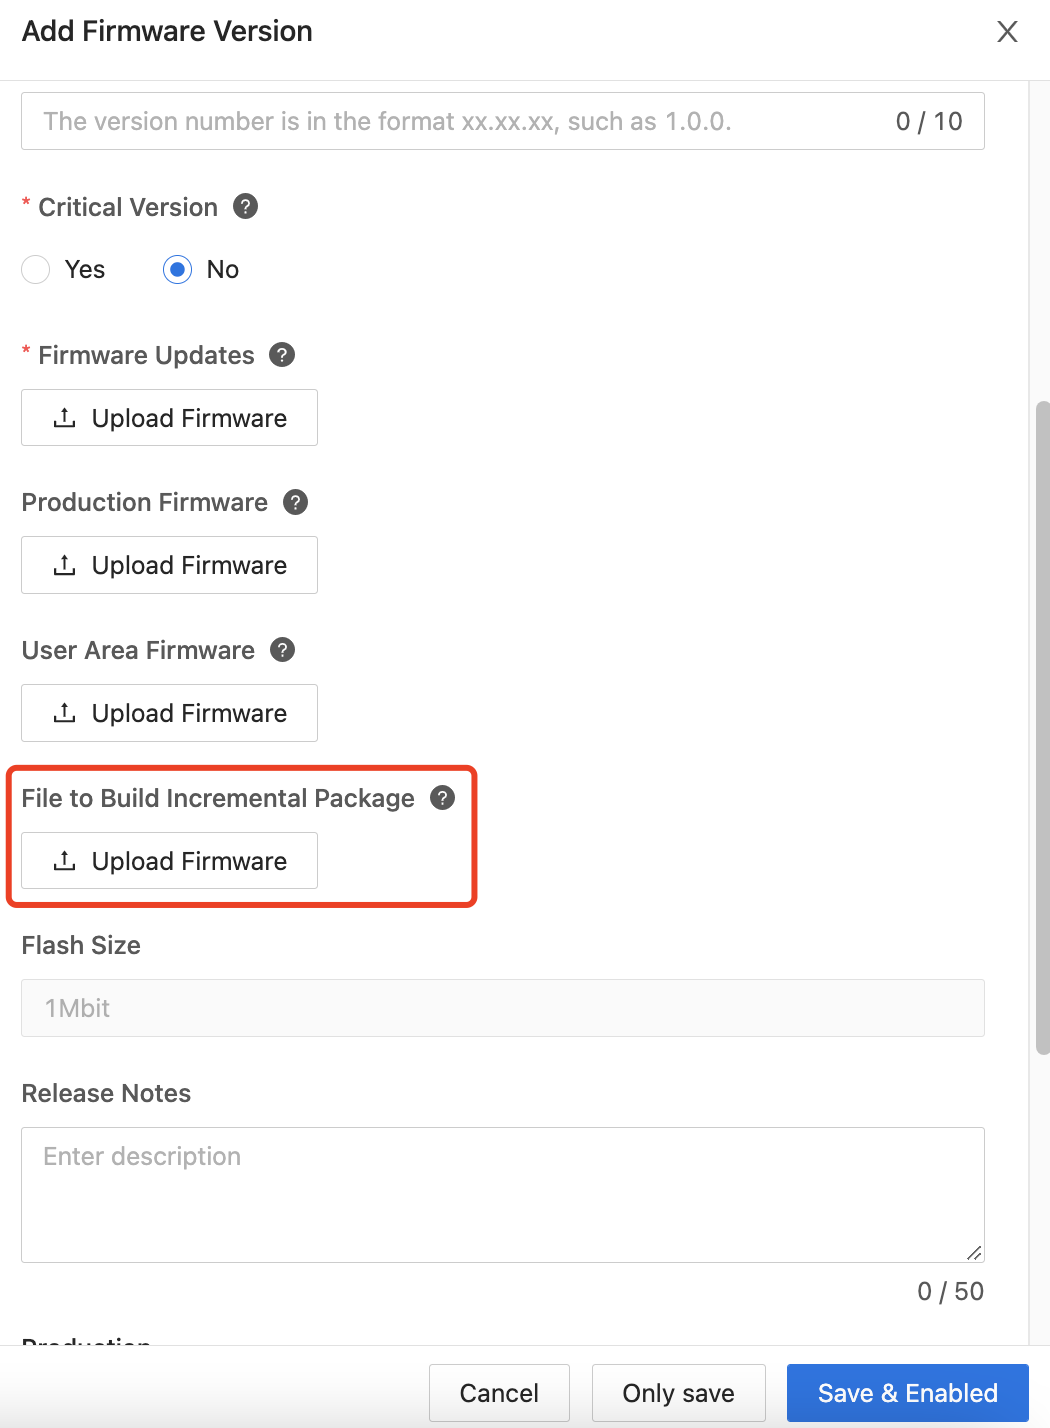
| File to Build Incremental Package | The file used for incremental calculation. This file can be recognized by the incremental algorithm to compare it with another firmware version. |
| Incremental Package | The incremental update package is generated based on the target version as well as the File to Build Incremental Package. It is the update package delivered to devices for installation. |
Prerequisites
Before performing an incremental update, make sure:
- The firmware supports incremental updates.
- The File to Build Incremental Package is available.
Step 1: Add a firmware version
- Log in to the Tuya IoT Development Platform.
- In the left navigation bar, choose Product > Device > Firmware Management.
- Find the target firmware and click Details in the Operation column, and then click Add Firmware Version on the page that appears.
- Enter the required information and upload the file in the File to Build Incremental Package field.
Step 2: Build an incremental package
- In the Firmware Version Management section, click Incremental Package in the Operation column.
- Click Build Incremental Package.
- The system generates an incremental package. If the File to Build Incremental Package is not uploaded for the earlier version, an incremental update cannot be performed.
Step 3: Build the firmware
In the Firmware Version Management section, click Enable. Then, the firmware version becomes Enabled.
Step 4: Add the update deployment
- Select Product > Device > Firmware Update, and click New Update Deployment.
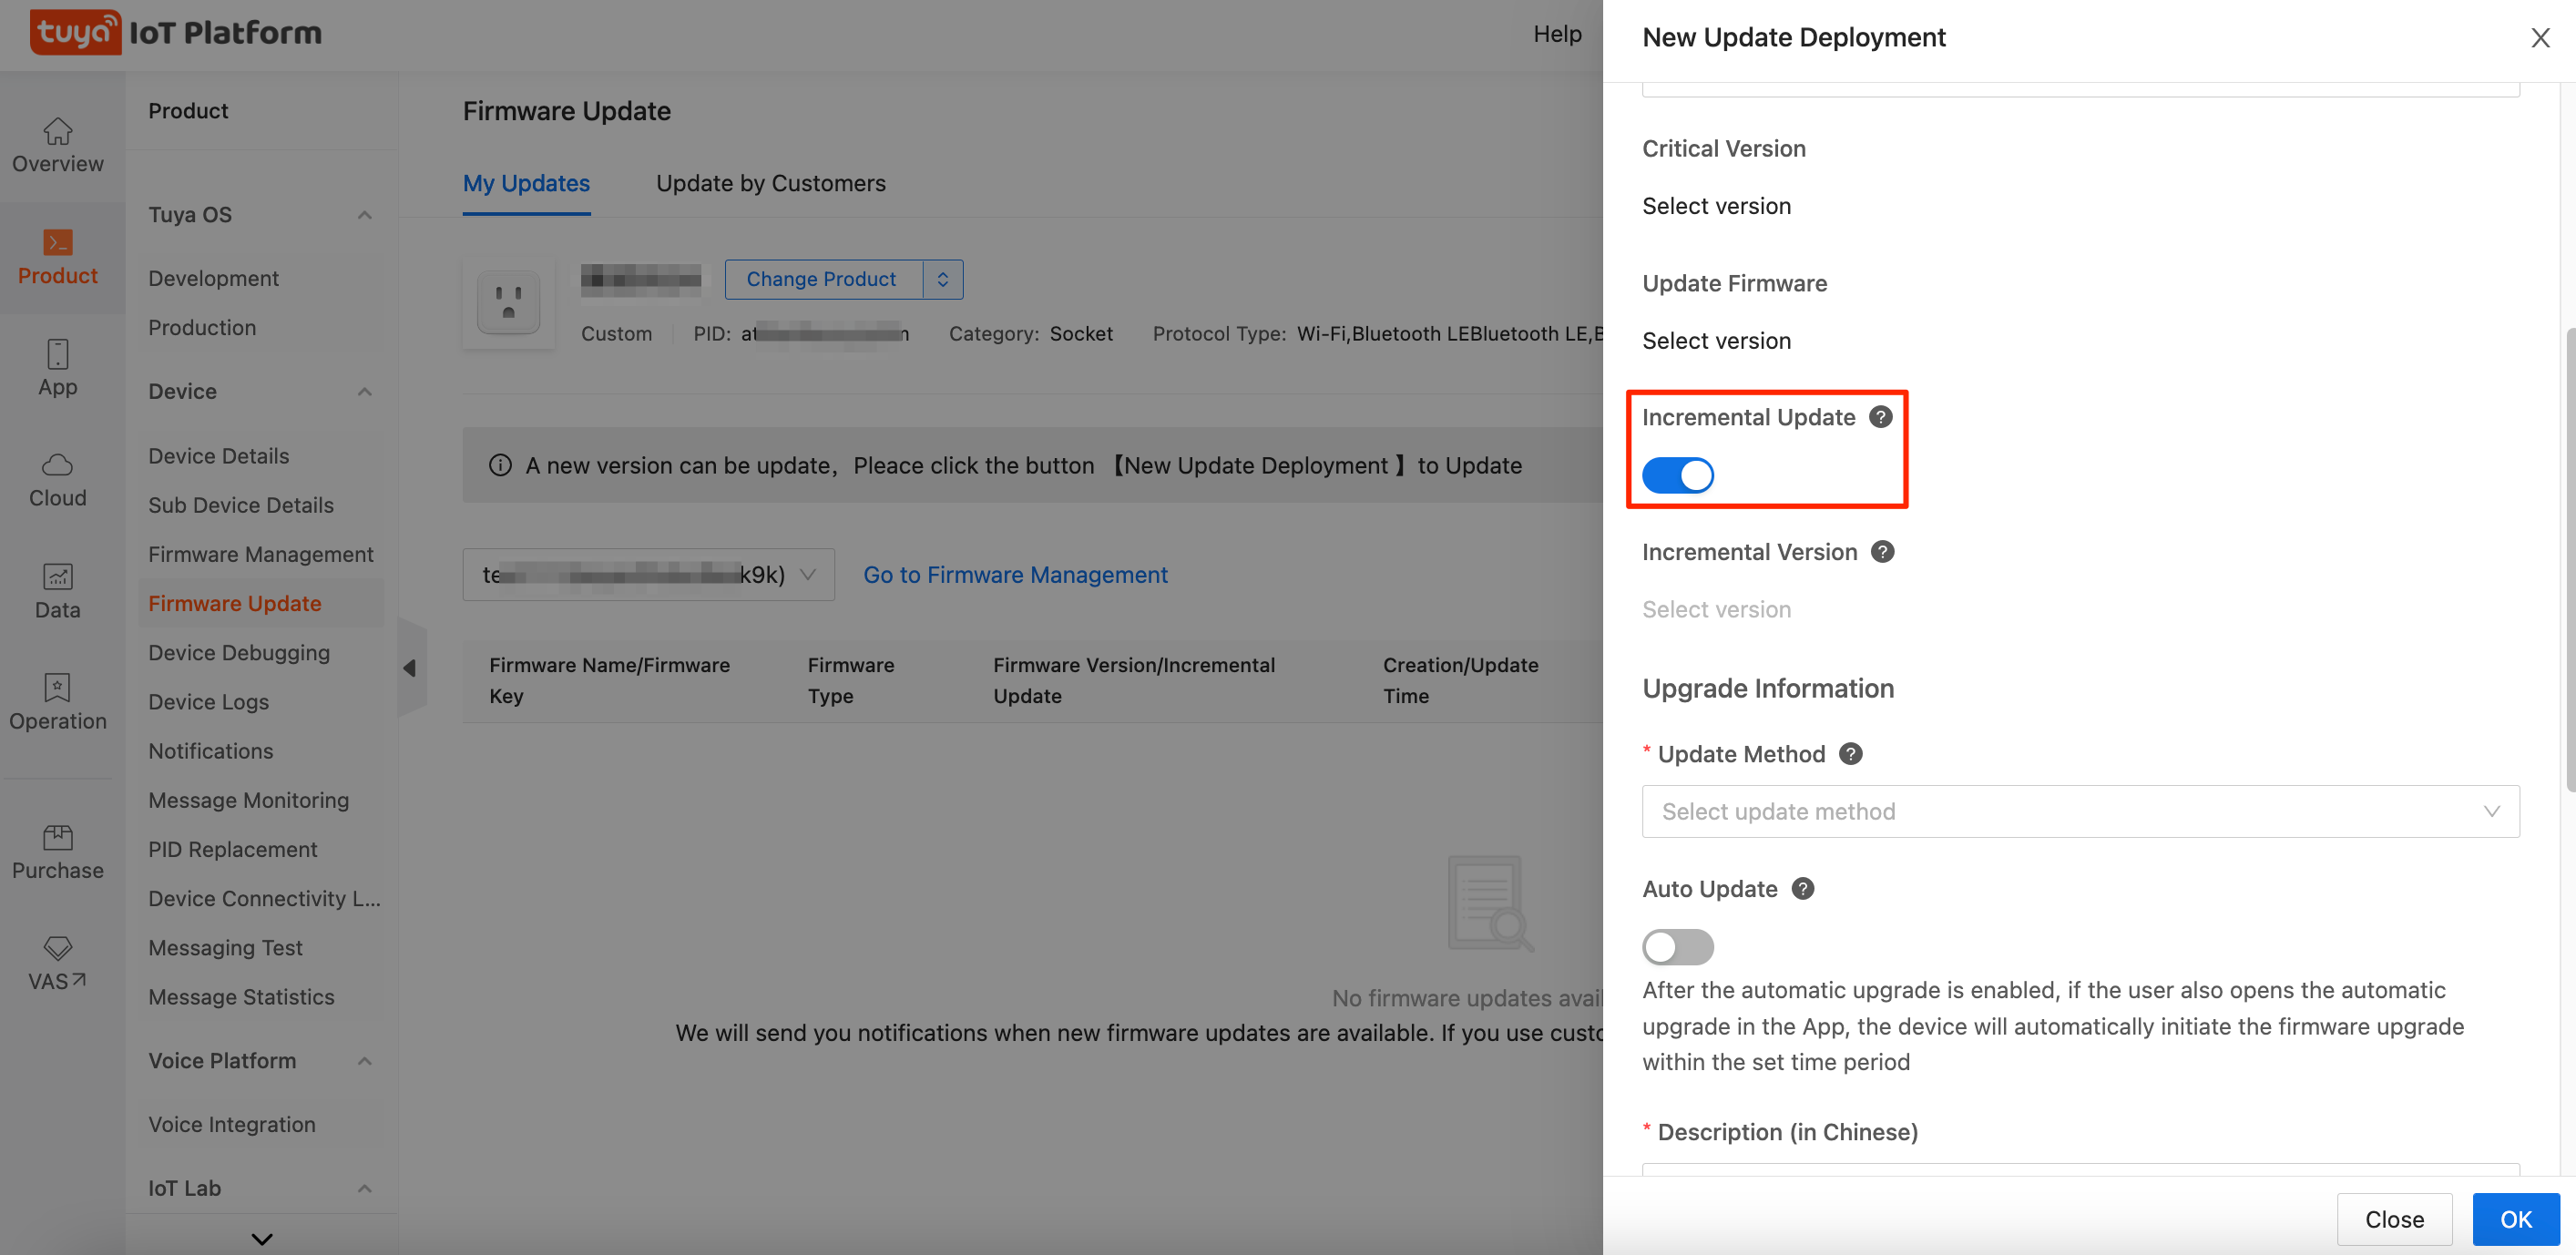
- Enable Incremental Update to allow the target devices to download the incremental package.
- Check the available incremental package.
- Click OK to generate a firmware update record. The target devices can then download the incremental package. The specific process depends on the update method supported by the devices. The full firmware package can still be obtained for an update.
Step 5: Verify the update
The steps are the same as Type 1 and Type 2.
Step 6: Deploy the update
The steps are the same as Type 1 and Type 2.
Manage Firmware
Background information
To enhance the self-service development capability of customers, Tuya IoT Development Platform has introduced firmware management. You can manage firmware uploaded by yourself during product development. With deployment scope setting, you can manage available firmware developed by OEM, copy, or transfer.
Application scope
The function mainly applies to those who develop products by copy or OEM.
Term
| Term | Definition |
|---|---|
| Custom firmware | This kind of firmware is uploaded, maintained, and updated by you. |
| Tuya firmware | This kind of firmware is developed and updated by Tuya. You can select and use the firmware. |
| Manufacturer firmware | This kind of firmware is obtained when you develop products by copy or OEM. It is maintained and updated by the manufacturer. |
| Firmware type | It is divided into production firmware, user area firmware, and update firmware. Production firmware and user area firmware are mainly used during the flashing by Tuya’s plant, and they are required only when the product is produced by Tuya. Update firmware is mainly used for device remote OTA updates. It is available for all products. |
| Firmware owner | The account that can manage the firmware. It is divided into the following two cases.
|
Operating procedure
Firmware management is mainly used to manage My Custom Firmware. You can add, edit, delete, enable, and deactivate the firmware.
By enabling and deactivating the firmware, you can set the availability of the firmware version. For example, if you want to remotely update your devices via OTA, you need to add a firmware version and enable it in Firmware Version Management, and then go to Update Firmware > New Update Deployment to add a new firmware version. Then, you can send update notifications to devices.
Prerequisites
You have created at least one product. See Create Products for details.
Scenario 1: Custom firmware management
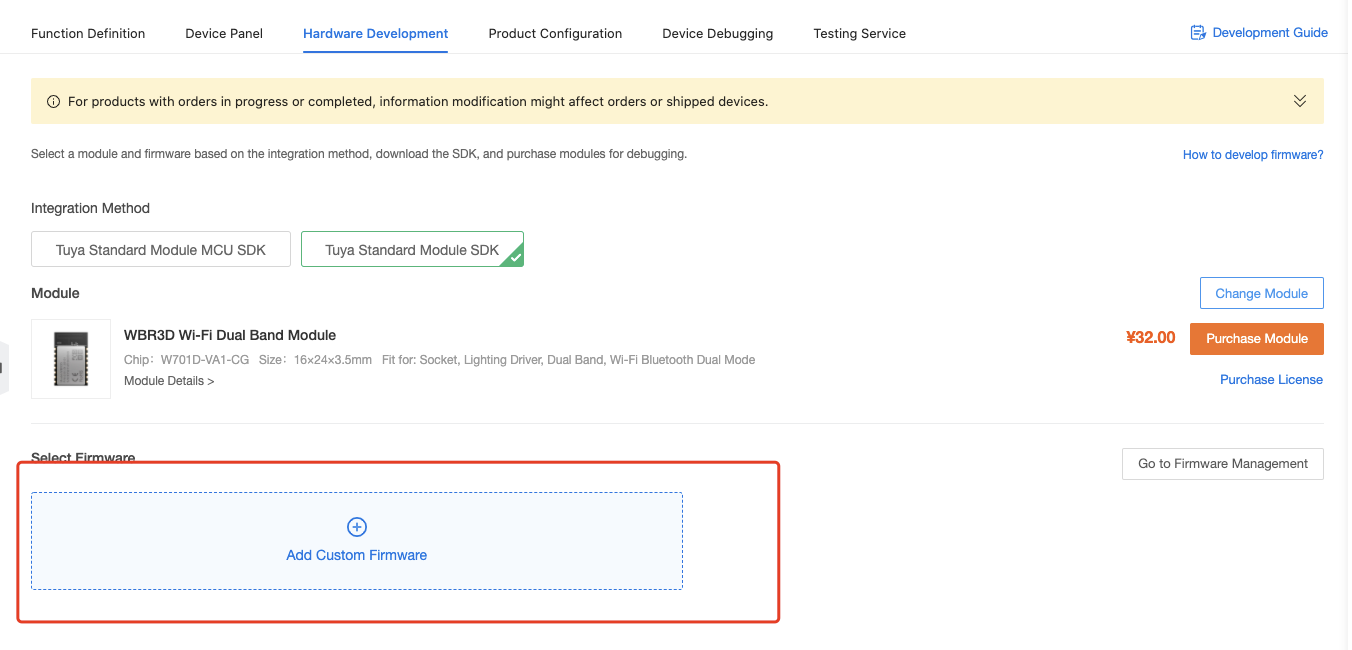
Choose Product > Development in the left-side navigation bar, find a product, and click Continue to Develop. On the page that appears, click Hardware Development > Add Custom Firmware.
You can add custom firmware in Development or in Firmware Management in 3 steps.
Step 1: Add firmware (generate firmware key)
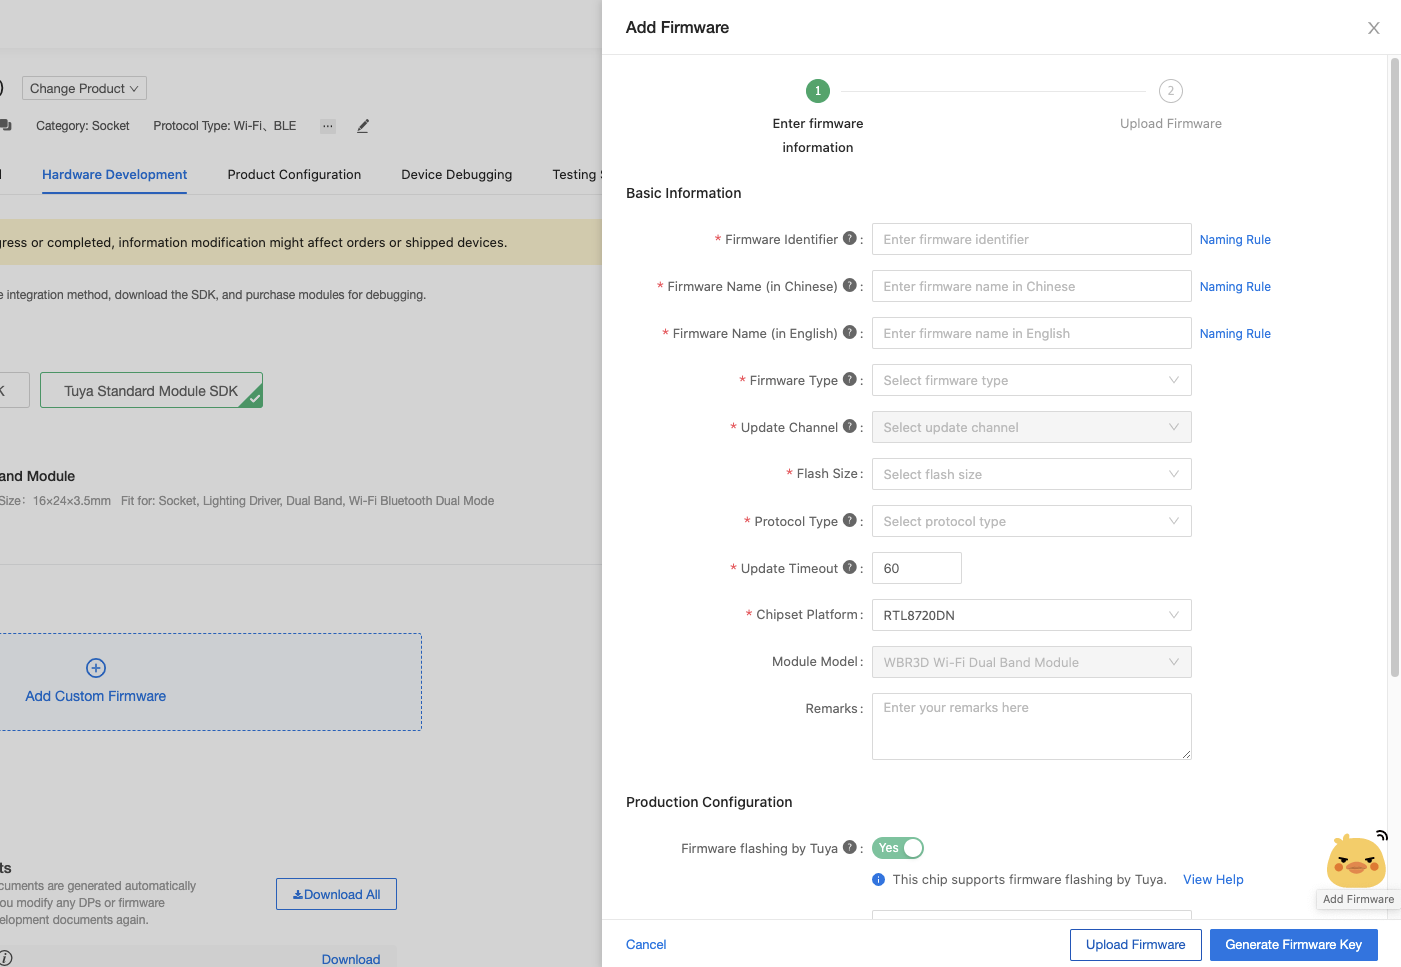
- Complete the basic information of firmware, and confirm to generate the firmware key. You can see the firmware in Firmware Management. The key is mainly applied to firmware updates and maintenance in the future.
- (Optional) If you select Tuya chips for the product, you need to complete Production Configuration.
Tuya will flash the firmware and arrange the production as per the production configuration. If the chip is not flashed by Tuya, Production Configuration is not supported.
Step 2: Upload production firmware (add firmware version)
With the firmware key generated, you are required to develop the firmware. After development, add a new firmware version and upload a valid firmware file, which mainly refers to production firmware.
Note: Generally, in product development, you upload production firmware and user area firmware. Every firmware file you upload (new firmware version) will be maintained as a version.
Step 3: Enable the firmware version and set the deployment scope
By default, once the firmware version is added, it will have a status—enabled or not enabled.
- Not Enabled (default): The firmware version is not available now. You cannot receive or purchase licenses in product development.
- Enabled: The firmware version is available for products.
- If production firmware and user area firmware are enabled, they can be selected during product development.
- If update firmware is enabled, it can be selected during firmware updates.
Firmware enabling process
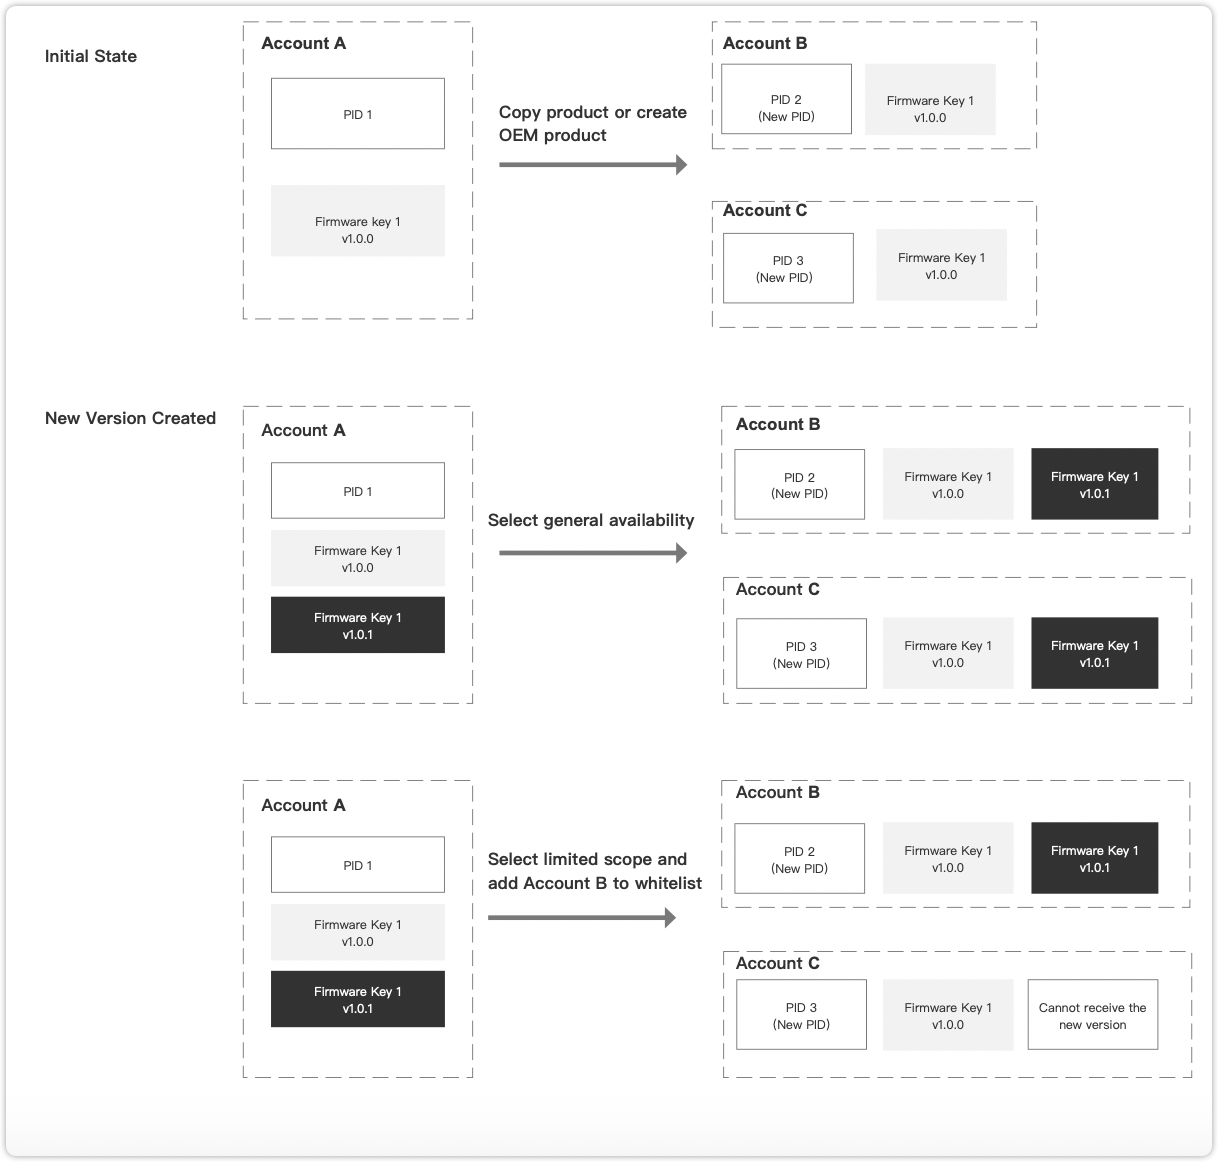
Firmware enabling is for managing products with the same firmware key. You can specify whether an account or a PID can receive update notifications for firmware updates or product development.
Service process (see the diagram above)
- With PID 1 including firmware key 1 under its account, Account A copies a product to or creates an OEM product in Account B and Account C.
- Account B and Account C can receive a copy or OEM link to create PID 2 and PID 3. These two products have firmware key 1 v1.0.0 by default.
- If Account A iterates the firmware key 1, it generates a new firmware version v1.0.1.
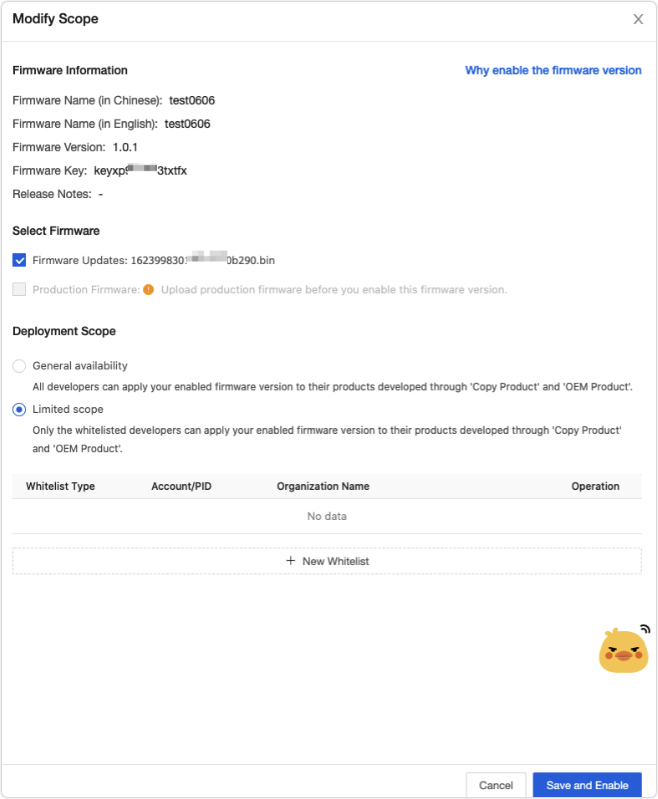
- If you want Account B and Account C to use the firmware version, you should select General availability when enabling firmware. In this way, both Account B and Account C can receive the new version v1.0.1.
- If you only want Account B to use the firmware version, you should select Limited scope and add Account B to the whitelist when enabling firmware. In this way, only Account B can receive the new version v1.0.1.
- If firmware key 1 is applied to PIDs of N customers, you can also set the deployment scope.
Whitelist of limited scope
A whitelist refers to the account/PID and organizations that can use the enabled firmware version during update and development. The organizations get firmware keys by copying a product or creating an OEM product.
Impact scope of enabling
- If you have uploaded production firmware, after you enable the firmware, the product in the whitelist can receive update notifications. You can copy it or develop it by OEM.
- If you have uploaded update firmware, after you enable the firmware, the product in the whitelist can receive update notifications.
- After being enabled, the firmware file cannot be modified. If you want to modify it, you must deactivate it first.
- During product development, you must enable the new firmware version (upload the production firmware) for customers to place an order.
Note: After you enable the firmware, OEM customers can use its versions if the product is published. To avoid troubles like misusing faulty firmware, it is recommended to set the deployment scope limited during debugging stage.
Step 4: View firmware management
After you complete product development, you can enter Device > Firmware Management > My Firmware to view the firmware information.
Note: Only firmware owners can add a new version of firmware (see Term).
Scenario 2: Remotely update devices with new firmware versions (firmware OTA update)
In practice, you can go to Firmware Management to add a new firmware version. Notice that only the firmware owner can do it.
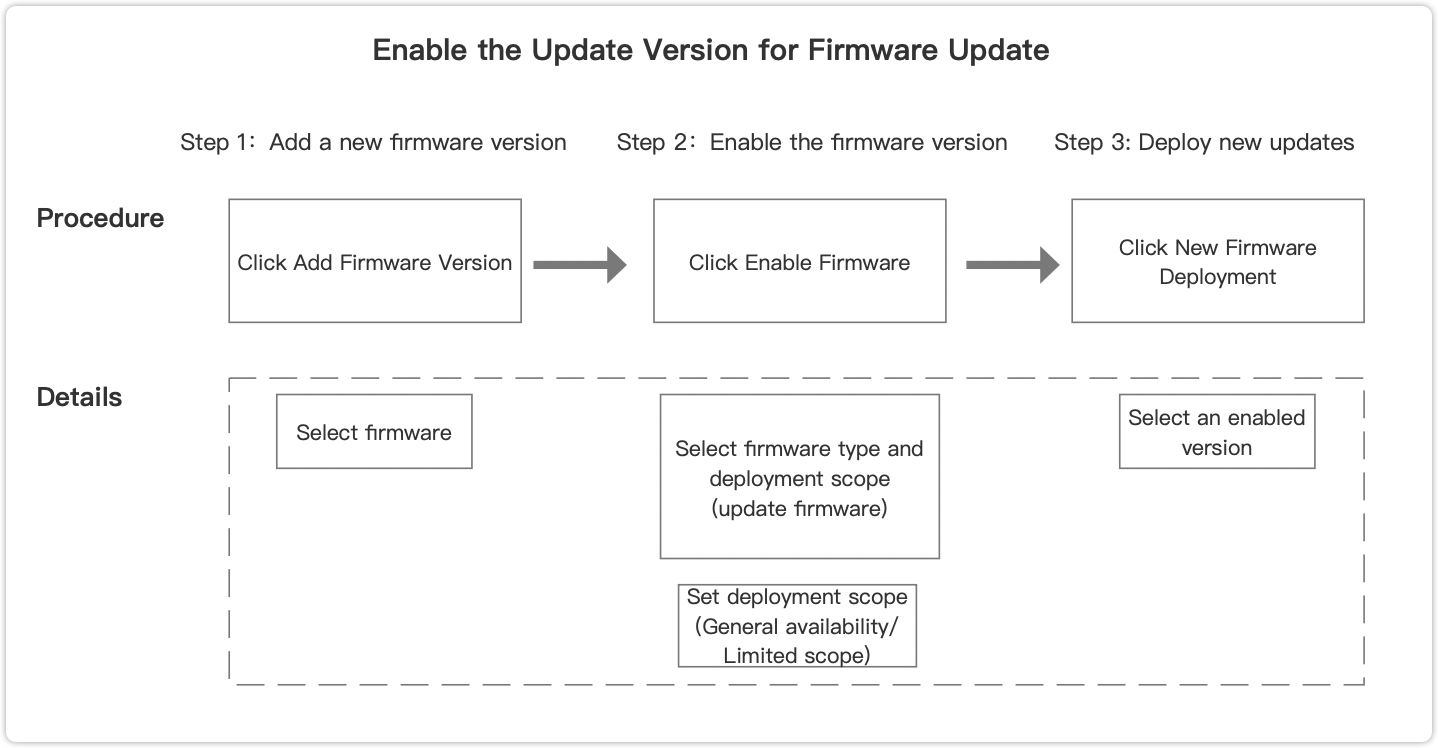
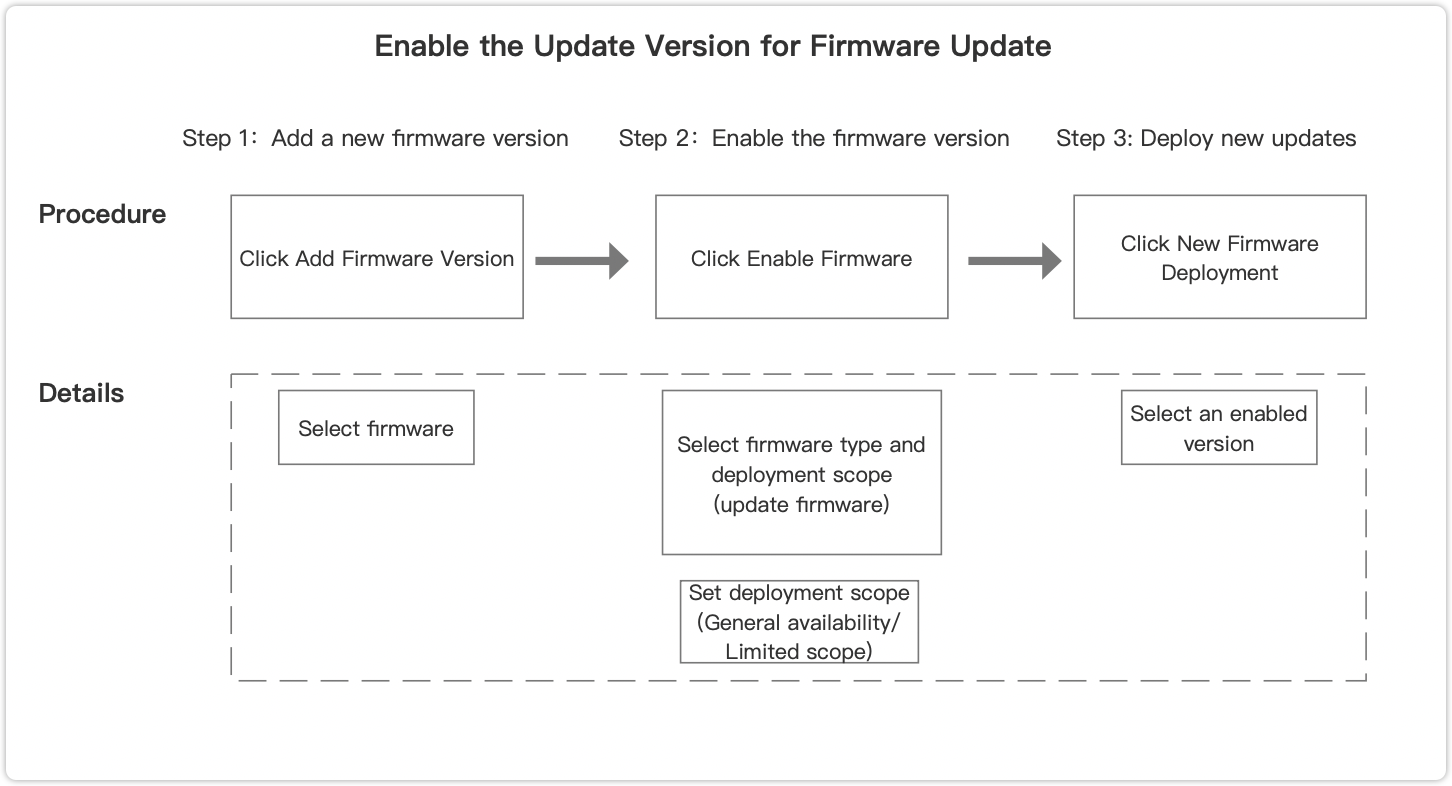
Process
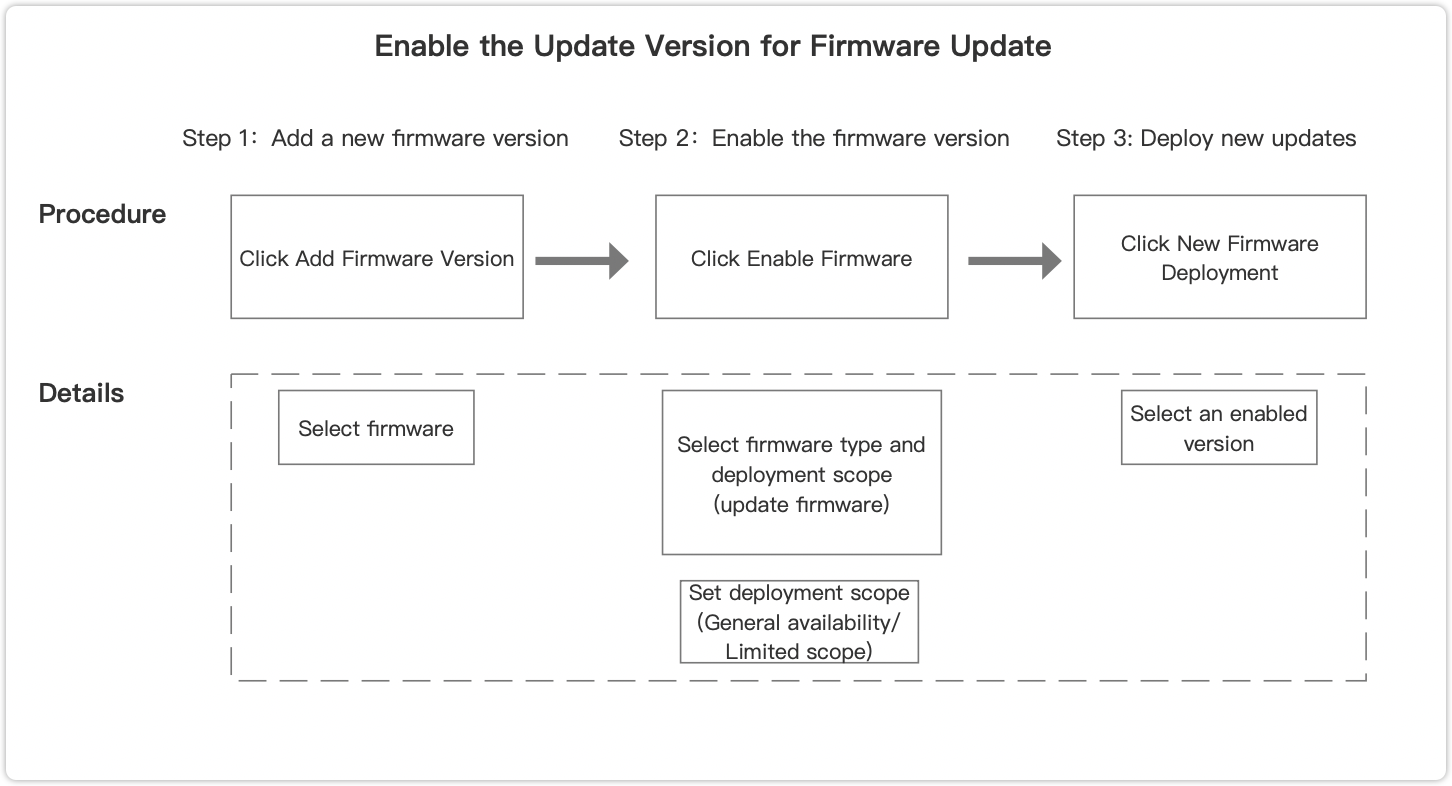
Step 1: Add a new firmware version
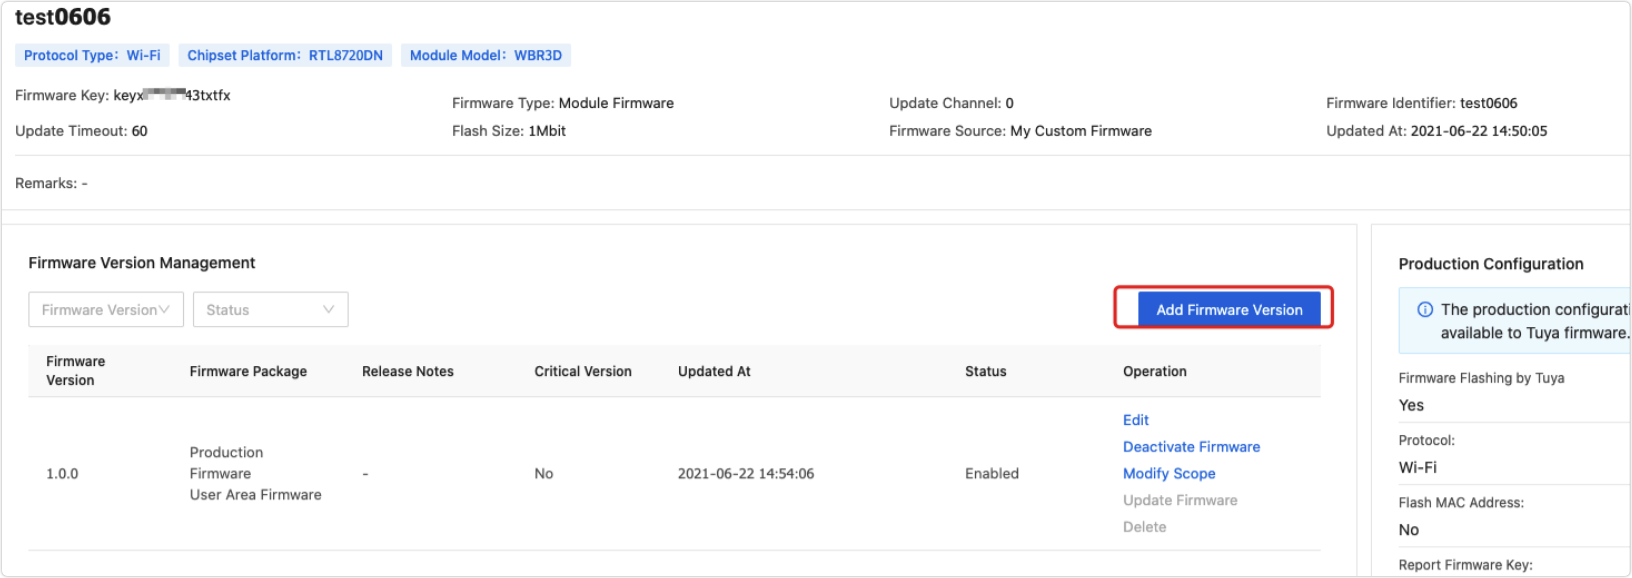
Note: Only the firmware owner can add a new version. If the button Add Firmware Version is invalid, it indicates that you are not the firmware owner. Contact the product owner to get authorized.
Add a firmware version
Entry 1 (recommended): In the left-side navigation bar, go to Product > Device > Firmware Management, select a firmware, and click Create Version.
Entry 2: In the left-side navigation bar, go to Product > Device > Firmware Management > Details, select a firmware, and click Add Firmware Version.
Entry 3: In the left-side navigation bar, go to Product > Device > Firmware Update, select a firmware, and click Add Firmware Version.
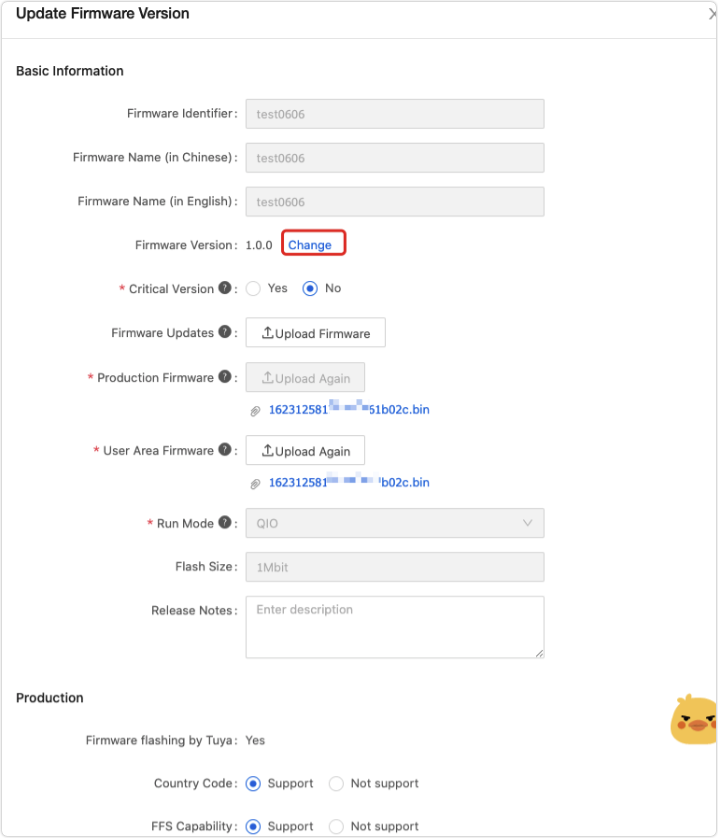
Complete the information of the firmware version, and upload the firmware file.
Step 2: Enable the firmware version
When you enable the firmware, you need to select the firmware type and its deployment scope.
- If you select Firmware Updates, customers who use the firmware can receive update notifications in Firmware Update.
- If you upload Production Firmware, customers who use the firmware can update it in the third step of Hardware Development.
Step 3: Deploy new updates
After you enable the new firmware version with update files, go to Firmware Update, and you can see update notifications for the firmware. Click New Update Deployment, and complete the setting.
After the setting, the new version will be displayed below My Updates. You can continue the process to verify and publish the version.
Scenario 3: Set the latest version as factory firmware
In practice, if you want to set the latest version as factory firmware, go to product development to change it.
Process
Step 1: Same as Step 1 for Scenario 2.
You need to upload both production firmware and user area firmware.
Step 2: Same as Step 2 for Scenario 2.
You must enable the production firmware first.
Step 3: Change version
After enabling the new firmware version, you will receive update notifications in your product list. You can enter Product > Development > Continue to Develop > Hardware Development, and click Update to change the version.
Product list
Hardware development
Update firmware version
Updated successfully
