Views: 13
How to Power Up Your R-Series IP Camera
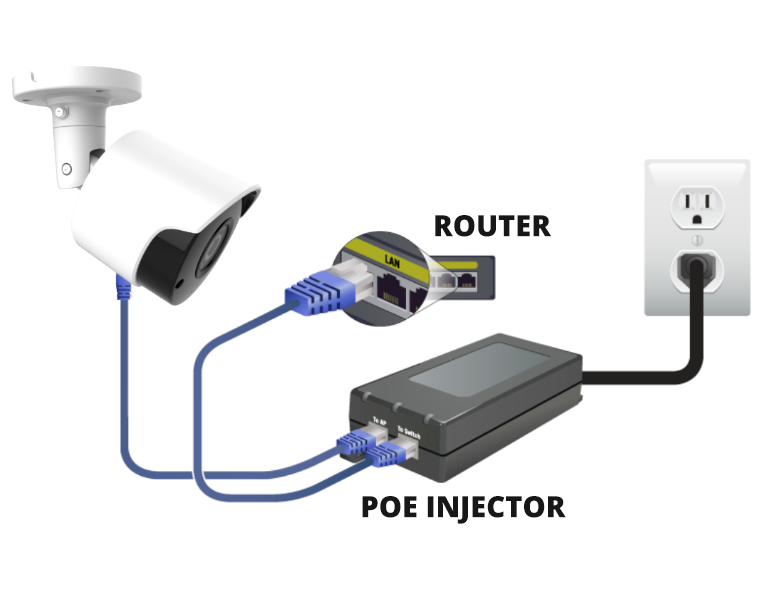
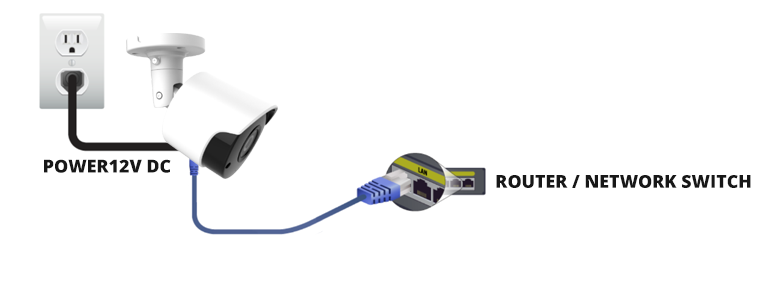
In this guide, we’ll show you how to power up your camera and plug it into your network. There are 2 options for powering your camera and connecting it to your network:
Use a POE Injector (Recommended)
Run a network cable from your router or network switch to your camera.
Then using a 12V DC power supply (atleast .6 amps), run power wire from the power supply to the camera.
How to Set Up Your R-Series Camera Without an Internet Connection
In this guide, we will show you how to setup your R-Series camera without an internet connection.
If you are one of the rare earthlings who doesn’t have an internet connection at the location where you are installing your R-Series camera, do not fret! We got you covered. You will need a windows-based PC to complete this step.
Go ahead and wire and power up your system as shown in the initial setup guide, then follow these instructions.
R-Series IP Security Cameras Guide
Read Next :
Install the Configuration Tool on your PC and open up the program
Make sure your PC is on the same network as your R-Series camera. The configuration tool can be found on the CD that came with your product or you can download the tool on our R-Series quick start page.
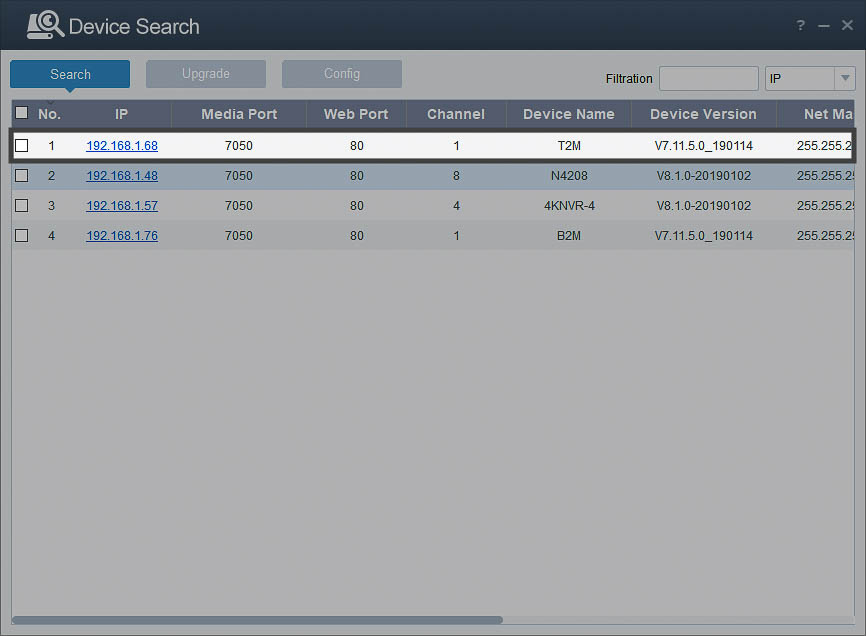
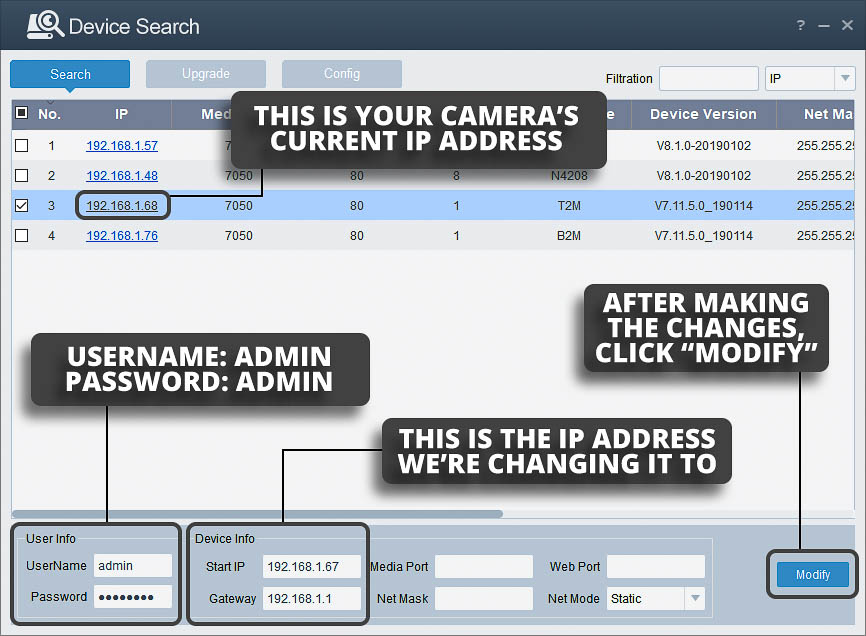
Open the program. You should see your device shown:
Click on the checkbox next to the IP address of your camera
Enter the username and password:
| 1 | Username: | admin |
|---|---|---|
| 2 | Password: | admin |
Change the Net Mode to “Static” and click “Modify.”
Be sure to write down your IP address! You will need it later.
Optional Step
If you prefer to set your own IP address, do all the steps above, but right before you click Modify, you can enter in your IP address and Gateway into the fields shown (Entering the port numbers and Net Mask is not needed).
In this example, we are changing the IP address from 192.168.1.68 to 192.168.1.67:
Log into the CamViewer program using the IP address from above.
Instead of entering your product ID, enter the IP address that you recorded above. You will now be able to acces your camera through the CamViewer application without internet access.
How to View and Manage an R-Series Camera from a Mobile Device
In this guide, we will show you how to view your first camera from your mobile device using the EyeCam mobile application. If you’ve already added one camera and would like to add additional cameras, click here to read our guide, “How to View Multiple R-Series Devices from your Mobile Device.”
Download and Launch the EyeCam Mobile Application
Download and launch the EYECAM application for Android or Apple devices.
Add Your First Device
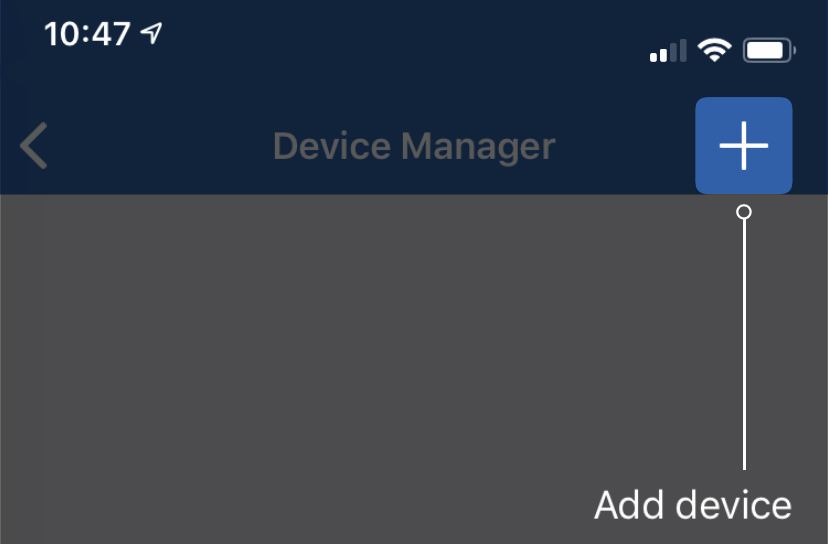
When you open the app for the first time, it will automatically display the “Device Manager.” Tap the “+” Icon in the Top Right-Hand Corner.
Scan the QR Code located on the camera body or the product box

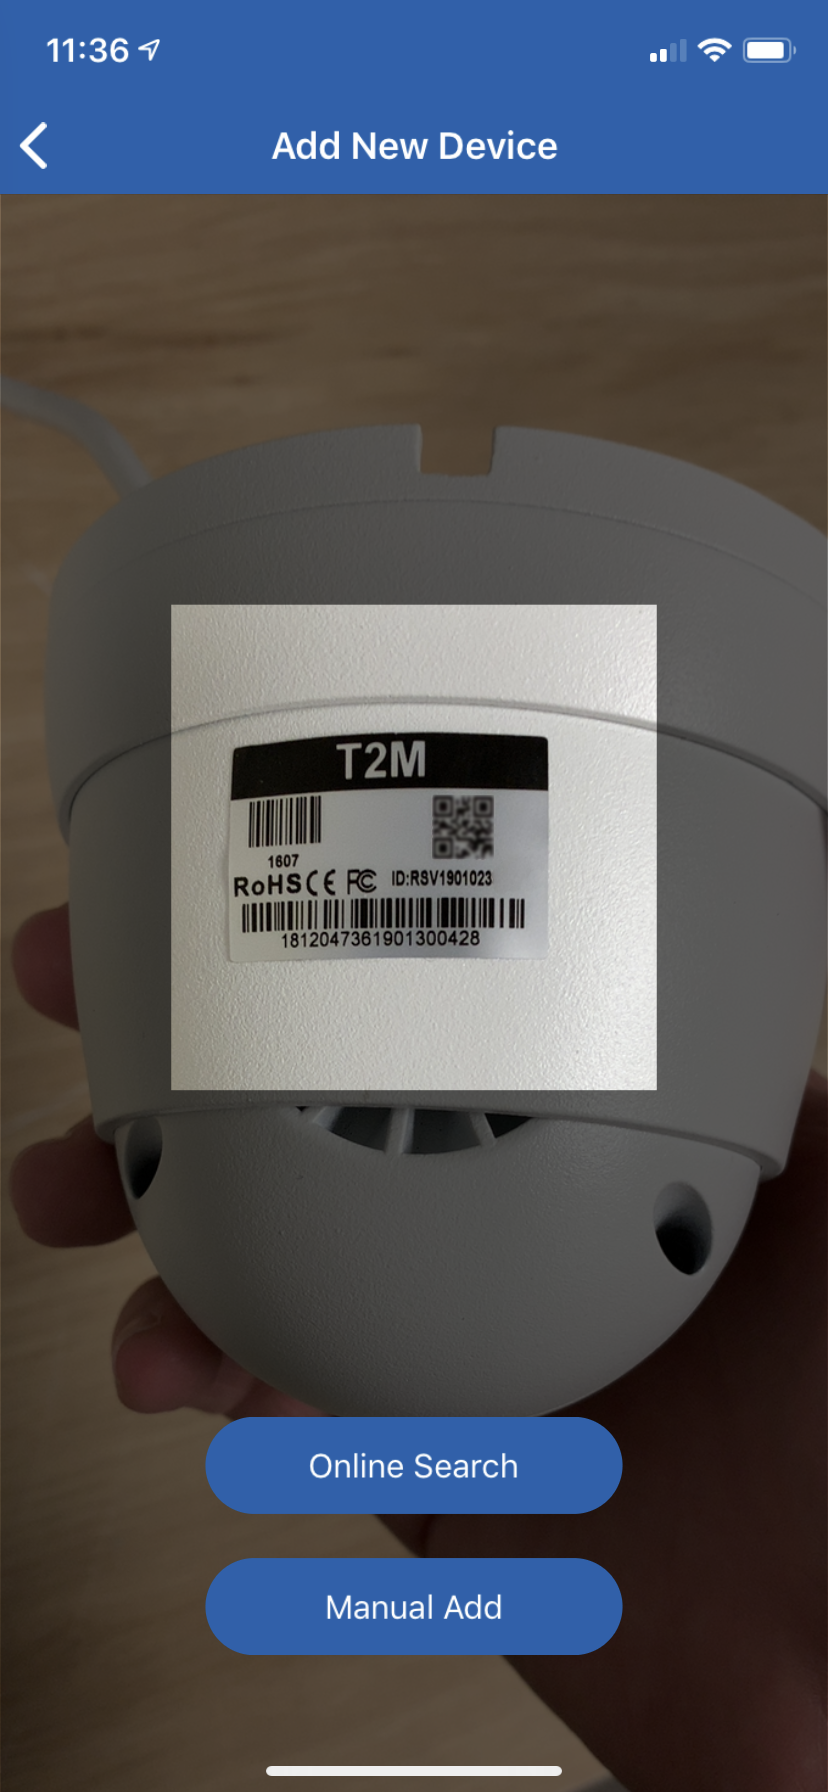
Verify the following credentials, enter the password, and click “Save”
| 1 | IP Address/ID: | Your camera’s Product ID can be found near the QR code on the product’s box or on the product itself. |
|---|---|---|
| 2 | Media Port: | 7050 |
| 3 | User Name: | admin |
| 4 | Password: | admin |
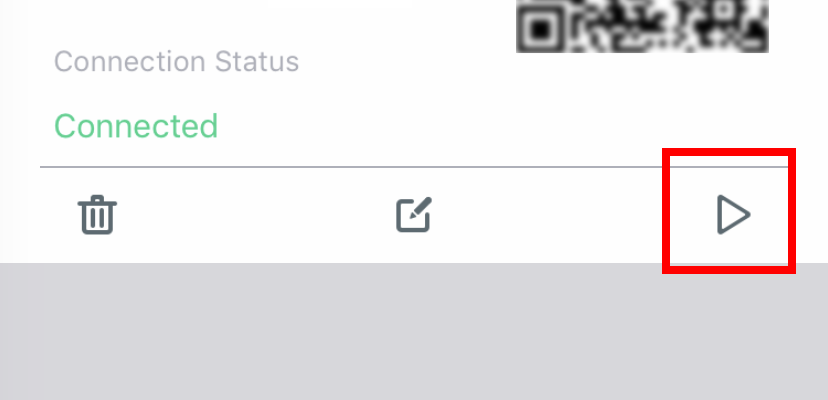
Congrats! You have successfully added your first camera to your EyeCam device list. You can now view your camera’s feed anytime and anywhere. Click the play button in the bottom right-hand corner to view your camera’s live feed.
Navigate the EYECAM User Interface
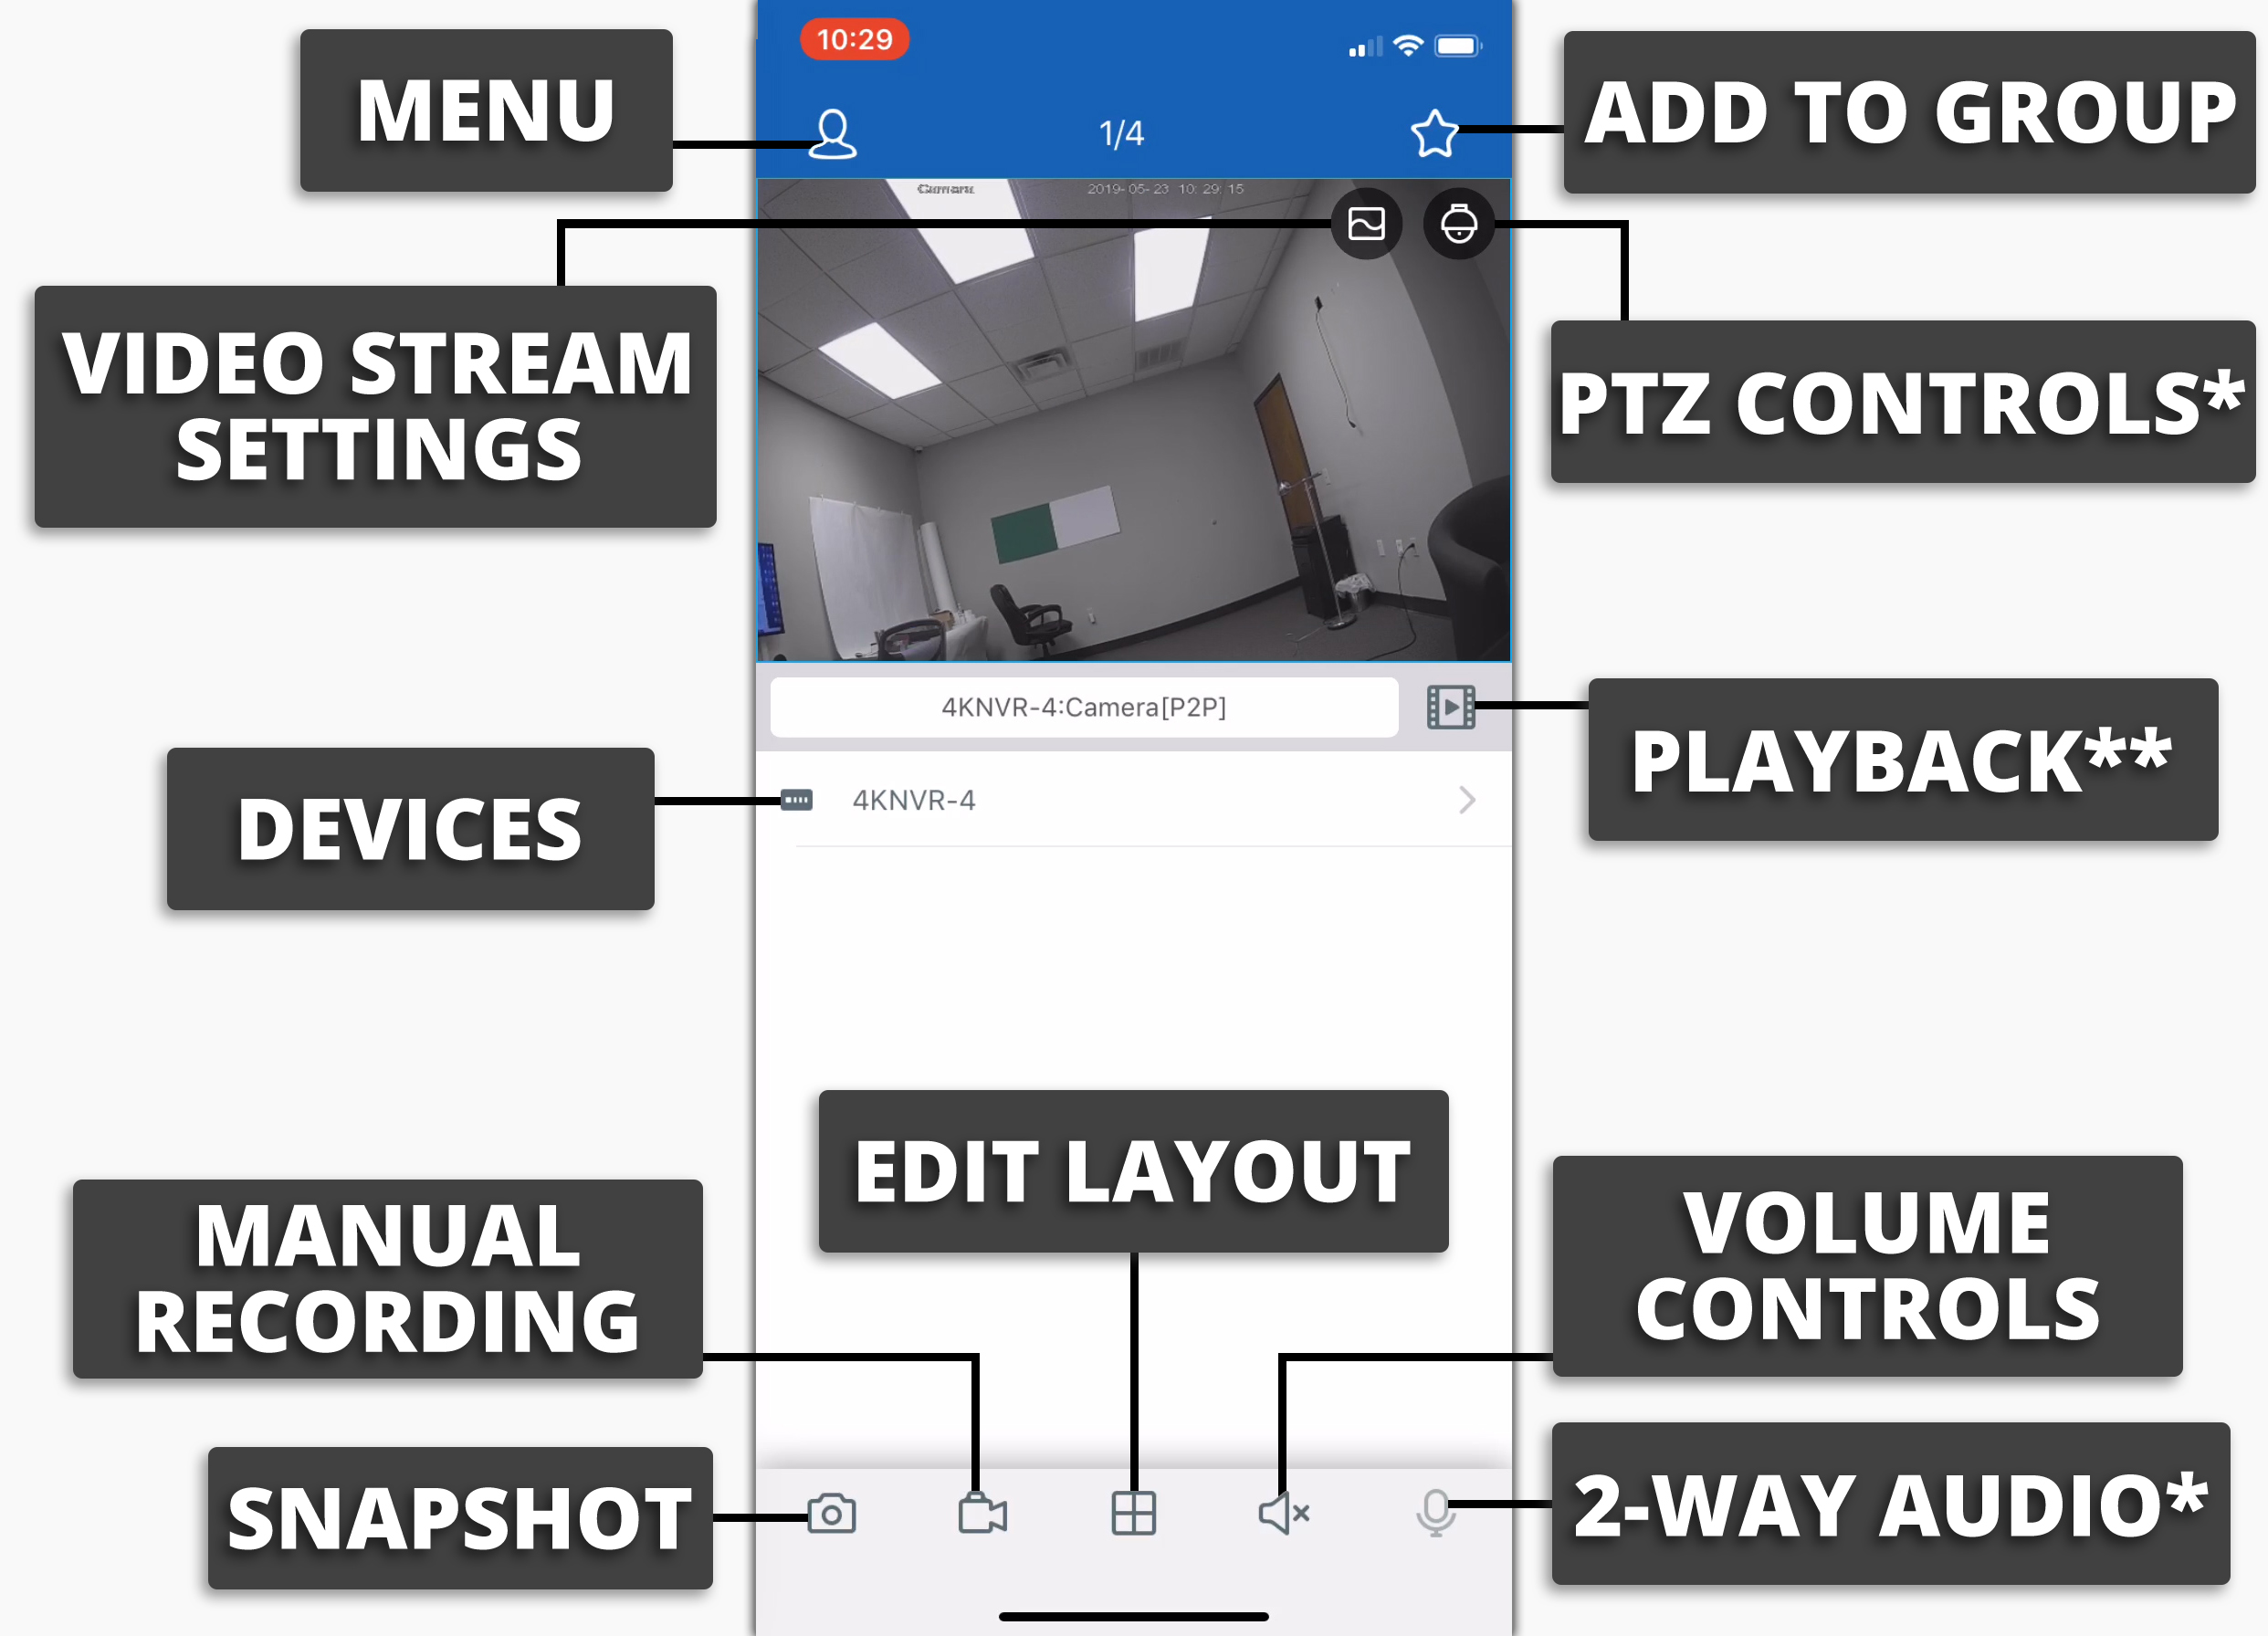
Check out the image below for a breakdown of the EYECAM app’s user interface.
* PTZ and 2-Way Audio functions are not currently available on any R-Series camera. However, you can still use these features if you have a PTZ or 2-Way Audio compatible camera connected to your R-Series NVR over the ONVIF protocol.
** The playback menu is only functional when remotely accessing a recorder with a hard drive.
How to View Multiple R-Series Devices from your Mobile Device
In this guide, we will show you how to view multiple R-Series devices from your mobile phone using the EyeCam app. Since the mobile app supports multiview, you can remotely access multiple cameras and recorders at once. If you’re looking to add your very first device, please click here to see our camera setup guide, or click here to see our recorder setup guide.
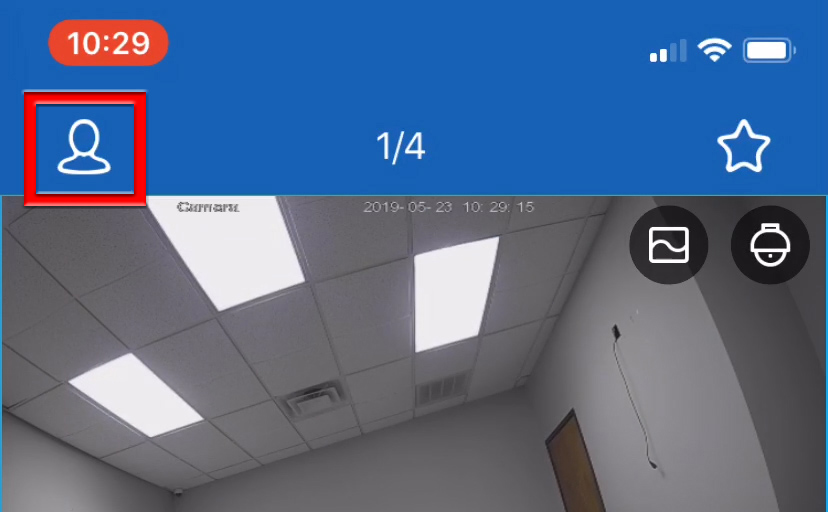
Click on the profile button on the top left-hand corner of the screen to pull up the menu.
In the menu, click “Device List” to bring up the Device Manager.

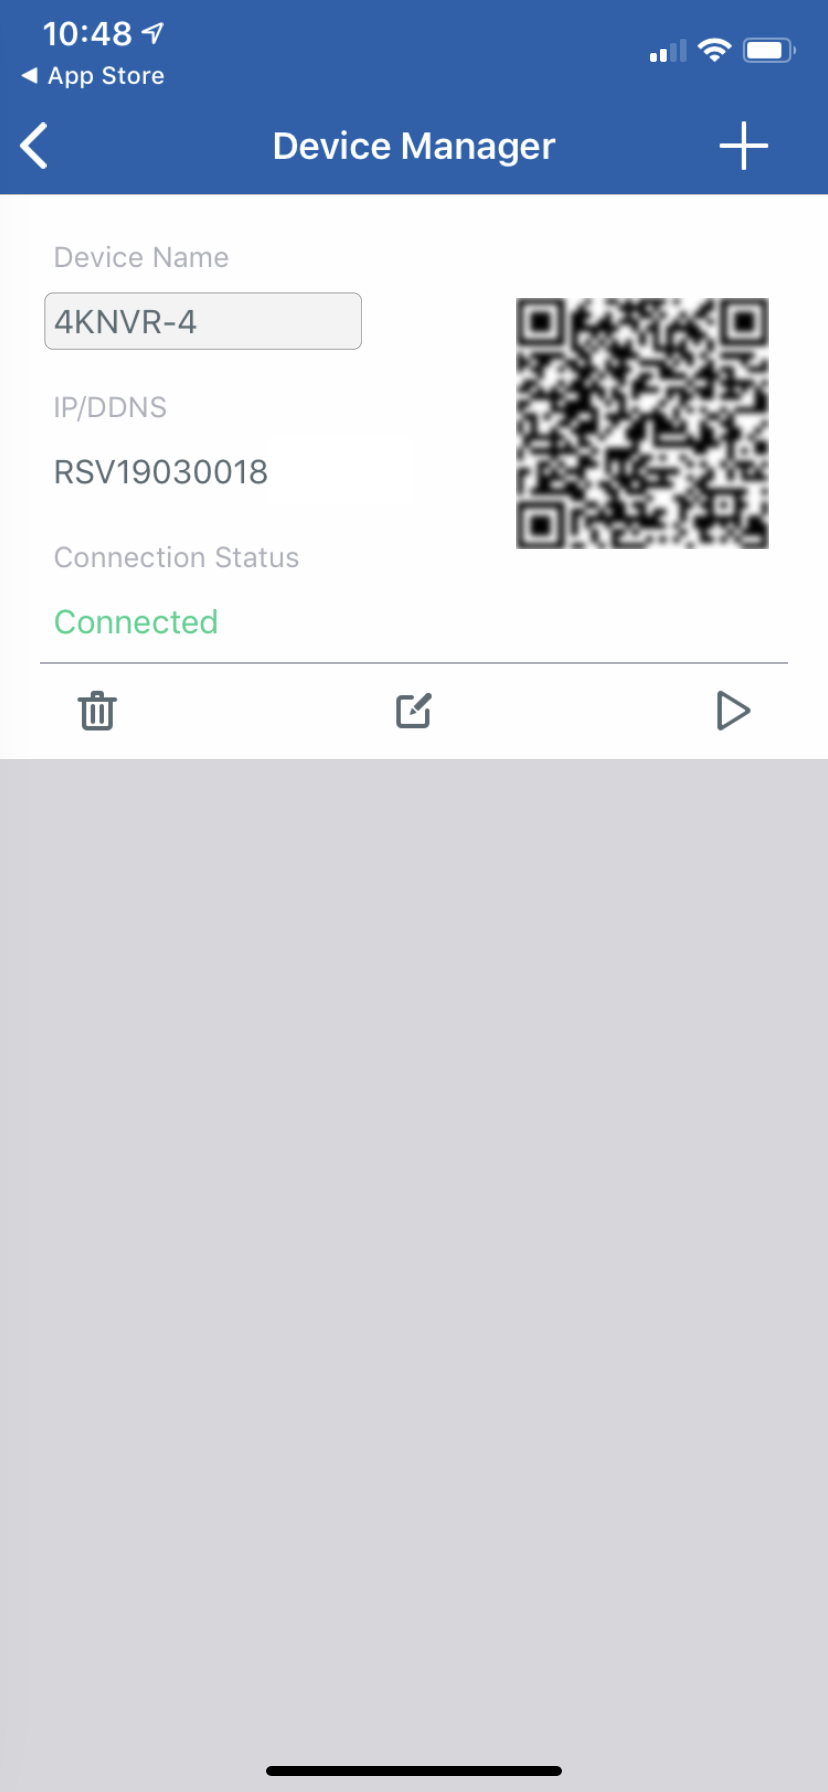
Touch the “+” icon in the top right-hand corner to add additional devices.
Scan the QR code and fill out the pertinent information just as you did the first time. Repeat all the above steps as many times as desired, until all your devices have been added to your device list.
How to View and Manage an R-Series Camera from a Computer
In this guide, we will show you how to view your R-Series camera from your computer using the CamViewer desktop application.
Download and Launch the CamViewer Application
You can install the program from the software CD that came with your camera, or you can click here to download it from our QuickStart page.
Log Into Your Camera
Click the image above to view full size.
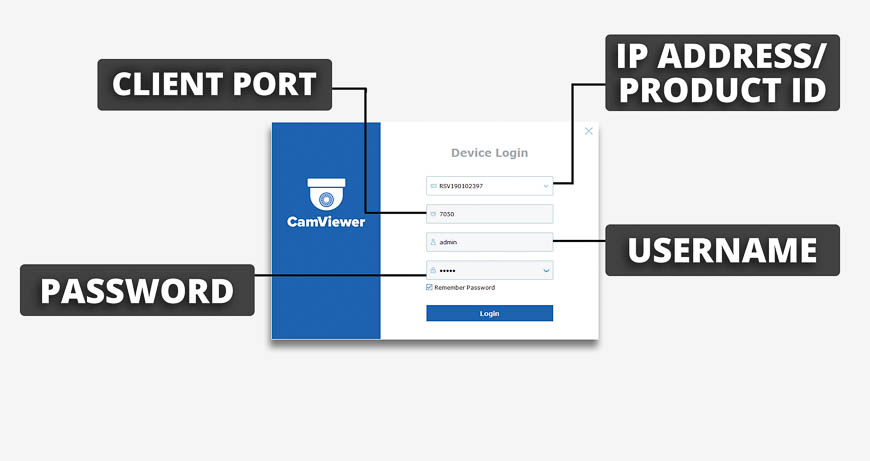
Enter the following credentials and click the “Login” button.
| 1 | IP Address/Product ID: | Your cameras’s Product ID can be found near the QR code, located on the product box or the product itself. |
|---|---|---|
| 2 | Client Port: | 7050 |
| 3 | Username: | admin |
| 4 | Password | admin |
Navigate the CamViewer Application Interface
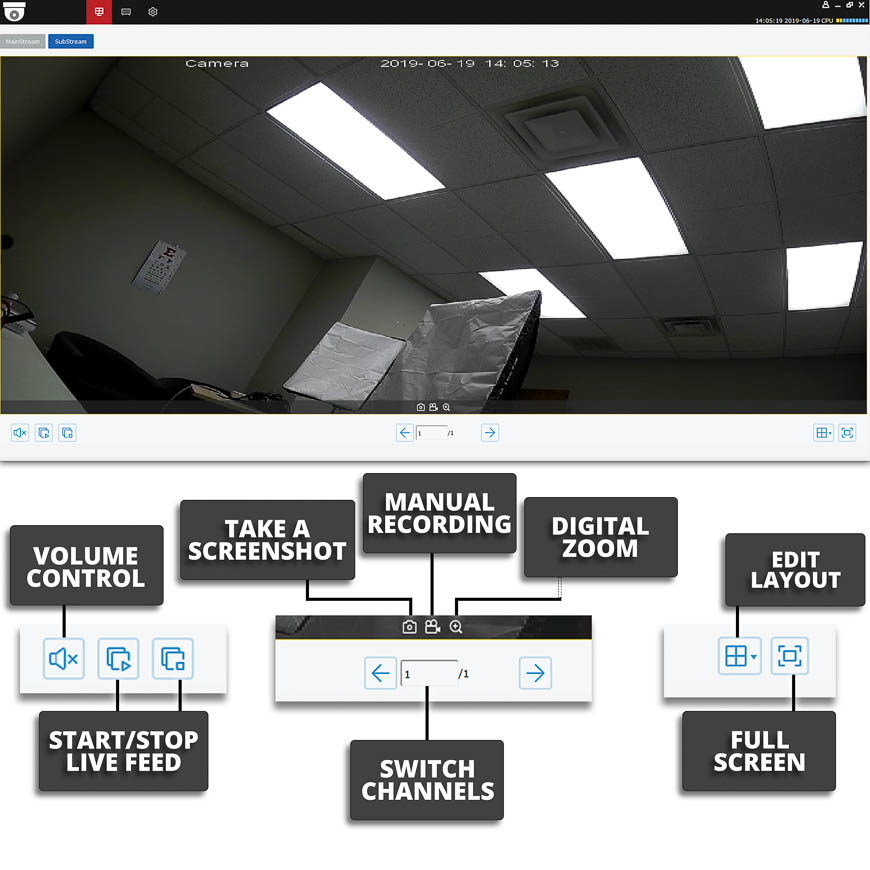
The entire program is split into three main tabs: Main View, Remote Setting, and System Config.
Main View
On the Main View screen, you can view the live feed from your camera. While the main purpose of this screen is viewing, you can also perform simple functions, such as digitally zooming in on your footage, taking a manual snapshot or recording, switching between your mainstream and substream, and more.
Remote Setting
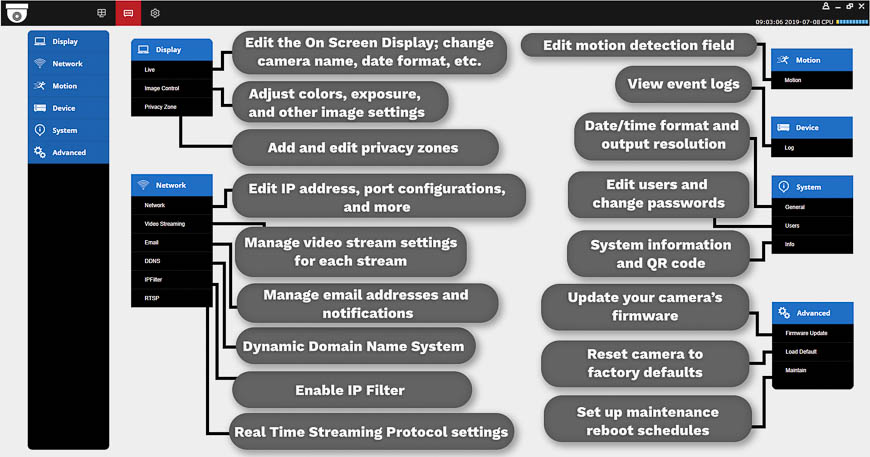
All of your camera’s system menus and preferences are located within the Remote Setting tab. This screen is split into six tabs: Display, Network, Motion, Device, System, and Advanced. To get an idea of what functions you can perform within each of the six tabs, reference the image below.
System Config
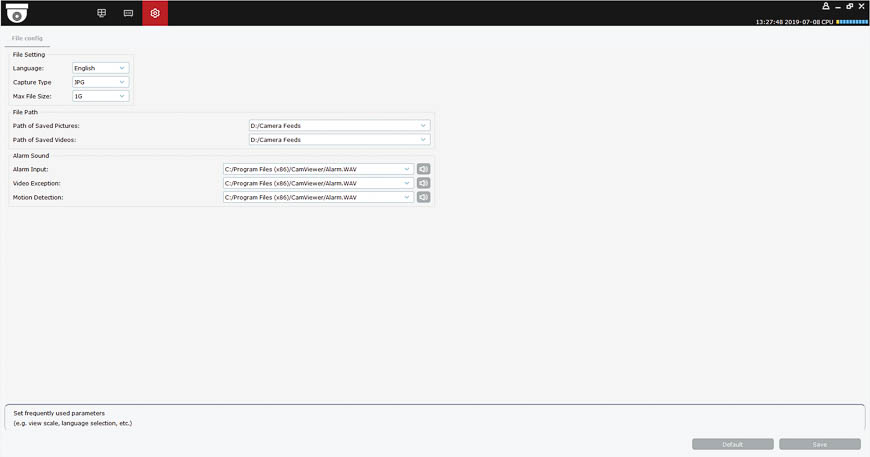
Within the System Configuration menu, you can set up how your computer works with the CamViewer program. Edit the file settings, file paths for your saved pictures and videos, and edit the sounds your computer makes during certain events.
How To Add R-Series Camera To UNV NVR Via Custom Protocol
Using Custom Protocol pulls the RTSP Stream of the camera.
This is a great alternative in case ONVIF does not play well between your UNV NVR and R-Series Camera.
We will be referencing the web interface of a UNV NVR in this guide.
Please Note
You will not be able to adjust any of the camera settings from the NVR if you have the camera added via Custom Protocol.
Accessing NVR Camera Setup
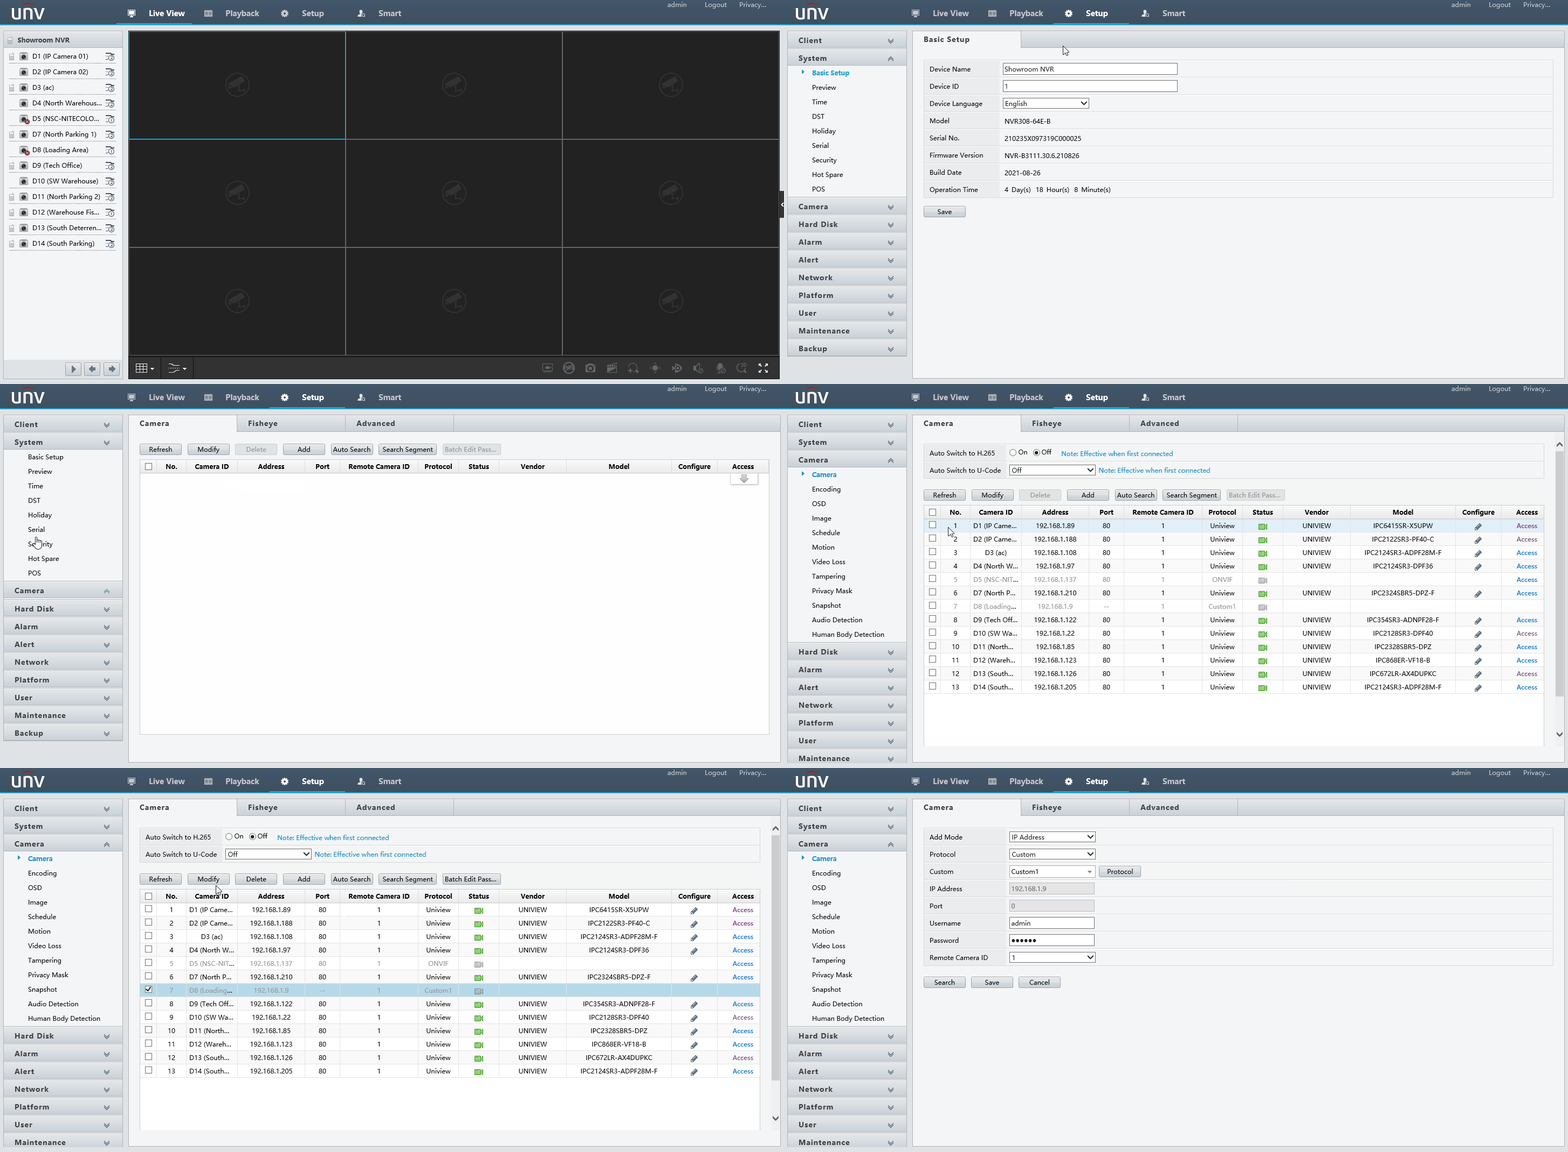
From your NVR’s Live View, go into Setup -> Camera -> Camera.
Select the channel you would like to have the R-Series camera on, and select Modify.
Configuring Custom Protocol
After you select Modify on the channel you want the camera to be on, change the protocol to Custom and click the Protocol Icon.
For R-series, the RTSP URL is as follows – rtsp:// [IPADDRESS] : [RTSP PORT] / ch [CH] / [STREAM TYPE]
The channel is going to be “ch01″. “Stream Type” is going to be 0 for main stream or 1 for sub stream.
Your finished product with all the information entered should look something like this:
Afterwards, Hit Save and the camera status should come up as online if inputted properly!
Once the cam is showing as Online, you will then be able to go over to Live View and watch your newly added camera!
How to Add an R-Series Camera to a 3rd Party Recorder
In this guide, we will show you how to set up your R-Series camera for viewing on most third party NVRs. The steps you take to actually add your R-Series camera to your third party NVR will vary depending on your NVR’s brand.
Before Getting Started
Before we start, if you do not yet have an NVR for recording your cameras, we recommend our R-Series recorders. All you need to do is plug your camera into the POE switch in the back and you are done.
However, if you want to use these cameras on a 3rd party NVR, here are some tips for getting it set up. The details for actually setting up on your NVR will differ depending on the brand. We do have two guides showing you how to do this using a Dahua and Hikvision NVR. However, the concept is the same no matter which ONVIF compatible NVR you are using, so please use these instructs as a baseline no matter what brand recorder you have.
Also, some NVRs cannot do H.265 encoding. Therefore we will show you how to change the camera to H.264 encoding to ensure that it will work on your NVR. Even if your NVR does allow H.265 decoding, depending on its ONVIF version, it may still not accept the R-Series H.265 video. Therefore, we recommend that you follow these steps before you get started.
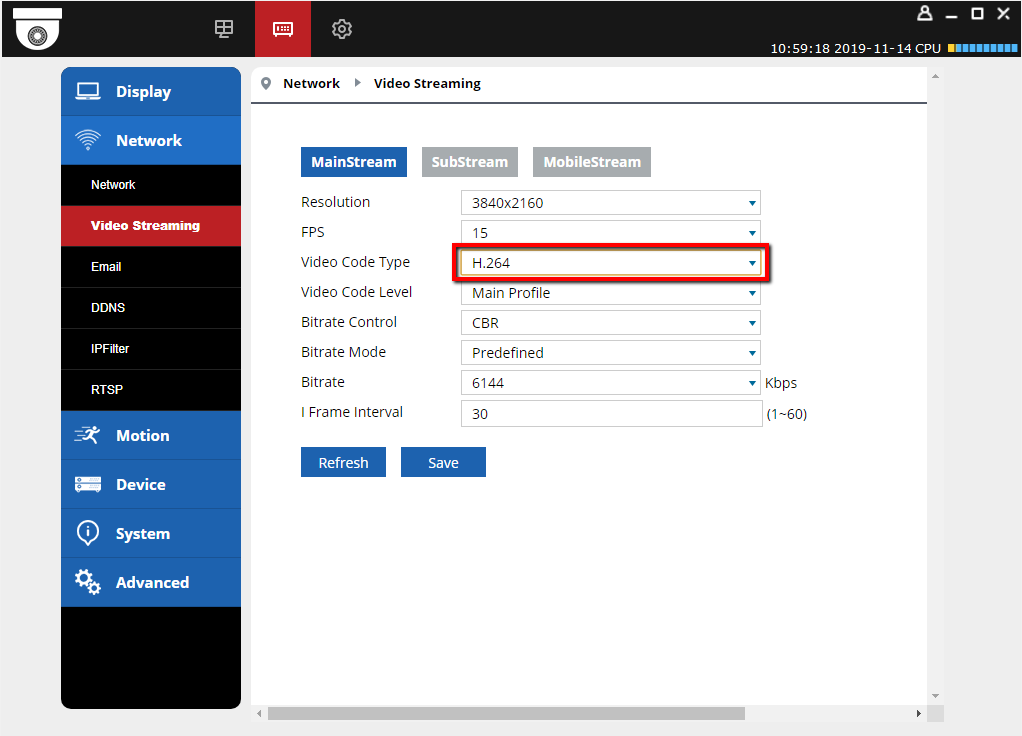
Navigate to the “Video Streaming” Menu
This menu is located in the “Remote Setting” > “Network” tab.
In the “Video Streaming” Menu, Change the “Video Codec Type” setting to “H.264”
Change your Camera’s IP Network Type to Static
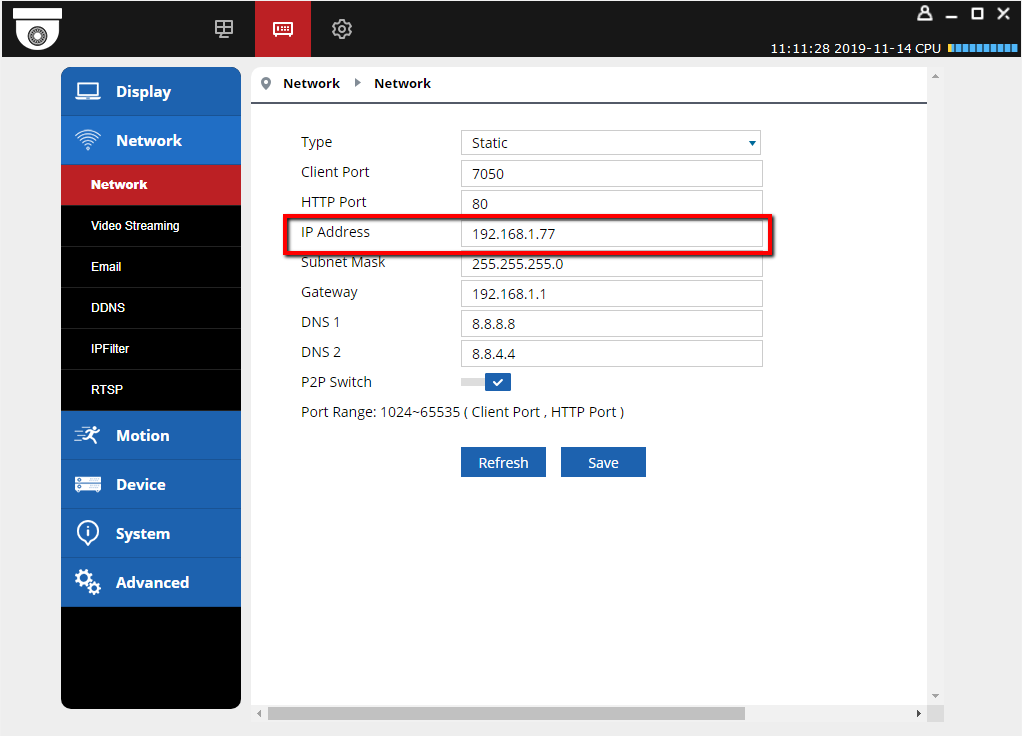
Navigate to the Network menu (“Remote Setting” > “Network” > “Network”) and change your IP network type from “DHCP” to “Static.” Also while you’re here, take note of your camera’s IP address, as you will need this whenever you enter it into your NVR.
In our example, we’ll take note of the IP address 192.168.1.77.
Proceed to your NVR and add your R-Series camera via the ONVIF protocol.
The exact steps you take here will vary. Click here if you’re using an H-Series or a Hikvision NVR. Click here if you’re using a Dahua NVR. If your NVR is a different brand, you may still want to read these articles to get the general idea. You’ll still be able to use these basic principles.
How to Add Your R-Series NVR to a Dahua NVR
This guide will walk you through setting up your R-Series camera on a Dahua NVR. If you haven’t already, read this guide to ensure your camera is properly setup for third party NVR integration.
There are two different methods you can use to connect your R-Series camera to a Hikvision NVR. It all depends on how you have it wired.
Do you have your R-Series camera connected to a router or a PoE switch separate from your NVR? Or do you have your R-Series camera connected to the built-in PoE switch on the NVR itself?
Your Camera is Connected to a Switch that is Separate from the NVR:
Log into the Dahua NVR web interface.
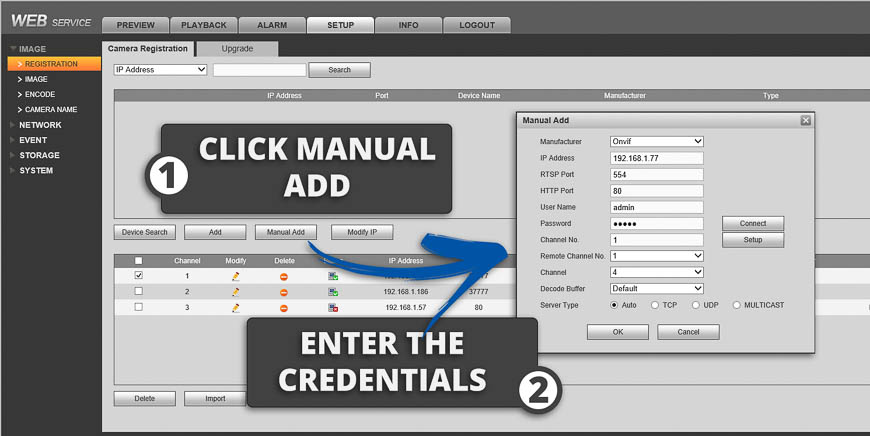
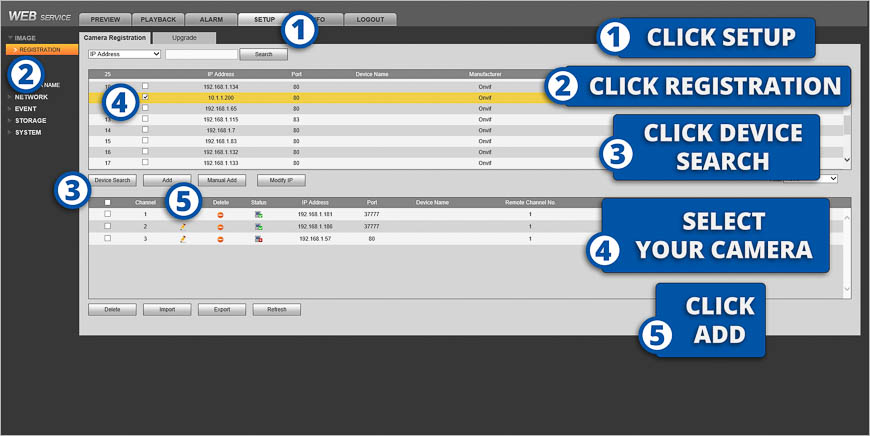
Navigate to Setup > Registration
Click “Manual Add” and Enter the Following Credentials
| 1 | Channel: | Desired channel |
|---|---|---|
| 2 | Manufacturer: | ONVIF |
| 3 | IP Address: | Enter camera’s IP address from Step 2. |
| 4 | Port: | 80 |
| 5 | Username: | admin |
| 6 | Password: | admin |
Be sure to click “Save.”
Congrats! You should now see your R-Series camera on the NVR.
Your Camera is Connected Directly to the POE Switch Built Into the Back of the Dahua NVR:
Log Into Your Camera via Camviewer and Change the Following Credentials.
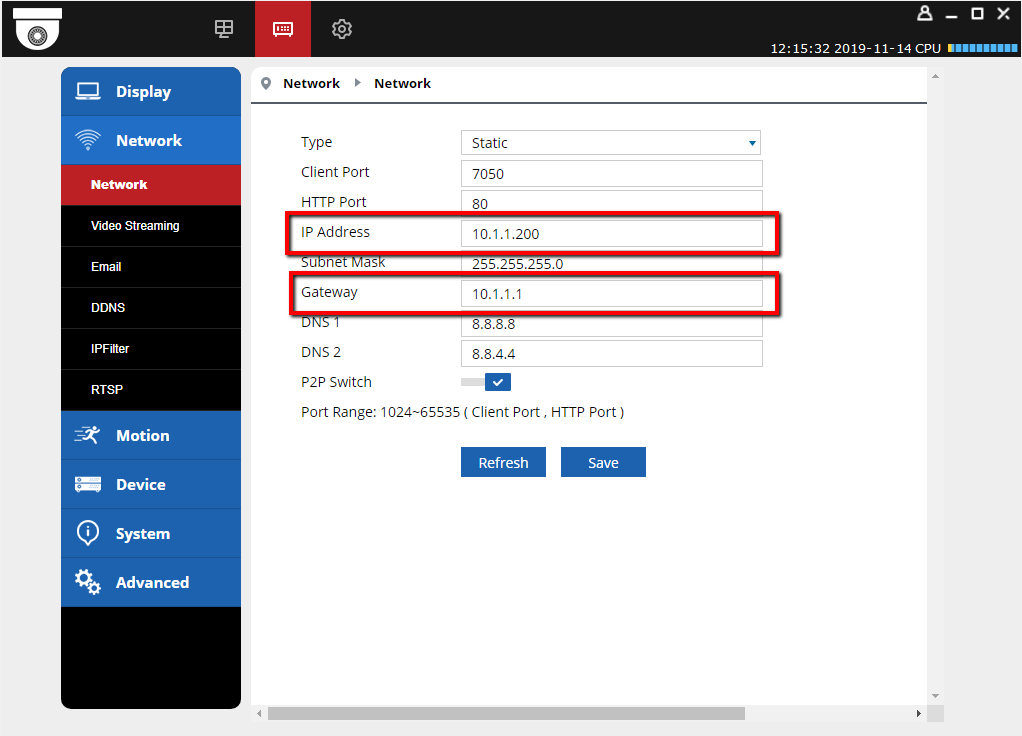
While your camera is still plugged into your main network (not the NVR), log into the camera using the CamViewer software and visit the network settings.
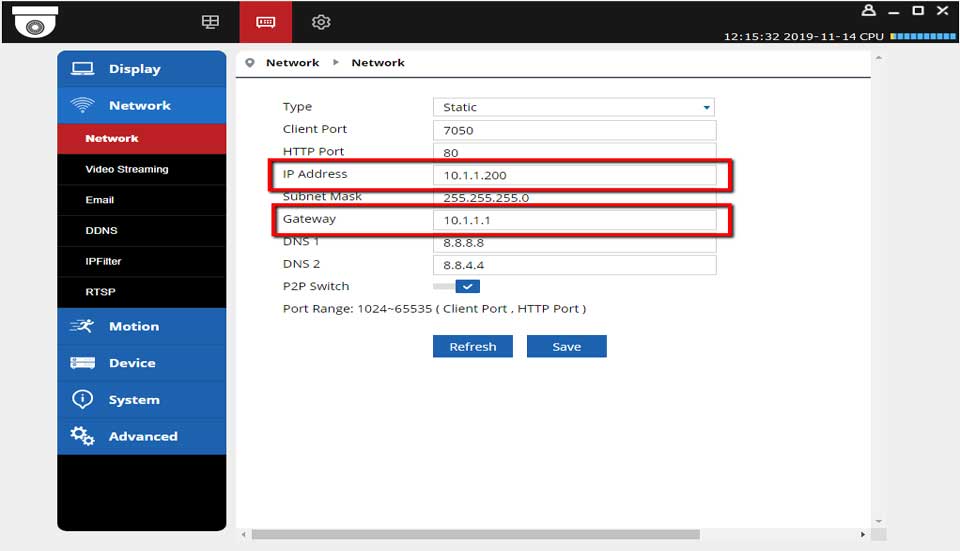
Change the IP address to 10.1.1.200
Change the gateway to 10.1.1.1
Finally, click Save.
Plug your camera back into the NVR
Allow two minutes or so for the camera to boot back up. Visit the Dahua NVR’s web interface, specifically the camera Registration Page.
Click on “Device Search”
You should now see the R-Series camera’s IP address listed.
Checkmark the box and click Add:
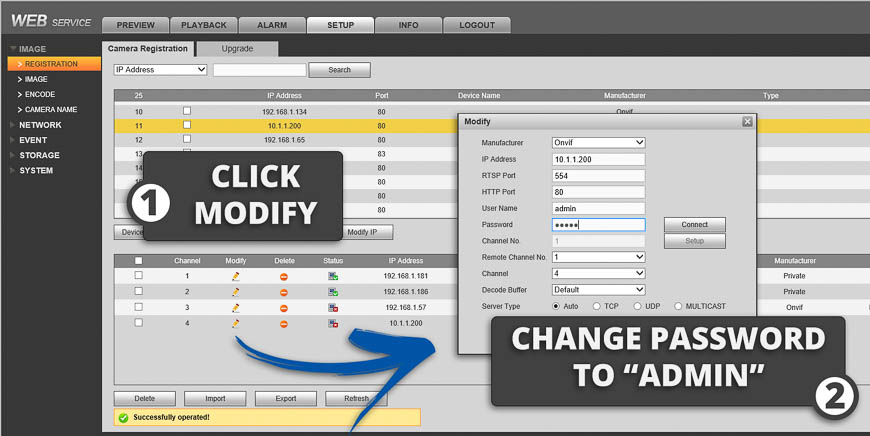
Click “Modify.”
Change the camera’s password to match your R-Series camera’s password. By defualt it is: admin.
Congrats! You should now be able to see your R-Series camera on your Dahua NVR.
How to Add Your R-Series cameras to an H-Series or Hikvision NVR
This guide will walk you through setting up your R-Series camera on an H-Series or a Hikvision NVR. If you haven’t already, read this guide to ensure your camera is properly setup for third party NVR integration.
There are two different methods you can use to connect your R-Series camera to a Hikvision NVR. It all depends on how you have it wired.
Do you have your R-Series camera connected to a router or a PoE switch separate from your NVR? Or do you have your R-Series camera connected to the built-in PoE switch on the NVR itself?
Your Camera is Connected to a Router or PoE Switch Separate from the NVR:
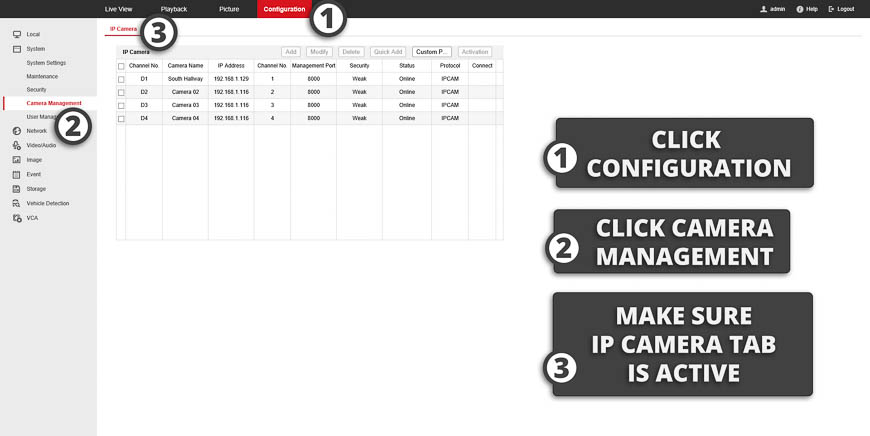
Log into your Hikvision NVR’s web interface and navigate to the Camera Management section:
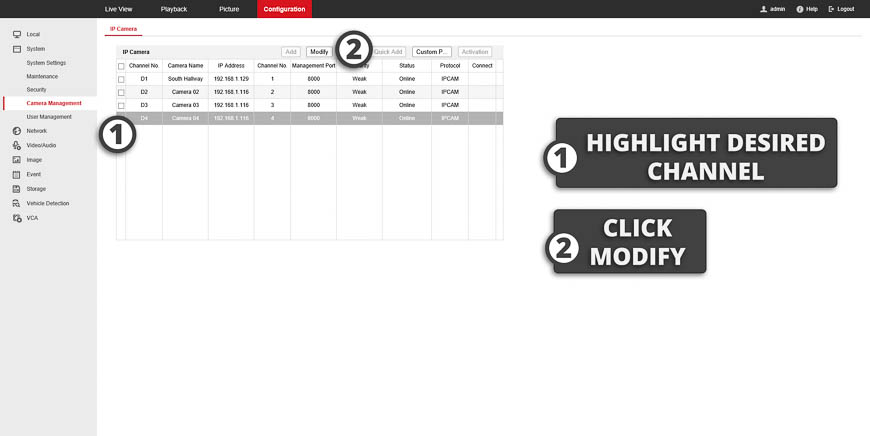
Highlight the channel onto which you want to add the R-Series camera and click “Modify.”
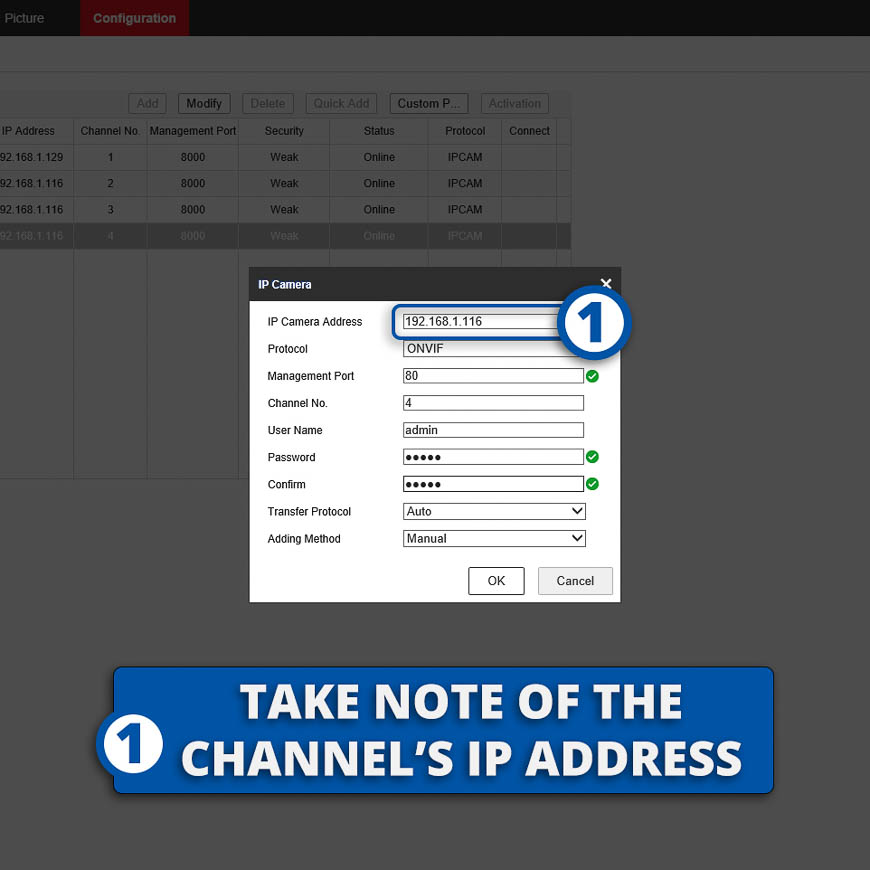
Change the credentials to match your camera’s credentials
| 1 | IP Address: | Enter your camera’s IP Address |
|---|---|---|
| 2 | Protocol: | ONVIF |
| 3 | Port: | 80 |
| 4 | User Name: | admin |
| 5 | Password: | admin |
| 6 | Transfer Protocol: | auto |
| 7 | Adding Method: | Manual |
Congrats! You should now see your R-Series camera on the NVR.
Your Camera is Connected Directly to the PoE Switch Built Into the Back of the NVR:
Log into your Hikvision NVR’s web interface and navigate to the Camera Management section:
Highlight the channel onto which you want to add your R-Series camera and click “Modify.”
Enter the Following Credentials
| 1 | IP Address: | Don’t change; take note of this. |
|---|---|---|
| 2 | Protocol: | ONVIF |
| 3 | Port: | 80 |
| 4 | Channel: | Desired Channel |
| 5 | User Name: | admin |
| 6 | Password: | admin |
| 7 | Transfer Protocol: | auto |
| 8 | Adding Method: | Manual |
Log Into Your Camera via Camviewer and Change the Following Credentials.
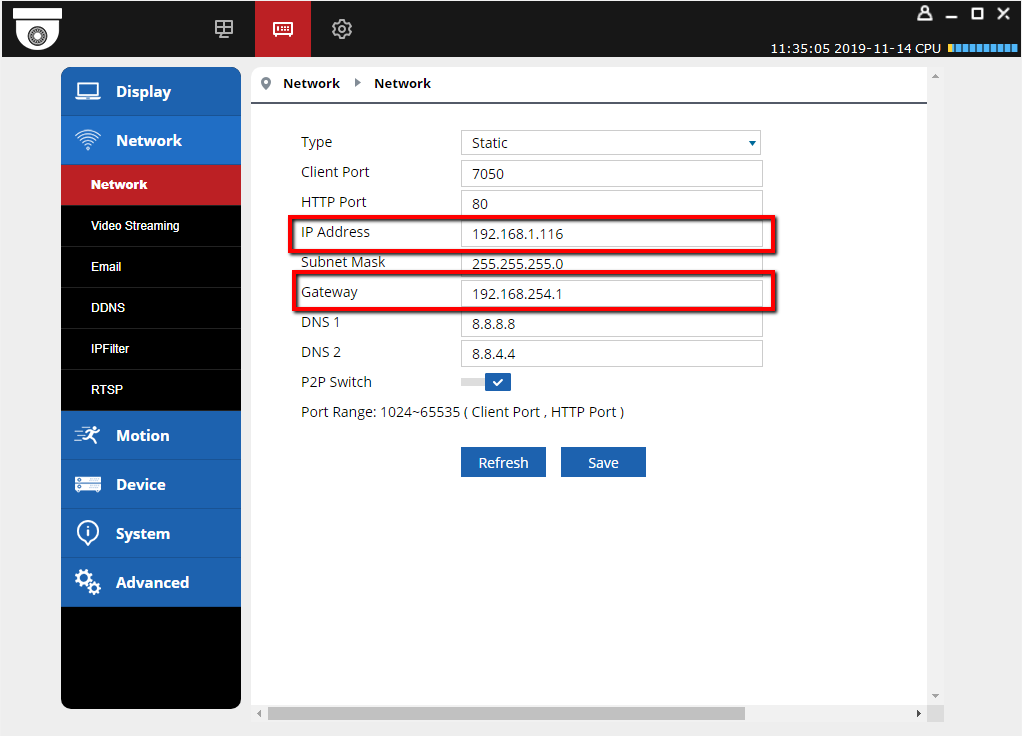
While your camera is still plugged into your main network (not the NVR), log into the camera using the CamViewer software and visit the network settings. Change the following credentials:
| 1 | IP Address | Change this to the IP address from step three. |
|---|---|---|
| 2 | Gateway: | 192.168.254.1 |
Be sure to click Save when done.
Plug your camera back into the NVR
Be sure to plug it into the port that coincides with the channel you configured back in step 2. Wait a couple of minutes for the camera to boot up and you should see your camera on the NVR.
How To Configure AI Deterrent Capabilities
Certain R-Series Camera Models support deterrent functionality. Such as a Strobe Light, or Siren. These features can be triggered via AI Event which is configured in the camera via Camviewer Pro VMS Software, or it’s web interface via web browser.
In this guide, we will be referencing the Web Interface of camera model “M8T-DT“.
Step 1 – Disabling “Smart” Basic Motion Detection
At the time of writing this guide, these cameras require that you disable the basic, grid-based motion detection first before being able to enable the AI Events for the Deterrent Capability.
If “Smart” Basic Motion is not disabled, You will get a “Failed” message when trying to enable an AI Event.
From the Live View of the Camera, select Remote Setting -> Event -> Setup -> Motion
Then either disable Motion altogether or just the “Smart Motion Detection“.
After the toggle has been set to Off, click Save.
Step 2 – Setting Up AI Event
The camera in reference to this guide only has 2 AI Events: LCD (Line Cross Detection) & PID (Perimeter Intrusion Detection). We will be setting up Line Crossing.
From the Live View, select Remote Setting -> AI -> Setup -> LCD
Then select Enable. Afterwards, you’ll be able to click on the Live View window to the Right side to draw your line.
Once all the parameters have been set to your liking, hit Save.
Step 3 – Configuring Deterrence Actions
Now that an AI event has been enabled, we can configure the deterrent functions.
First, lets enable the Light and/or Siren depending on your requirements.
From the Live View of the Camera, select Remote Setting -> Event -> Setup -> Deterrence.
Depending on what “Image Setting” Mode the camera is configured to, there will be different Light options available.
- Light – Visible White Flood Light
- Duration – Seconds
- Deterrence Mode:
- Light Warning – Solid Flood Light
- Light Strobe – Strobe
- Strobe Frequency will be how fast the light strobes.
- Warning Light – Red & Blue Lights
- Duration – Seconds
Once the Deterrence Light settings have been configured, hit Save.
To access the Siren Settings, Go to Remote Setting -> Event -> Setup -> Custom Voice.
There is only 1 pre-configured Alarm sound to choose. So all that is needed to be done is enabling, choosing the loudness, and duration, then select Save.
Step 4 – Enabling Deterrent Linkage To AI Event
Now that the AI event, and the deterrent features are configured, lets link them together!
Go to Remote Setting -> AI -> Alarm -> LCD
Then set the toggle icon to ON for whichever Feature you would like to use per the Event Trigger.
Light(s) – Deterrent
Siren – Custom Voice
Next, Select the Schedule Icon and ensure the Light & Sirens are set to the proper scheduling.
After the toggles and scheduling are set, hit Save
How To Configure Basic Deterrent Functionality
Certain R-series cameras have Built-in Deterrent Functions. This is great for if you want an Event-based Strobe or Flood Light action to trigger.
In this guide, we are referencing the Web Interface to the M5T-NC.
Please Note
In order for the deterrent functionality to be available, the camera must be in Day/Night Mode in its Image Settings.
Configuring Deterrence Setting
First, you must enable the Deterrent capabilities in the camera but going to Device Settings -> Event -> Setup -> Deterrence
- Light – Enables the Deterrent Light
- Duration – Sets the amount of time the deterrent function will be enabled for once triggered
- Color Image – The Camera will switch from Black&White to Color in order to get a quality image on the Event Trigger.
- Deterrence Mode:
- Light Warning – White LED will be solid for the duration set
- Light Strobe – White LED will strobe for the duration & frequency set
- Sensitivity – From 1 to 8, with 8 Being the highest sensitivity and 1 being the lowest
Linking Deterrent to AI Event
Go into Device Settings -> AI -> Motion
Select the specific event you want the deterrence light to be triggered by, then enable Deterrent.
How To Reset an R-series Password
Step 1. Download The Device Configuration Tool
You can Download the Device Configuration Tool Here
Step 2. Locate The MAC Address of the Device
Step 3. Email The MAC Address over to the Support Team
customerservice@nellyssecurity.com
Step 4. The Team Will Send Over a Generated Code
Please Note
This Code is good for That Day Only. If you need one for a later date, definitely mention that.
Step 5. From The Config Tool, Go into the Config Tab
- Enter the IP address and media port of the Device
- Admin will be the username
- The password will be the generated code the support team sent over
- Once logged in, click on the “user” tab and insert a new password for your device.
- Click “set”
