Views: 25
Guides for Hikvision NVRs with V4 firmware, Hikvision NVRs (Network Video Recordes) are keeping moving forward. The NVR 3.0 fitted the basic video security management, while NVR 4.0 focused on AI function updates. Now, Hikvision NVR 5.0 leads the innovative change from traditional Network Video Recorders to AIoT NVRs. Serving as the domain center, AIoT NVR provides an intelligent platform as well as scenario-based applications, opening a new era of AIoT.
How do I use a Hikvision NVR’s “Virtual Host” feature?
One of the most successful selling points of a Hikvision NVR to many small-setup customers is the “Plug and Play” functionality that simplifies the setup process of their surveillance system. However, plugging a camera directly into a port on the NVR, unfortunately, does not allow you to access the camera via its own internal LAN IP using a browser due to it being on the NVRs internal network, and this can significantly reduce the number of configuration options you have access to.
The NVR does allow you to configure many options for each connected camera, but some essential features are only accessible via connecting to the camera itself (such as audio codec options). This was of course a big problem previously.
With the advent of newer firmware and models of NVR, Hikvision has introduced a feature called Virtual Host. Activating this feature turns your NVR into a “host” for the cameras allowing you to connect to them via a browser. Essentially, the NVR forwards all traffic received from your browser to the appropriate camera you’re trying to connect to, eliminating the biggest problem of plug and play functionality.
Step 1:
First of all, access your NVR via a web browser. If you do not know the LAN IP of your NVR, download Hikvision’s tool SADP tool, which scans your network for any Hikvision devices that are connected and allow you to see and change their network settings, including the IP address.
Step 2:
Once you’ve logged in, navigate to:
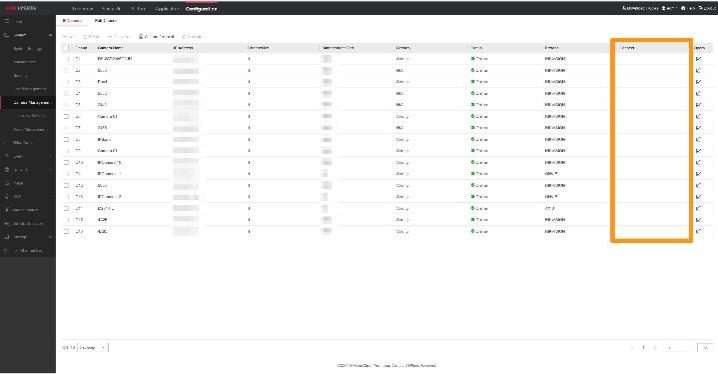
Configuration → System → Camera Management
This screen displays all the connected cameras on your NVR. Notice that the final column labelled “Connect” is currently empty. We’ll be coming back here in a moment.
Step 3:
Now, navigate to:
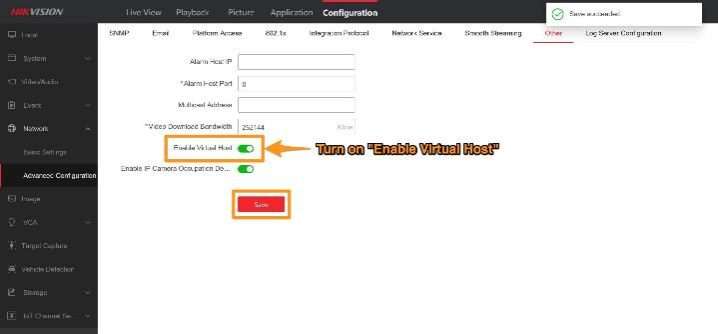
Network → Advanced Settings → Other
Turn on the Enable Virtual Host option.
Note – Your NVR will reboot when you click “Save“.
Step 4:
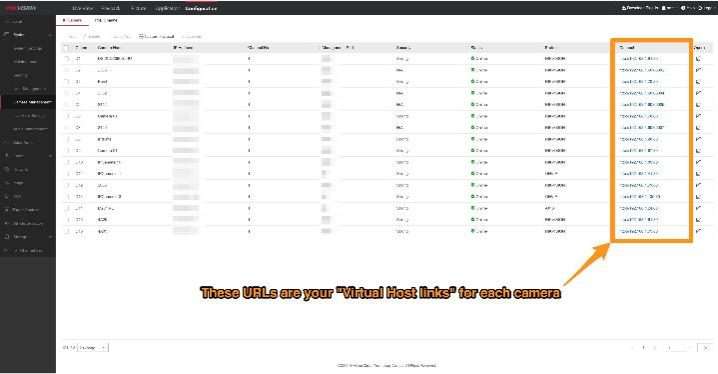
Now, navigate back to the Camera Management window from earlier. You’ll notice that the previously empty connect tab now features links for each camera currently connected to your NVR.
Step 5:
Click on any of these links to access the respective camera via your web browser:
That’s it, you’re done!
This should be useful when you want to access options on your camera that your NVR doesn’t feature. If you have any further questions feel free to ask, we’re happy to help.
Guides for Hikvision NVRs with V4 firmware
How do I view my Hikvision IP camera on a mobile device or tablet using the Hik-Connect app?
One of the biggest draws to Hikvision is the convenience of the free Hik-Connect app, which will allow you to view your devices remotely on a mobile phone or tablet wherever you are, without the complicated setups needed for a static IP, DDNS, or port forwarding.
Hik-Connect is designed with the primary focus of viewing your cameras. You do not get the same level of access to settings that you get connecting to your device in a web browser or in iVMS-4200, which we have found to be a common misconception amongst customers. It will, however, allow you to view and download recordings, manage notifications, remotely adjust PTZ and varifocal cameras, and operate any of the Hikvision video intercom modules that are connected to it, and use the audio features on those cameras that support it.
To get set up with the app, please follow the steps below:
Step 1:
Enable Hik-Connect in your device’s network settings:
On an NVR’s Local GUI:
If you are adding an NVR to Hik-Connect, you are able to do this first step by accessing the NVR’s local view on a directly connected monitor. First, go to:
System (Cog Icon) → Network → Advanced → Platform Access
Select Hik-Connect from the Access Type dropdown
Tick Enable
A popup should appear reminding you to read the service terms and privacy statement for using Hik-Connect. Once done, tick the box to indicate you have done so and then click OK.
If you would like to set an encrypt/lock the live view of any camera connected to the NVR to new devices, then tick the Enable Stream Encryption box.
Now, enter a 6-12 character verification code of your choice in the ‘Verification Code/Encr…’ field. We recommend using a combination of upper case letters, lower case letters, and numbers to keep this as secure as possible. Do not forget this code, as you will need to enter it in the app later on. If you have ticked the Enable Stream Encryption box, then this verification code is also the encryption key that you will need to unlock/be granted access to the cameras’ footage.
Now, just click Apply.
The Status should change to offline.
Hik-Connect Account Status should remain unchanged, as you are yet to add this to your Hik-Connect account, which will be covered in the next steps.
In a web browser:
Use the device’s local IP and admin credenials combination to log in to it in a web browser.
Then, go to:
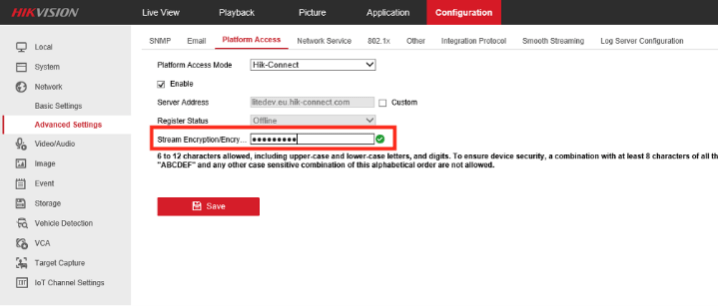
Configuration → Network → Advanced Settings → Platform Access
On this page, select Hik-Connect from the Platform Access Mode dropdown and tick Enable.
Don’t worry too much about the Server Address field, the default entry here is usually fine.
You’ll see this popup telling you that you’ll need to set a verification code, just click OK:
Now, enter a 6-12 character verification code of your choice in the Stream Encryption/Encry… field. We recommend using a combination of upper case letters, lower case letters, and numbers to keep this as secure as possible. Do not forget this code, as you will need to enter it when adding the device to your Hik-Connect account later on.
Now, click Save. The Register Status should change to Online – you may need to refresh the page before you see this.
Step 2:
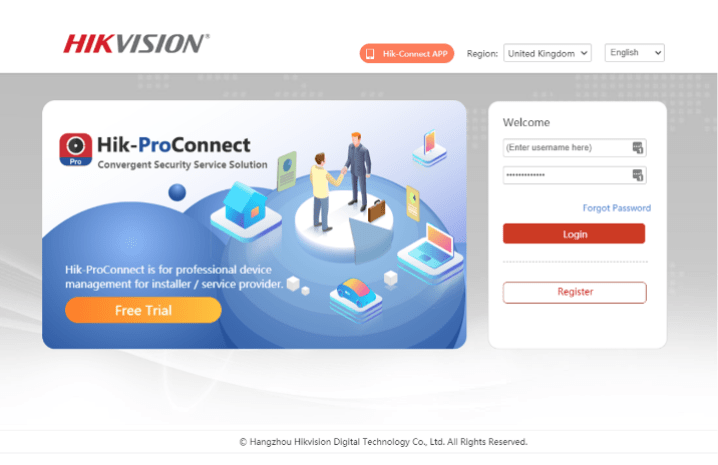
Now, navigate to the online Hik-Connect Portal in a web browser.
You should come to this page, you’ll need to create an account using the Register button if you don’t already have one, or log in with your Hik-Connect credentials if you do:
NB – These credentials are only used for logging in to your Hik-Connect account and are different to those you use to connect to and configure your device in a web browser or SADP (usually with the username “admin”).
Step 3:
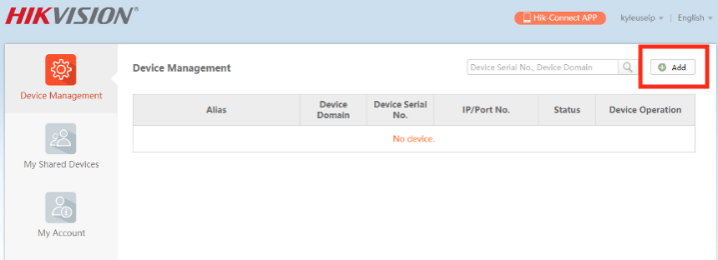
On this page, click on Add in the top-right hand corner:
Step 4:
You’ll be asked to enter the device’s serial number. This is a 9 digit number, usually starting with a letter, which can be found on the white label with a QR code on the device’s box, or on the device itself.
If you don’t have access to either of these, then you can find the shorter nine-digit serial number in SADP, by taking the last 9 digits from the long serial number shown in the tool for the device. This serial number will usually start with a letter with 8 numbers after it.
Click Search, which, provided your device is online, should find it and add it to your device list on the Device Management page.
Step 5:
Now, you need to install the Hik-Connect app on your phone or tablet.
If you’re an iOS user, then you can download the latest version of the app straight from Apple’s App Store.
If you’re an Android user, you’ll need to go to Hikivision’s App Store for this. The below guide covers how to download the app from here:
How-to: How to update the Hik-Connect App on your Android phone using Hikvision’s App Store
Once downloaded, launch the app and log in using the same Hik-Connect credentials that you used to log into the portal. Your device should be visible on the home page and will be accessible from here when your phone or tablet is connected to any network.
