Views: 19
Guarding Vision NVR First Setup, This is a step by step guide on how to setup a password on an NVR/DVR.This method is for when you are using a monitor/tv attached to the HDMI or VGA output on the back of the NVR/DVR. You will also need a mouse connected to the NVR/DVR
Setting Up Password on the NVR/DVR
This is a step by step guide on how to setup a password on an NVR/DVR.
Please Note
This method is for when you are using a monitor/tv attached to the HDMI or VGA output on the back of the NVR/DVR. You will also need a mouse connected to the NVR/DVR
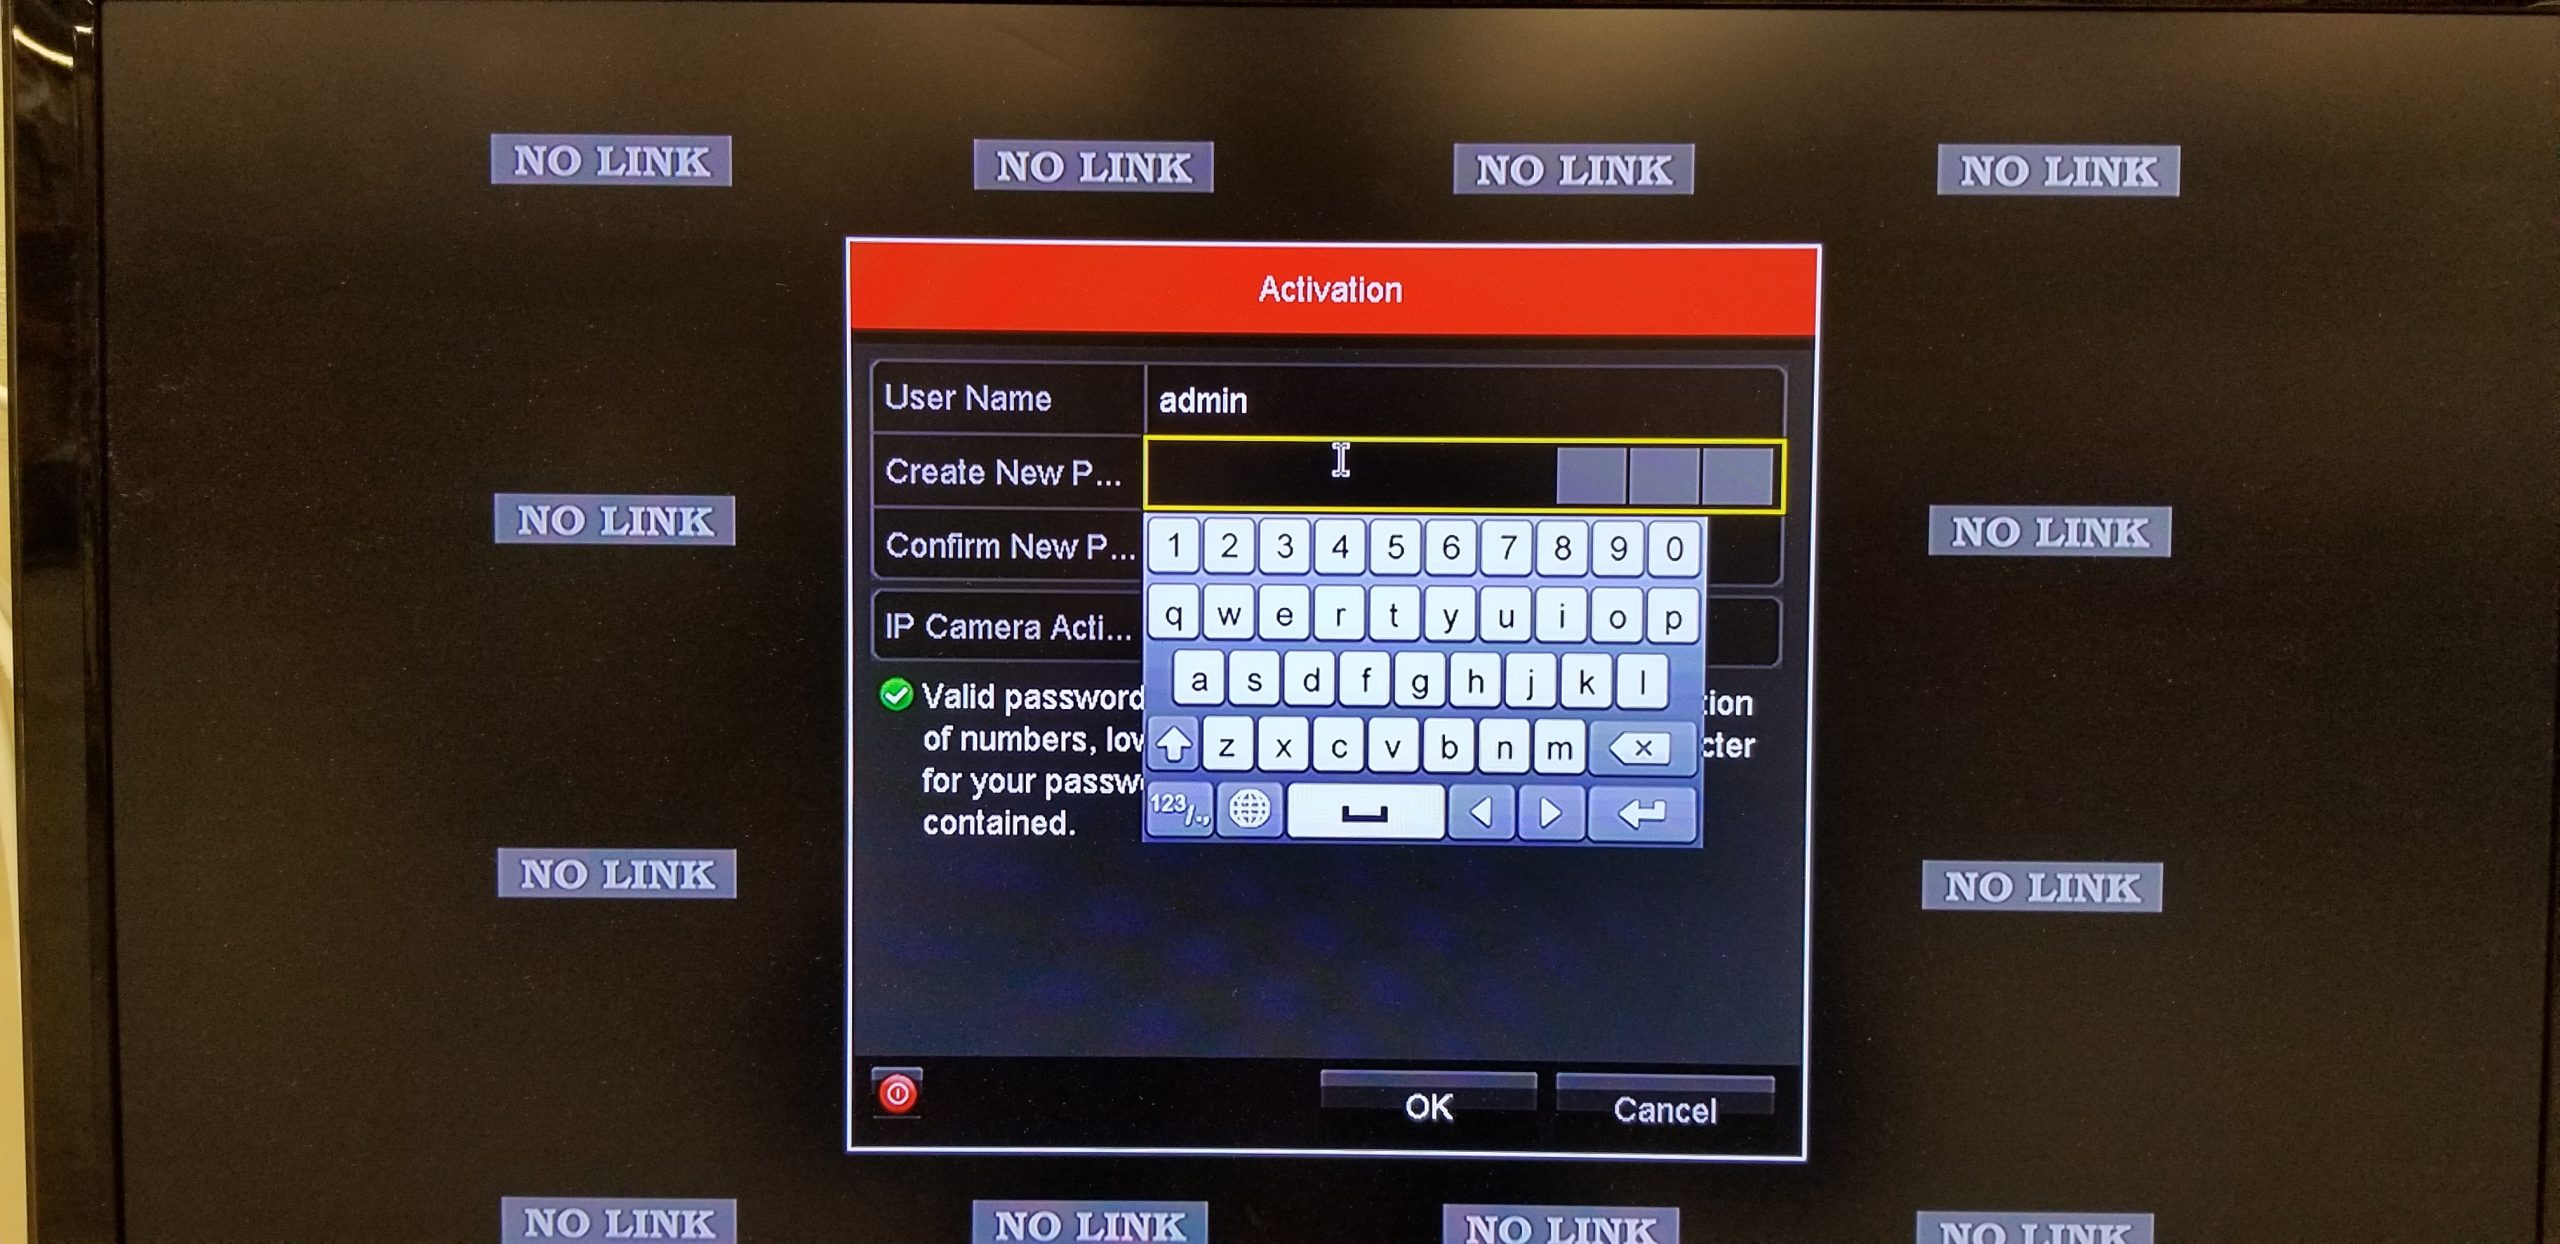
After your NVR/DVR is fully booted up you will be brought to the ‘Activation’ screen. In there you can click in the empty field and an on screen keyboard will popup. Using that keyboard you can setup a password.
Version 3.0 (Old User Interface)
User Name: admin (this is the default username)
Create New Password: New password can be setup in this field and will need to be between 8 to 16 characters. The password must be combination of letters and numbers.
Confirm New Password: You will simply retype the password in here to confirm it.
IP Camera Activation: Purpose of IP camera activation password is to setup a password which the NVR will give out to all the IP cameras which are plug n play with the system. It is best if we make this password the same as the NVR’s password
Guarding Vision NVR First Setup
Read Next :
- Guarding Vision FirmwareSoftware Tool Download
- Upgrading Hikvision DVR NVR Firmware 2023
- SAFIRE IP Cameras and recorders Firmwares
After your NVR/DVR is fully booted up you will be brought to the ‘Activation’ screen. In there you can click in the empty field and an on screen keyboard will popup. Using that keyboard you can setup a password.
Version 4.0 (New User Interface)
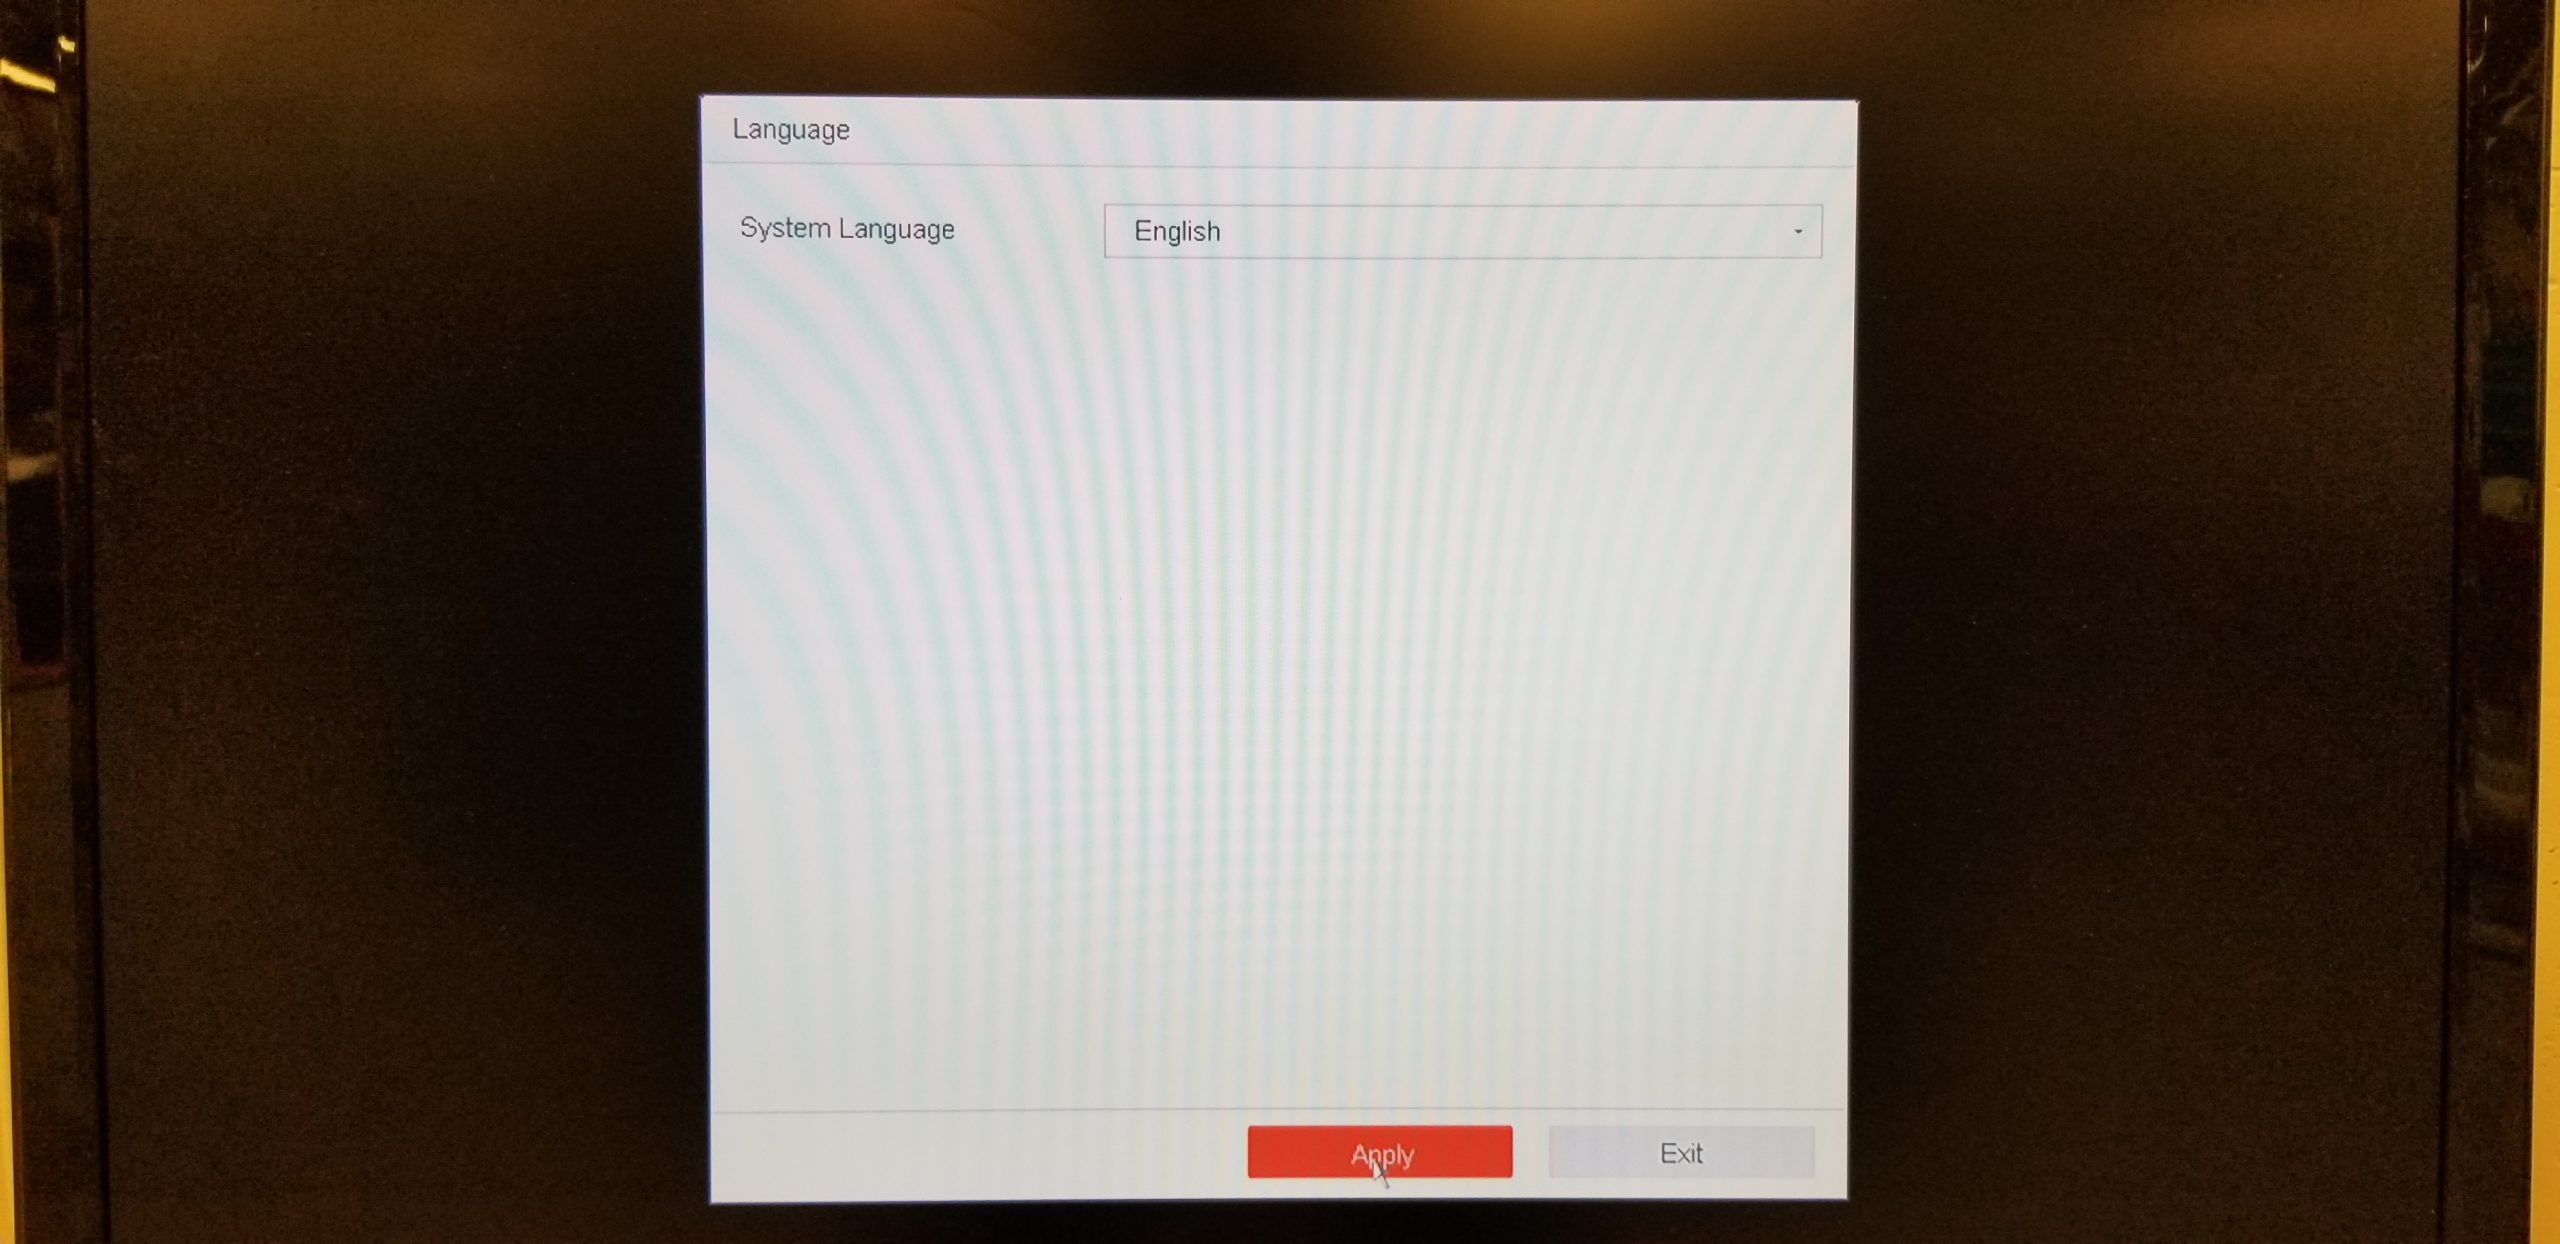
Step 1: Select the Language and Click Apply
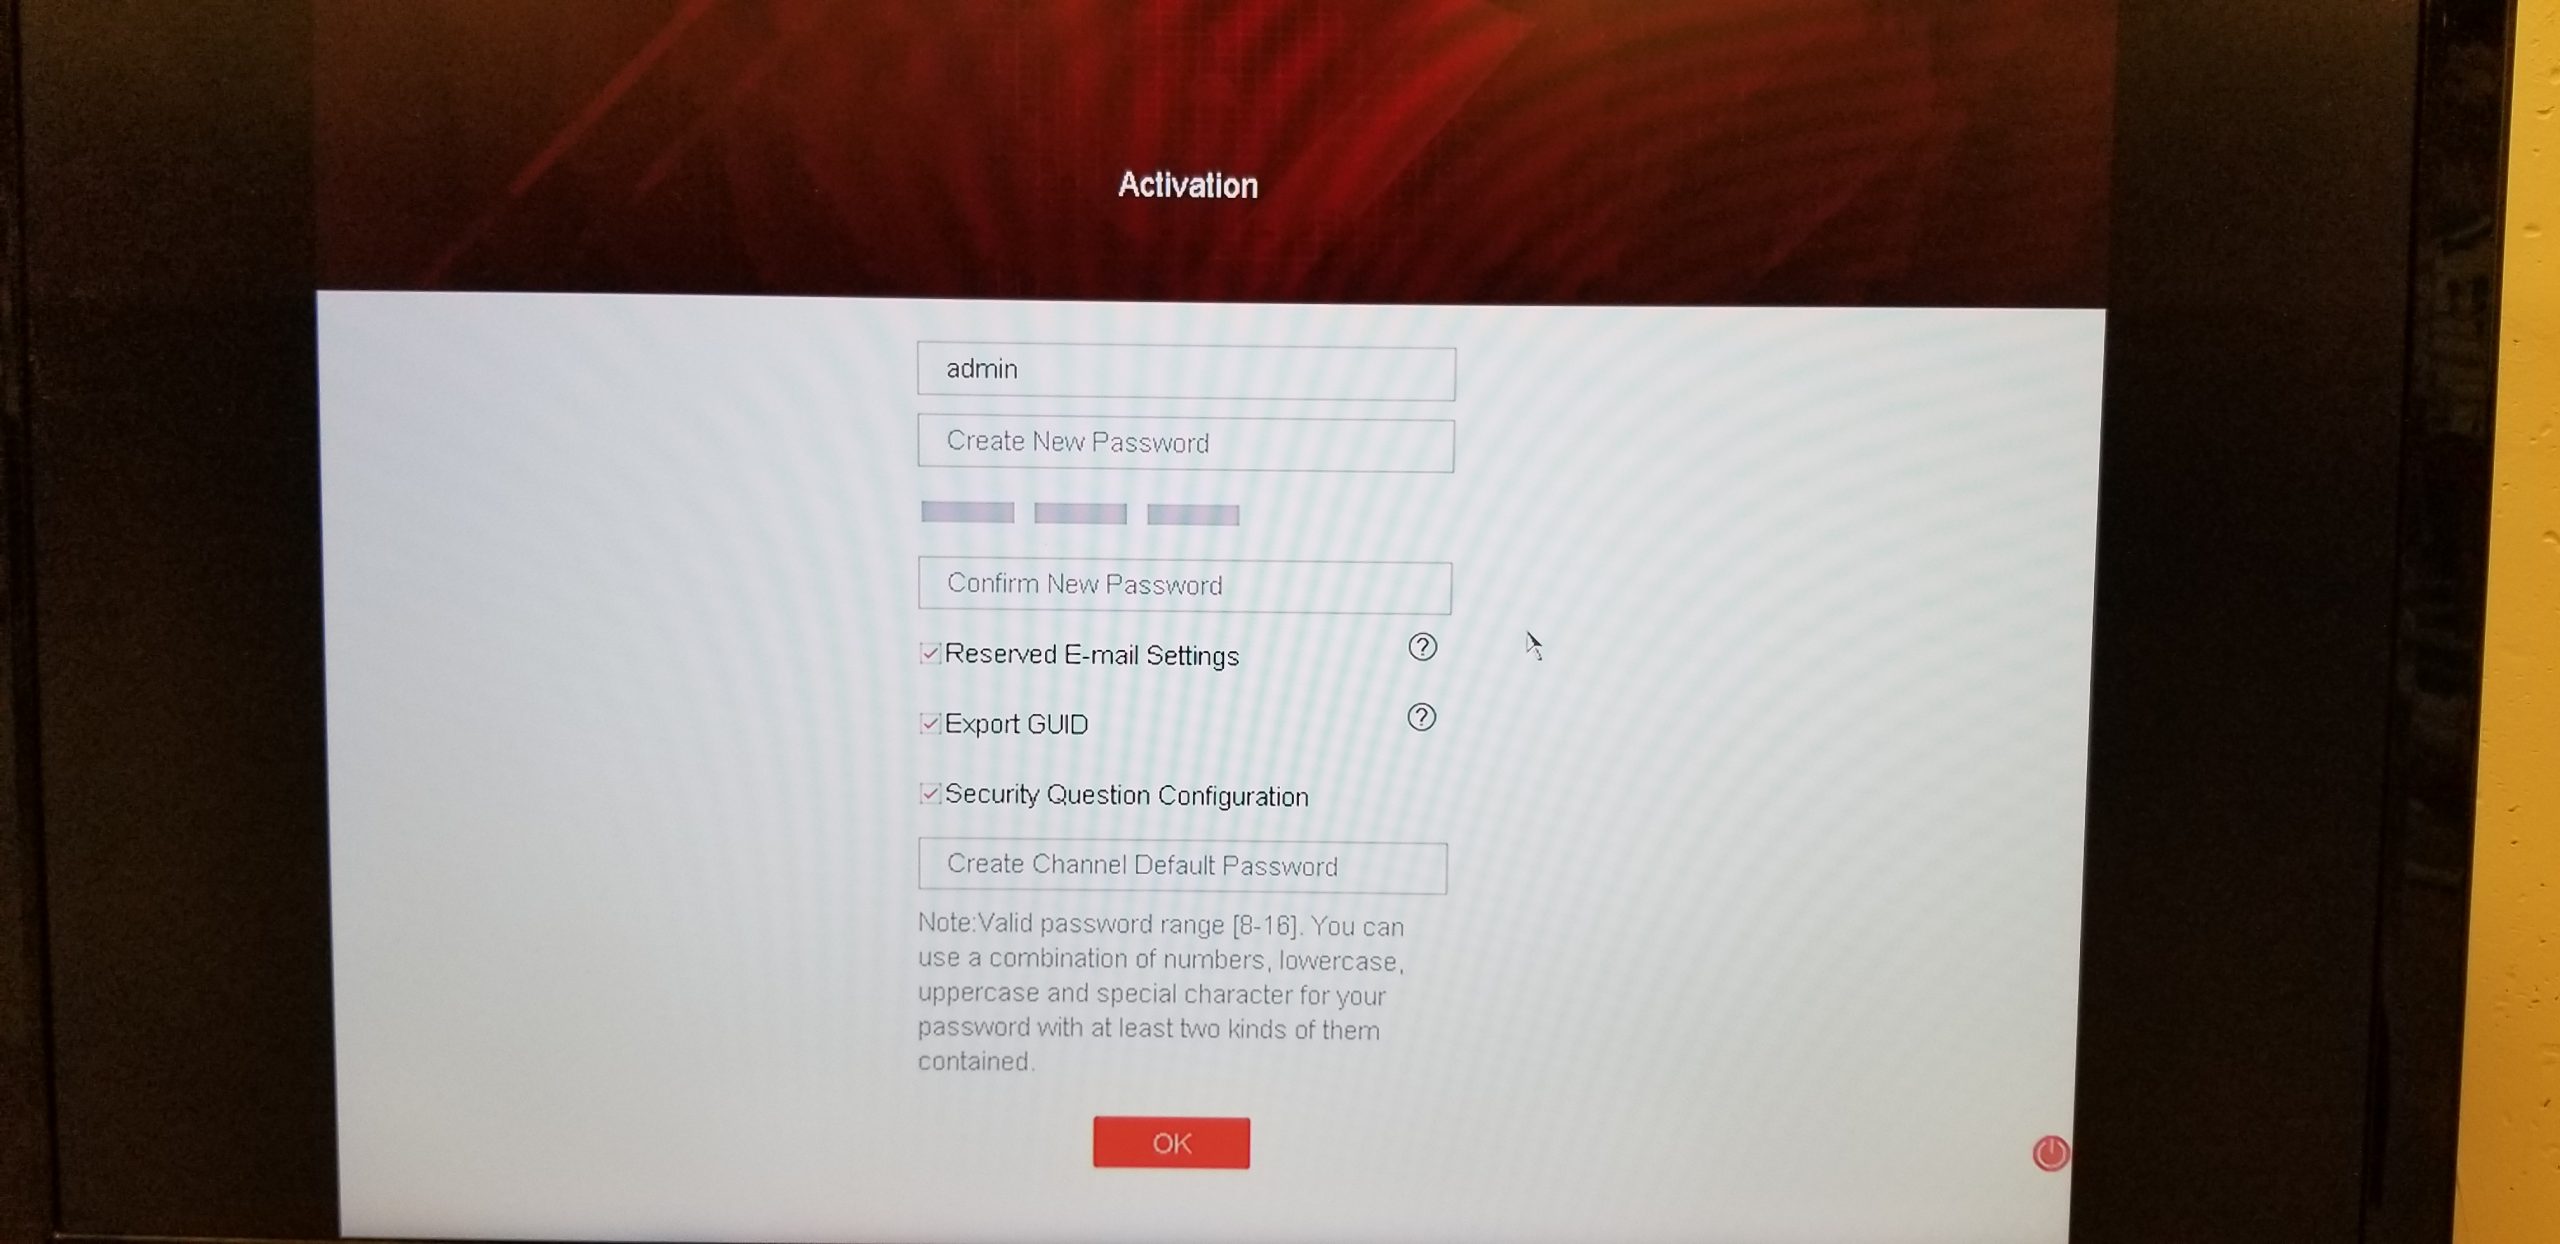
Step 2: Using the mouse click in each field to type in the password using on screen keyboard.
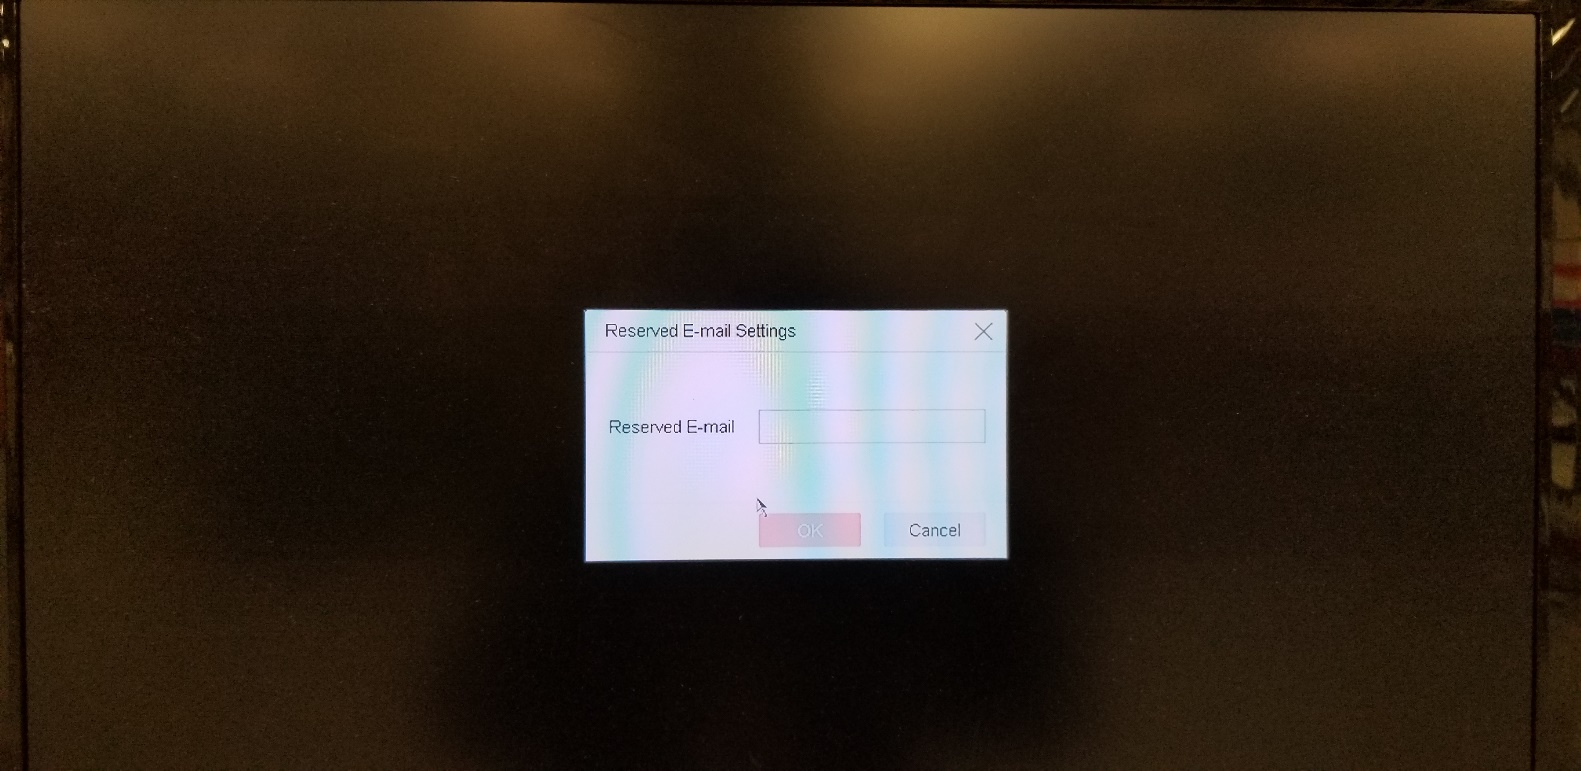
Reserved Email settings: When this option is Checked it will allow you to enter an email address on next screen which will be used to send a Verification code when the QR code is sent to the Server for password reset.
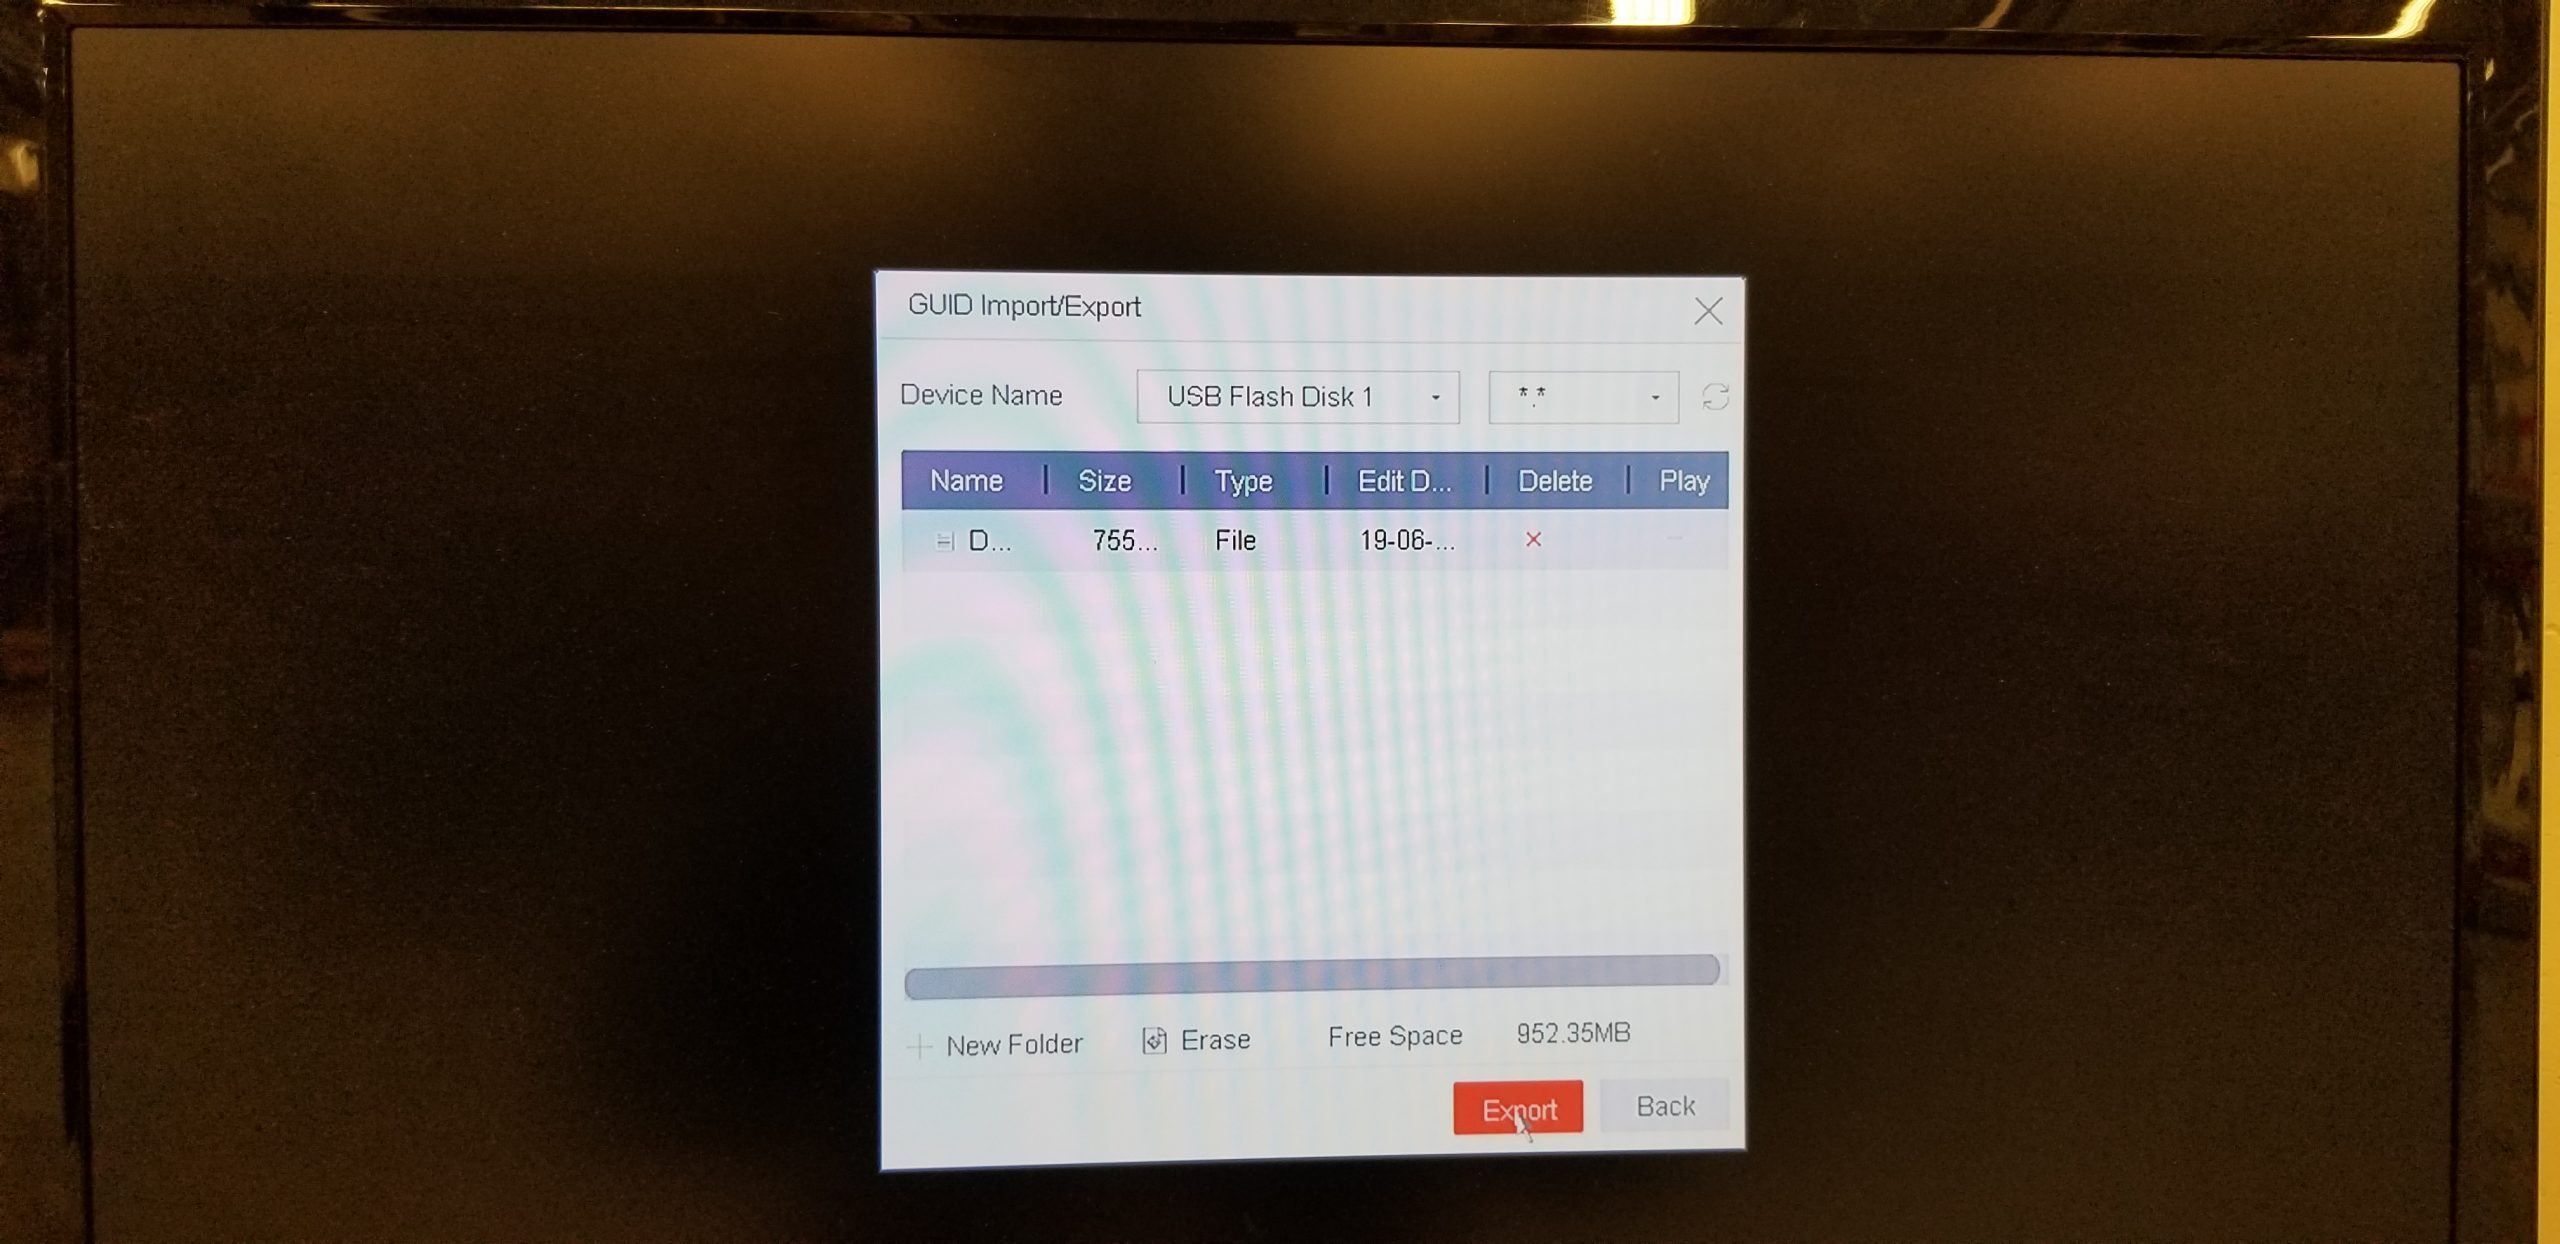
Export GUID: When this option is Checked it allows you to export GUID file which can later be used to recover the password of the NVR/DVR if needed. You will need to insert a USB Drive into the NVR/DVR in order to export the file.
Security Questions Configuration: When this option is checked it will allow you to setup security questions incase password recovery is needed in future. You will be required to answer the questions exactly as you enter them in order to reset the password.
Step 3: Input Reserved E-mail
Step 4: Select the folder in which you would like to save the GUID file, once the folder is highlighted Click Export.
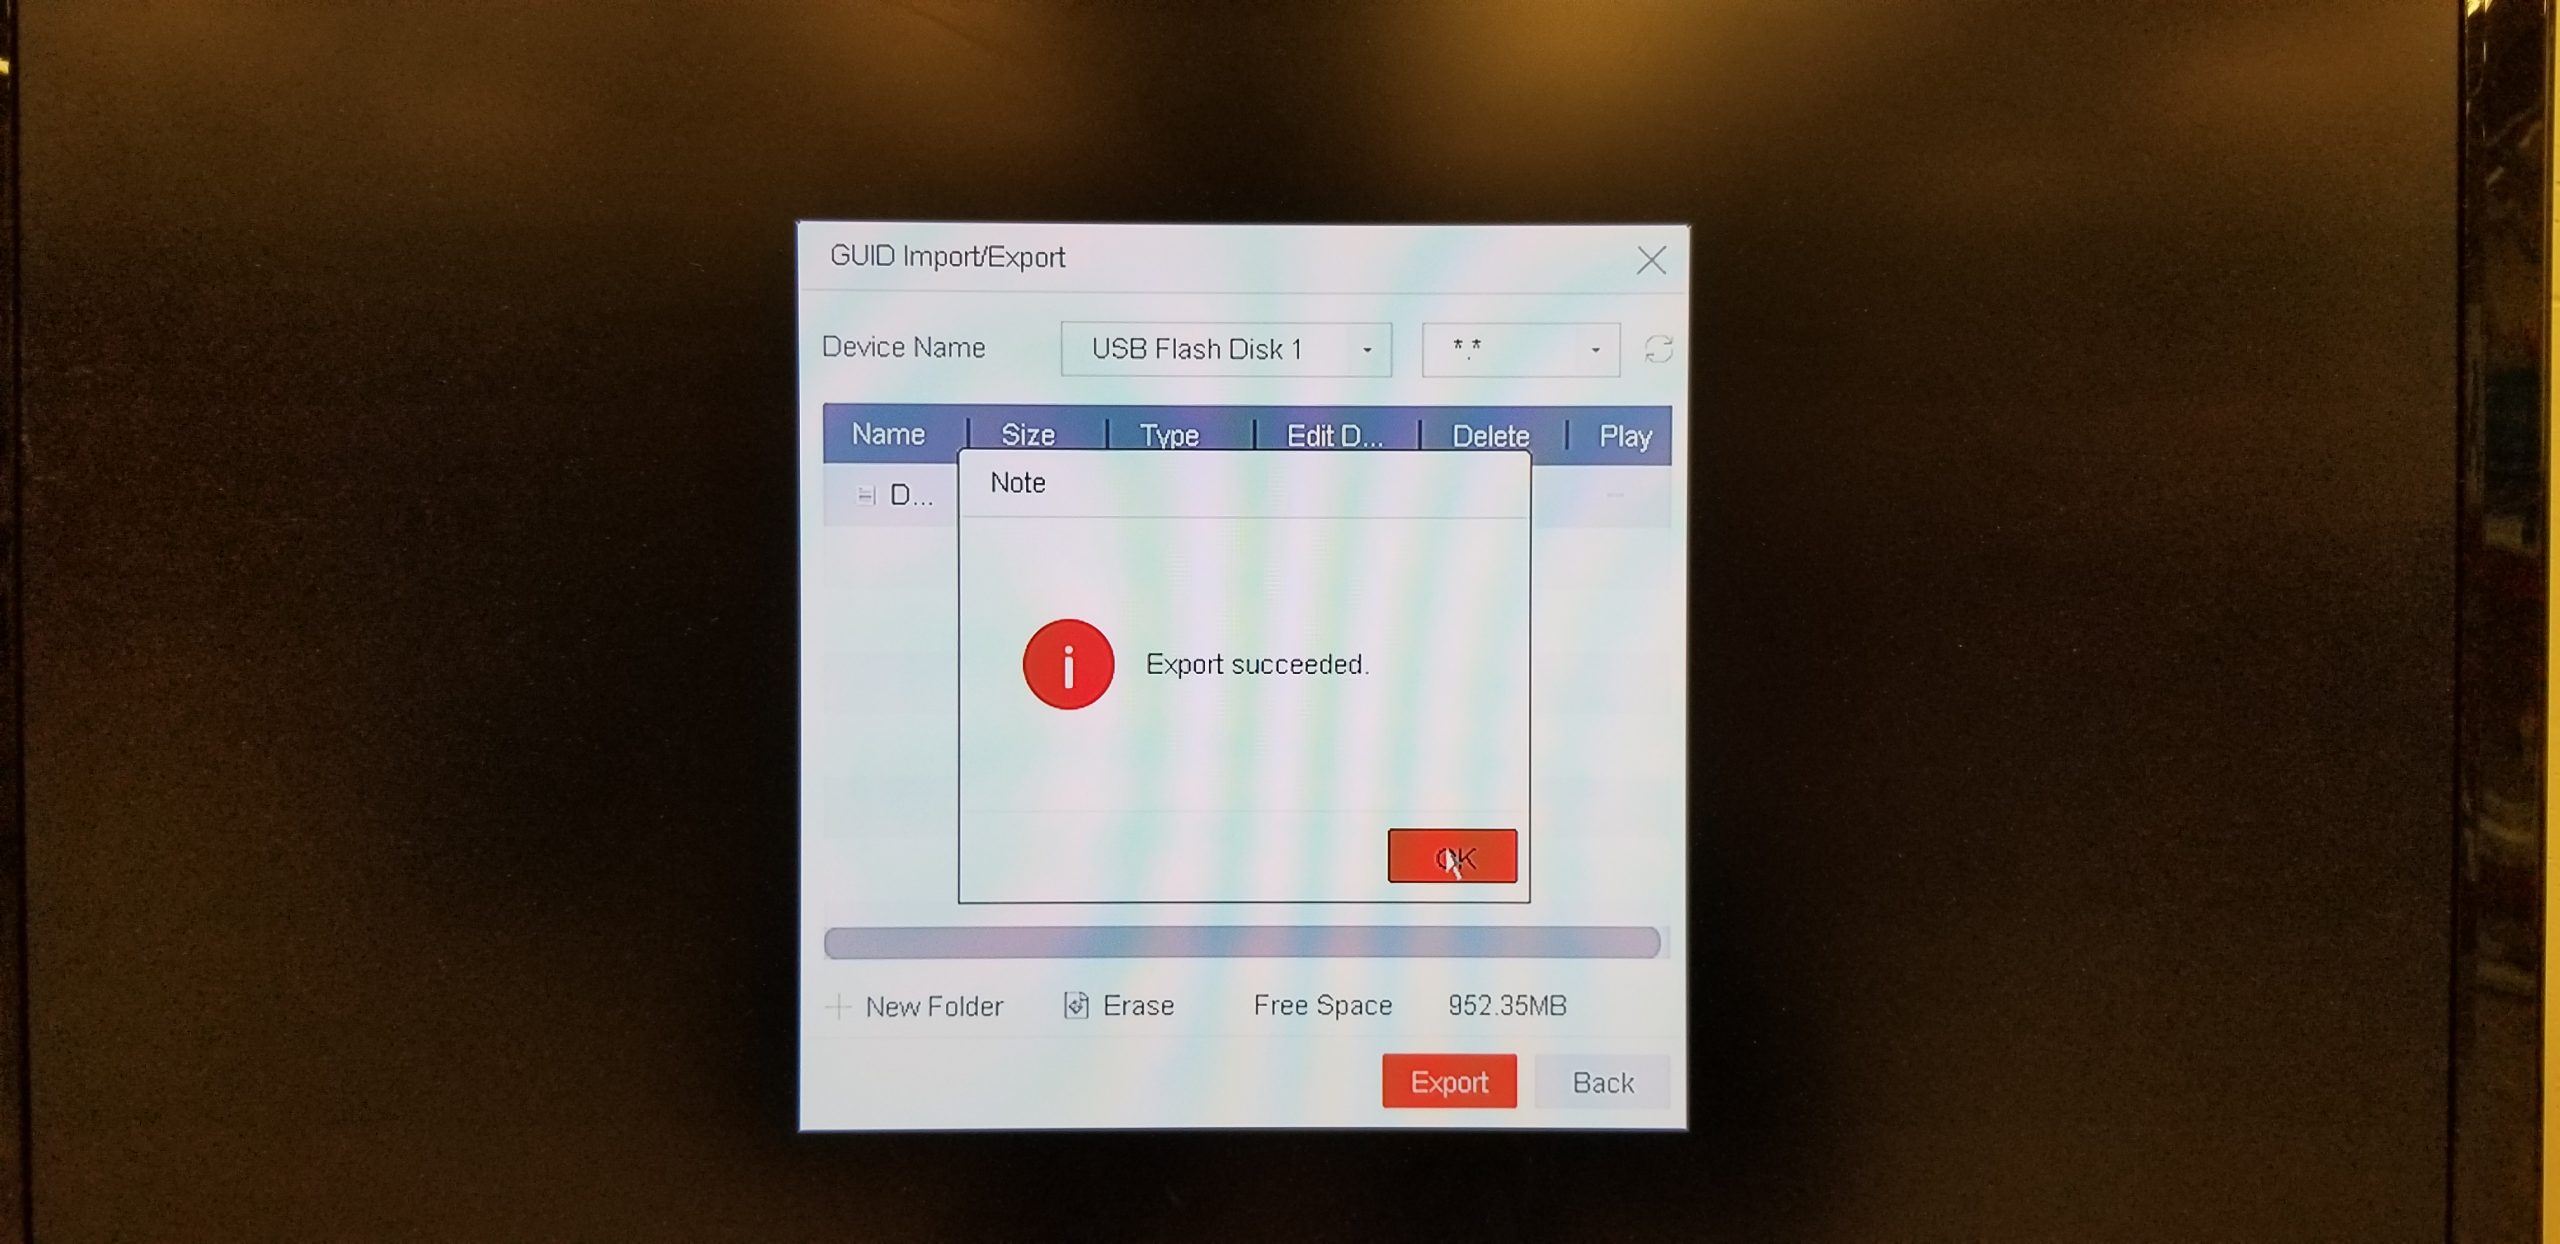
After the file has been exported you will receive confirmation.
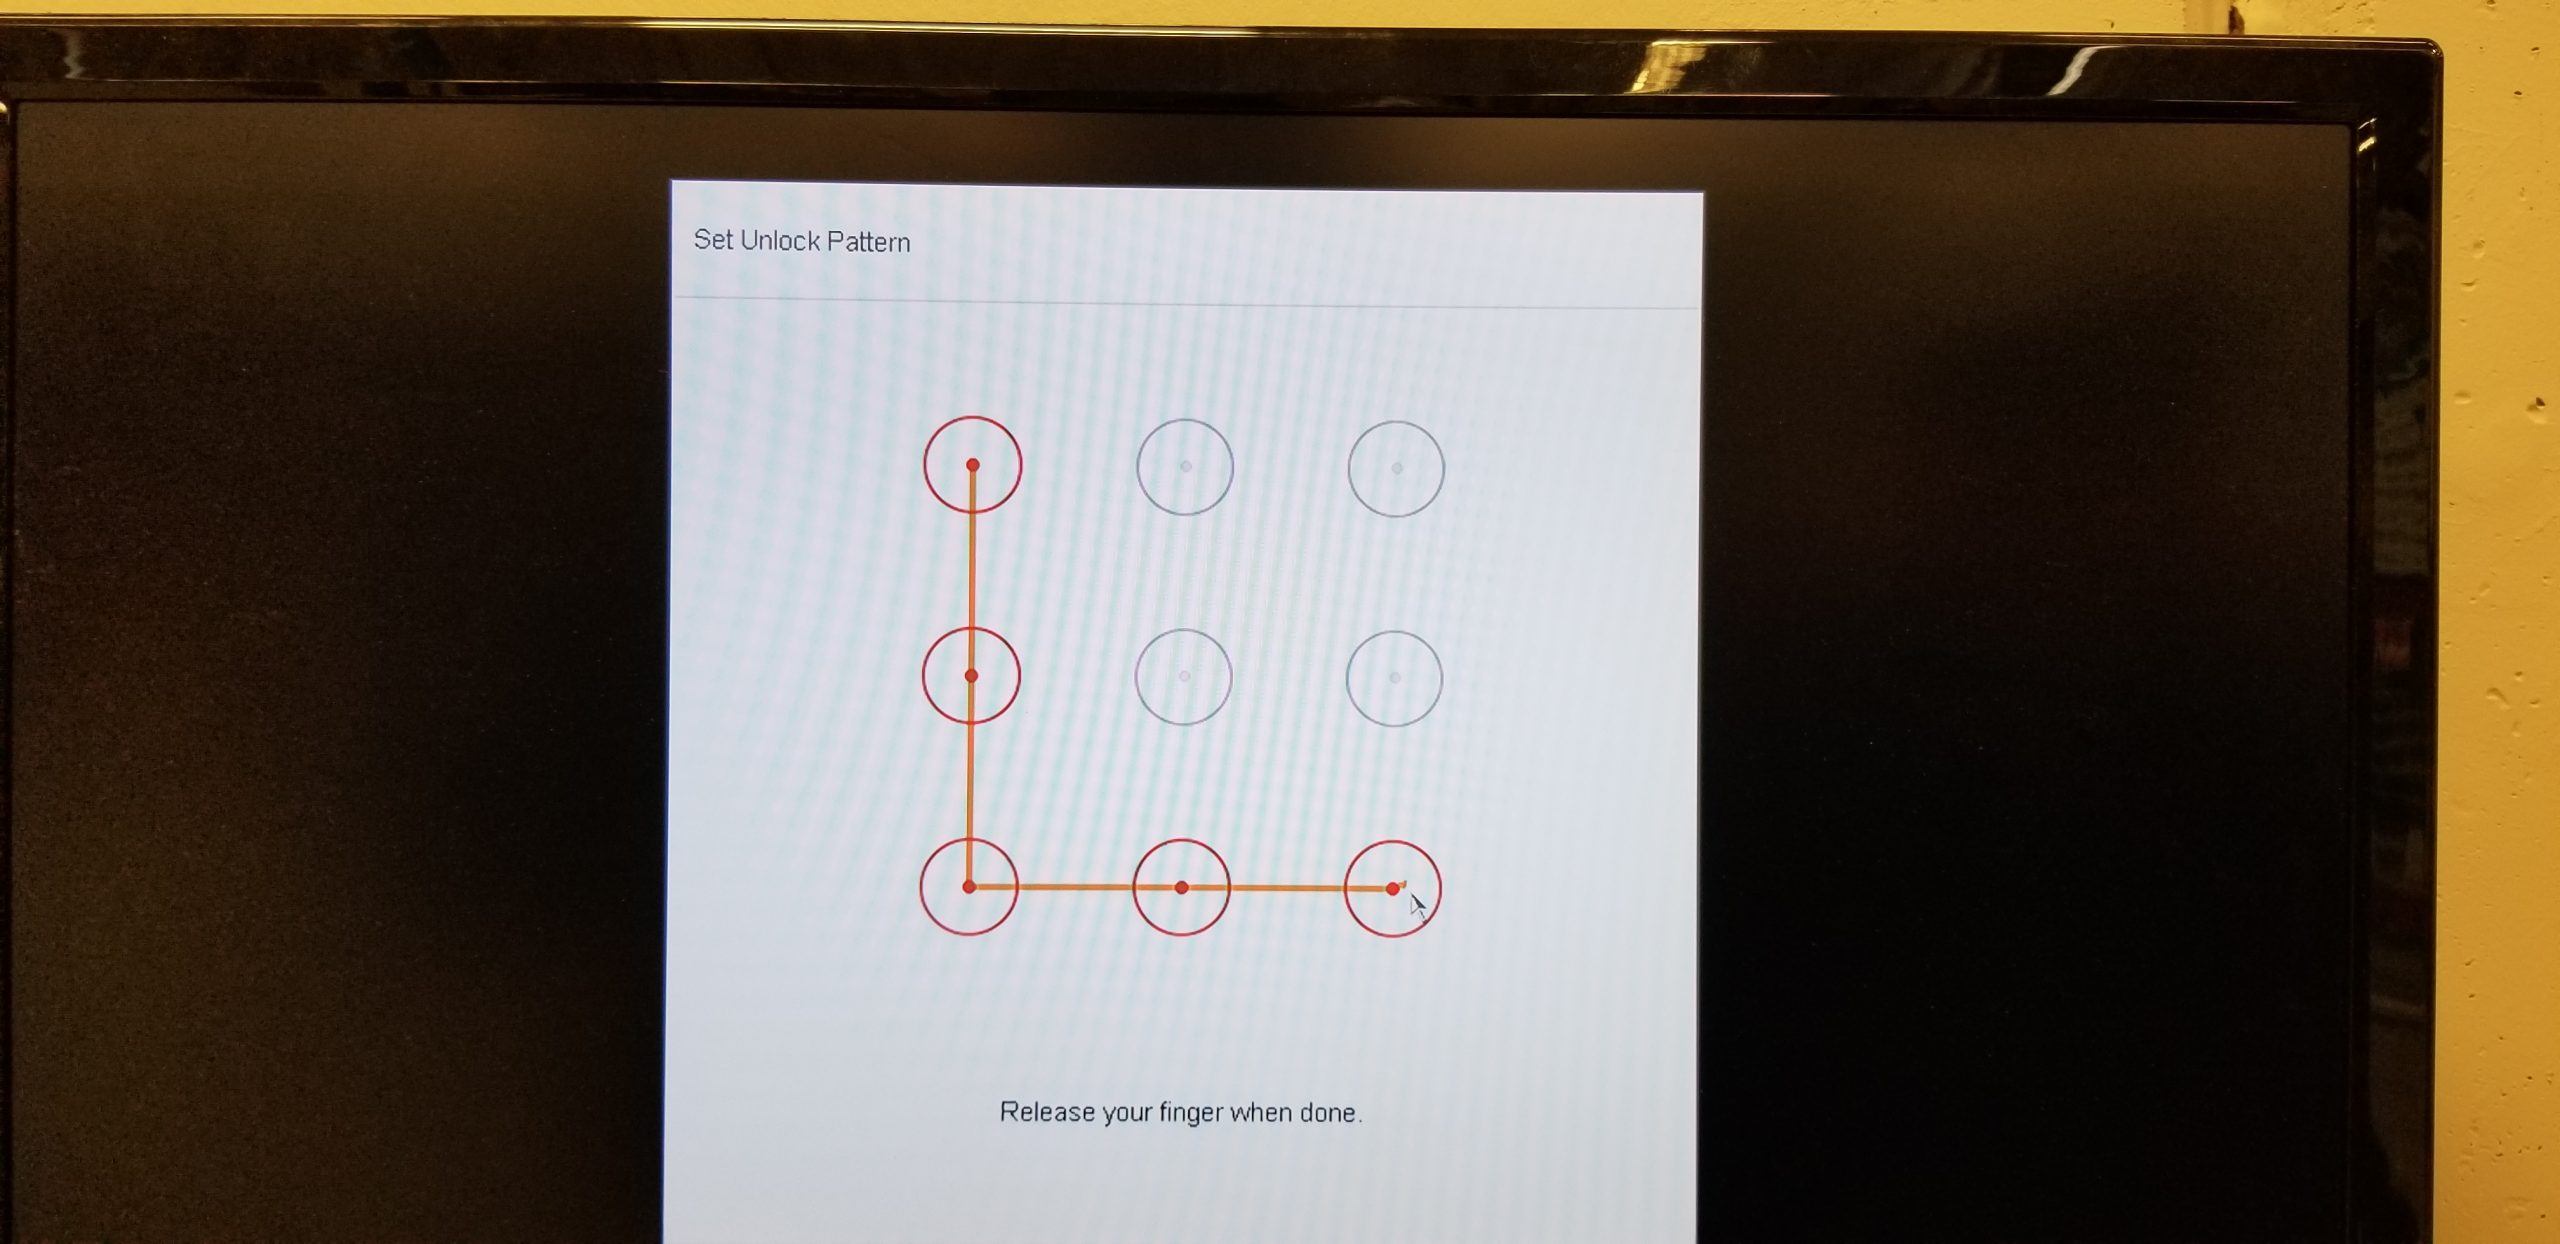
Step 5: You can also setup a Pattern unlock, this can be used in place of entering a password to access the NVR/DVR. This pattern unlock will only work on the Attached monitor interface.
You have now completed the process of activating the NVR/DVR with a password.
How To Install And Format a Hard Drive on a H-series NVR
Installing a Hard Drive is a great way to either save on costs to DIY or if you need to replace or upgrade an existing Hard Drive.
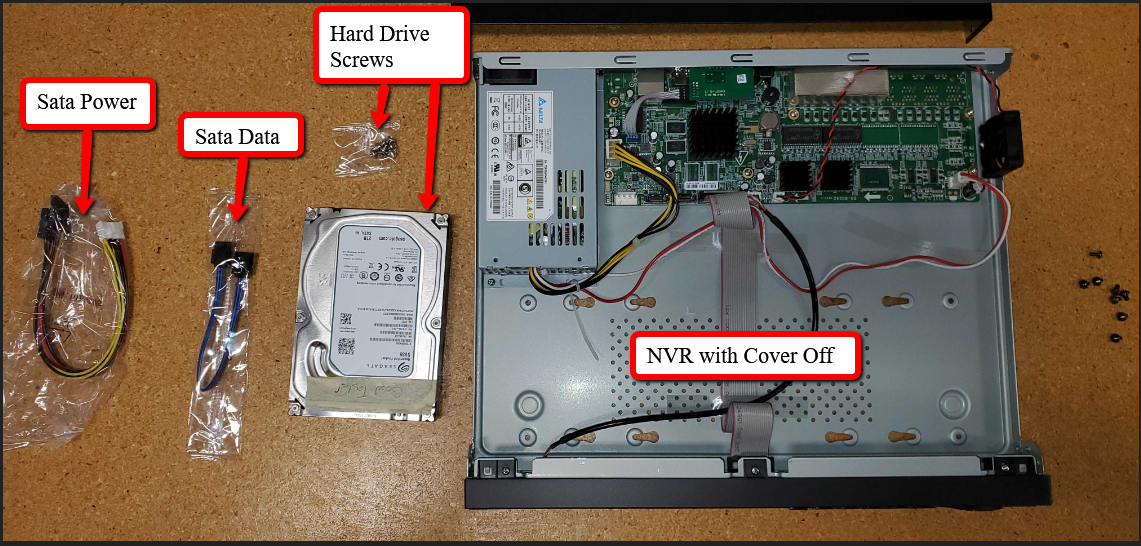
Step 1. Take Off the Top Cover and Gather The Needed Equipment
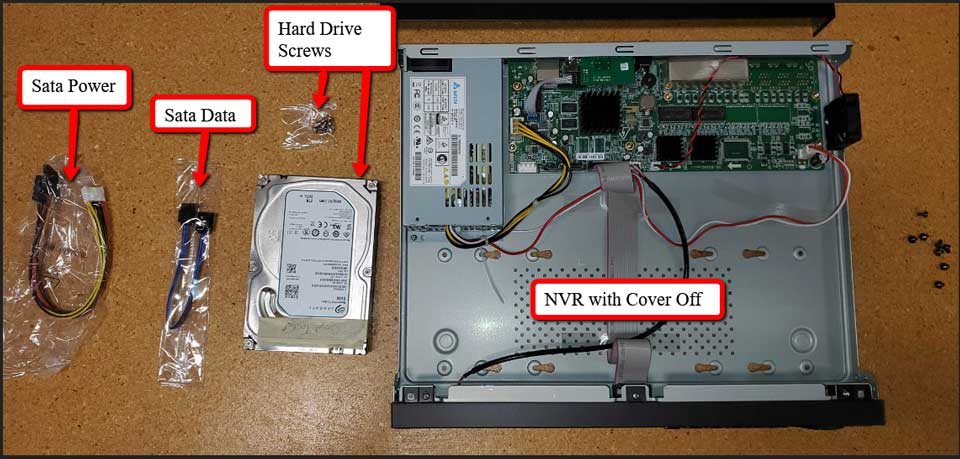
If this is a new Install, The recorder should come with a Sata Power & Sata Data cables. Along with mounting screws for the Hard Drive.
If this is an upgrade or replacement installation, everything should be with the existing hard drive.
Step 2. Connecting Cables To The Recorder and Hard Drive
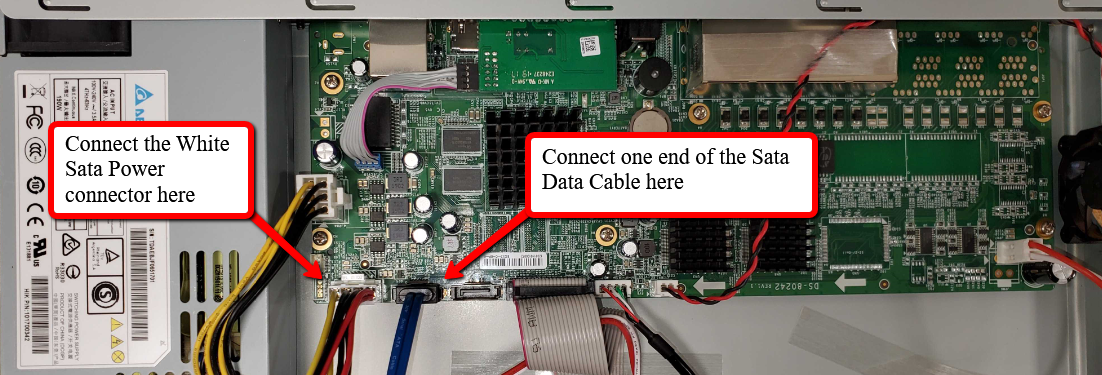
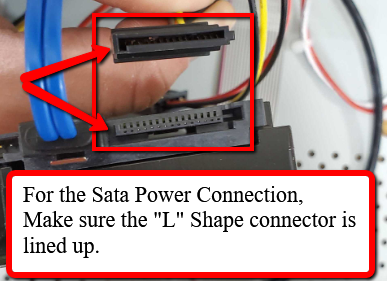
Locate where the Sata Power and Data connections are on the motherboard to the Recorder and connect the proper connections to it.
Next, Connect the Sata Power and Data cables to the New Hard Drive.

Step 3. Mounting The Hard Drive
Now that the Hard Drive is wired to the recorder. It is time to mount it.
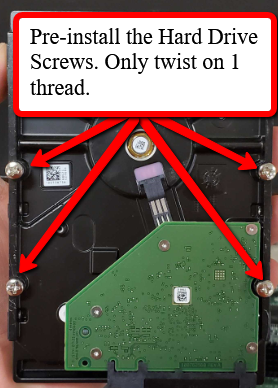
First, Pre-install the Hard Drive Screws on the Hard Drive itself. Only twist on a single thread.
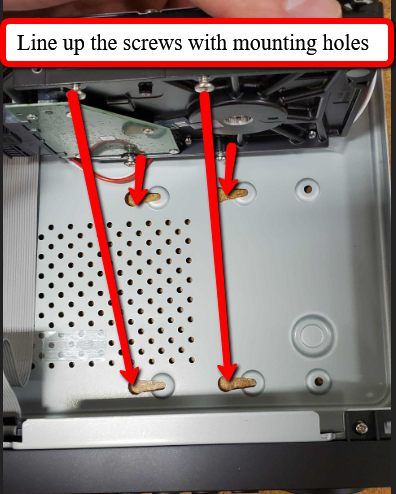
Next, Line up the Hard Drive Screws with the mounting holes in the recorder Chassis
Once the Screws are in the holes, slide the drive over to the proper position.
Then Tighten the screws until you feel resistance. Do not torque, you can strip the threads doing this.
With the Hard Drive installed, You are ready to Format it! Definitely Format the drive before reinstalling the cover in case the recorder doesn’t recognize the drive right away or if a connection is loose.
Step 4. Formatting via HDMI Interface
After the Drive is installed, It’s not quite ready to go yet. It still needs to be Formatted.
The H-series Recorders have two different attached monitor interfaces. There is a 3.4.x & and 4.0 interface. Then, there is the Web Interface if an attached monitor is unavailable .
We will go over all 3 in this guide. Simply scroll down til you see the interface that you have!
3.0 Interface
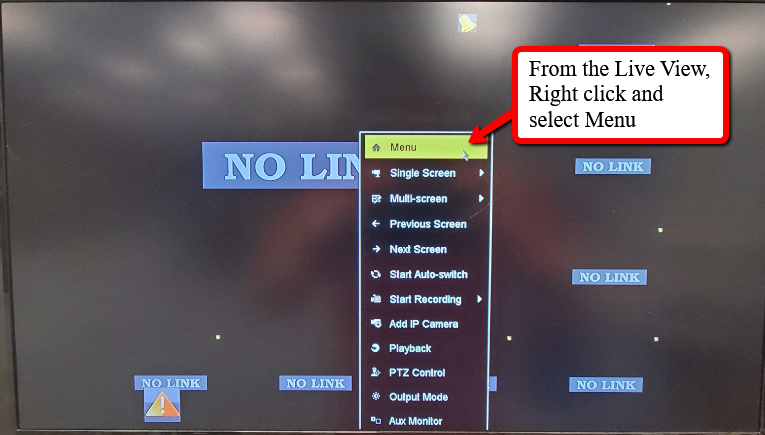
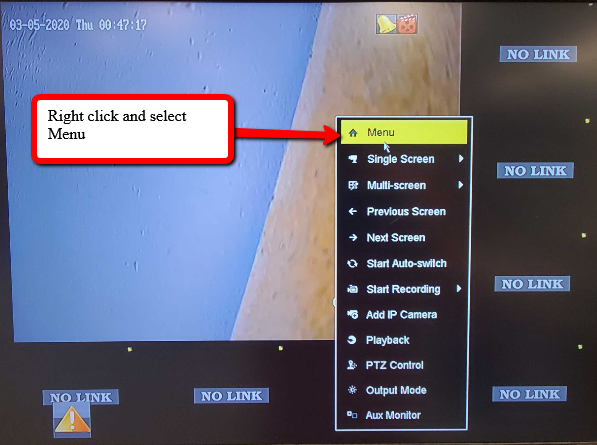
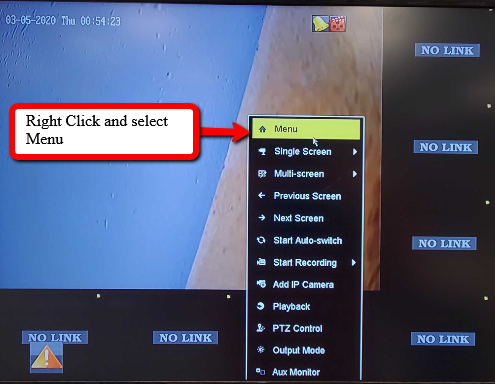
From the live view of the recorder, Right Click and select Menu.
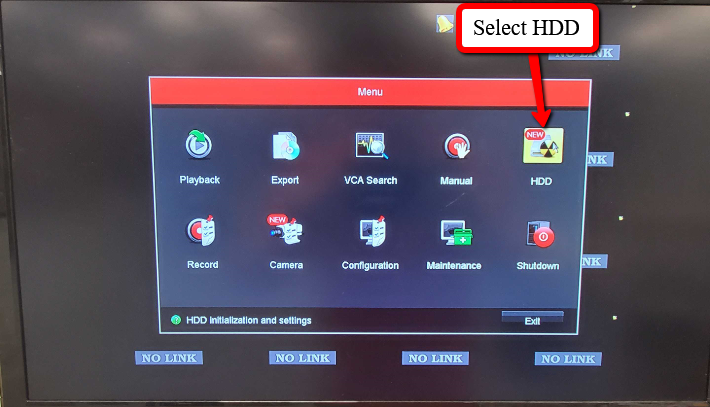
Next, select HDD
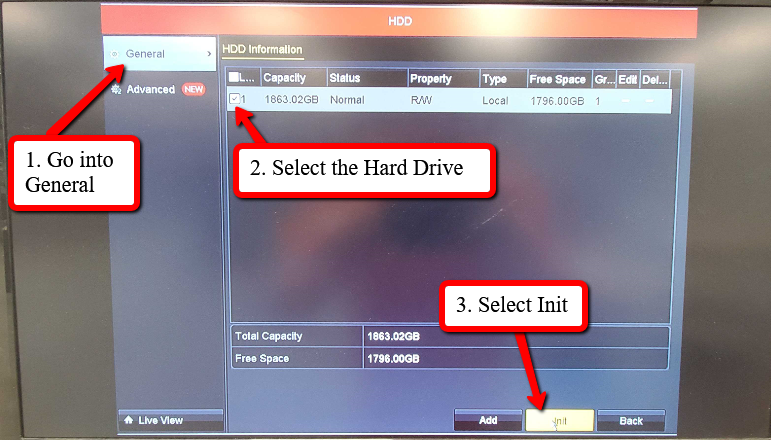
Go into General -> Select the Hard Drive -> Click Init
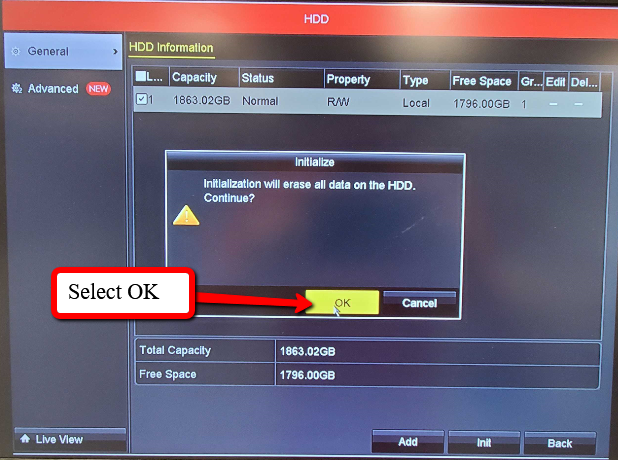
A prompt will appear asking if you want to initialize. Click OK
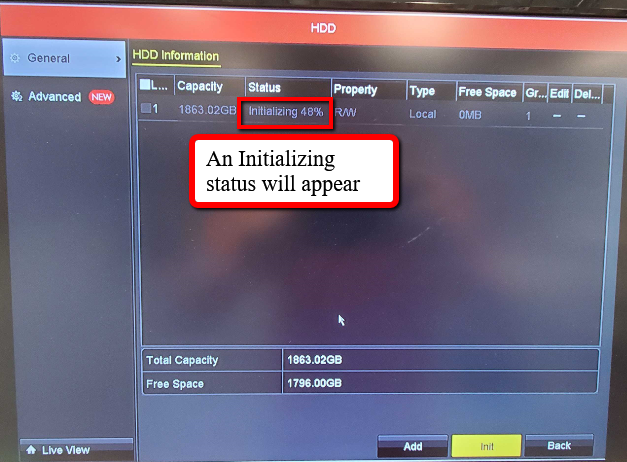
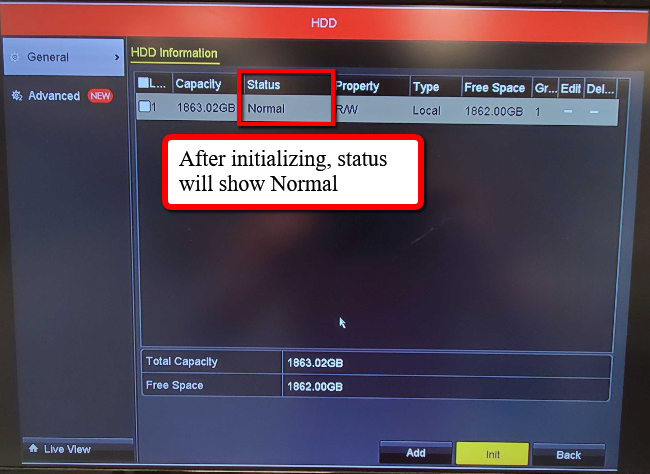
Then, the status will show Initializing and will go from 0% to 100% and will then show Normal as its status
4.0 Interface
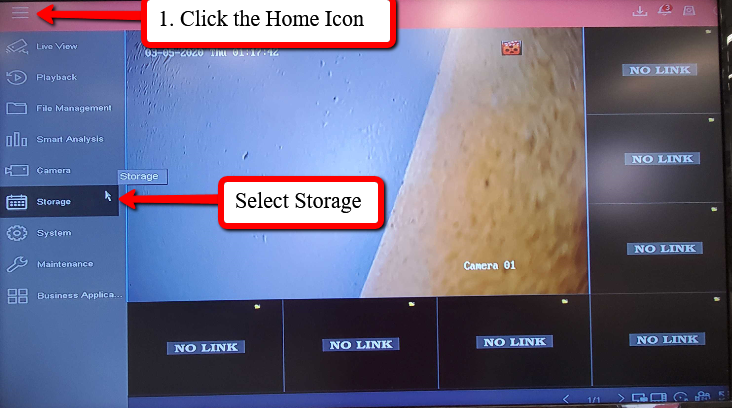
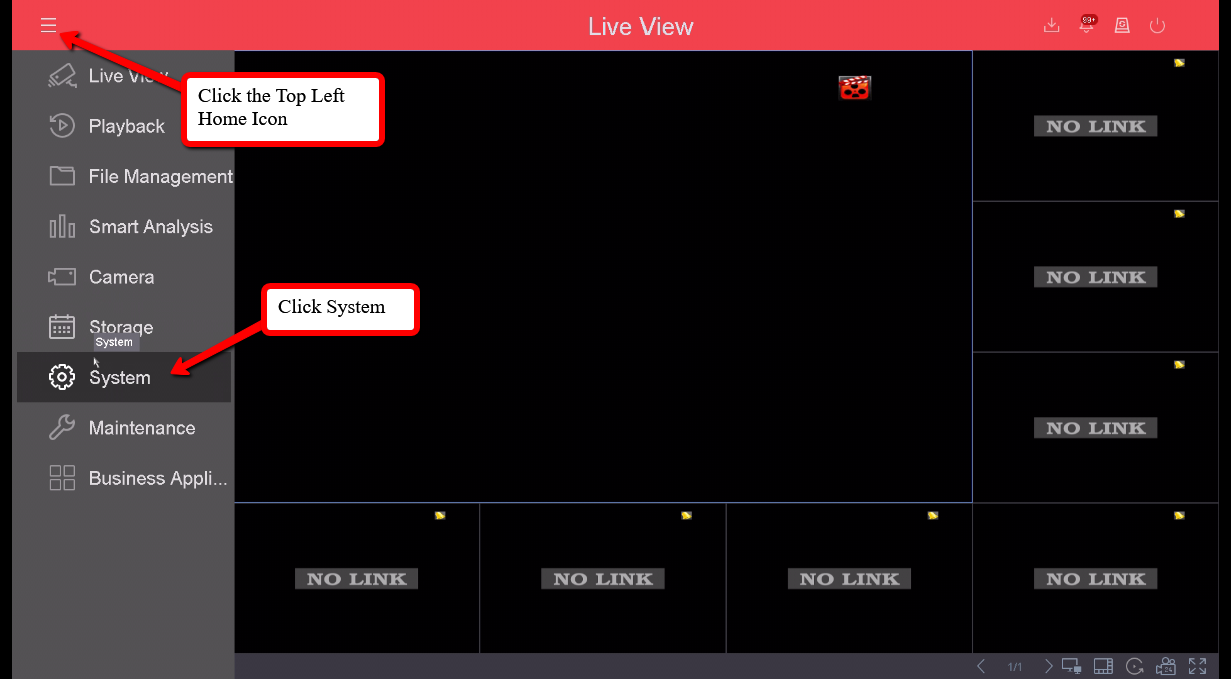
From the Live View Screen, select the Home icon in the top left corner. Then Select Storage.
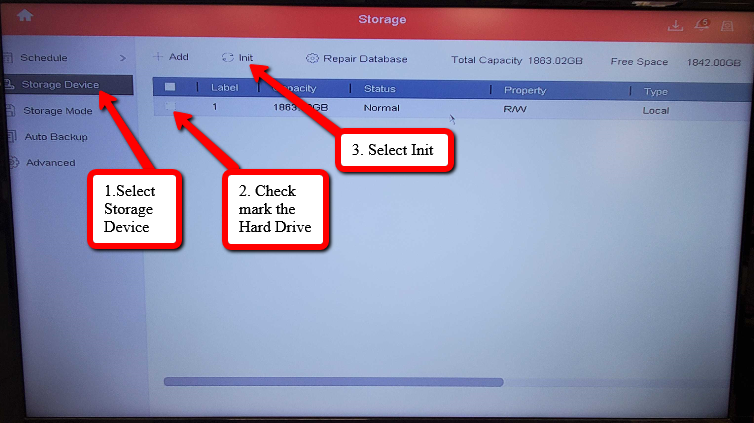
Next, Go into the Storage Device Tab on the left. Check mark your Hard Drive on the list. Then Click Init.
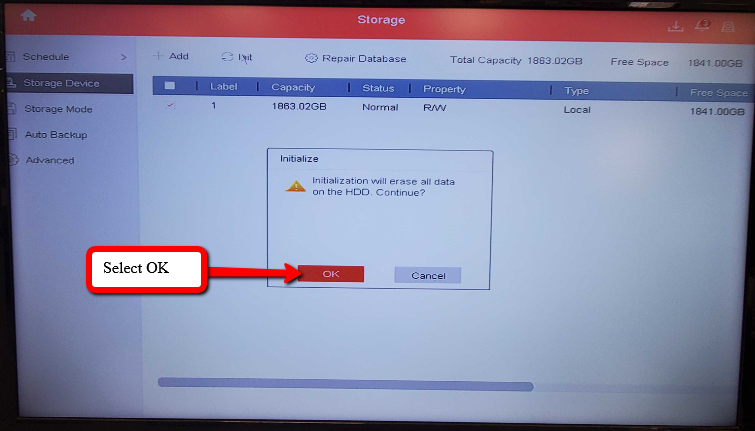
A prompt will appear. Click OK
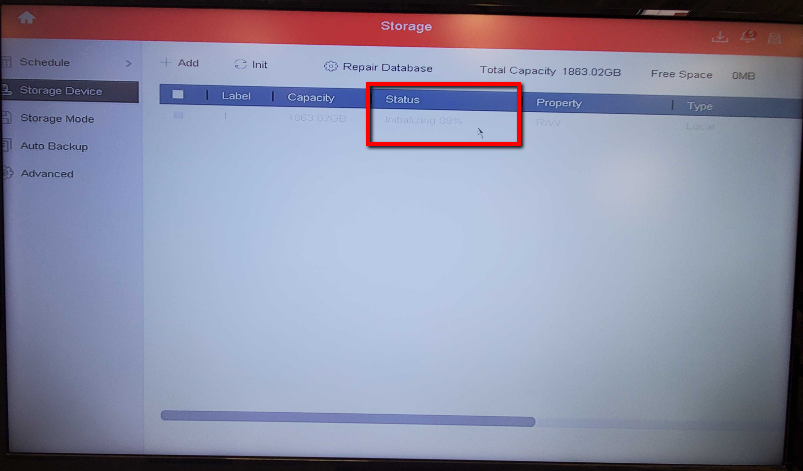
The status will go from 0% to 100%.
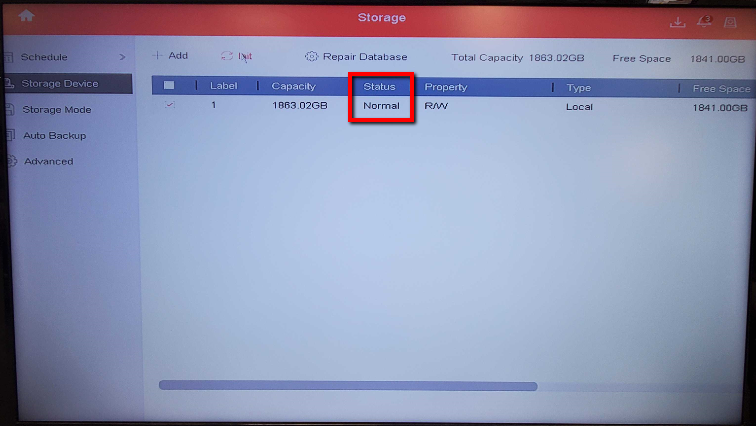
Afterwards, the status will become Normal
Web Interface
Once you are logged into the Web interface of the NVR, Go into Configuration -> Storage -> Storage Management.
Then Check Mark your Hard Drive listed and Click Format.
How To Enable Event App Alerts For H-series NVR’s
App alerts are great if you would like to be notified when an event gets triggered.
Step 1. Creating an Event and Enabling App Linkage
In this guide, we will show how to create a simple motion event from both the HDMI Interface and the Web Interface. Simply scroll down til you see the interface you are using.
HDMI Interface 3.0 & 4.0
3.0
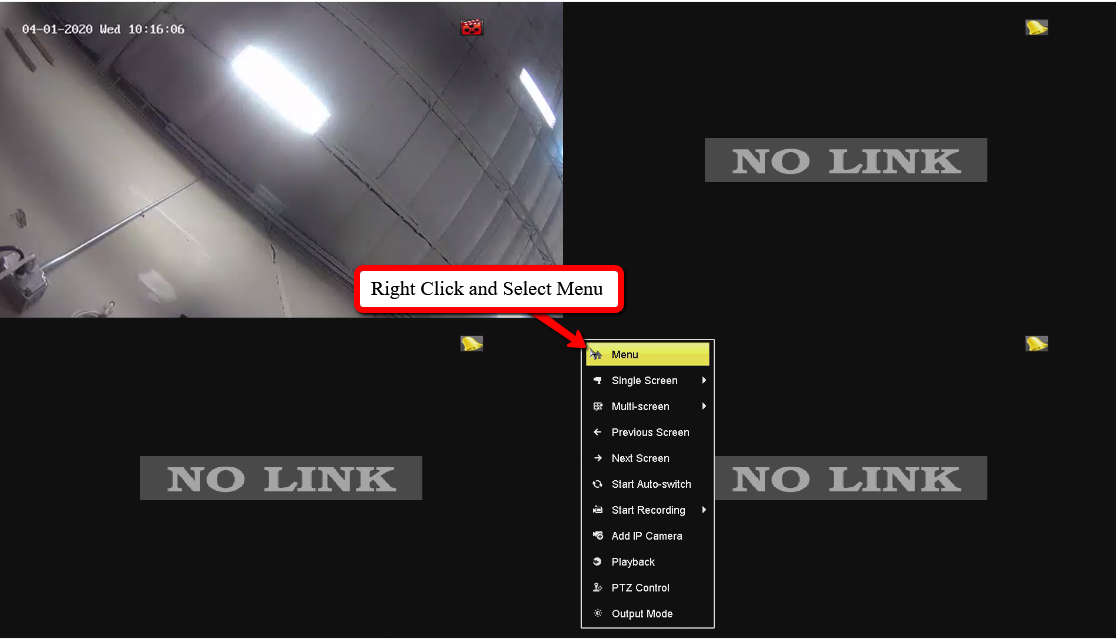
- From the Live View, Right click with your mouse and select Menu from the drop down.
- You may get prompted to login, please do so.
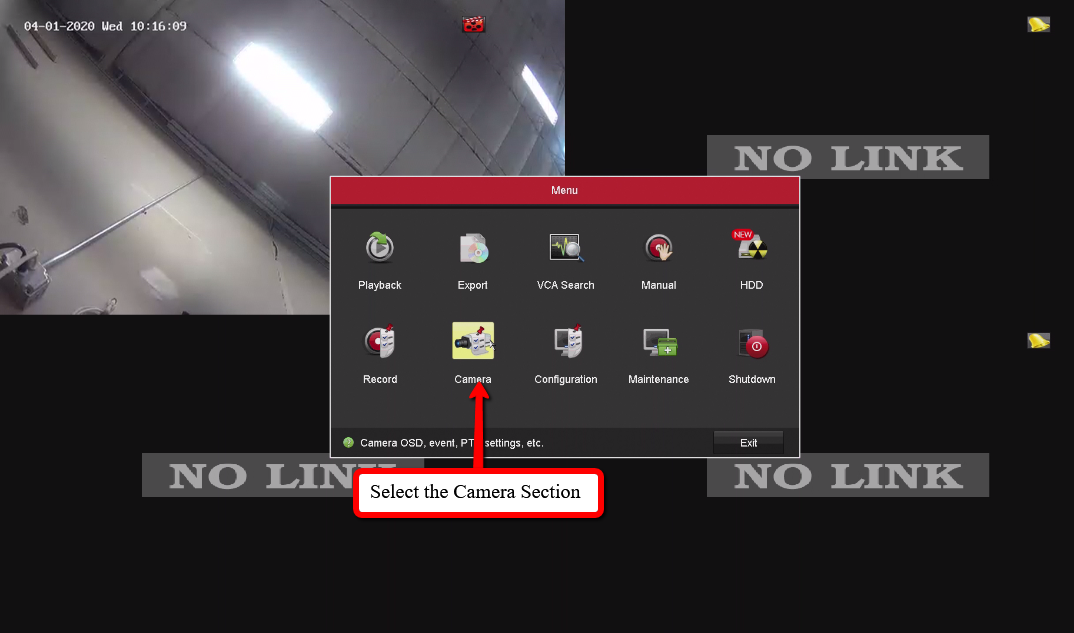
- Now select the Camera Icon
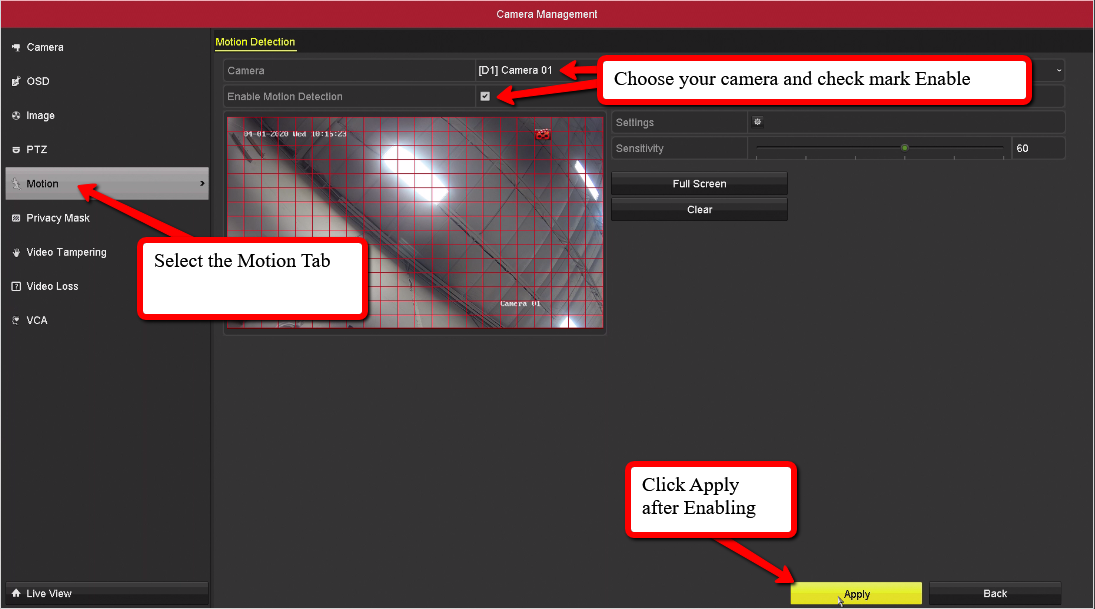
- Then Click on the Motion Tab
- Select the camera you are wanting to use, we are using Channel 1 in this guide.
- Check Mark the Enable Motion Detection box and select Apply
- Now that the Event is enabled, we need to let the NVR know that we want app alerts.
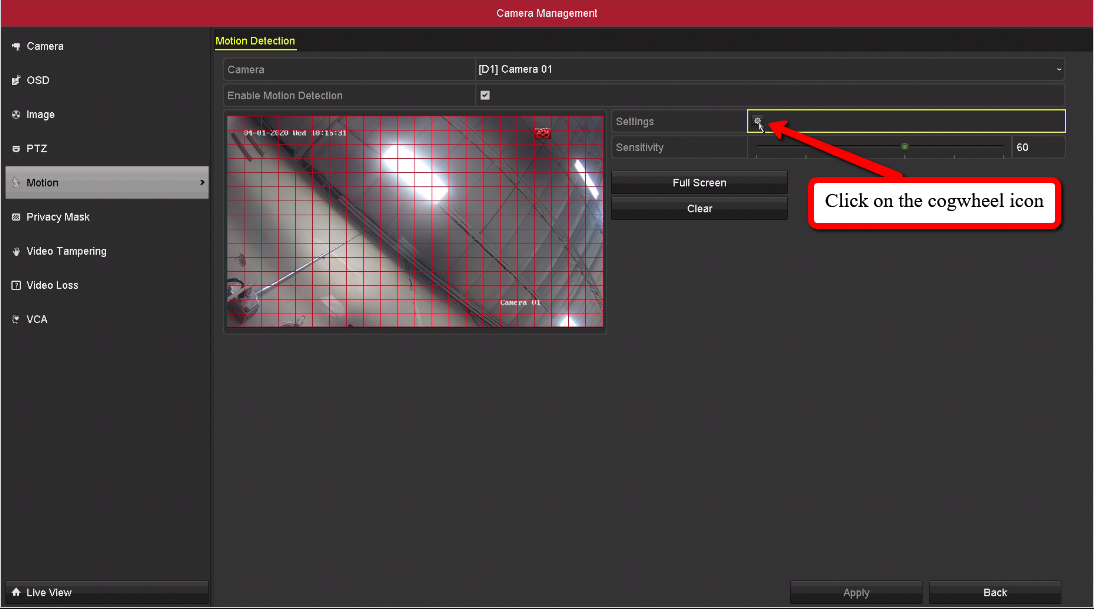
- From the same motion section, click on the Cogwheel Icon Next to Settings
- Then select the Linkage Method tab and check mark Notify Surveillance Center. Click Apply, and OK.
4.0
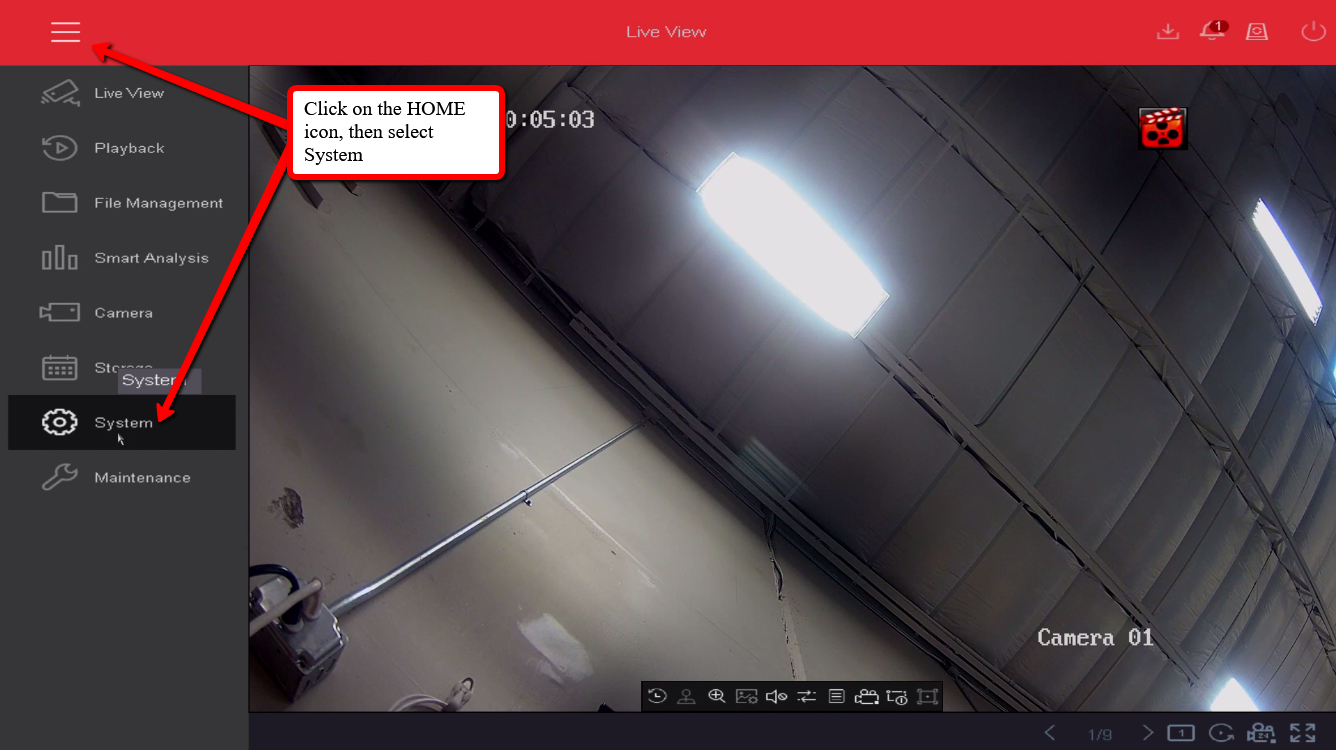
- From the Live View, click on the Home Icon at the top left corner, then select the System Tab.
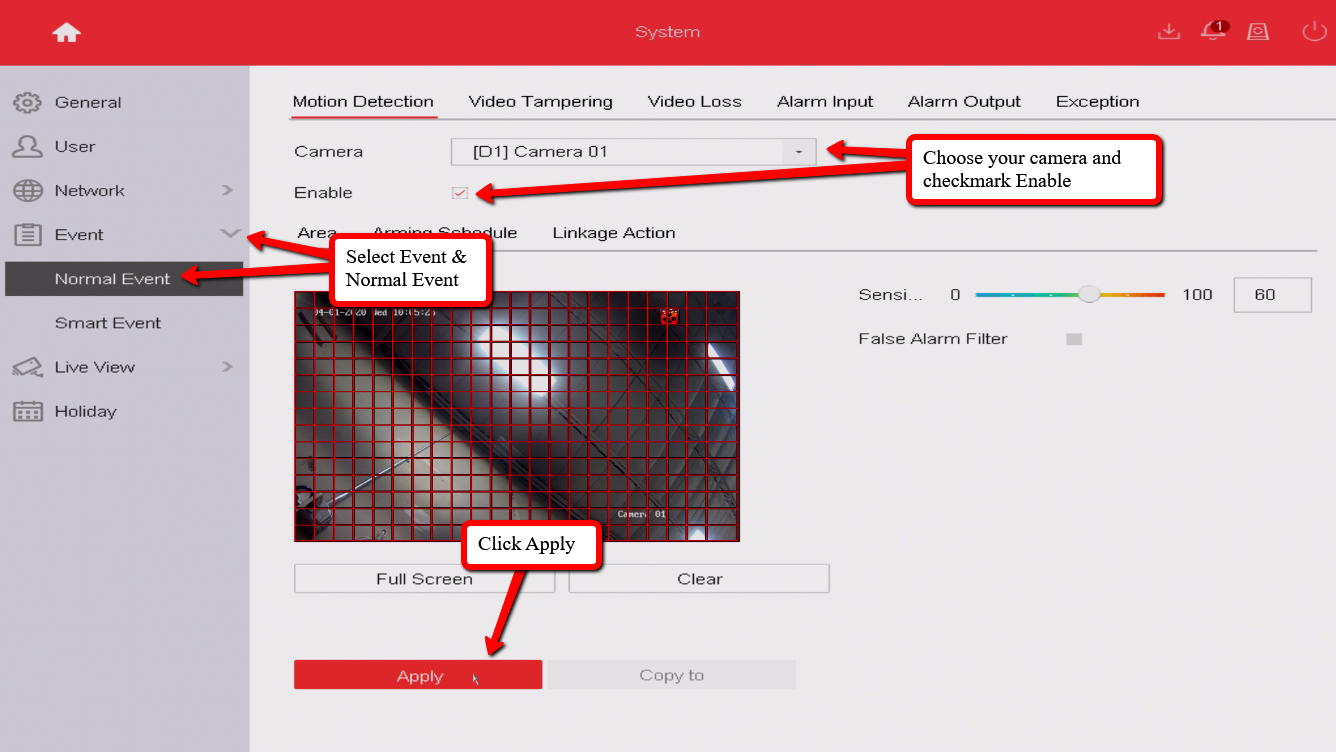
- Click on the Event Tab on the left side, and in this guide, we are using basic Motion Detection.
- Choose your camera, and check mark the Enable box, then Apply
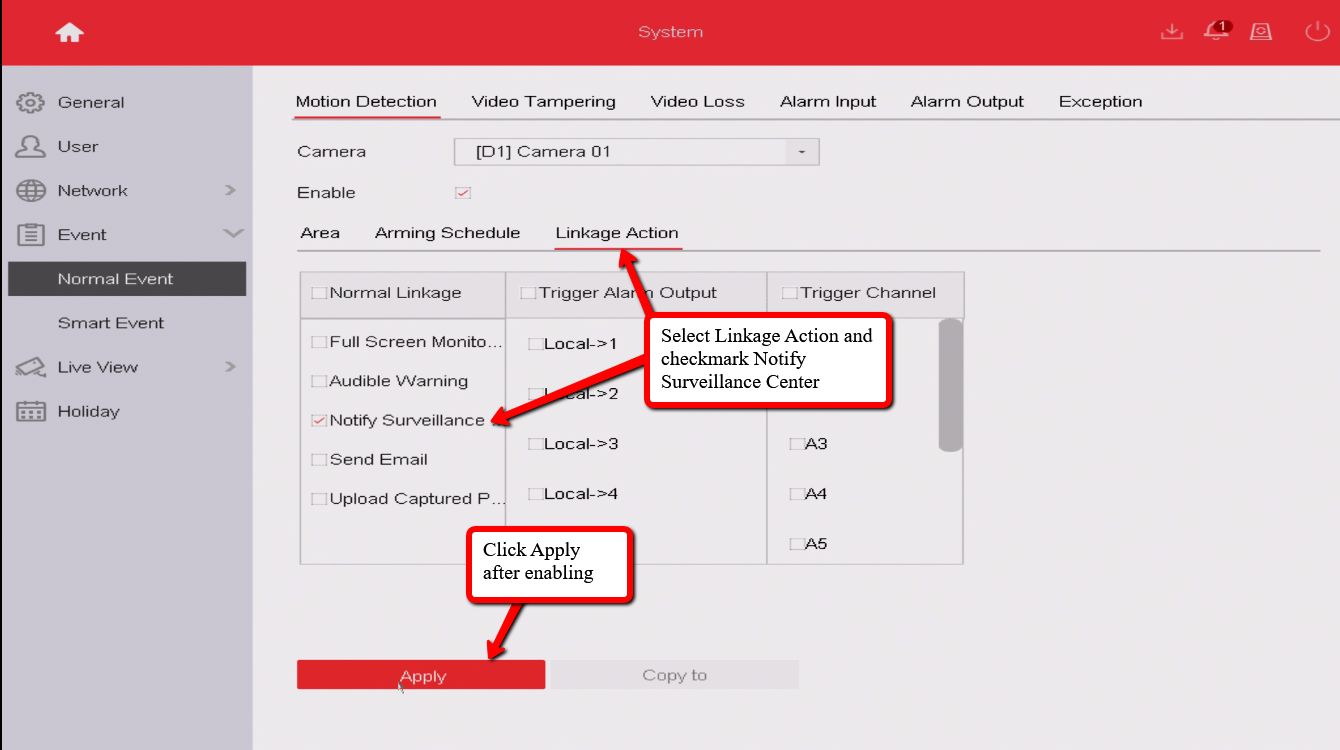
- Now that we have the Event enabled, we need to let the NVR know that it needs to send app alerts.
- From the same Motion section, select the Tab Linkage Action and enable Notify Surveillance Center.
- Click Apply
Web Interface
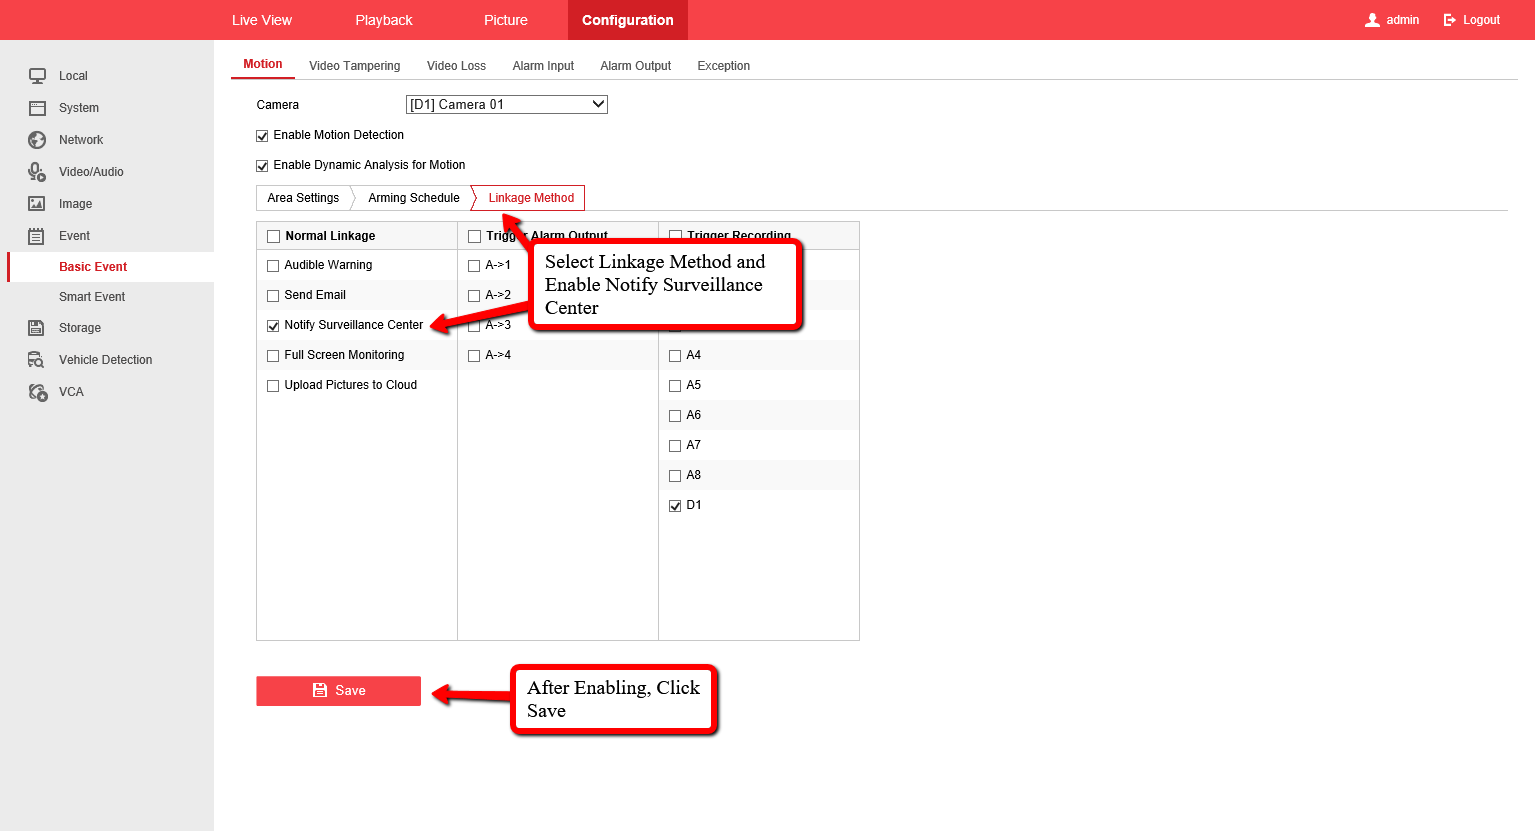
- Once you are signed into the web interface of the NVR, select the Configuration Tab at the top, then Event and Basic Event Tab on the Left Side
- Next, select your Camera, check mark Enable Motion Detection, then click Save at the bottom
- Now that we have the Event enabled, we need to let the NVR know that it needs to send app alerts.
- From the same Motion Section, Select Linkage Method, and Check mark Notify Surveillance Center, then click on Save.
Step 2. Enabling The Notifications From Guarding Vision
Please note, we are adding the NVR using the cloud P2P process.
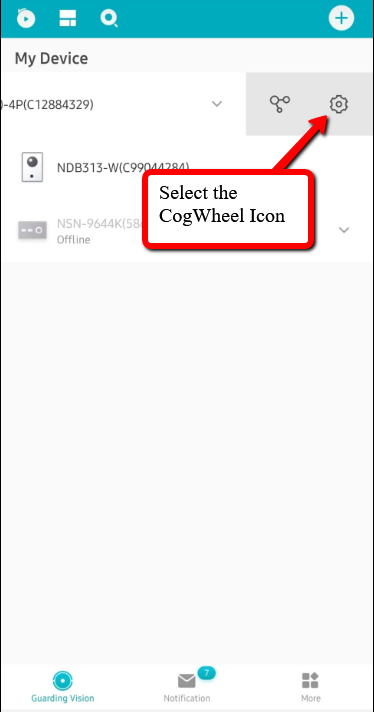
- From the Device List, swipe the NVR to the left to reveal a cogwheel icon
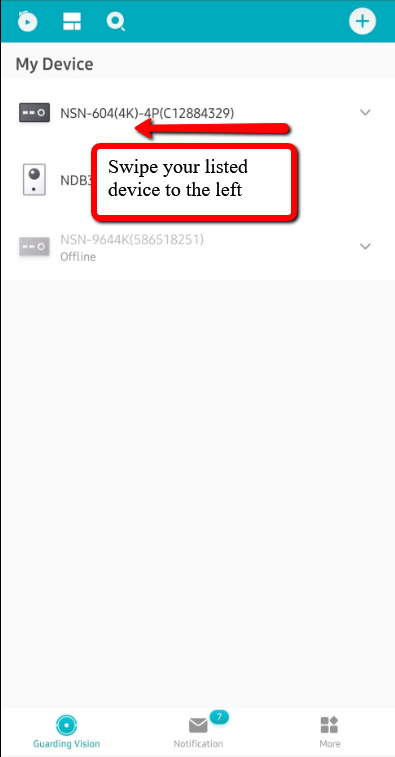
- Select Notification, then Enable.
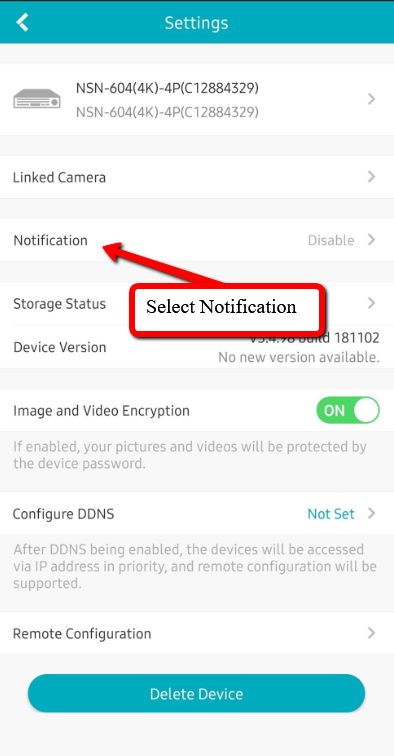
You can create a notification schedule if you’d like, but if you keep it disabled, then you will receive alerts whenever an Event is triggered for the camera’s that have alerts turned on.
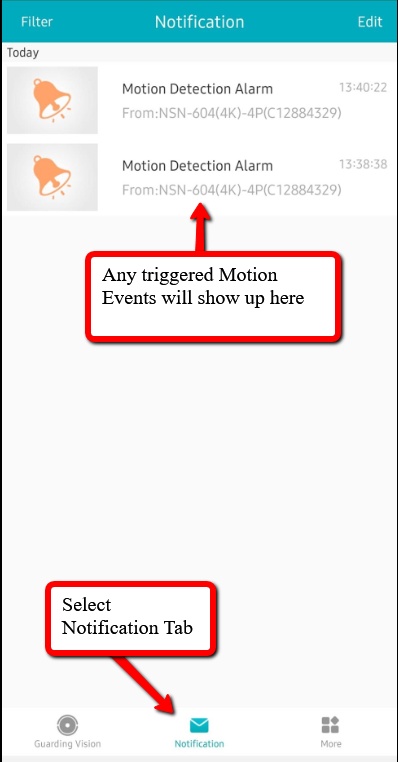
Now your phone will receive a push notification you can view all Notifications from the Notification Tab on the app.
If the notifications don’t work right away, do not worry, they sometimes take can a short while to push to the phone. (Usually its the smart events that don’t go through instantly, if any)
How To Export Footage Via HDMI Interface
Being able to export stored footage is very much needed in order to submit to authorities or any party upon request.
The H-series Recorders have Two HDMI Interfaces (3.0 & 4.0). We go over both in this guide.
Step 1. Insert Your Flash Drive
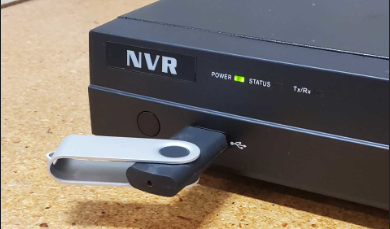
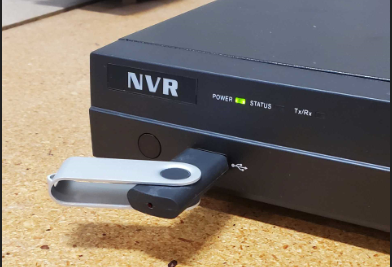
Take your USB Flash Drive and insert it into the USB Port on the NVR
Step 2. Navigate The Menus
3.0 Interface
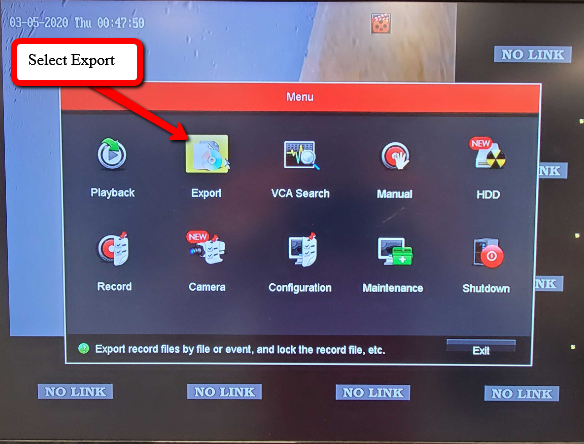
From the Live View, Right Click and select Menu
Select Export
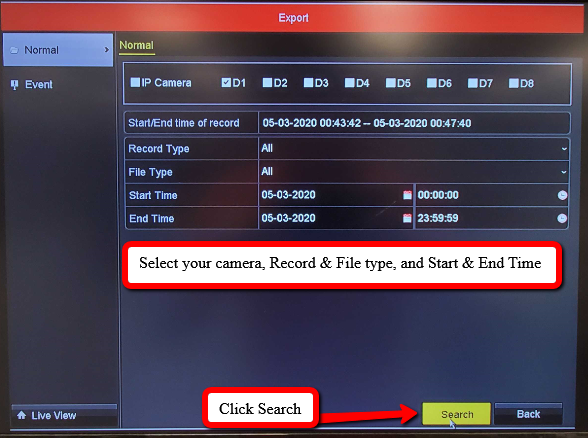
Select your Camera, Record & File Type, and Start & End Time. Then click Search
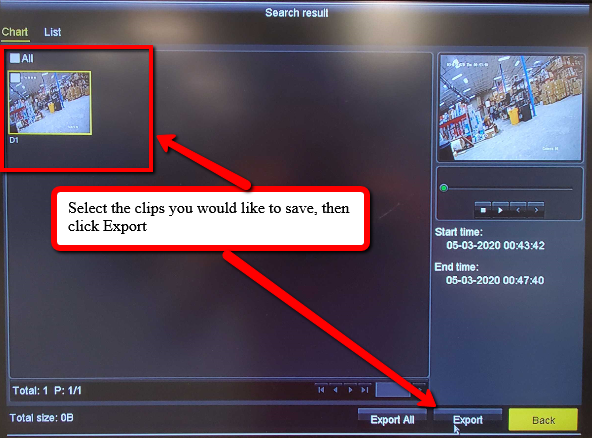
Now Select the Clips that need to be saved, then click Export
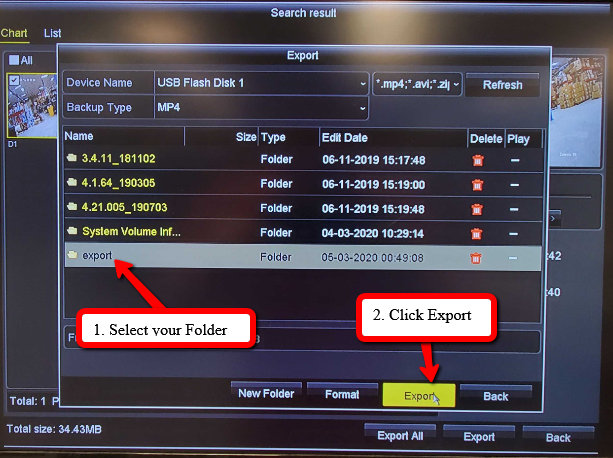
Select the folder you would like to save the file to, then click Export
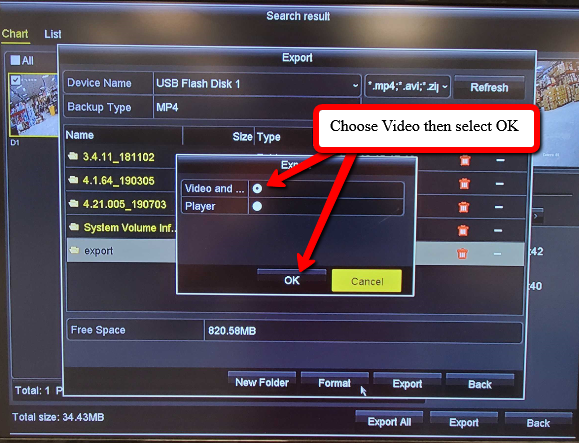
Choose Video then OK
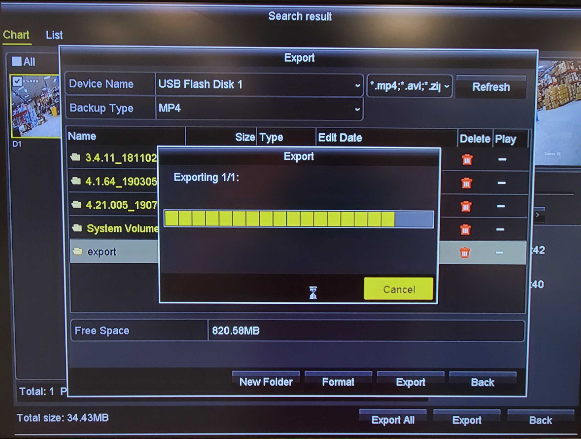
A loading prompt will appear to show the exporting status
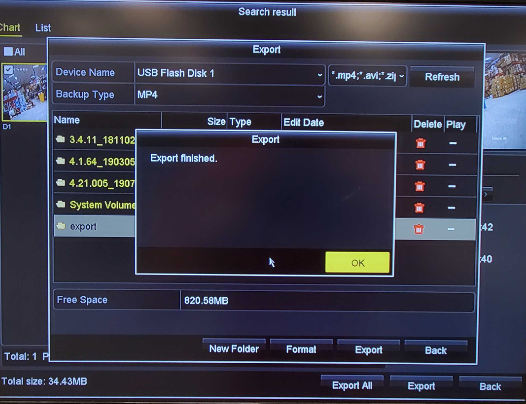
Once Completed, a Export Finished message will appear.
Footage on the Flash Drive can now be viewed from a PC using either the VLC or VS Player.
4.0 Interface
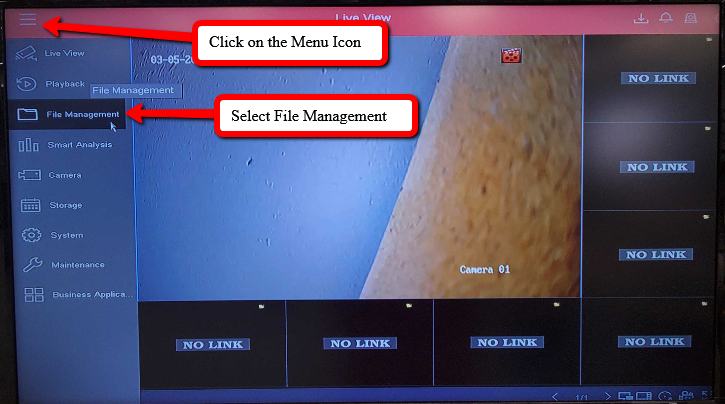
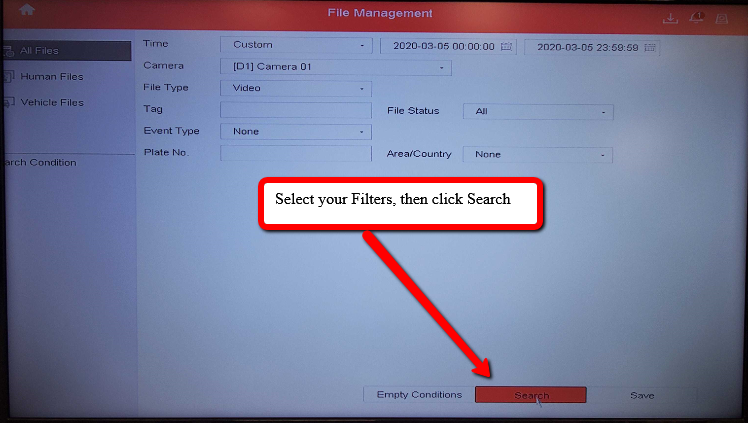
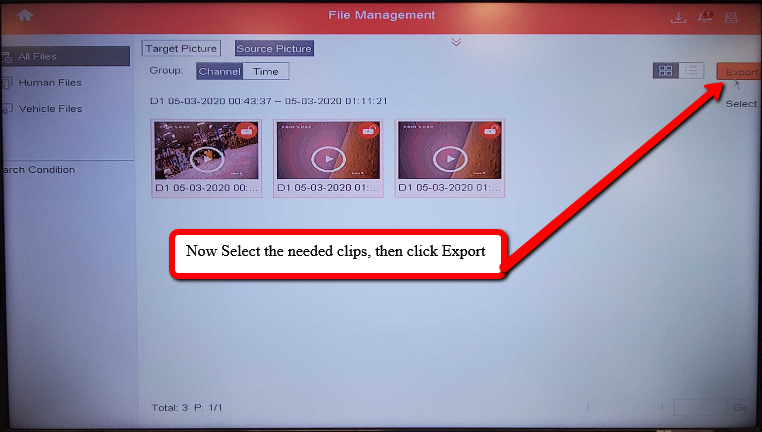
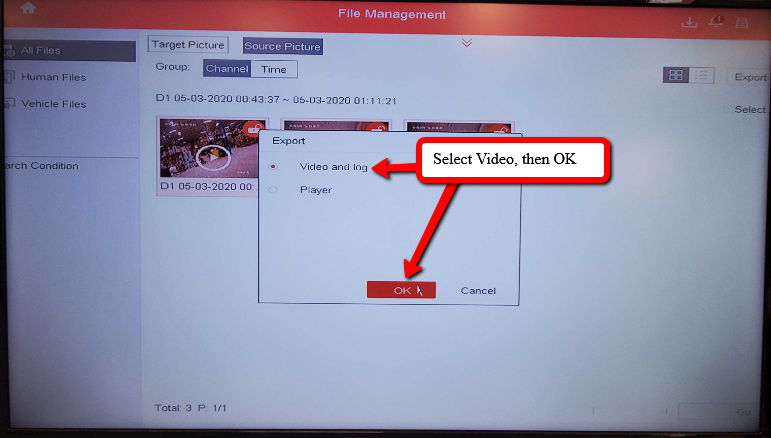
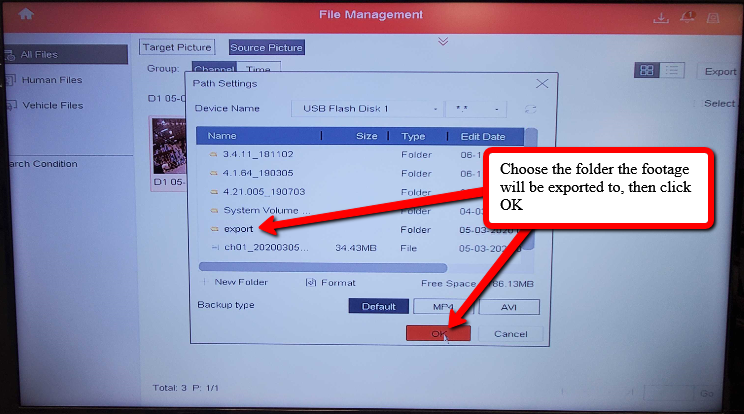
From the Live View Select the Menu Icon in the top left corner, then click File Management
Select the filters and click Search
Choose the needed clips, then click Export
Select Video, then OK
Select the Folder the footage will be saved to, then click OK
Then a Prompt will appear to export and save to the Flash Drive! You will be able to view the clips on a PC using VLC or VS Player
Upgrading Firmware Via HDMI Interface on H-Series NVR
Upgrading the Firmware can provide Security and Performance improvements as well as adding features.
Step 1. Finding The Current Firmware on your Device
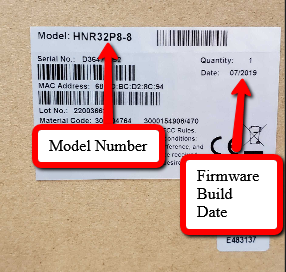
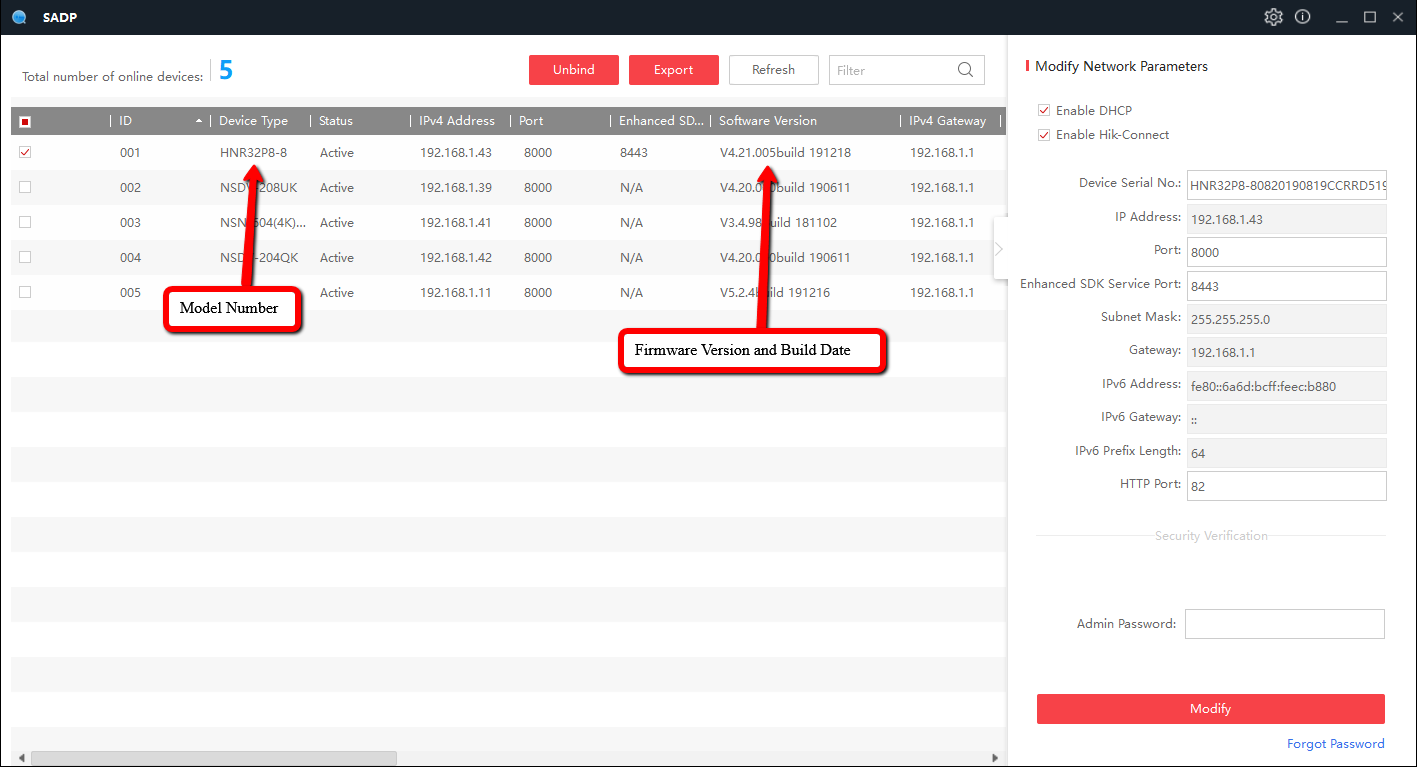
First, we will need to know the model and firmware version of the recorder. You can do this in a couple of ways.
In this Example, We are using the NSN-608(4K)-8P.
Please Note
on H-series Products, you may come across the OEM Model number. If this is the case, please lookup either your order number or feel free to reach out to us.
customerservice@nellyssecurity.com
855-340-9999
Looking at the sticker on the product box or on the camera itself:
Via SADP Tool:
Step 2. Checking For Newer Firmware
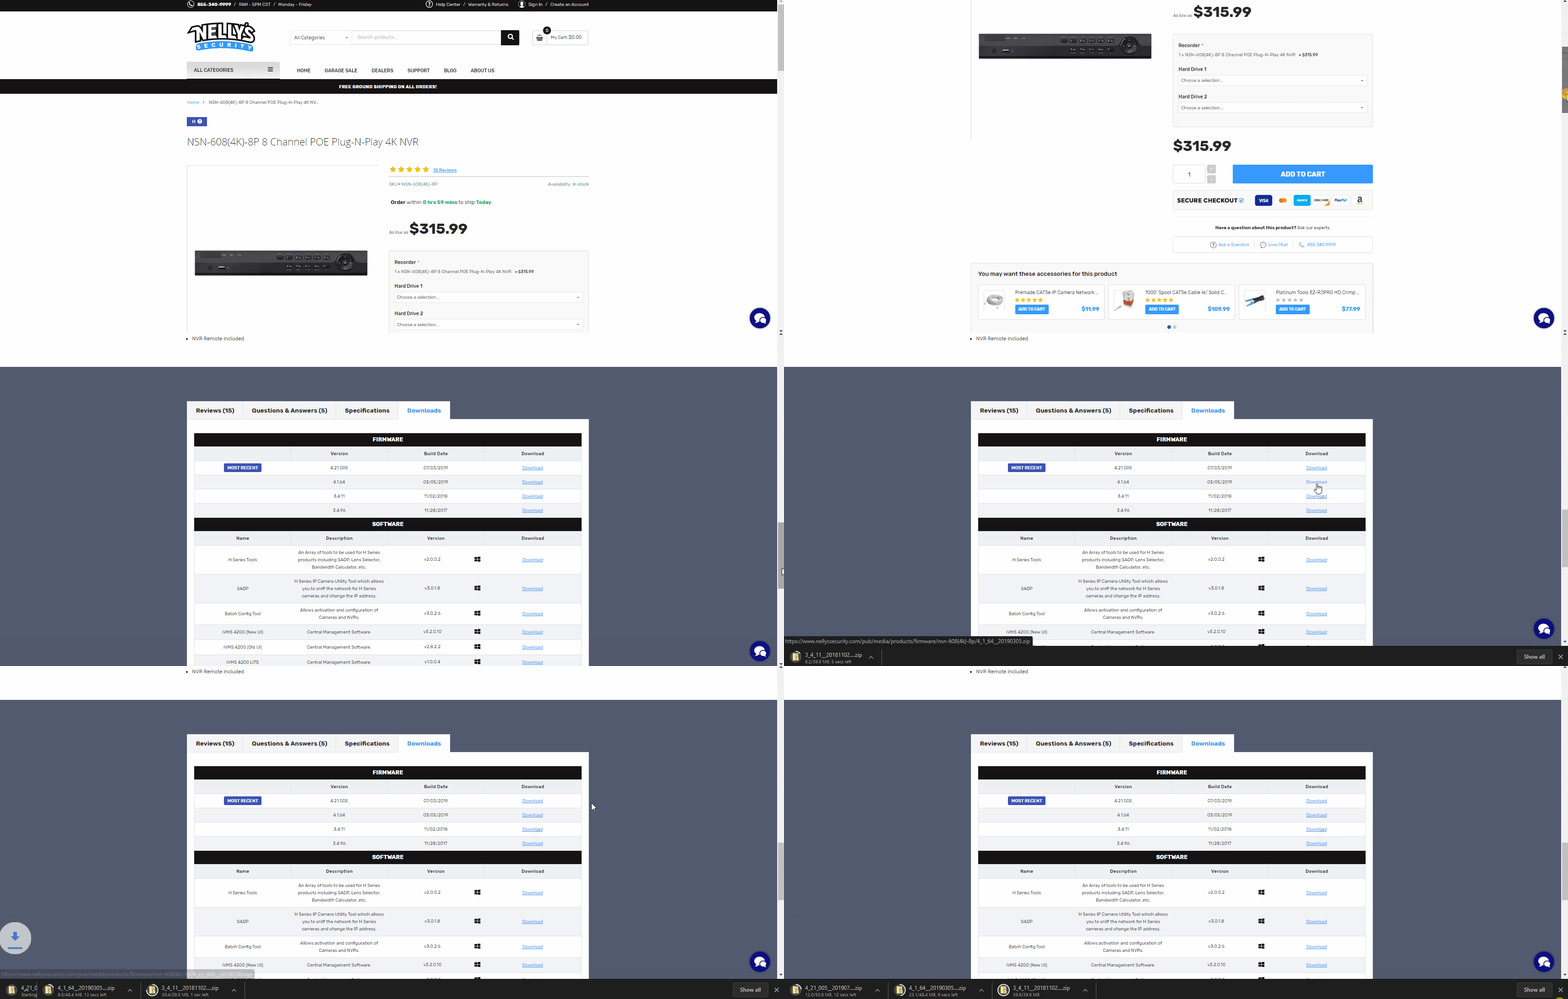
Go to NellysSecurity.com
Go to the product page of your camera and scroll down until you see “Downloads“. Then “Firmware“.
It is recommended to “Step Up” the firmware on your recorder.
For our NSN-608(4K)-8P, it currently has firmware V3.4.101 / Build 11/02/2018.
The available firmwares are V4.1.64 – 03/05/2019 & V4.21.005 – 07/03/2019.
The Upgrade path would be 3.4.101 -> 4.1.64 -> 4.21.005
Step 3. Loading The USB Drive
Once You have Downloaded the needed firmware, the Next Step is to put them on a USB Flash Drive
First, connect your Drive to a computer
Then open up its file location and Drag the Folders with the Digicap File in them over to the Flash Drive
Step 4. Uploading The Firmware To The Recorder
The H-series Recorders have 2 Different HDMI interfaces (3.0 & 4.0). We will go over both in this guide. Simply scroll down til you see the interface that yours has.
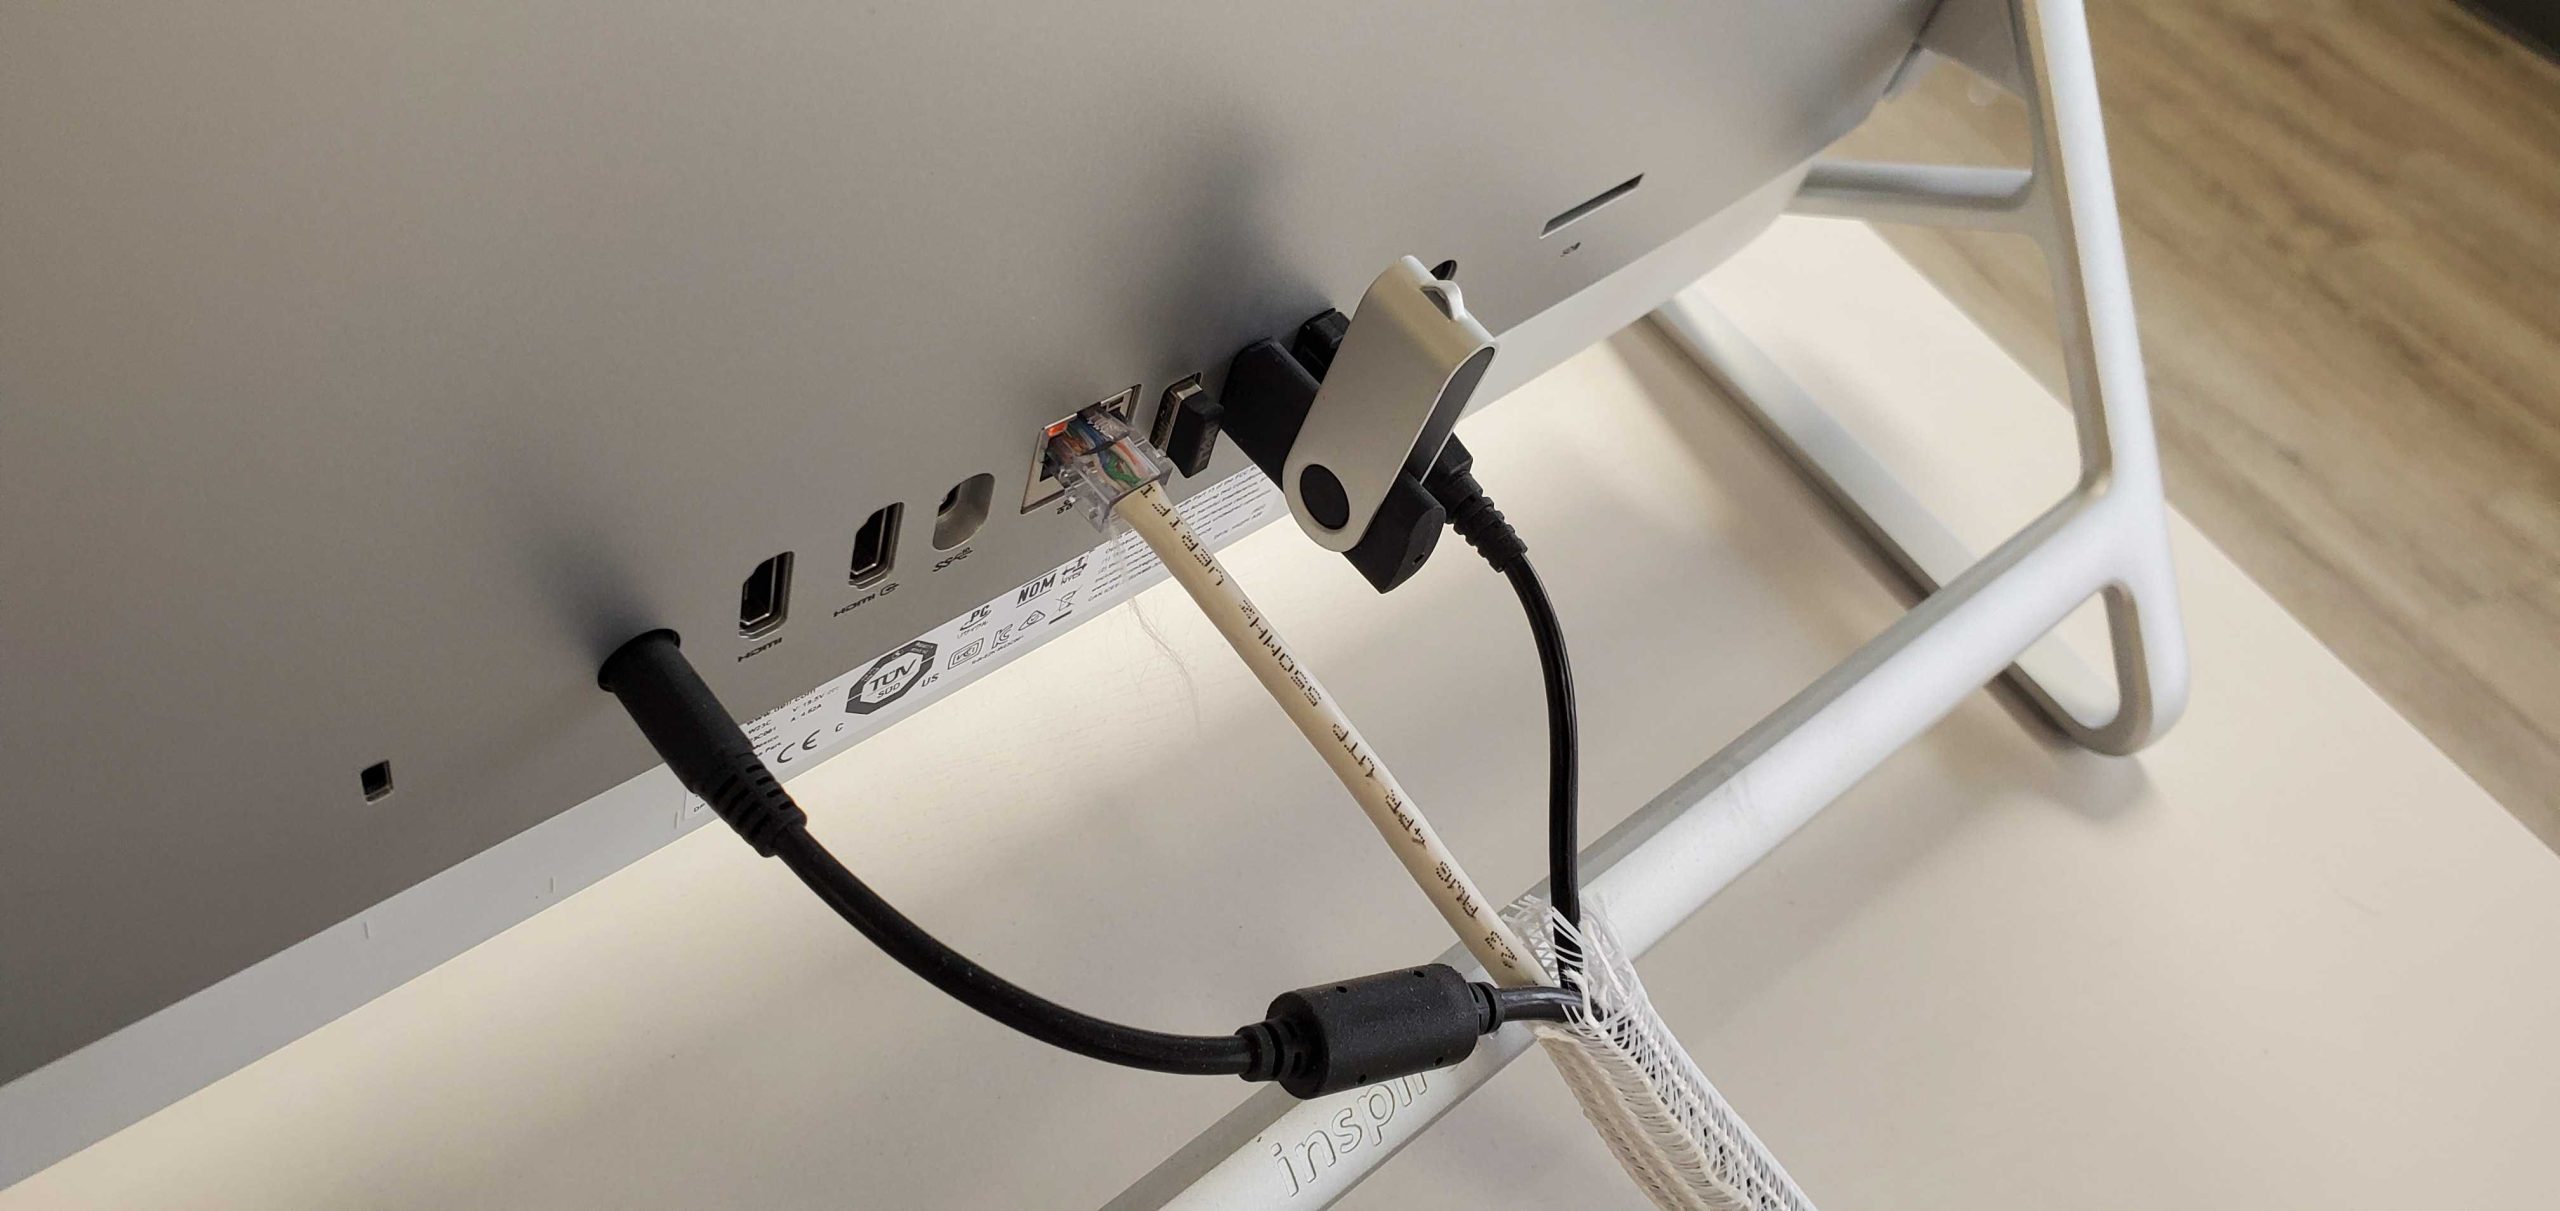
Firstly, insert the Flash Drive into the NVR’s USB port
3.0 Interface
From the Live View on the recorder, Right click and select Menu.
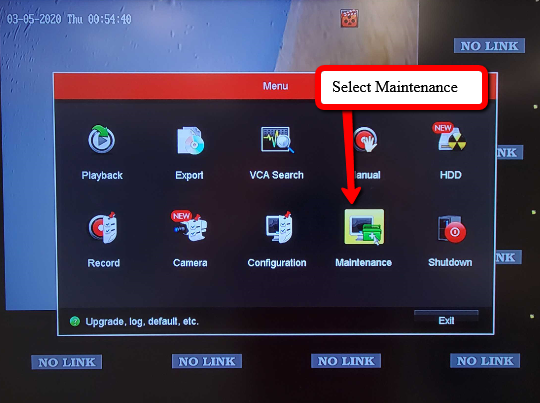
From the Menu, Select Maintenance.
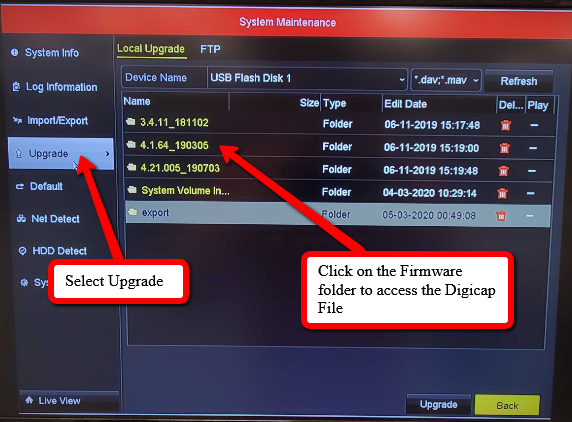
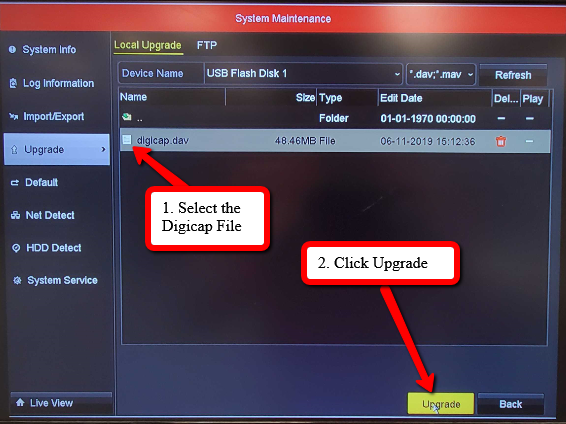
Select the Upgrade tab on the left and then click through the file paths to find the Digicap file
After finding the file, select it, then click Upgrade
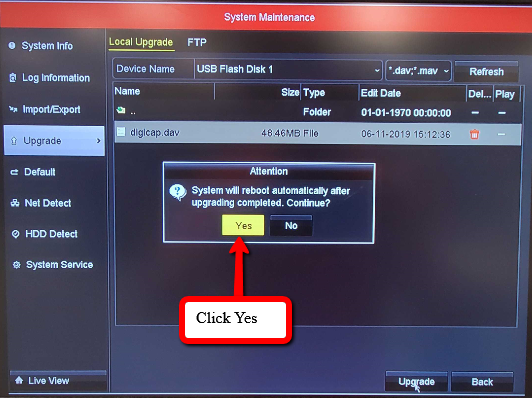
You will then get a prompt. select Yes
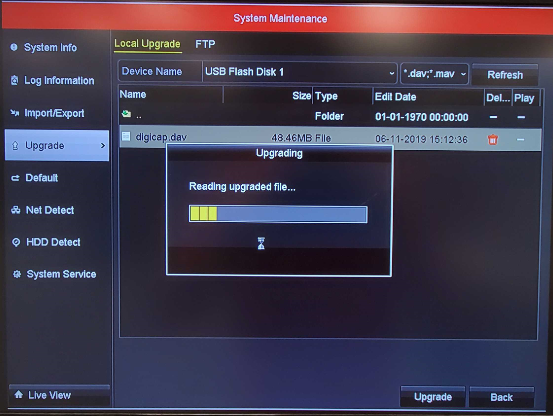
Afterwards, a progress bar will appear
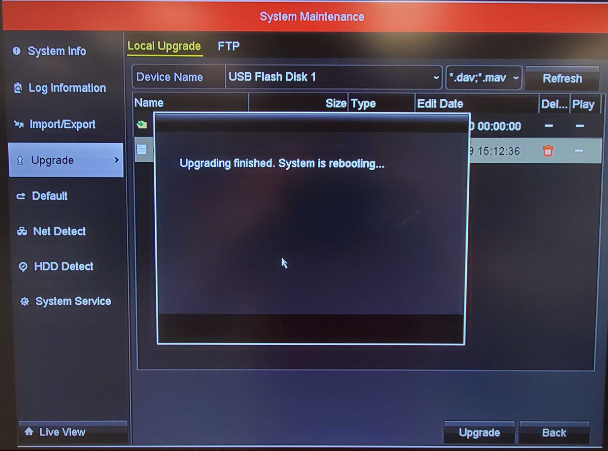
Once the update is complete, a reboot prompt will appear.
And after the recorder reboots, it will have the new firmware!
4.0 Interface
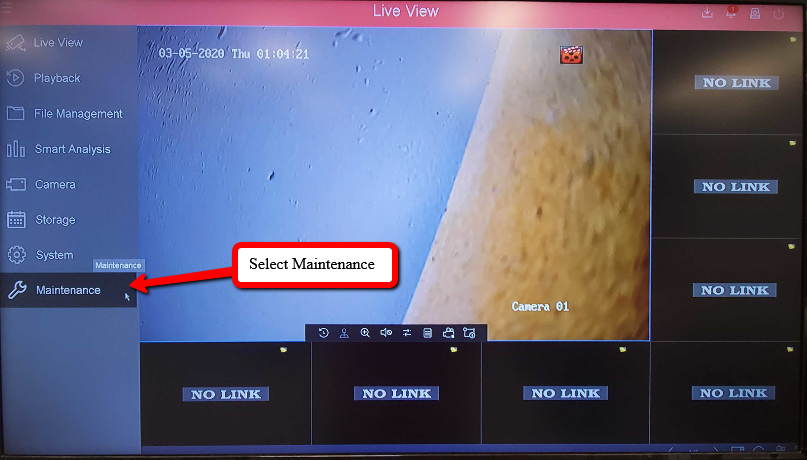
From the Live View screen, click on the Home / Menu icon at the top left corner
Then select the Maintenance tab
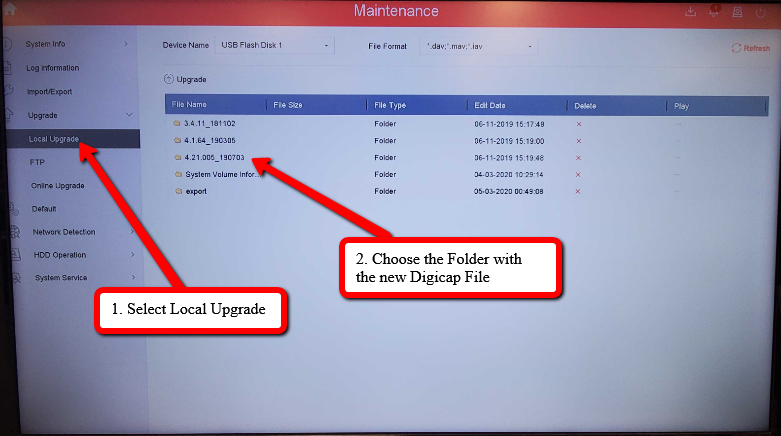
Then go to the Local Upgrade tab and find your Digicap file
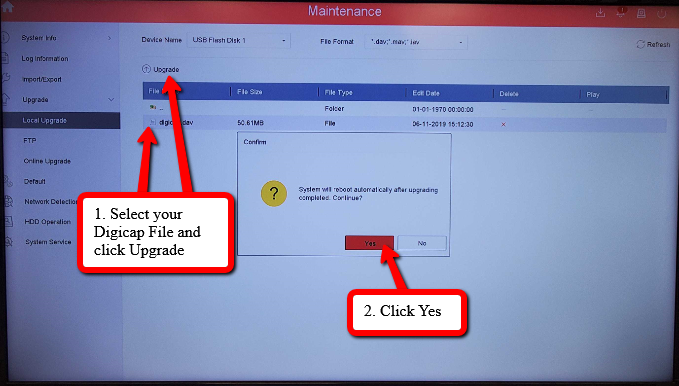
Select the Digicap file, then click Upgrade. You will then see a prompt, click Yes.
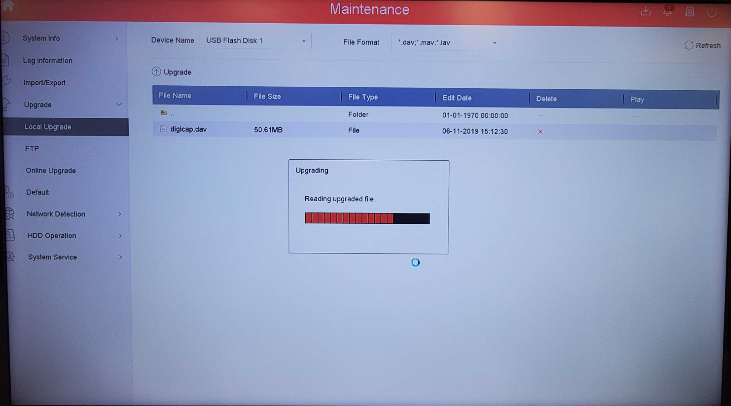
Then a progress bar will appear.
After the upload is complete, the recorder will reboot with the new firmware installed.
How to Create a New User
Adding Users is great for if you have multiple people that need to use or view the NVR, they can have their own unique logins aside from the admin account.
In this guide, we will go over both the 3.0 & 4.0 Attached monitor Interface, as well as the Web Interface.
Web Interface
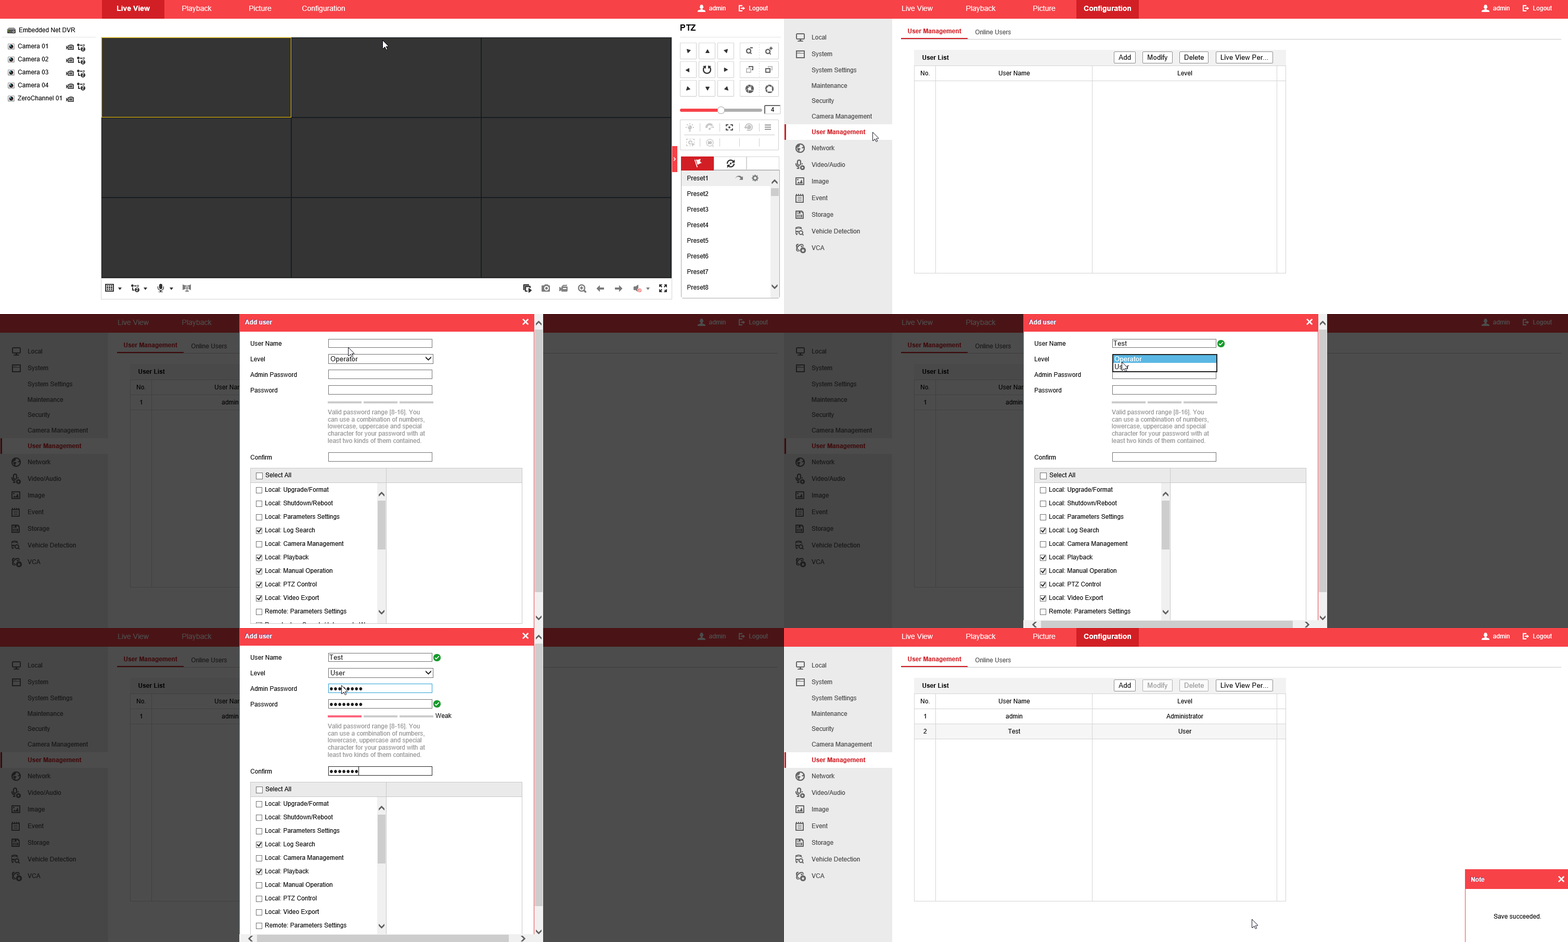
When you are logged into the local web interface, go into Configuration -> System -> User Management
Then click Add.
A popup menu will appear and you can then type in the username, and password for the new account, then set the permissions you’d like the user to have.
Level: Set the user level to Operator or Guest. Different user levels have different operating permission.
- Operator: The Operator user level has permission of Two-way Audio in Remote
Configuration and all operating permission in Camera Configuration. - Guest: The Guest user has no permission of Two-way Audio in Remote Configuration and
only has the local/remote playback in the Camera Configuration. - User’s MAC Address: The MAC address of the remote PC which logs onto the NVR. If it is
configured and enabled, it only allows the remote user with this MAC address to access the NVR.
Local Configuration
- Local Log Search: Searching and viewing logs and system information of NVR.
- Local Parameters Settings: Configuring parameters, restoring factory default parameters and
importing/exporting configuration files. - Local Camera Management: The adding, deleting and editing of IP cameras.
- Local Advanced Operation: Operating HDD management (initializing HDD, setting HDD
property), upgrading system firmware, clearing I/O alarm output. - Local Shutdown Reboot: Shutting down or rebooting the NVR.
Remote Configuration
- Remote Log Search: Remotely viewing logs that are saved on the NVR.
- Remote Parameters Settings: Remotely configuring parameters, restoring factory default
parameters and importing/exporting configuration files. - Remote Camera Management: Remote adding, deleting and editing of the IP cameras.
- Remote Serial Port Control: Configuring settings for RS-232 and RS-485 ports.
- Remote Video Output Control: Sending remote button control signal.
- Two-Way Audio: Realizing two-way radio between the remote client and the NVR.
- Remote Alarm Control: Remotely arming (notify alarm and exception message to the remote
client) and controlling the alarm output. - Remote Advanced Operation: Remotely operating HDD management (initializing HDD, setting
HDD property), upgrading system firmware, clearing I/O alarm output. - Remote Shutdown/Reboot: Remotely shutting down or rebooting the NVR.
Camera Configuration
- Remote Live View: Remotely viewing live video of the selected camera (s).
- Local Manual Operation: Locally starting/stopping manual recording and alarm output of the
selected camera (s). - Remote Manual Operation: Remotely starting/stopping manual recording and alarm output of the
selected camera (s). - Local Playback: Locally playing back recorded files of the selected camera (s).
- Remote Playback: Remotely playing back recorded files of the selected camera (s).
- Local PTZ Control: Locally controlling PTZ movement of the selected camera (s).
- Remote PTZ Control: Remotely controlling PTZ movement of the selected camera (s).
- Local Video Export: Locally exporting recorded files of the selected camera (s).
Attached Monitor Interface
3.0 Interface
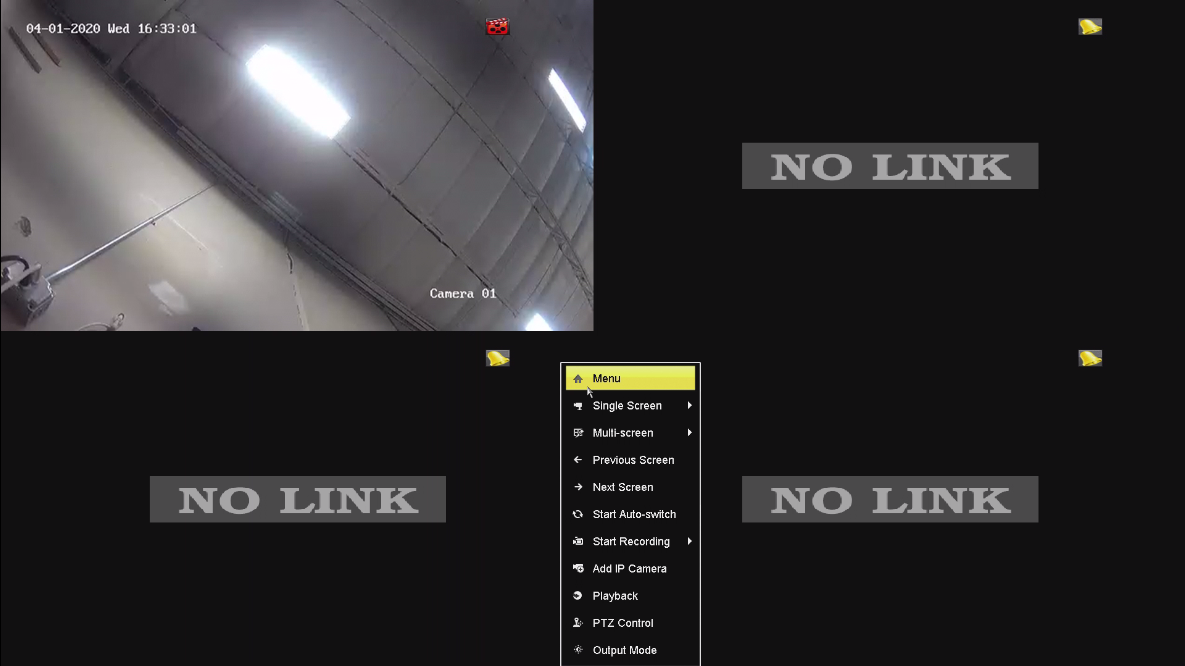
From the Live View, right click and select Menu
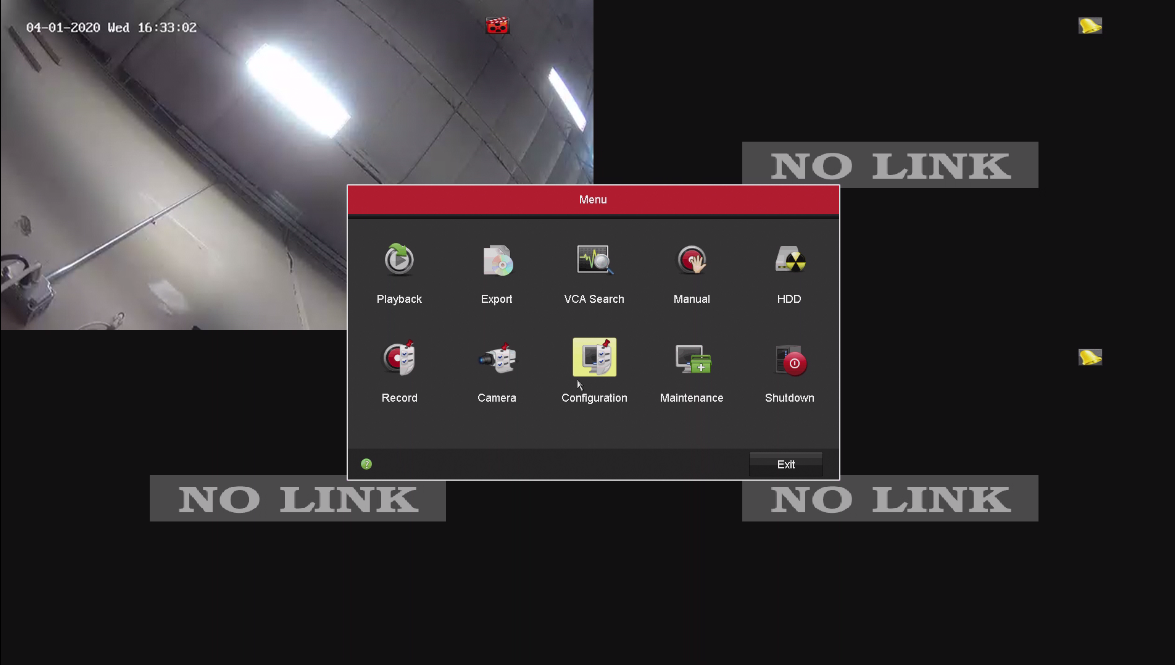
Go into the Configuration Section
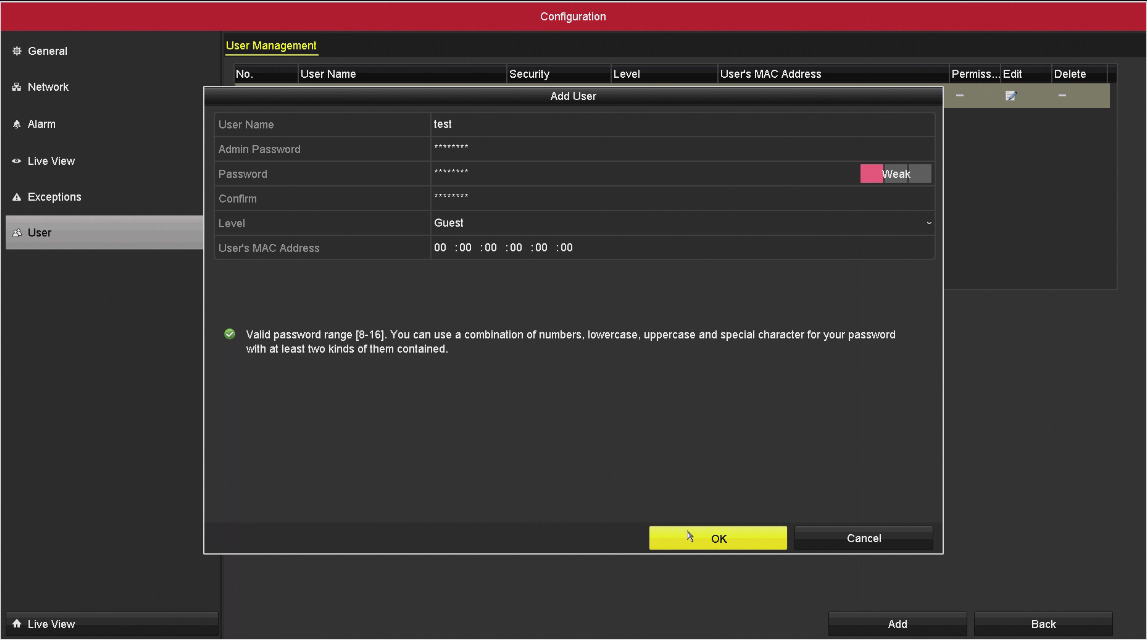
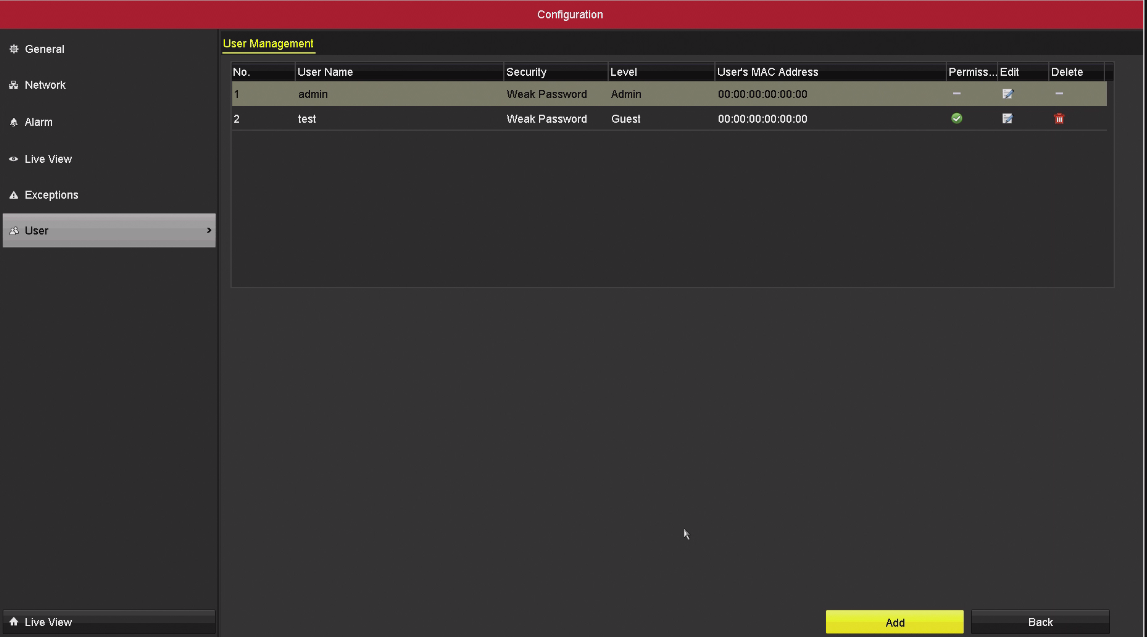
Then select User on the left side and click Add at the bottom right to add a New User
Enter the information for new user, including User Name, Password, Level and User’s MAC Address.
Click the OK button to save the settings and go back to the User Management interface. The added new
user will be displayed on the list
You Can Click on the Green Check Mark under the Permissions Column to adjust the permissions for the User.
4.0 Interface
From the Live View of the NVR, click on the top left Home Icon. Then select the System Tab.
Select the User Tab on the Left. Then Click +Add
A Popup section will appear for you to put in the User Name, Password, Level and User’s MAC Address. for the new user.
Afterwards, click OK. Then the new user will appear.
You can click on the Green Check Mark to adjust the users permissions.
