Views: 9
Eseecloud Stand alone camera, EseeCloud(IP Pro, VR Cam) is a simple, stylish, user-friendly, and powerful mobile video surveillance software. We are committed to continuously improving our video processing technology and video innovation technology and providing global security products, professional industry solutions, and superior services to continuously create greater practical value for our customers.
Eseecloud Stand alone camera Fast Installation Manual
Using the App to scan QR codes to add devices quickly
Before operating this unit, please read these instructions carefully and save them for future use.
Download and install the latest APP
Register and log in by scanning the QR code to download and install the latest app
Setting installation and configuration
Wireless connection installation
1. After downloading and installing, login to the APP;
2. When the camera is powered on, you will hear the tone of configuration mode (if there is no device configuration mode, please press and hold the device’s reset button for 3 seconds to reset the device);
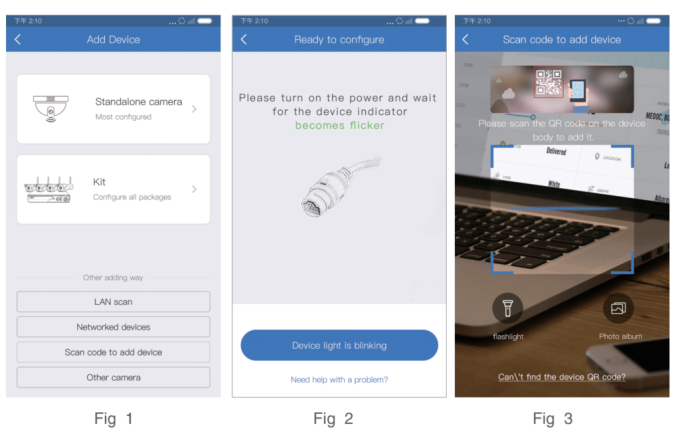
3. Click the plus sign on the upper right corner in the APP device list interface to add the wireless signal camera (Figure 1 );
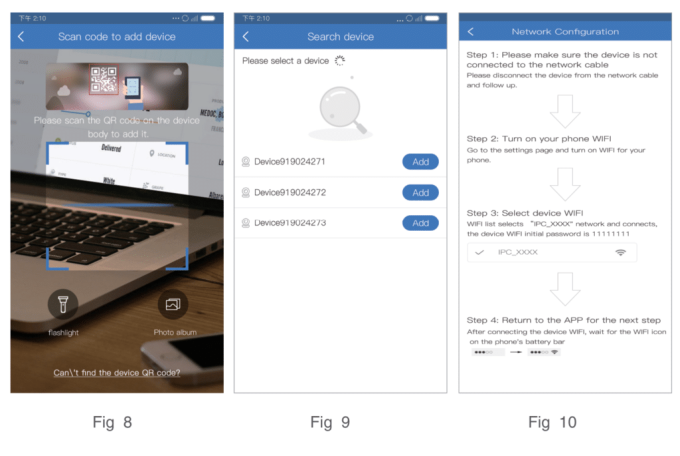
4. According to the (Figure 2) guide operation, After waiting for the device indicator to flash, click “device indicator has flashed” into the scan code interface (Figure 3) and check whether the device has a QR code.
When there is a QR code on the device
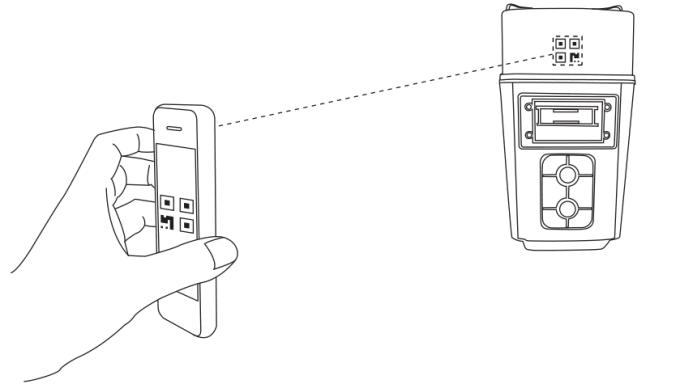
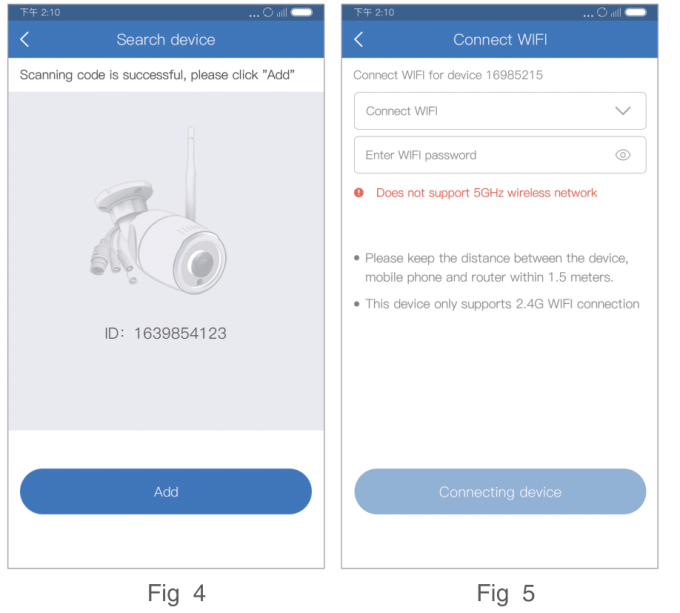
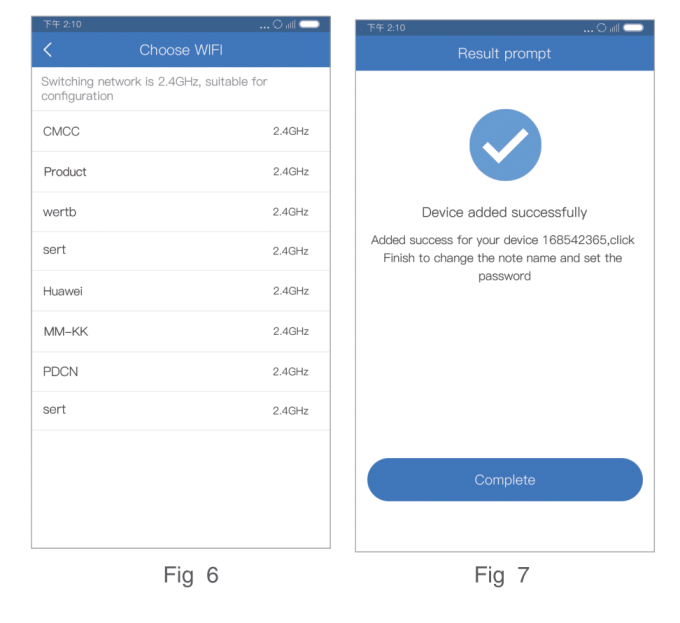
Scan the QR code on the device, and it will jump to the search device interface, then it will display the ID of the current device (Figure 4), click the” Add button” below, make it connect to the WIFI (Figure 5), user can click ” select WIFI” to select the WIFIwhich near the device (Figure 6), then enter the WIFI password, click on the” connected device “to enter the device distribution network interface (Figure 7). Finally, the device distribution network will be successful.
When there is no QR code on the device
Android:
If there is no QR code on the device, click the prompt “Can’t find the device QRcode?” button on the scan code interface(Figure 3). The device will automatically search for wireless devices near the phone (Figure 9), select the device you need, and click the Addition button to jump to the WIFI interface. The subsequent distribution steps are the same as (1)
iOS:
If there is no QR code on the device, click on the prompt “Can’t find the device QRcode?” button on the scan code interface (Figure 3), the device will jump to the operation guide prompt interface (Figure 10), follow the operation guide and go to the mobile phone setting interface to connect to the device hotspot, then return to the “IP PRO,” and jump to the WIFI interface, The subsequent distribution steps are the same as (1).
Wired connection installation
1. Make sure the device is connected to the Internet router by cable;
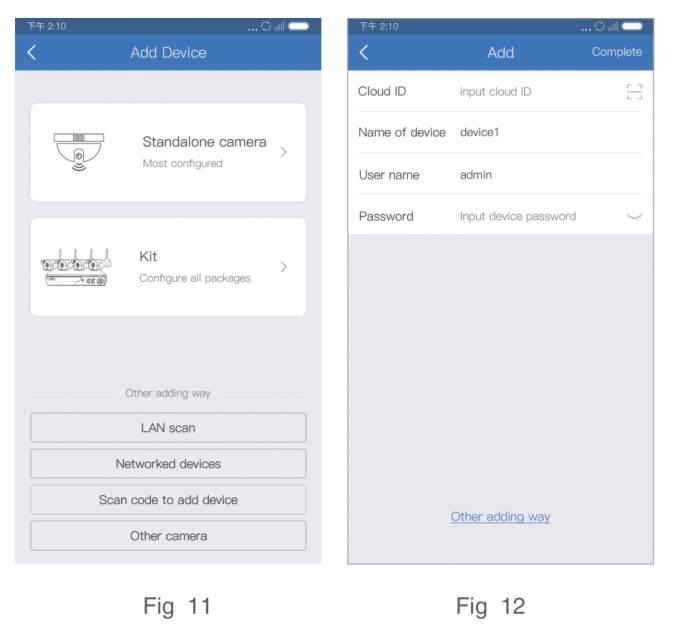
2. Click “Connected devices” in the Addition device interface;
3. Fill in the serial number of the device and click on the upper right corner to confirm the addition.
Warning
In case of fire or lightning, pls don’t put the product in a damp and rainy place; operate or maintain it according to the user manual.
Be careful when you see an attachment with a Dangerous voltage, which might cause a serious electric accident.
Notice:
1. Ensure your equity, pls read the user manual carefully before you use the product
2. Pls contact professional people if you need to install and maintain the product. The input voltage of this model is DC 12V
4. Working Environment: temperature of -20°C~+60°C, relative humidity under 85%5. Pls don’t exceed the user manual’s standard range of temperature, humidity, and voltage.
Eseecloud/IP PRO Quick Operating Guide v3.3.10
Before operating this unit, please read these instructions carefully, and save them for future use.
1. APP Download and Installation
Users can search “EseeCloud” on the APP store or “IP PRO” on Google Play or scan the QR code below to install the APP.
Note: For the IOS system, it requires the IOS 9.0 version or above.
For Android, Android 4.4 or above.
2. Software Operation
2.1. Log in
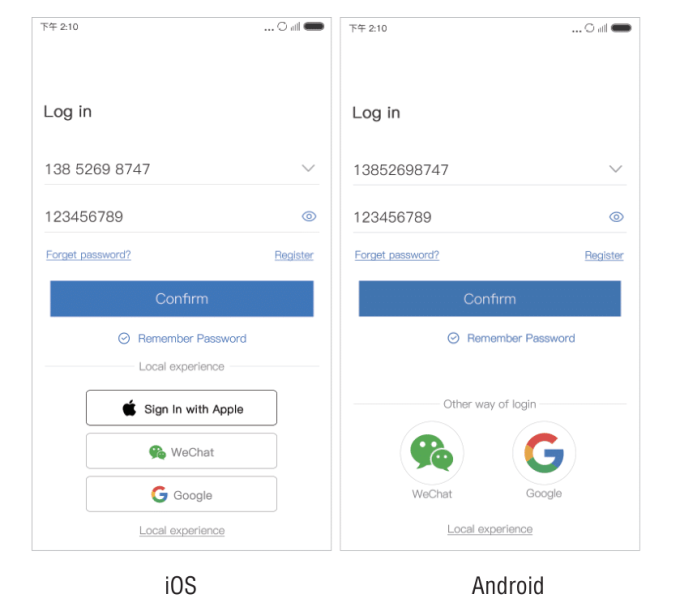
This APP supports “account log-in,” “third-party log-in,” and “local experience.”
Account log-in: At the log-in interface, input your user name/cellphone number/e-mailaddress and password, click “Confirm,” and log in.
Third-party log-in: Click the icon of the third-party network social software and authorize the app to log in.
Local experience: Users can use the app without logging in.
Remember the password: Supportremem-bearing the account and password that have been logged in, which is convenient for switching account login.
Note: Please pay attention that“Local experience” mode will be stored at local.
Once data is lost, it can’t be restored.
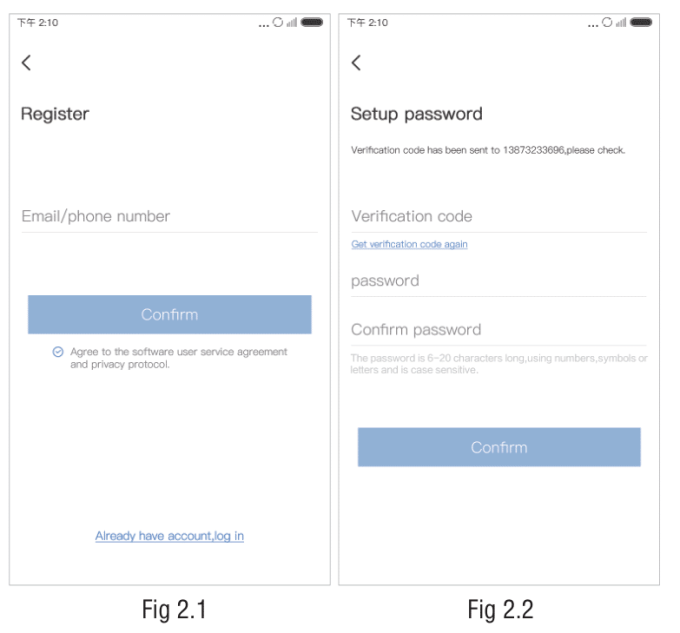
2.2. Registration
Input your cellphone number/email address to register and get a verification code.
Input the verification code and password, and click “Confirm.” After registration, it will move to the device list.
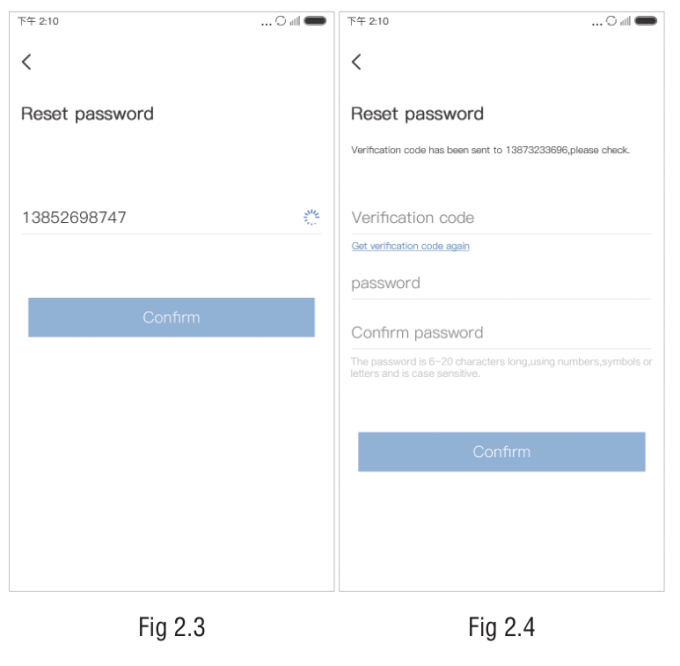
2.3. Reset Password
Input the registered cellphone number/email address to get the verification code.
Input the verification code, reset the password, and click “Confirm.”
Then, go back to the login interface and log in with a new password.
3. Add Device
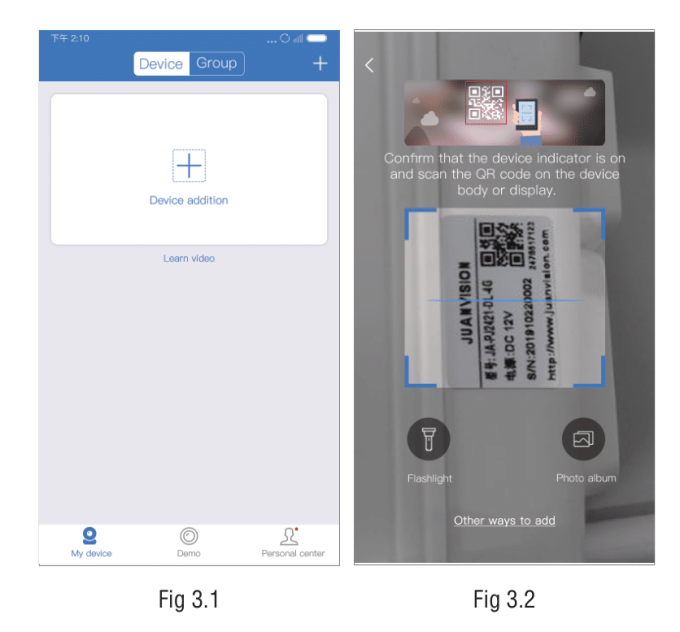
(1). After logging in, jump to the device list and click the “+” add button on the interface (Figure 3.1) to jump to the QR code scanning interface (Figure 3.2).
(2). If there is a QR code on the device or on the monitor, please refer to the QR code scanning process of adding the device in 3.1. If you cannot find the QR code, please check the adding process in 3.2.
Note: When adding the device, please make sure that the phone camera, WIF, and positioning permission are turned on.
3.1. Scanning and adding devices (There is a QR code )
How to add a non-networked device
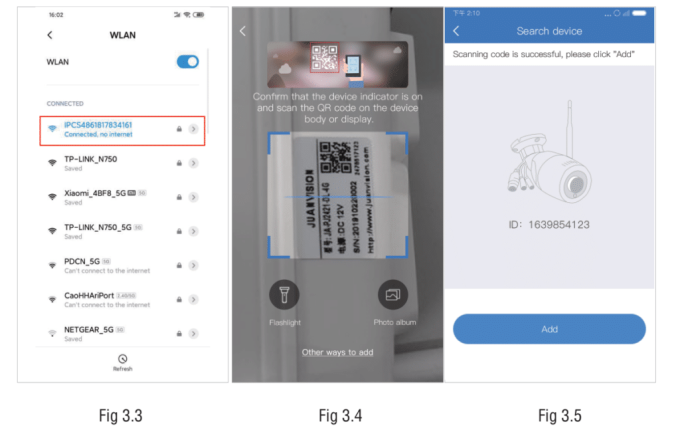
(1). Please go to the mobile phone system settings and select the device hotspot starting with IPC. The default password is 11111111 (Figure 3.3)(Notice: please keep connected with the device hotspot);
(2). Open the EseeCloud app, input the QR code scanning interface to scan the device QR code (Figure 3.4), and on the search device interface(Figure 3.5), click “Add”;
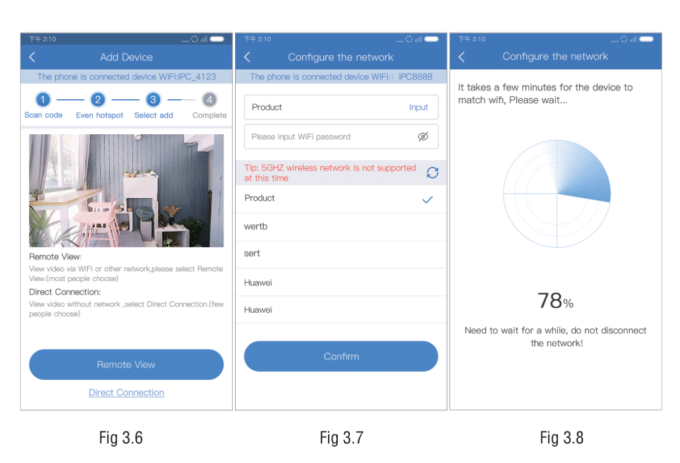
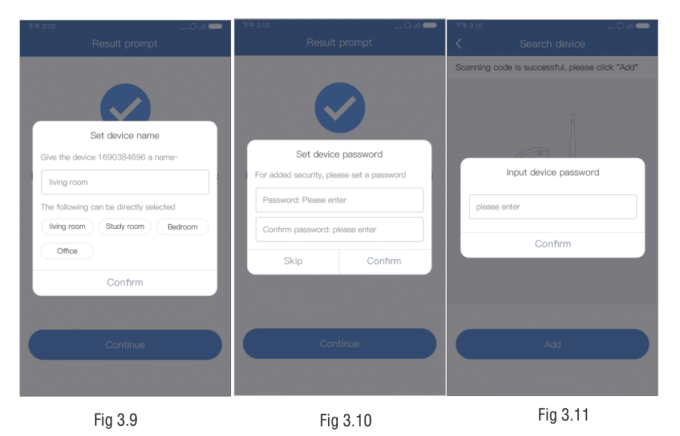
(3). For viewing and using via WiFi or other networks, please choose to use it remotely; if there is no network, connect the camera at close range for viewing, and please select a local connection (Figure 3.6). Remote view: Click the “Remote view ” button (Figure 3.6) to go to the configuration network interface. The system will display the WiFi search for the device below the interface. Select or enter the router’s WiFi name and password at home (Figure 3.7), and click OK to configure the device WiFi(Figure3.8); after the configuration is successful, follow the interface to complete the device name and password settings (Figures 3.9 and 3.10), and return to the device list after adding successfully.
Direct connection: Click the “Direct connection” button (Figure 3.6) and pop-up box for setting the device name, and follow the interface steps to complete the device name and password settings (Figure 3.9, 3.10); after adding successfully, return to the device list to display the added device.
How to add networked devices
(1). Open the EseeCloud APP, enter the QR code scanning interface to scan the QR code on the device or the monitor (Figure 3.4), and in the search device interface (Figure 3.5), click “Add”;
(2). Follow the interface to set the device name (Figure 3.9), input the correct device password (Figure 3.11) (skip this step if the device has no password), and return to the device list after adding successfully.
3.2. Other adding methods (Device QR code cannot be found)
How to add a non-networked device-standalone camera
(1). Please go to the phone system settings and select the device hotspot starting with IPC. The default password is 11111111 (Figure 3.12) (please keep connected with the device hotspot during the connection process);
(2). Open the EseeCloud App, enter the QR code scanning interface, and click ” Other Ways to Add ” (Figure 3.13);
(3). Select the wireless standalone camera (Figure 3.14). For the subsequent network configuration steps, please refer to the adding process in 3.1 Adding a non-networked device(3).
How to add networked devices
1: Process of adding wireless NVR Kit
(1). Please connect the KIT device to a router that can access the Internet through a network cable;
(2). Open the EseeCloud App, input the QR code scanning interface, and click ” Other Ways to Add ” (Figure 3.13);
(3). Select the KIT(Figure 3.14);
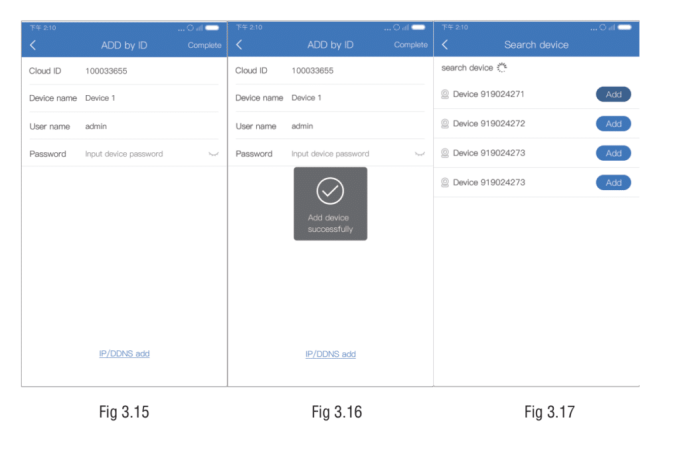
(4). After inputting the device ID, name, and device password (Figure 3.15),
click complete in the upper right corner to return to the device list after the addition is successful (Figure 3.16).
2: Adding process of LAN search device
(1). Please go to the mobile phone system to set the currently connected
WiFi of the connected device, and ensure that the mobile phone and the
the device is under the same routing WiFi;
(2). Open the EseeCloud APP, enter the QR code scanning interface, and
click “Other Ways to Add” (Figure 3.14);
(3). Select LAN scan (Figure 3.15).
(4). Select the required device ID in the scanning interface (Figure 3.17), click Add to enter the ID-adding interface, enter the device name and device password, and click Complete in the upper right corner to return to the device list after the addition is successful.
3: Process of adding networked devices
(1). Open the EseeCloud APP, enter the QR code scanning interface, and click
”Other ways to add” (Figure 3.13).
(2). Select the networked device(Figure 3.14);
(3). After entering the device ID, name, and device password (Figure 3.15),
click complete in the upper right corner to return to the device list after the addition is successful (Figure 3.16).
3.3. Add Shared Device
Click the “+” add button on the device list to jump to the scan code scanning interface, scan the shared device QR code, enter the search device interface, confirm the addition, and return to the device list interface to prompt the addition result. (Figure 3.18-3.20).
4. Preview Playback
4.1. Operating instructions
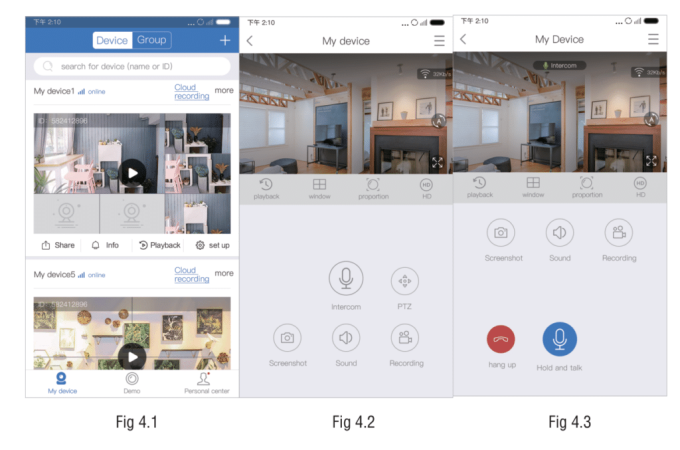
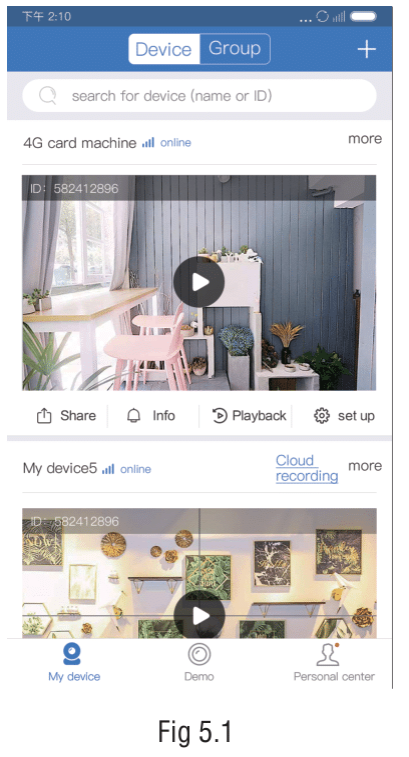
Device list: After adding the device successfully, the device list will display the device card, showing the device name, online and offline status, sharing, playback, alarm messages, settings, and more function buttons; click the thumbnail to enter the preview interface. (figure 4.1).
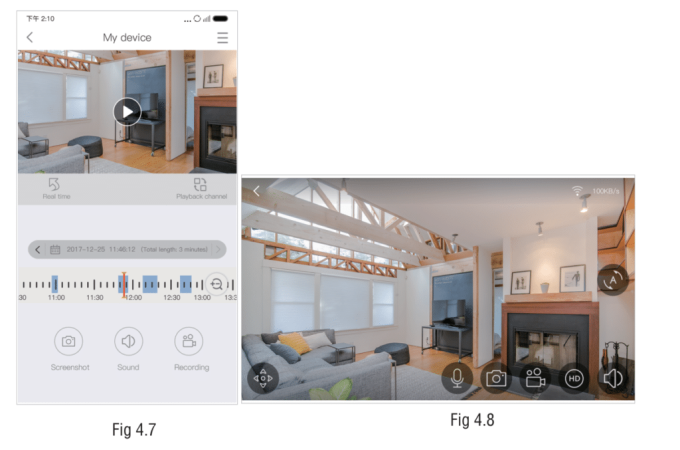
Preview: Click the thumbnail of the device channel to enter the preview interface, and click the full-screen button to switch to landscape display (Figure 4.7).
The preview interface functions can be adapted according to the device.
Intercom function: Click the intercom button (Figure 4.2), and the APP initiates an intercom to the device. After the launch is successful, it prompts that the intercom is successful. The interface displays the intercom and hang-up buttons (Figure 4.3). Click the hang-up button to end the intercom (when the device is in the intercom state, other users cannot initiate an intercom to the device).
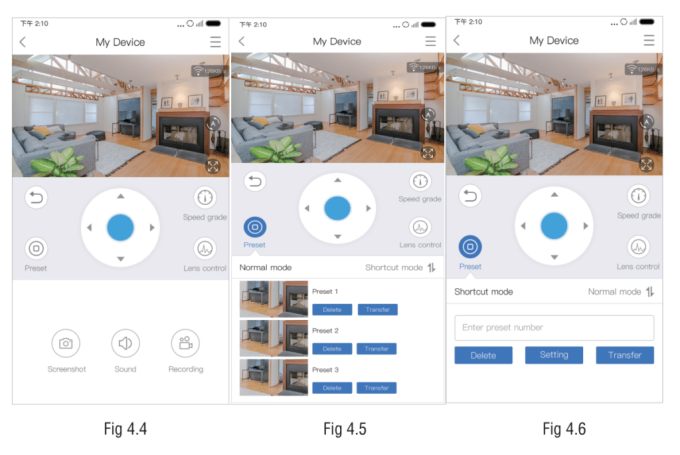
PTZ preset function: Click the PTZ button (Figure 4.2) to display the PTZ function (Figure 4.4). You can slide the control button or click the direction arrow to control the camera direction and adjust the monitoring area.
(1) Click the preset button to display the preset position below the interface(Figure 4.5), you can add, recall, and delete preset positions; preset positions are divided into normal mode (Figure 4.5) and shortcut mode (Figure 4.6);
(2) Click the speed level button to pop up the PTZ speed level selection pop-up box; click the lens control button to change the camera focal length, magnification, and other functional parameters.
Playback: Click the playback button (Figure 4.2) to switch to the playback interface (Figure 4.7); you can view the video and filter the recording date.
4.3 Gesture operation illustration
1) Two-finger touch screens are stretched out to enlarge the picture.
2) Two-finger touch screens are stretched inward to reduce the picture.
3) Double-click on the screen to zoom in and out.
4) Single-point left/right and up/down to slide the screen.
5. Data recharge of 4G camera
5.1 4G Card Device Management and Recharge
4G camera management:
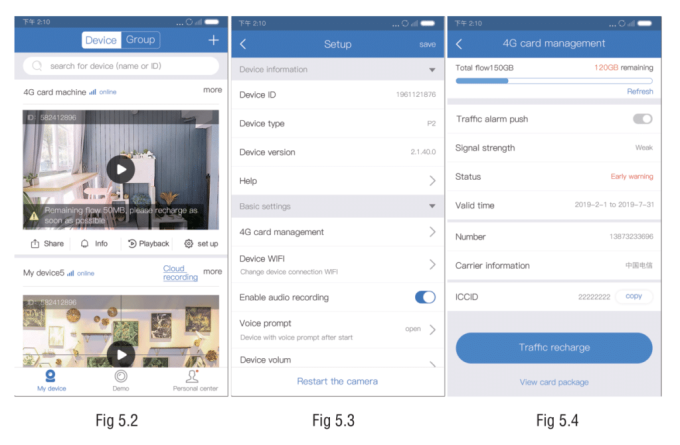
(1) When the flow is sufficient, the device list is displayed normally (Figure 5.1), and when the flow reaches the warning value, the current remaining flow is displayed (Figure 5.2);
(2) Click on the 4G card management (Figure 5.3) or flow warning value prompt text in the settings to jump to the 4G card management interface(Figure 5.4), and you can view the information about the 4G card traffic usage, signal level, etc.
4G card data recharge process:
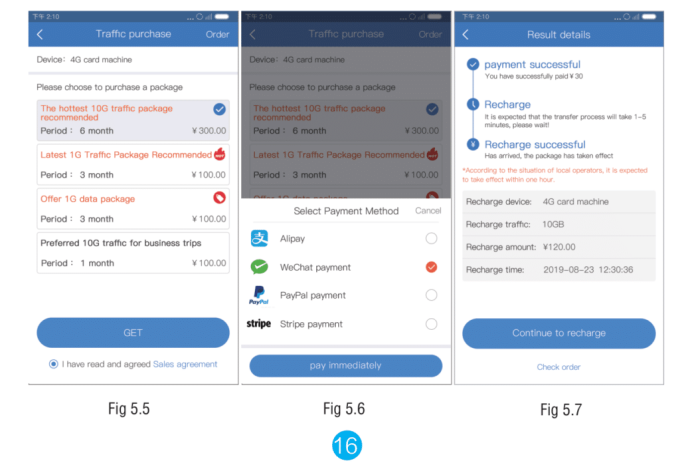
(1) On the 4G card management interface, click the “Recharge Data” button(Figure 5.4) to enter the data purchase interface (Figure 5.5). After selecting the package and payment method, click Pay Now (Figure 5.6);(2) After completing the payment, return to the APP and display the details of the result. After the recharge is successful, the recharge device, traffic, and other information will be displayed (Figure 5.7).
Note: The effective time of the recharge depends on the local operators and is expected to take effect within one hour.
5.2 4G Camera Abnormal Conditions
4G camera device list abnormal situations:
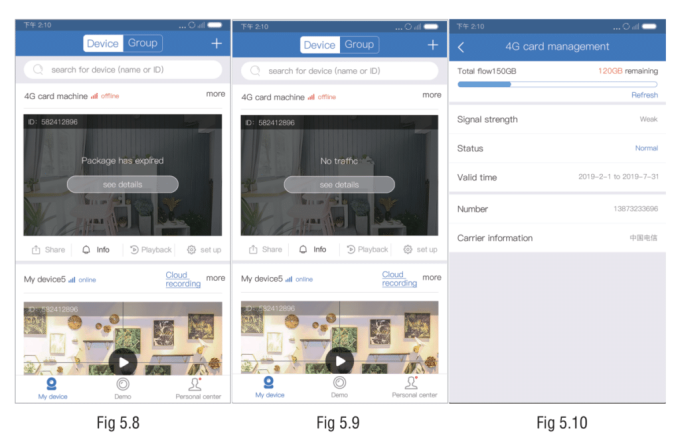
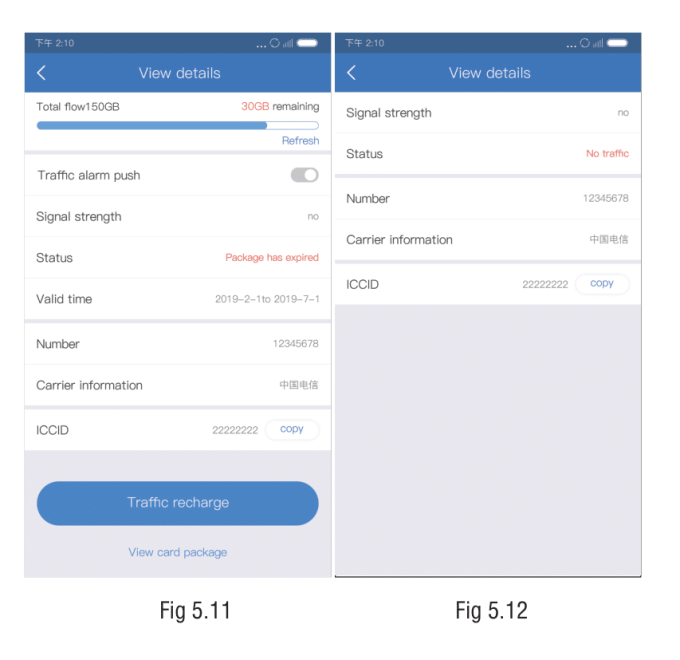
When the 4G camera has no traffic, and the package expires, the device list displays the corresponding status (Figures 5.8 and 5.9). Click View Details to enter the 4G card details interface and display the corresponding status based on the offline reason of the device list (Figures 5.10 and 5.11), Click on Data Recharge to enter the 4G card data recharge process.
Note: When the camera is plugged into a non-equipment 4G card, it will not support data package recharge, traffic query early warning, and other functions (Figure 5.12).
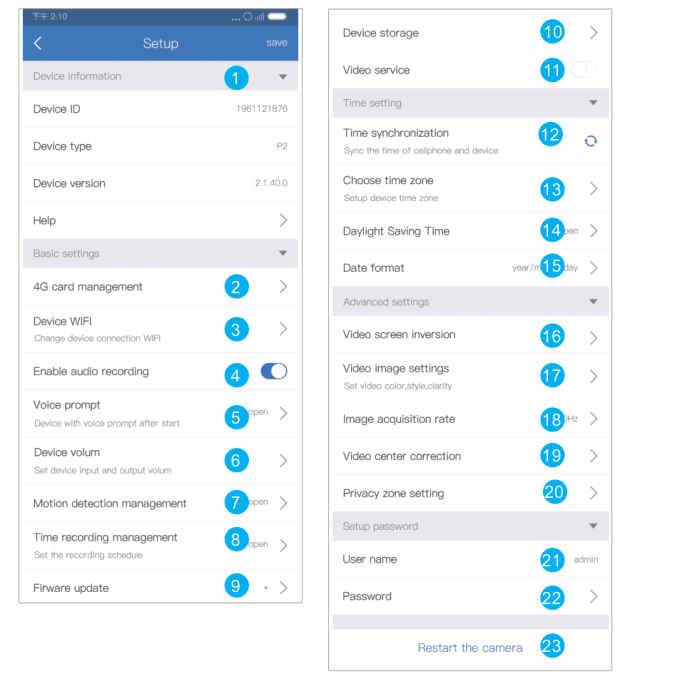
6. Setup Instructions
Note: The function in the list will be displayed only if the camera hardware supports it. If the camera does not support a function in the list, the APP will hide the function setting item.
