Views: 2
Backup via USB
Description
Dahua records backup all methods This lesson will show you how to backup recorded video off of a DVR or NVR using a USB drive.
Prerequisites
- FAT32 USB flash drive or FAT32 USB storage.
- Monitor or display connected to NVR or DVR
- USB Mouse
Load More : Dahua Cloud Recording, Backup, Monitoring and Playback
Video Instructions
Step by Step Instructions
Note: This is for local back up on physical recorder.
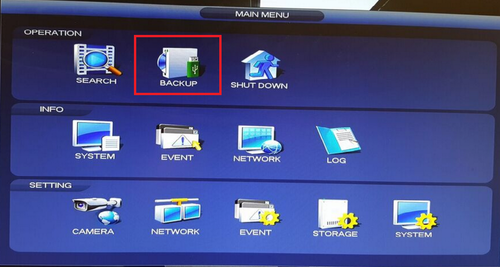
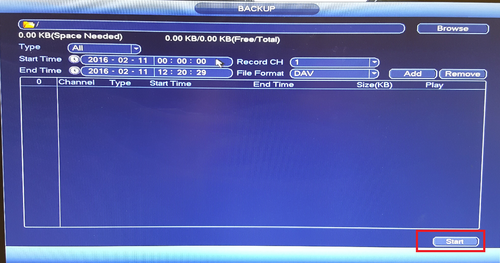
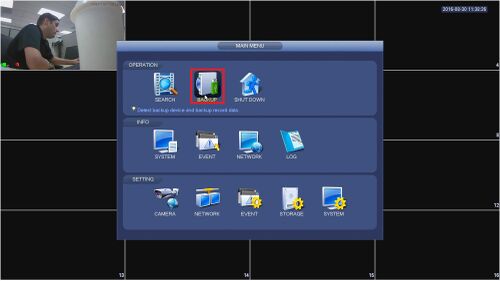
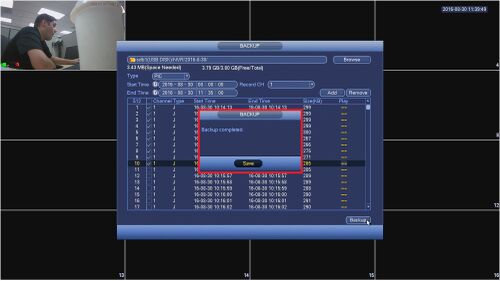
1. From the Main Menu select “Back Up”
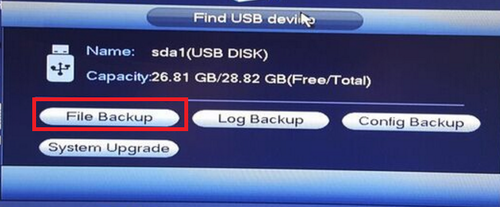
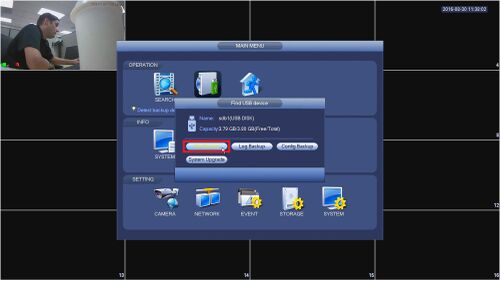
2. Plug in USB device such as a flash drive in to one of the USB ports of the recorder.
3. A pop up will show → Select “File Back up”
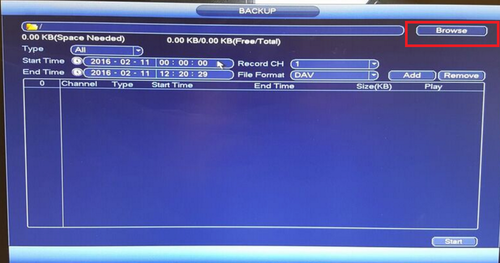
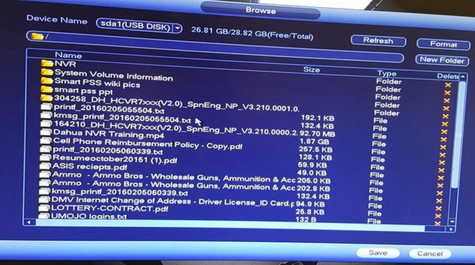
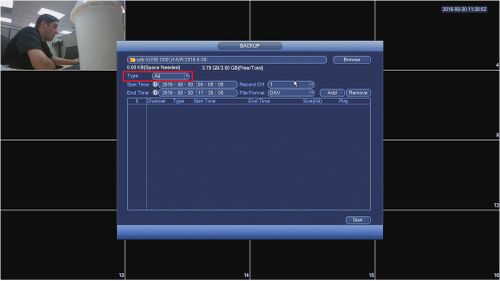
4. Select “Browse” → Select folder to save back file in or create new folder to save back up.
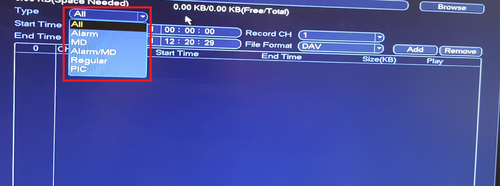
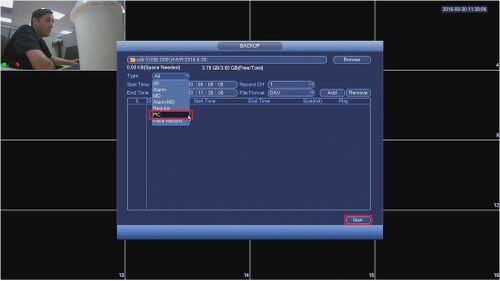
5. Select “Type” such as Alarm or MD (Motion Detect).
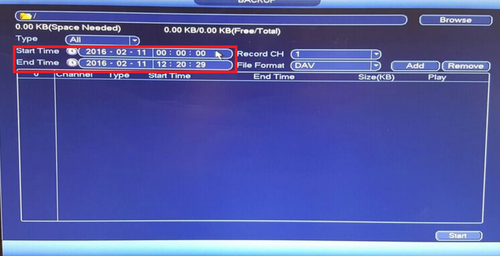
6. Select “Start Time” and “End Time”.
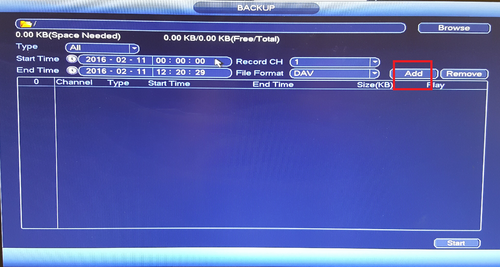
7. Select “Channel” → “Add” to add what you have selected. What you added will be in list form.
8. Select “Start” to start back up.
Backup via SmartPSS2
Description
This allows you to back up videos on SmartPSS2.
Prerequisites
- SmartPSS installed on a Windows or Mac computer
- Dahua NVR with a stored recording
- Established network connection with the NVR
- The NVR added to SmartPSS
- Enough drive space for the video backup
Video Instructions
Step by Step Instructions
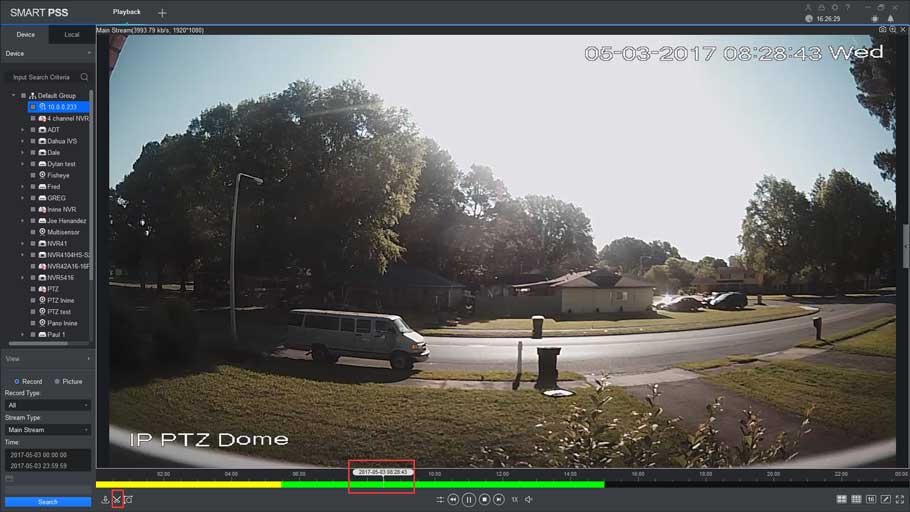
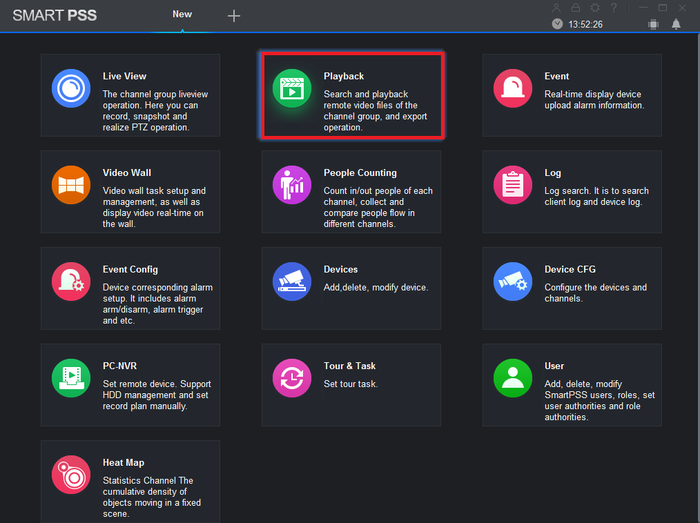
1. From the home menu select “Playback”.
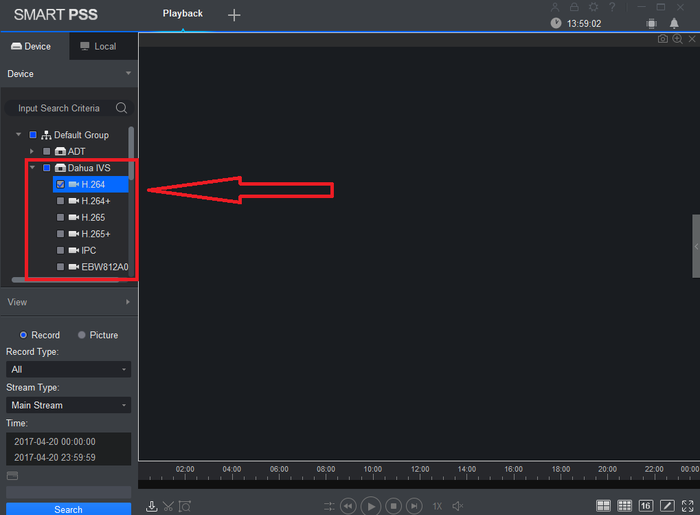
2. From the left hand side select device -> camera or cameras. More than one maybe selected.
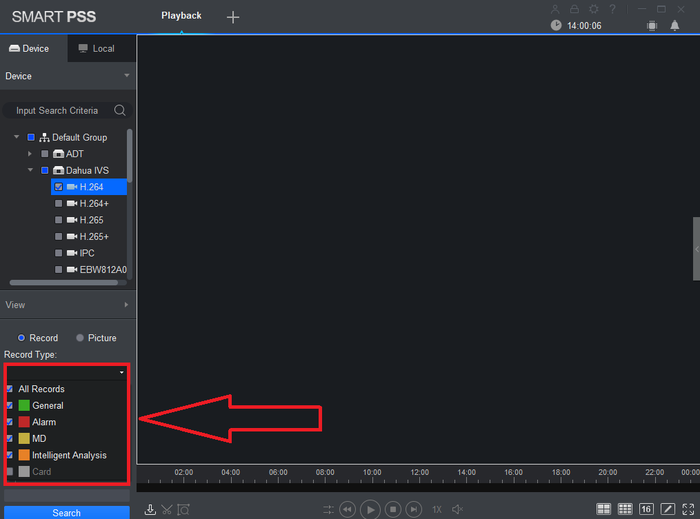
3. Select Record type. Drop down menu allows to select All Records, General, Alarm, MD (Motion Detection), and Intelligent Analysis.
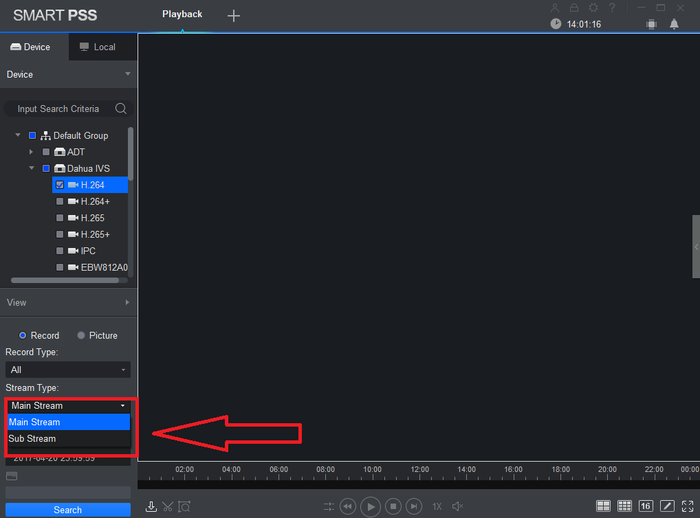
4. Select Stream Type (Main Stream or Sub Stream).
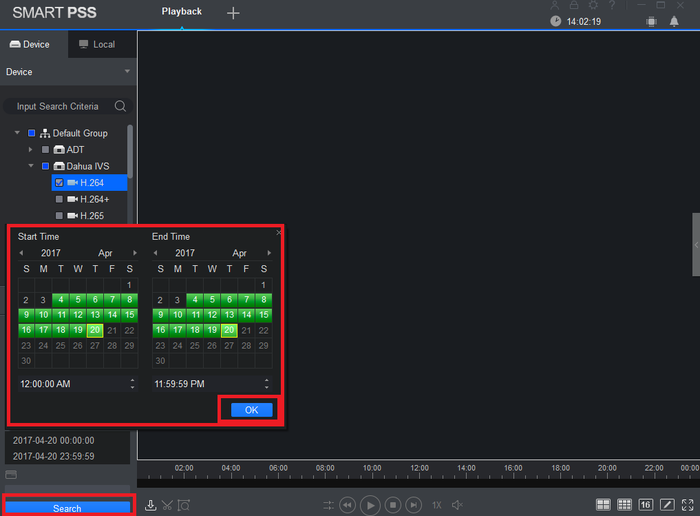
5. Select Date and time -> Select OK -> Select Search.
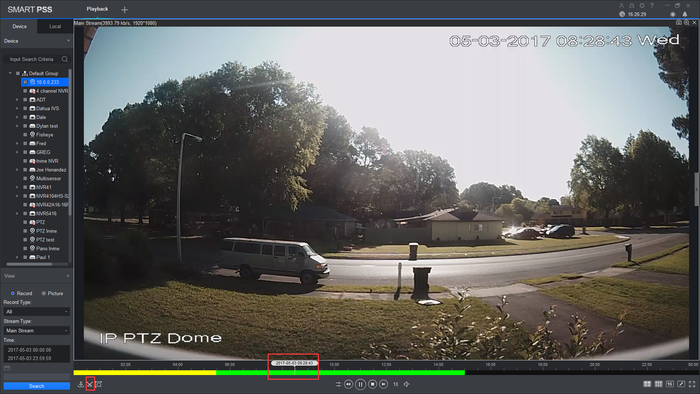
6. Choose a time frame and click on time clip.
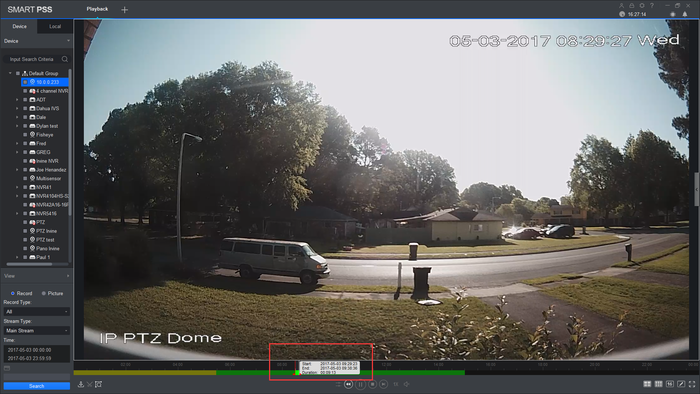
7. Choose the beginning and end of time clip you want to backup.
8. Click on time clip again and select the folder to back up to and select the exported file type.
9. Click ok
10. It should start downloading the back.
11. You should now have the file backed up at the specified folder.
Backup via Web Browser
Description
This article will show you how to backup recorded video off of a DVR or NVR over the network using Internet Explorer.
Prerequisites
- A NVR
- PC
- Internet Explorer
- HDD installed on the NVR.
Video Instructions
Step by Step Instructions
Please Note: If you are on a Windows PC, please make sure you disable UAC and reboot your PC before attempting these steps.
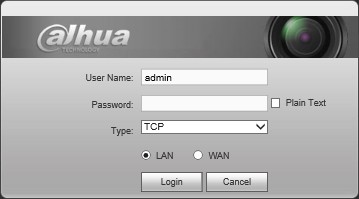
1. Login to your NVR or DVR via Internet Explorer.
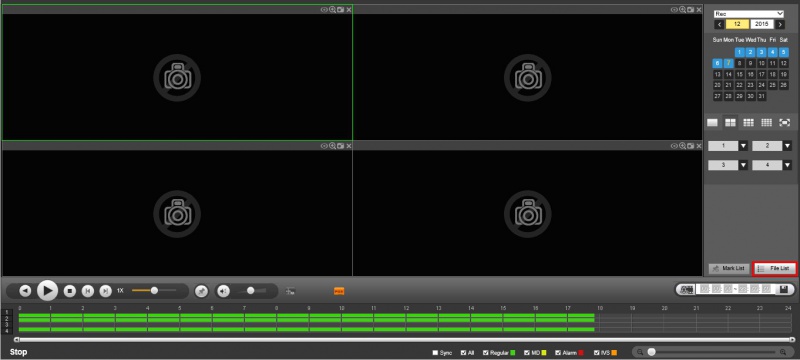
2. Click, “Playback”
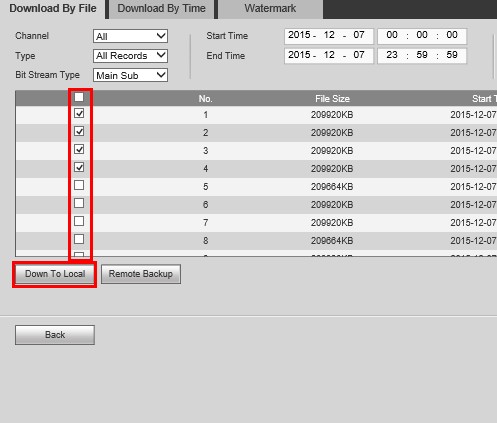
3. Click, “File List”
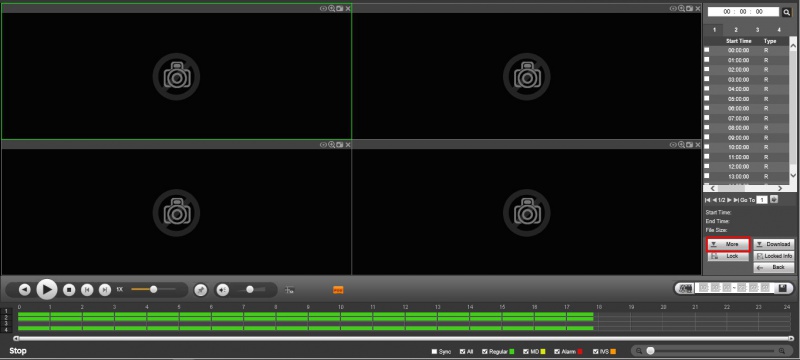
4. Click, “More”
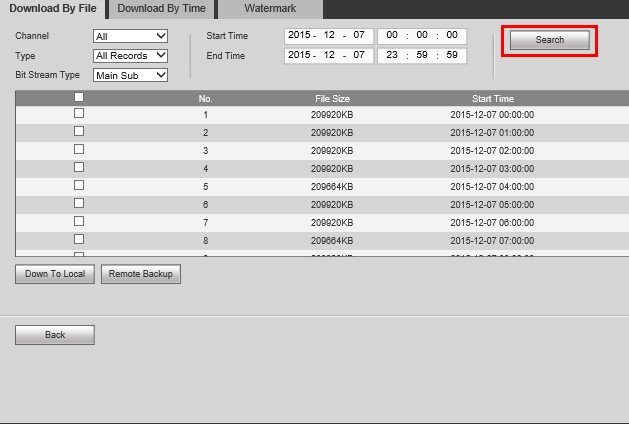
5. Input the following:
- Channel
- Type
- Bit Stream Type
- Start Time
- End Time
6. Click, “”Search”
7. Check the boxes for each of the files you wish to back up, and click, “Down to Local”
8. Change the, “Record Format” to “ASF”
9. Select the location you wish to save the files, and click “OK”
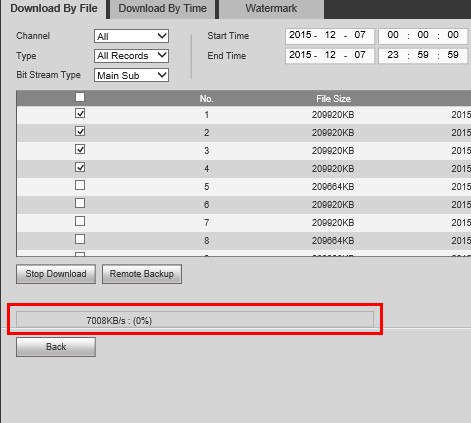
10. Progress will be displayed towards the bottom of this page.
Backup via SmartPSS
Description
This allows you to back up videos on SmartPSS.
Prerequisites
- SmartPSS installed on a Windows or Mac computer
- Dahua NVR with a stored recording
- Established network connection with the NVR
- The NVR added to SmartPSS
- Enough drive space for the video backup
Video Instructions
Step by Step Instructions
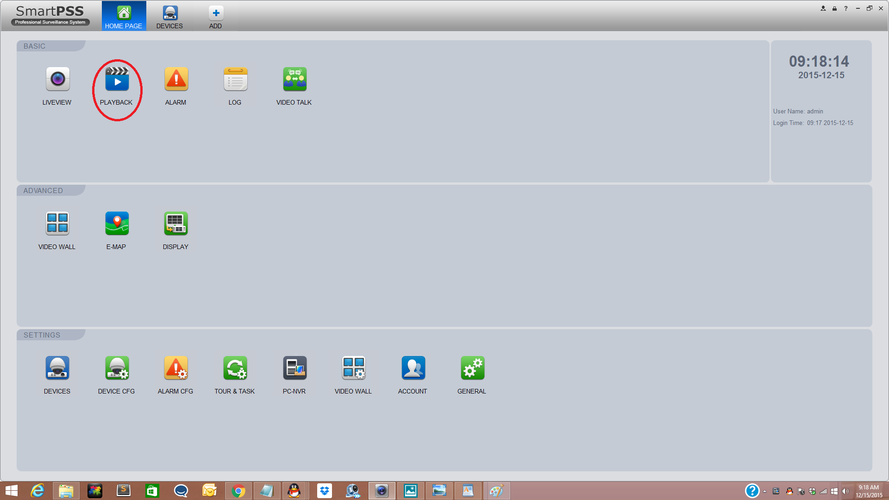
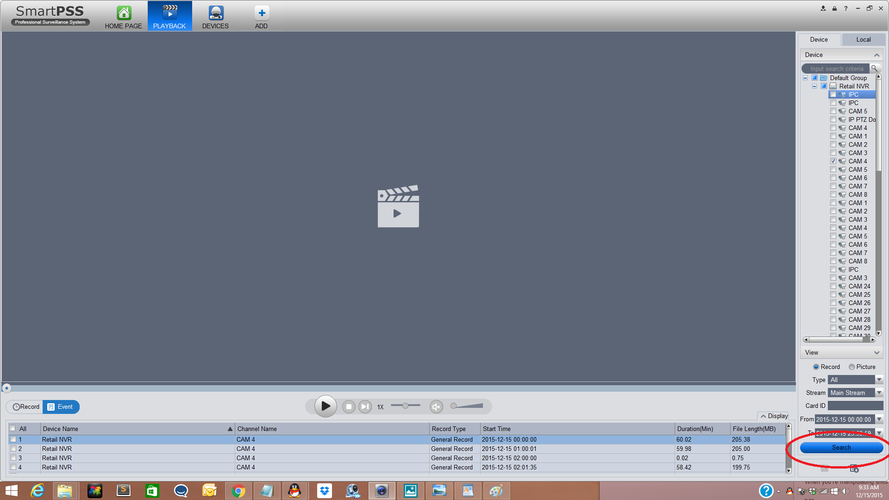
1. From the Home Page on SmartPSS select the “PlayBack Button”
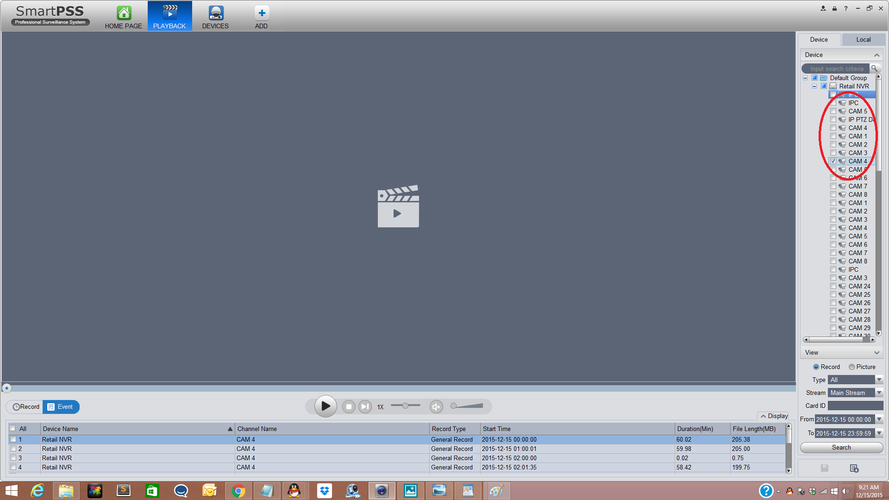
2. From the PlayBack Page on the right hand side select“Camera or Channel” for the footage you need to backup. Multiple cameras or channels may be selected.
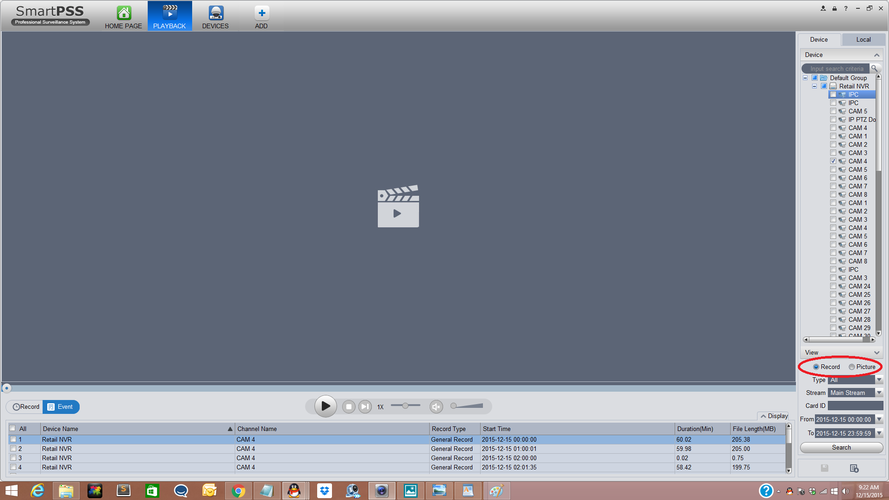
3 . Select “Record or Picture” for the content you would like to backup.
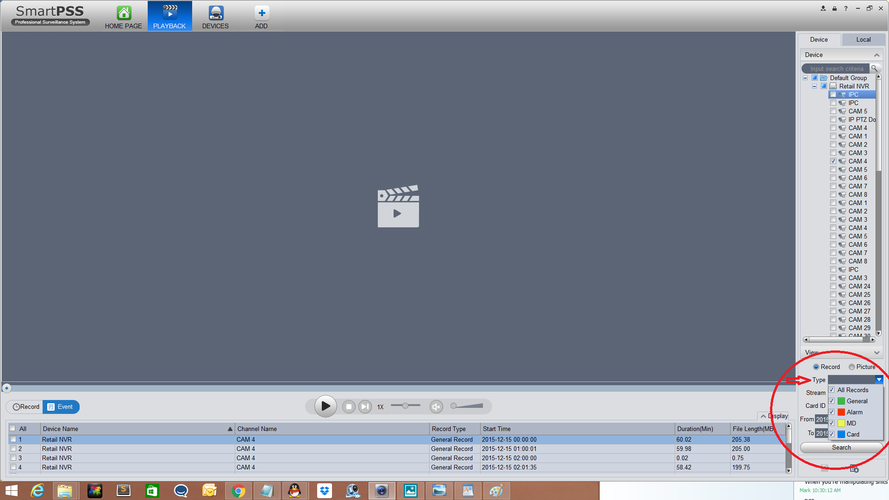
4. Select which one of the options “Type” (such as Motion Detection) you nedd to backup.
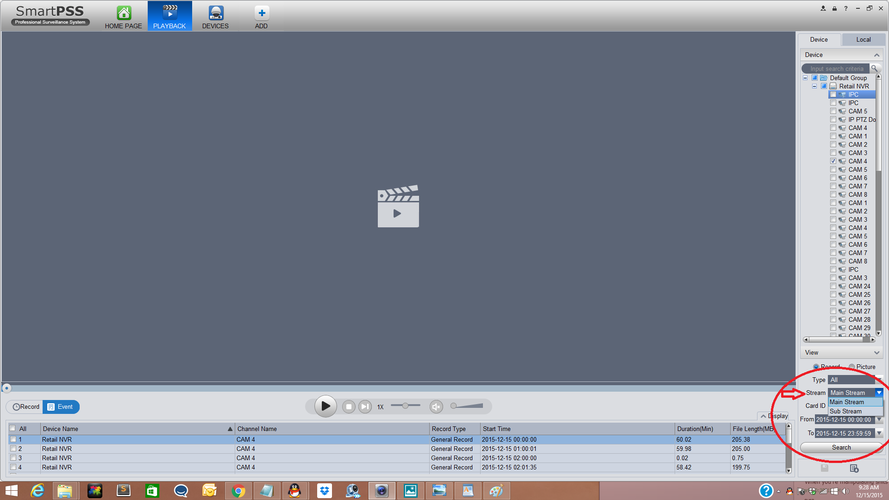
5. Select the stream “Main or Sub”.
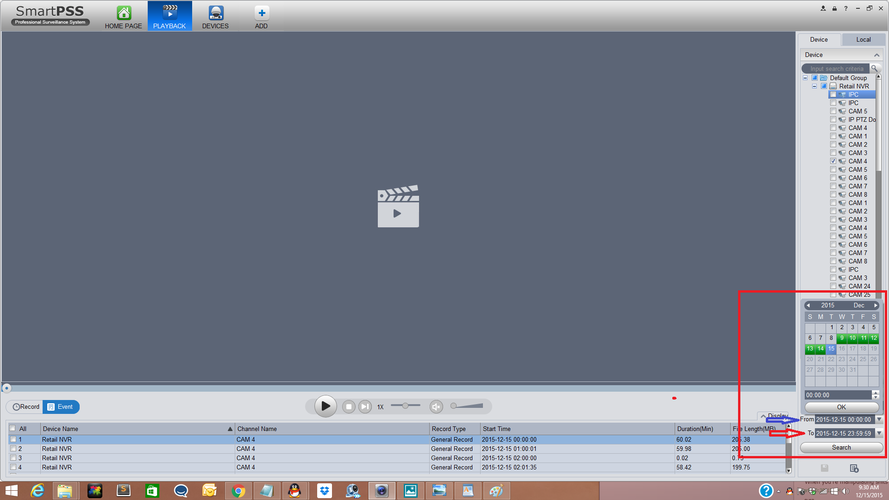
6. Select and choose “Date and time” .
7. Select “Search”.
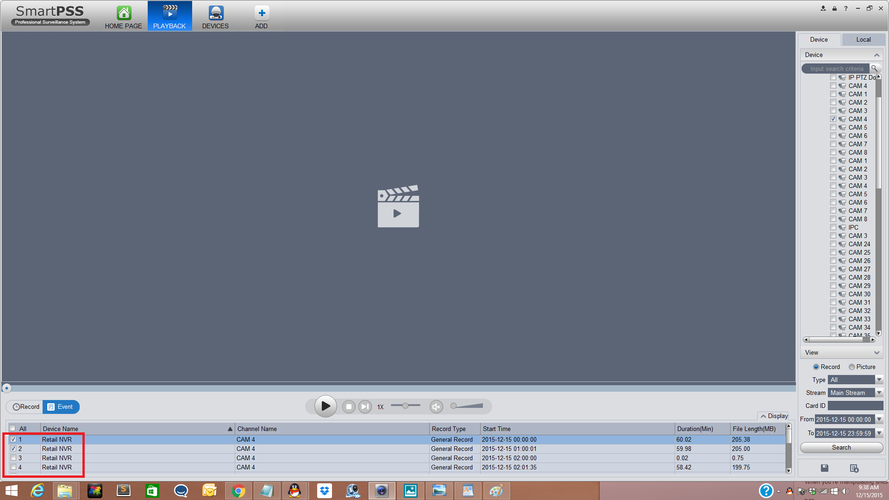
8. Select or Check which footage you need to export or download. Video footage can be viewed by clicking on the “Play” button and by selected events.
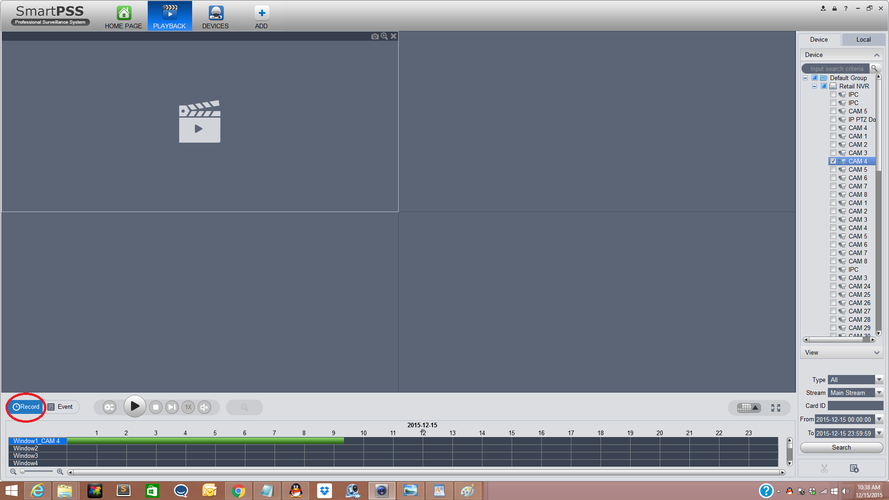
9. You may trim the video footage if the “Record tab” is selected. You will need to click the scissor or trim icon to trim the selected video.
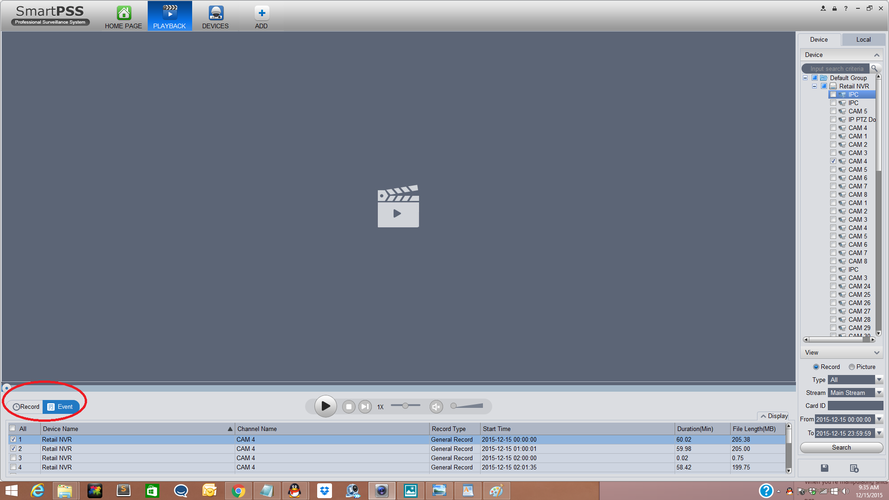
10. On the “Event” tab you will need to select or check the events you want to save e.g (1, 2, 3, 4). Multiple videos may be selected to export.
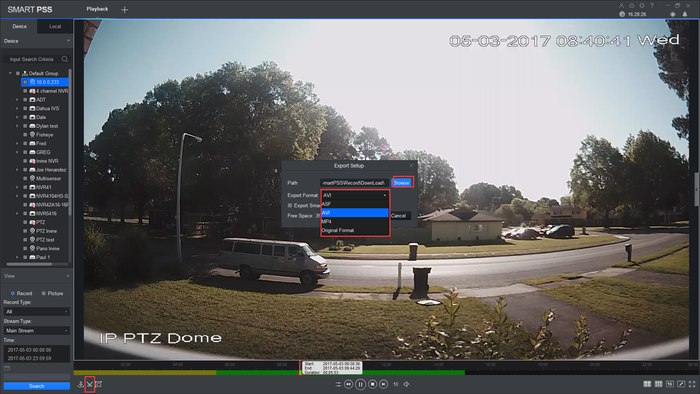
11. Click on the disk icon to save and start the export.
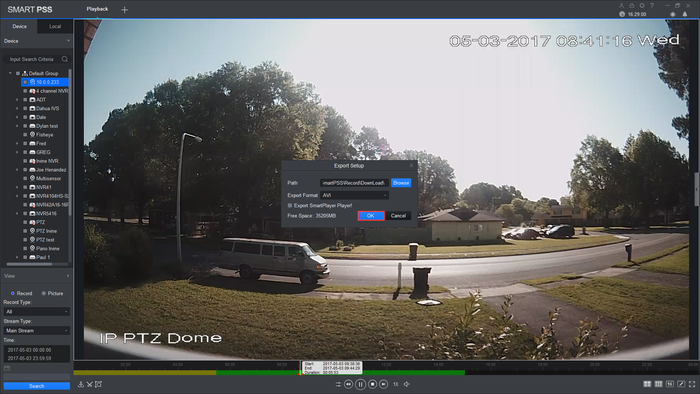
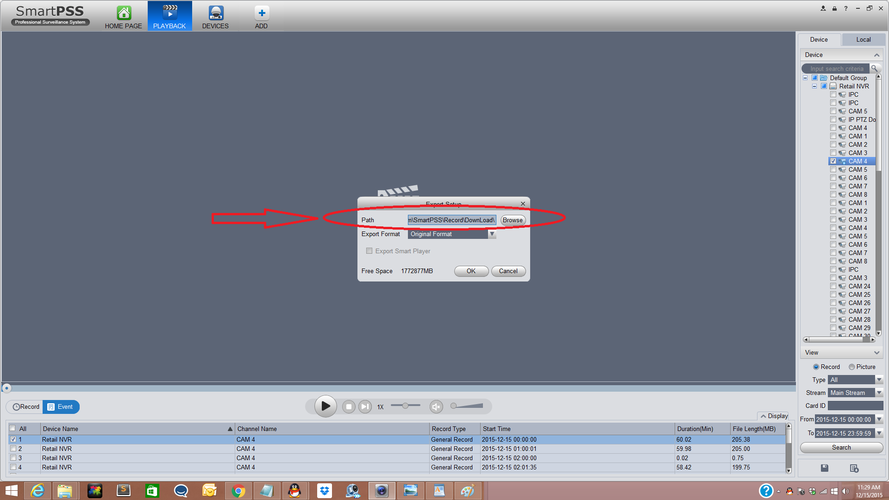
12. Select “Path” You would like to save to . You can save it to a specific folder.
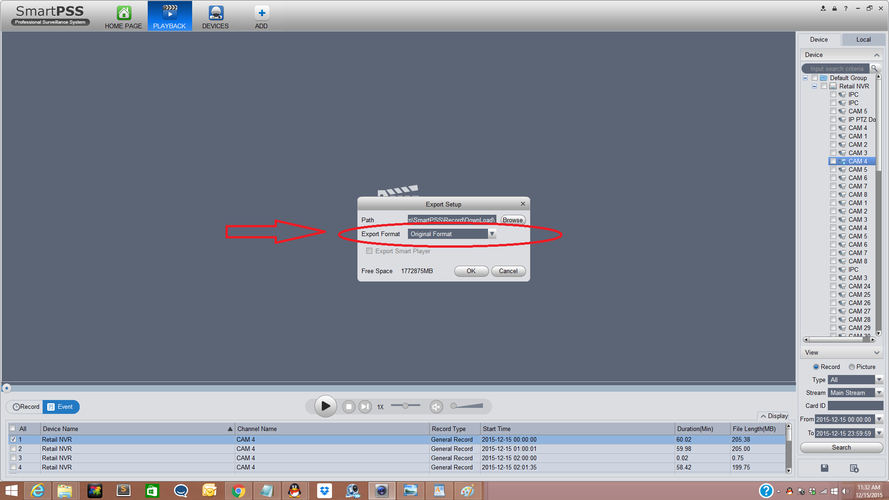
13. Select “Export Format” (Original Format, ASF, AVI, MP4) and click “OK”
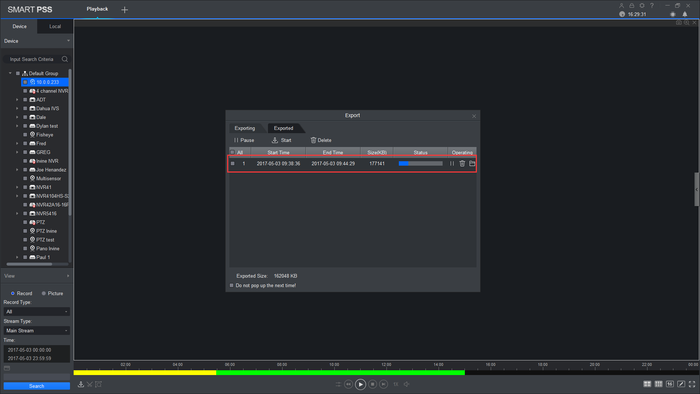
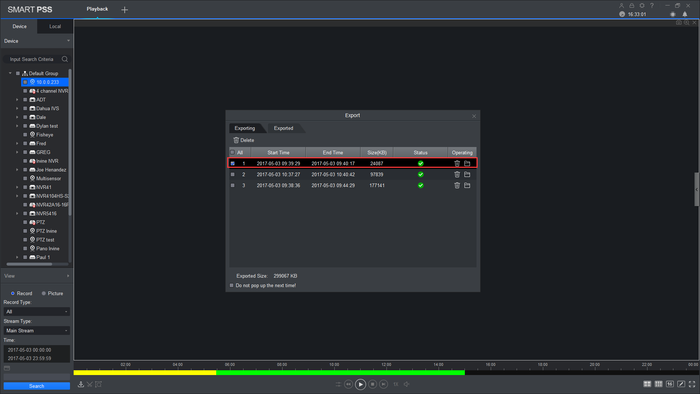
14. The progress can be viewed clicking on the “Export Progress” icon.
How to Playback a video file
Description
Follow this guide to setup your mobile device with our app!
Prerequisites
- Requires iOS 7.0 or later. Compatible with iPhone, iPad, and iPod touch
- Requires Android 3.0 and up
Video Instructions IDMSS/GDMSS version
Step by Step Instructions IDMSS/GDMSS version 3.50.000
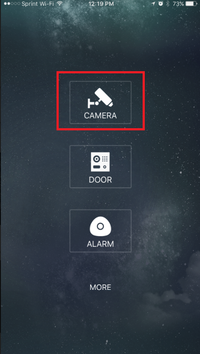
1. From the home screen select “Camera”
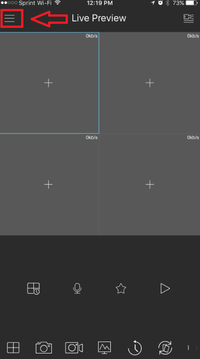
2. Select the Menu Icon -> Select playback.
3. Select the + Icon to for a device to playback.
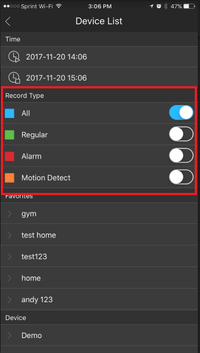
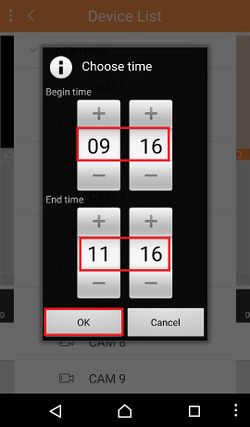
4. Choose a beginning date and time -> end date and time.
5. Toggle on to choose record type. ( All, Regular, Alarm, and Motion Detect)
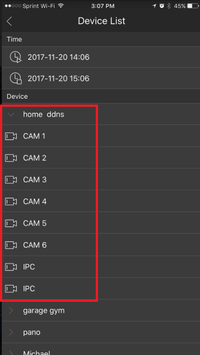
6. Select a device from the list to playback.
IDMSS/GDMSS Version 3.40.003
Video Instructions Version 3.40.003
Step By Step Instructions IDMSS/GDMSS Version 3.40.003
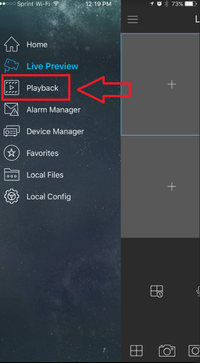
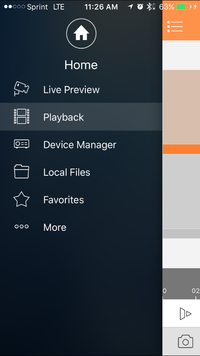
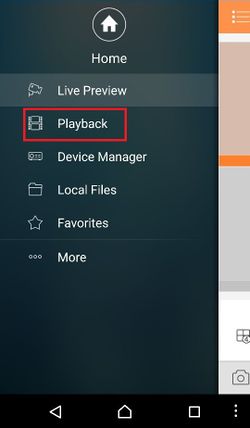
1. From the Live View page tap on the top left hand corner. This bring you to the home page.
2. In the Home page tab the Playback option.
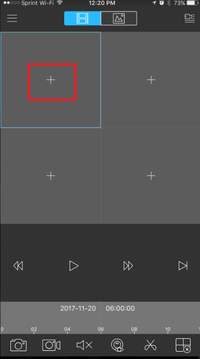
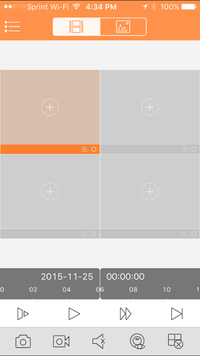
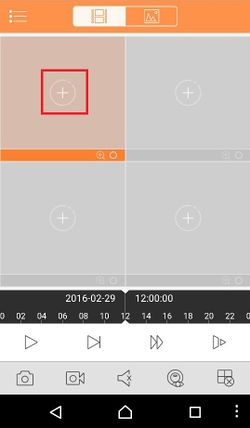
3. In the Playback screen, tap on the first box for video.
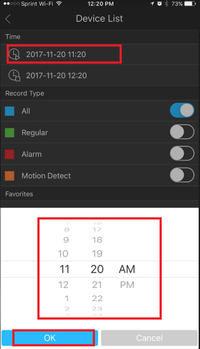
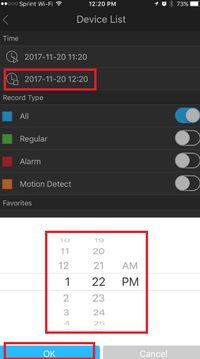
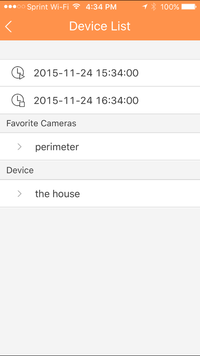
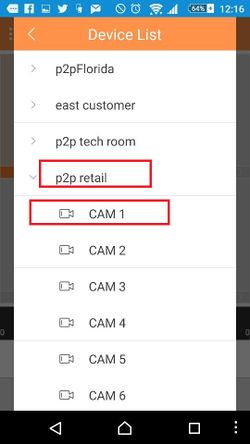
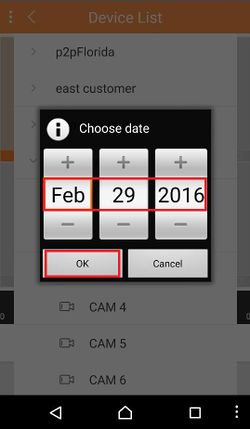
4. This will bring up the device list menu.
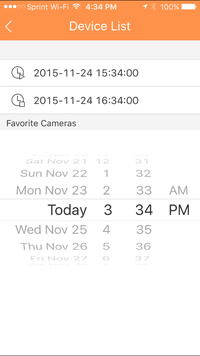
- a. Determine and select the start time for the playback
- b. Determine and select the ending time for the playback
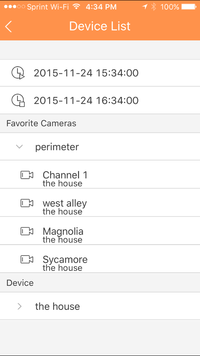
5. Now select the camera
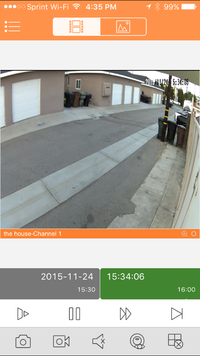
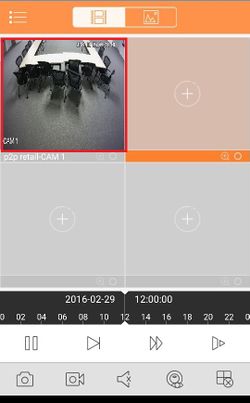
6. The camera will come up with the playback.
Here you can maneuver the time line to get the point that you want to watch. With the play buttons you are able to Fast forward, slow down and go the next segment of video.
Backup via Tablet using gDMSS
To backup your camera’s recording on your tablet:
1. Go to the main menu and select playback.
2. Click on the plus sign to add a camera.
3. Go to an NVR and add a camera.
4. Select the date.
5. Select the time frame.
6. Select the ones that you wish to back up.
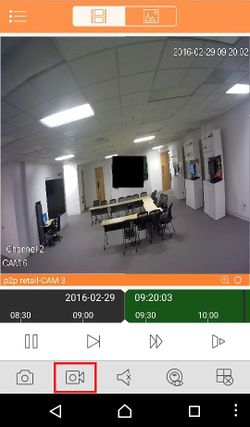
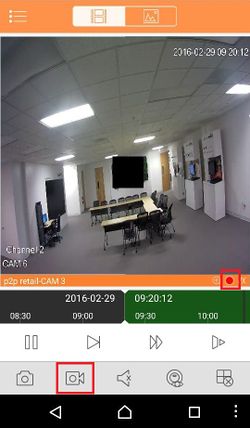
7. Select the record icon.
8. You should see the record sign lit and then press it again to unrecord the backup.
Backup Snapshot via USB
Description
Backup snapshots on USB allows you to backup the snapshots for later use.
Prerequisites
- Flash drive or other backup device.
- NVR/HCVR with HDD
- Camera connected to recorder
Video Instructions
Step by Step Instructions
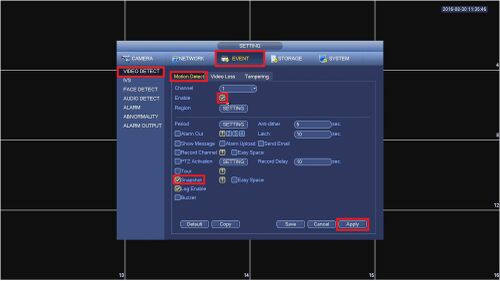
1. In order to get the system to save a snapshot we will setup motion detection. On the NVR go to the MAIN MENU->EVENT->VIDEO DETECT->Motion Detection and Enable motion detection, then the snapshot function, and hit Apply.
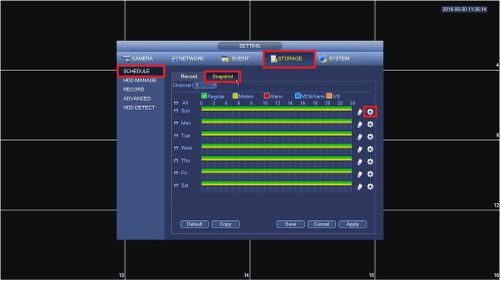
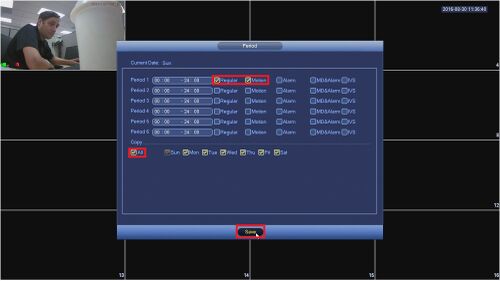
2. Now we will setup the terms of recording by going to MAIN MENU->STORAGE->SCHEDULE->Snapshot and selecting the gear icon.
Select Motion and copy to All days of the week in order to trigger a snapshot, then select Save.
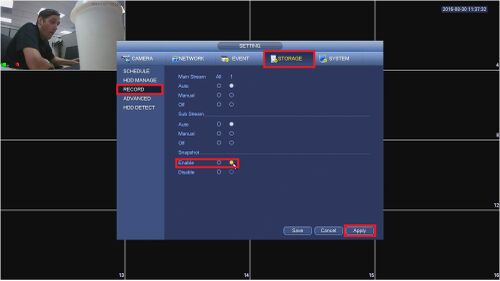
3. Ensure that you have enabled Snapshot Recording by going to MAIN MENU->STORAGE->RECORD and selecting Enable and then Apply.
4. Plug in your USB flash drive into the recorder, and select File Backup on the prompt OR go into the MAIN MENU->BACKUP
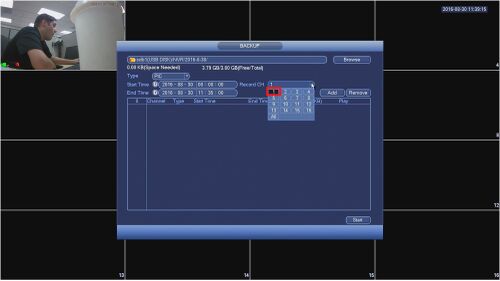
5. Under the Type pull-down menu select PIC for pictures
6. Under Record CH select the channel or all channels that you would like to find a screen shot on.
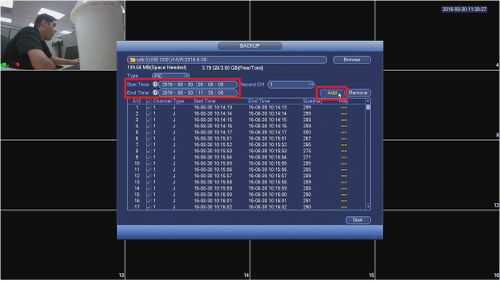
7. Define a time frame within 24 hours that you would like to search for the Snapshots and select Add
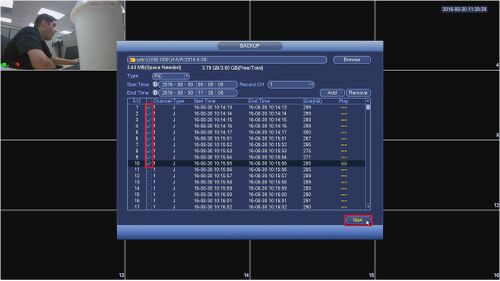
8. Once a list populates select the Snapshots that you would like to backup and select Start to begin the backup.
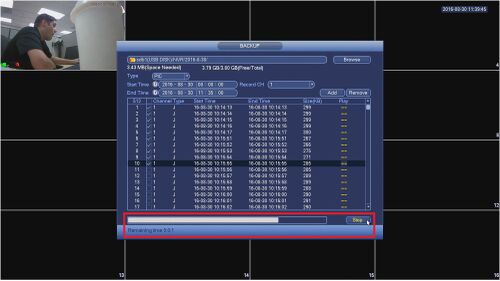
9. A progress bar at the bottom of the window will give you an estimate of when it will complete. You can cancel this operation by selecting Stop.
10. A prompt will appear on the screen once the process has finished, select okay and remove the USB flash drive with your backup.
HDD Backup Redundant
Description
Watch the video below or use the step by step instructions to setup a Redundant HDD which will keep a copy of the primary drive.
Prerequisites
- 2 or more HDD
- SATA Cables
Video Instructions
Step by Step Instructions
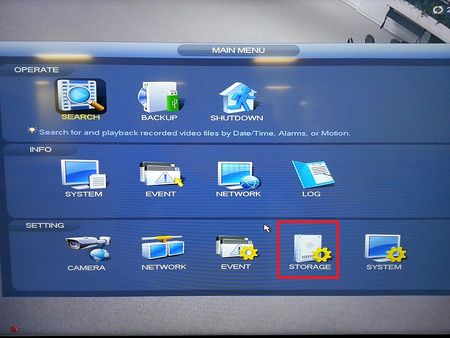
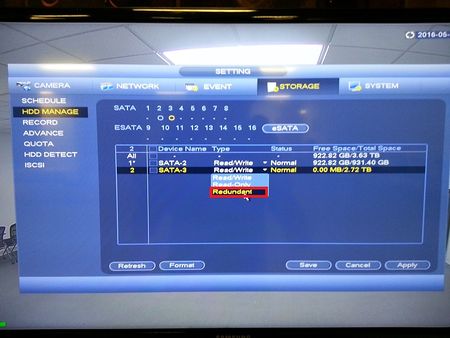
1. Get into the menu and select Storage.
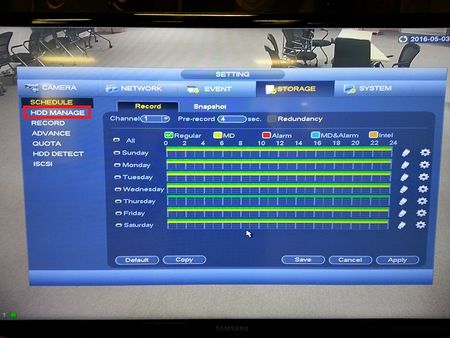
2. Select HDD manage.
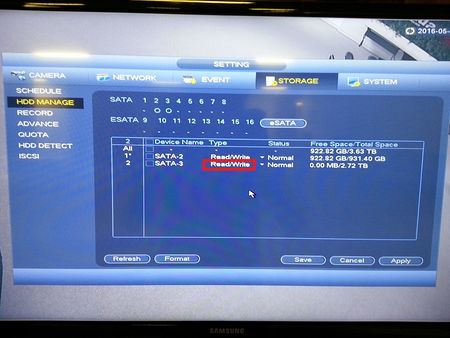
3. Click on Read and write.
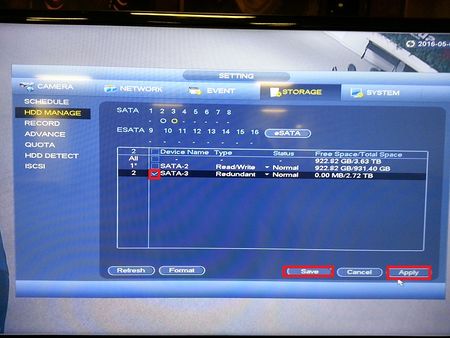
4. Select Redundant.
5. Select apply and save.












can you help me please
I am having trouble with the installation
hello nice sharing thanks
Can you write your contact number?
I sent an e-mail from the communication channel. Can you help?
Can you write your contact number?
It was a great sharing
It was a great sharing
hello nice sharing thanks
hello nice sharing thanks
I sent an e-mail from the communication channel. Can you help?
hello nice sharing thanks
can you help me please
It really worked, I appreciate it!
hi how can i do
I really love you