Views: 14
xmartO NVR Ip Camera Firmware Guide, How to upgrade xmartO NVR Firmware? Here are two ways to upgrade your NVR.
Online upgrade:
1. Keep your NVR connected to Internet and make sure status is ONLINE.
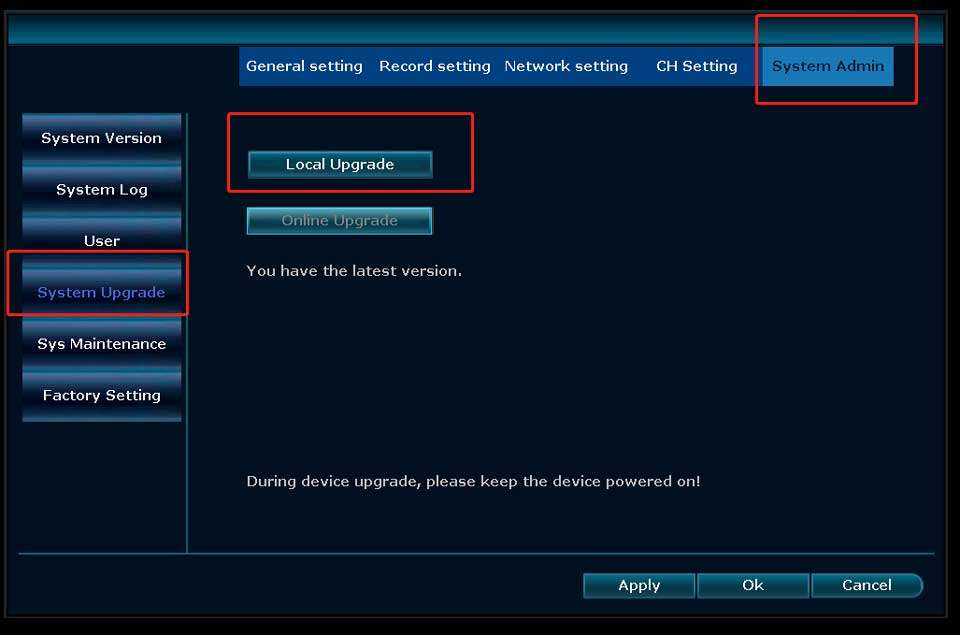
2. In NVR’s main menu – System Setting – System Admin – System Upgrade, choose Online Upgrade.
Offline upgrade:
If your NVR is not online, you will need to download correct firmware and upgrade your NVR with an USB thumb drive. After it’s upgraded, you will obtain online upgrade fearure eversince.
1.Find your NVR model # on the bottom label, download correct firmware for your NVR. Find your NVR model # on the bottom label.
https://xmarto.com/pages/download
2.Use an USB flash disk, copy the firmware to the root directory of the USB drive.
3. Plug USB disk to the NVR’s USB port. Go to NVR’s main menu – System Setting – System Admin – System Upgrade, choose Local Upgrade. (As shown in picture below)
Note: After successfully upgrade NVR’s firmware, please go to Device Manage – click “Auto Add” to find cameras back.
xmartO NVR Ip Camera Firmware Guide
Read More : INNEKT Firmware Software Download
How to Upgrade xmartO IP camera firmware
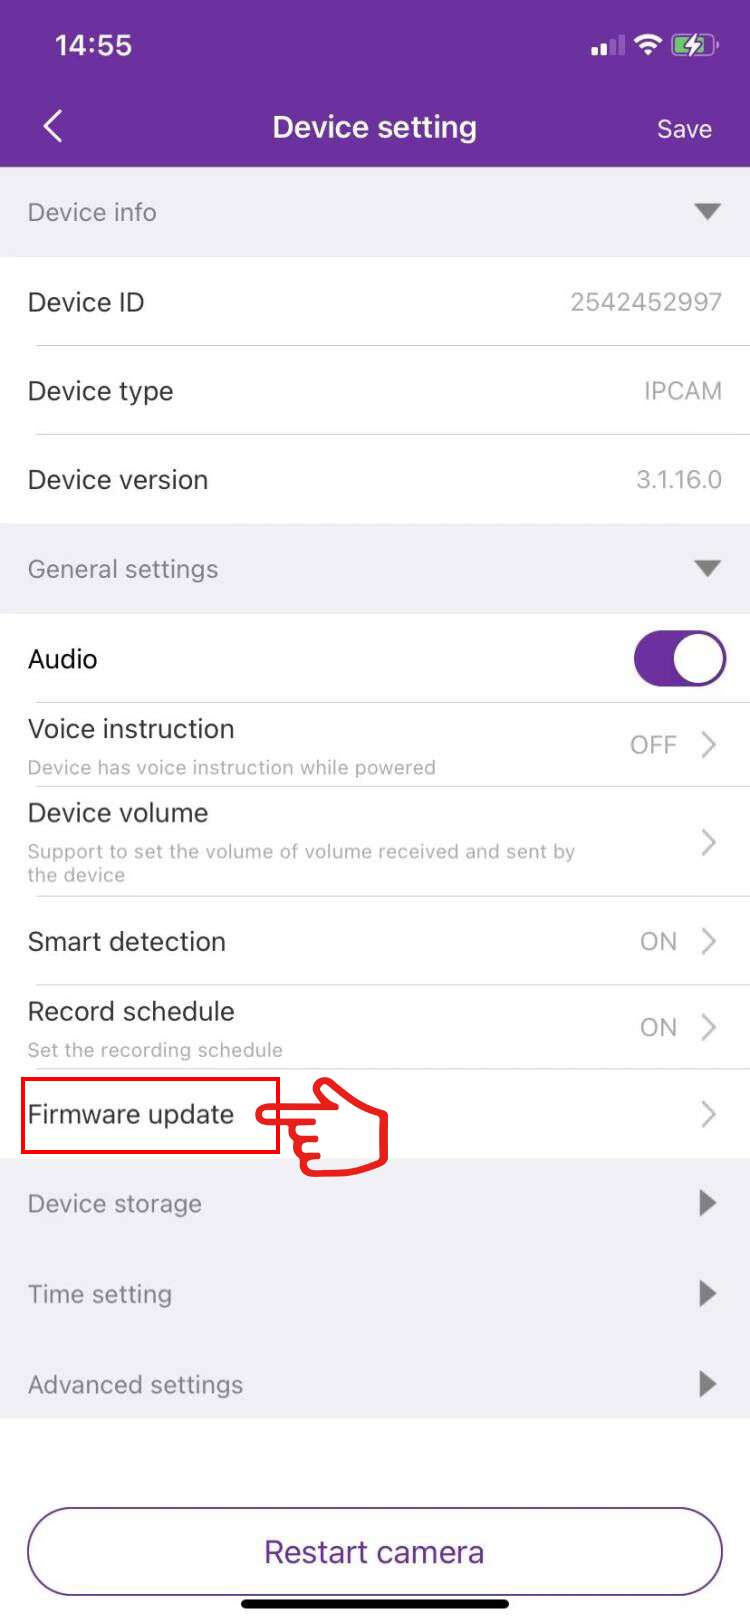
OTA upgrade cameras firmware from APP (for standalone cameras)
It will take a few minutes to update your camera; and the update requires your camera to have good Internet connection.
Upgrade camera firmware from NVR
For multiple-camera systems, if you want to upgrade the cameras, you will need to do it from the NVR menu with an USB stick.
1. Please download the camera’s new firmware from xmarto.com or contact customer support for new firmware
2. Copy the firmware to an USB flash disk’s root directory (not in any folder)
3. Plug the USB flash disk to your NVR’s USB port
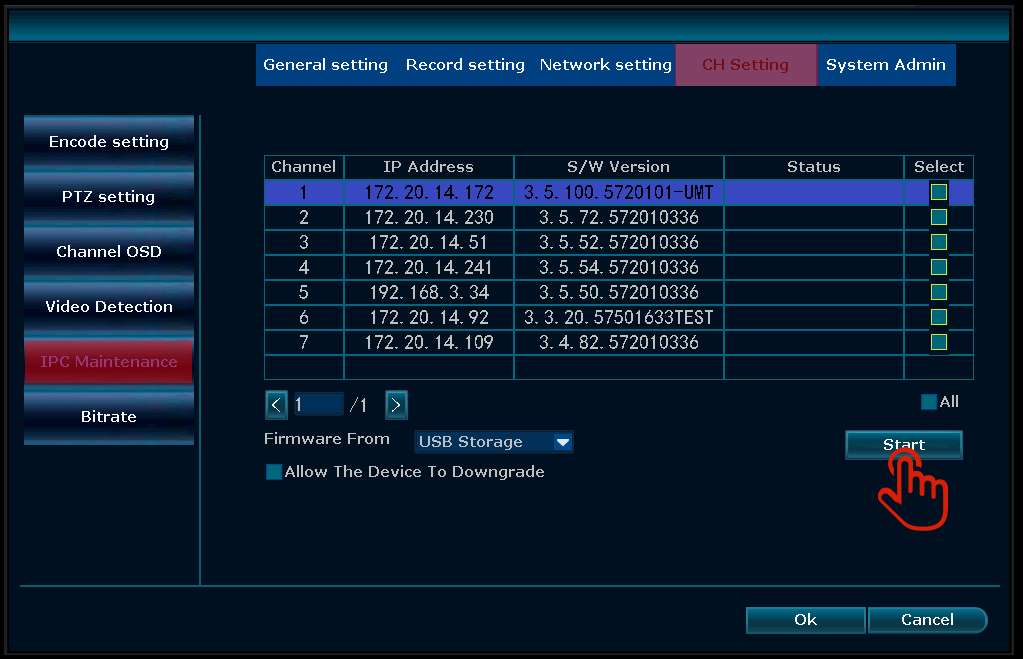
4. Go to System setting-CH Setting- IPC Maintenance, choose the firmware from USB Storage, and click start to update the firmware of your camera.
The camera will be uprgraded and you will see a new version.
Tips: if your NVR has only 1 USB port, click Start, the NVR will start a 60-second count down. Within 60 seconds, unplug the mouse and plug the USB flash drive, your camera will be upgraded.
WNM810/WNS810
V3.5.5.5M Mar.13, 2023
What’s New
1. Improves compatibility with early models of XMARTO cameras.
WNP810/WNQ58-M
V3.5.5.5M Mar.13, 2023
What’s New
1. Brand new UI 3.5 user interface. .
2. The NVR supports 4K 8MP cameras with this upgrade.
3. The NVR outputs up to 4K videos and menu to HDTV or screens.
WNP810/WNQ58-M
V3.5.5.5M Mar.13, 2023
What’s New
1. Brand new UI 3.5 user interface. .
2. The NVR supports 4K 8MP cameras with this upgrade.
3. The NVR outputs up to 4K videos and menu to HDTV or screens.
WNQ28-DW
V3.1.8.1 Nov.5, 2021
What’s New
Improves compatibity with old cameras.
WNQ24 – 2019 New
V3.0.6.4 Dec.30, 2019
What’s New
Fixed bug: Unable to find repeater in repeater setting UI
WNQ28 – 2019 New
V3.0.8.0 Sep.21, 2020
What’s New
Fixed bug
V2.8.7.4 Jul.19, 2019 (This is the final version for NVRs with Ver.2.)
What’s New
Improved NVR’s compatibility with old version cameras.
ENQ58
V2.8.9.11 Jun.6, 2020
What’s New
1. Added IPC Siren ON/ OFF switch in CH setting – Video detection.
2. Fixed known bugs.
WNP24
V2.7.12.2 Aug.15, 2018
What’s New
[Fixed] Error recognizing IP camera module
WNP28
V2.7.12.2 Aug.15, 2018
What’s New
[Fixed] Error recognizing IP camera module
WNV18
V2.7.16.0 Dec.17, 2020
What’s New
[Fixed] Error recognizing IP camera module
WNV14
V2.7.12.2 Aug.15, 2018
What’s New
[Fixed] Error recognizing IP camera module
WNO14
V2.5.5.0 Apr.8,2017
What’s New
Optimized mobile connection
Optimized system security
WNO18
V2.5.5.0 Apr.8, 2017
What’s New
Optimized mobile connection
Optimized system security
IP Camera Firmware Download
DY3034
DY3034 (Camera in WYS3084) V3.6.92 Sep.23, 2022
What’s New
1. Improves Auto-track stability
2. Optimizes PTZ auto calibration.
DDY3034
DDY3034 4.8.68 Dec.14, 2023
What’s New
1. Pickup sound while rotating
2. If no operation in 1 minute, automatically resume 1x zoom to ensure FOV and auto-tracking
WP2K34
WP2K34 (Camera in WPS2K84) 3.6.88 Sep.23, 2022
What’s New
1. Fixes bugs.
DT3034
DT3034/ DT30320 3.6.86 Sep.23, 2022
What’s New
1. Optimized auto-track
2. Optimized home point feature
3. Optimized aoto-focus
DZ5035
DZ5035 3.6.70 Sep.23, 2022
What’s New
1. Optimized auto-track
2. Optimized home point feature
3. Optimized aoto-focus
DX30530
DX30530 V3.7.70 Oct.8, 2022
What’s New
1. Optimizes WiFi performance
2. Optimizes zoom
SDP3034
SDP3034 V4.0.18 May.11, 2023
What’s New
1. Fixes bugs.
Manual & User Guide
View your cameras via CMS PC Client Software
The WallPixel CMS (Central Management System) is a relatively professional solution on PC. It enables you to view, playback and manage the xmartO cameras/ camera system on PC.
1. Download the CMS PC Client software from xmartO website:
http://www.xmarto.com/download/xmarto_wallpixel_cms_pc_client_1.9.4.1.zip
2. Install it on your Windows PC and run it.
3. You’ll be asked to select the network adapters. Select the network adapter your PC is connecting to. For instance, if your PC is a laptop connecting via WiFi, please choose “Wi-Fi; if you are using desktop PC with Ethernet cable connection, normally you should choose Local Area Connection.
Skip this step if this did not pop-up.
4. CMS will search the device in LAN and add devices automatically.
5. If CMS did not succeed adding the devices, or devices (cameras) did not give you images, please follow below steps to set it manually.
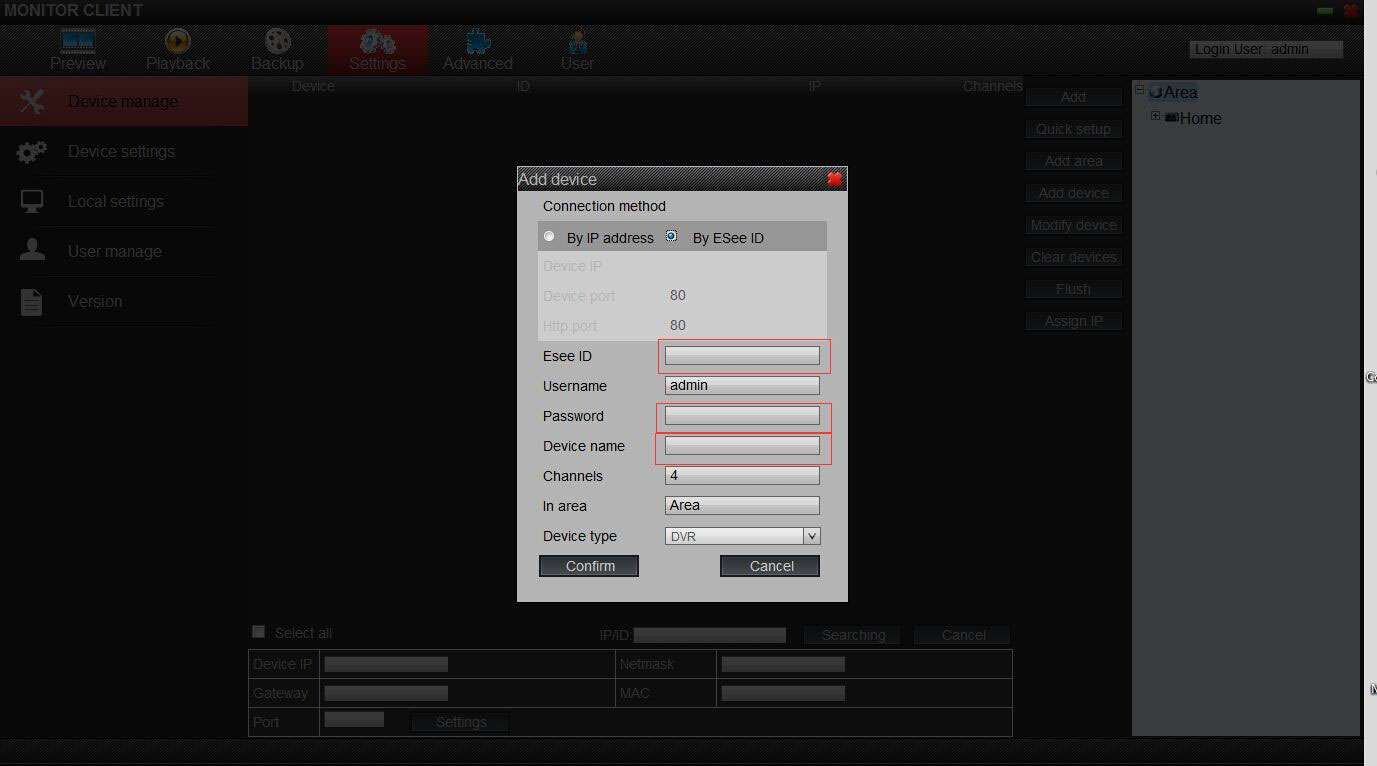
Click “Settings” at the top navigation – click “Add device”on right, you will see pop-out Add device table – choose “By ESee ID”, enter
-ESee ID (device ID on NVR),
-Username & Password (same as on NVR),
-Device name
-Number of channels
click “Confirm”to complete adding device.
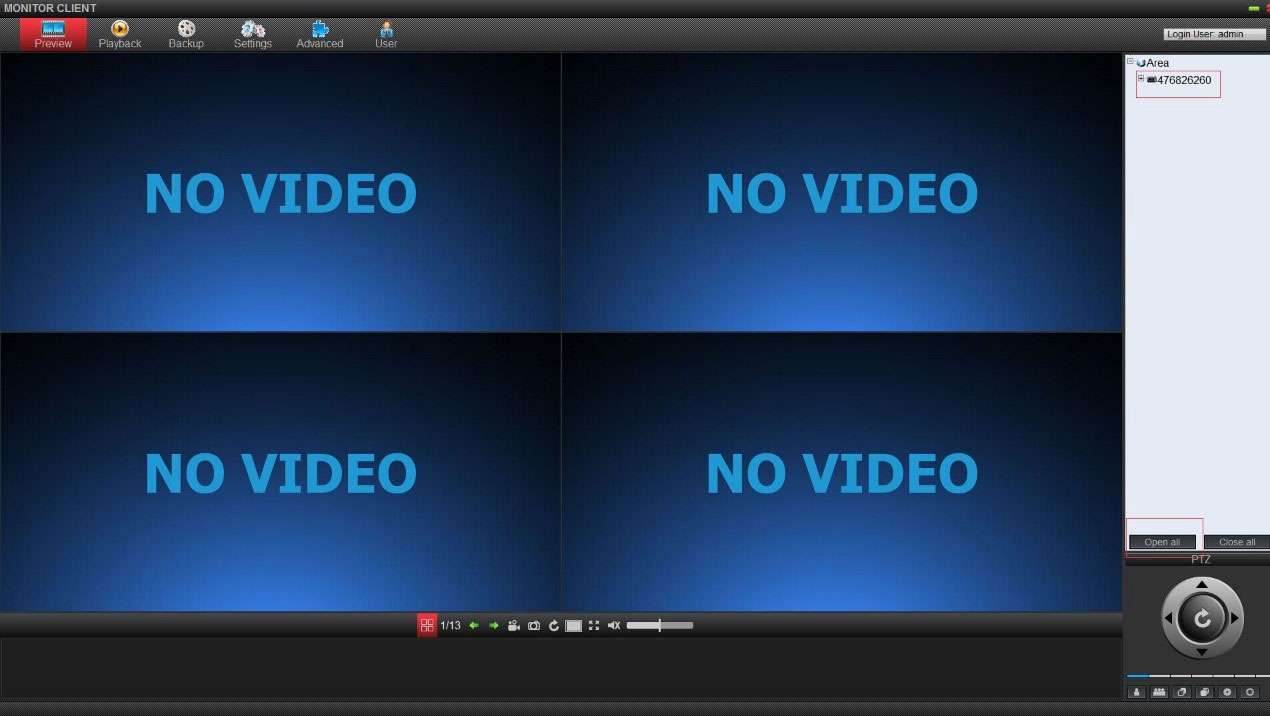
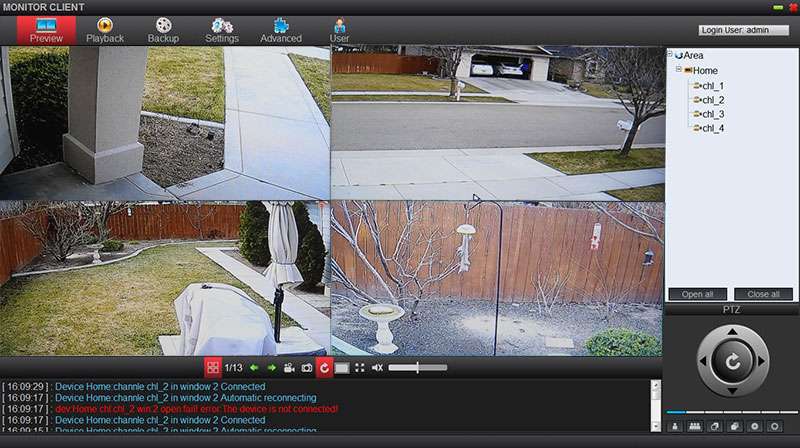
6. You shall see the device listed out on right. Click“Open All”below to connect all cameras.
7. Connect information will be displayed at the bottom. Once cameras are connected, you’ll be able to see live video of the cameras. If some cameras failed to connect at the first time, click “Open All” again to re-connect the cameras.
