Views: 14
Turing AI Smart NVR Firmware Upgrade
This article applies to the Smart Series NVR.
The model designation example is TR-MRP04xx-B; where P means the NVR has a PoE (Power over Ethernet) switch, 04 is the number of channels/ports, xx is the terabytes of memory, and -B indicates the NVR is bundled with the Turing Bridge. The PoE transmits data as well as powering the cameras.
The model numbers that apply are:
- TR-MRP04xx
- TR-MRP08xx
- TR-MRP16xx
- TR-MRP32xx
- TR-MRP04xx-B
- TR-MRP08xx-B
- TR-MRP16xx-B
- TR-MRP32xx-B
Turing AI Smart NVR Firmware Upgrade

Read Next : Lorex Security Firmware all models latest
It is important to keep your firmware current to ensure the latest features and any bug fixes are installed on your network.
There are two methods to perform a firmware upgrade:
- The first method is to access the NVR using any web browser by typing the IP address of the NVR in the web browser address bar.
- The second method is to upgrade with local access through USB.
Users are encouraged to contact their installers with questions or for assistance.
Upgrading a NVR from the NVR web portal
-
- Download the SMART NVR Firmware, NVR Firmware B3601_201929, from the link.
- Extract the zip file before proceeding to upgrade the firmware.
- Save the firmware file, Program.bin, to your local drive.
- Use the same computer where you saved the firmware file to access the NVR. Using any web browser, type the IP address of the NVR into the web browser address bar.
- Log in to the NVR with your user credentials.
- Navigate to Setup > Maintenance > Maintenance > Local Upgrade > Select NVR.
- Click Browse to select the firmware file, Program.bin.
- Click Upgrade to proceed with the upgrade.

- Once Upgrade is clicked, a message displays The upgrade takes about 2 minutes and will restart the device. Continue? To begin the upgrade process, click OK.
Note: During the upgrade process, DO NOT power cycle the NVR. If the upgrade process is interrupted, it may result in a NVR malfunctionAn upgrading process bar indicates the upgrade status. The NVR reboots automatically when the firmware upgrade process reaches 100%. The system is upgraded successfully when the NVR completes the reboot.
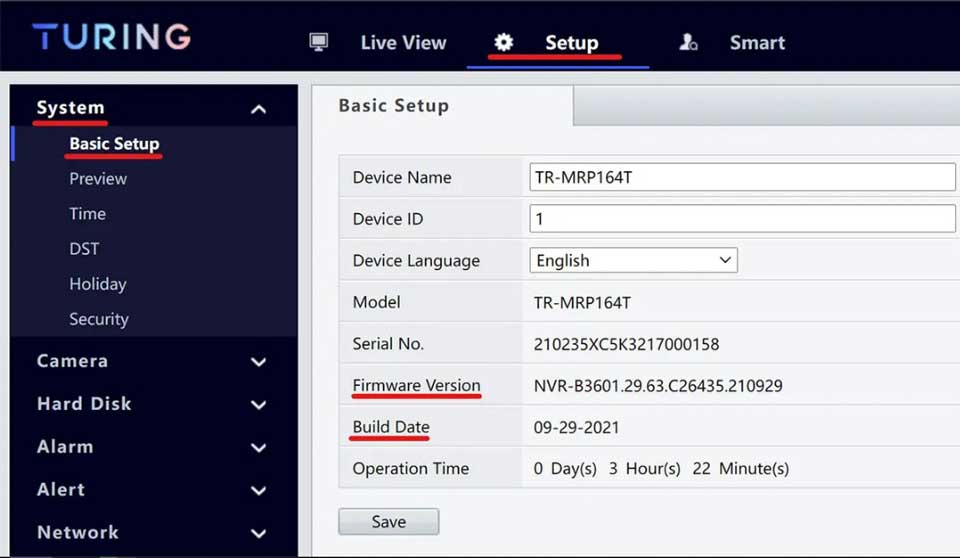
- Confirm that the NVR was upgraded to the correct firmware version by verifying the Firmware Version and Build Date.
Upgrading a NVR using the NVR local access and a USB drive
- Download the SMART NVR Firmware, NVR Firmware B3601_201929, from the link.
- Extract the zip file before proceeding to upgrade the firmware.
- Save the firmware file Program.bin to a USB flash drive. NVR will only accept the firmware name Program.bin when upgrading firmware from a local USB drive.
- Insert the USB flash drive containing the NVR firmware update into the USB port of the NVR.
- Use the mouse connected to the NVR to navigate the GUI.
- Select the Menu option. If prompted, enter your credentials
- Select Maintain > Upgrade > NVR Upgrade > and Local.
- The USB flash drive should automatically be detected by the NVR; but if not, select the correct USB flash drive from the Partition drop-down menu.
- Browse to the designated firmware folder to select the NVR firmware bin file for the upgrade.
- Click the Upgrade button to proceed.
- The message The device will restart after upgrade, Continue? displays. Click OK to begin the upgrade process.
- Note: During the upgrade process, DO NOT power cycle the NVR. If the upgrade process is interrupted, it may result in a NVR malfunction.
The NVR reboots automatically when the firmware upgrade process reaches 100%. The system is upgraded successfully when the NVR completes the reboot. - Confirm the NVR was upgraded to the correct version by checking the Firmware Version and Build Date.


