Latest Swann Firmware Updates 2024

Views: 1489

Latest Swann Firmware Updates 2024, Swann is a global leader in security monitoring, consumer electronics and security-centric solutions for the smart homes and businesses of today and tomorrow.

Swann has always been a leader. From humble beginnings in Melbourne, Australia the business now has offices in the USA, Canada, Australia, UK, Hong Kong and China and a presence in over 40 countries on 6 continents. Swann pioneered the category of Do-it-Yourself security and is proud of the work it has done to make local communities safer. Today, Swann is part of the Infinova Group, providing the business with enhanced manufacturing capabilities, cutting-edge research and development of security and networking solutions, and access to an expanded international network.

MaxRanger4K™ (NVW-MR4K) USB Firmware Update

To check what is your current firmware, access the NVW’s Menu then go to System > Information and look for the Software Version. For MaxRanger (NVW-MR4K), the latest software version is V8.2.2-20240403.

Follow this guide 
to proceed with the OTA update.

If you are unable to use the automatic update service to update the recorder, you can use the following procedure to update manually. 

Prepare the following:

1.Computer with internet connection
2.USB flashdrive (preferably 32GB or below)
3.Mouse and monitor connected to the NVW

Quick install steps

Download the correct image file:

1.Prepare a FAT32 flash drive or USB – it needs to be on FAT32 for it to be read; there is no need for an external HDD as the files are small. 
2.Download the firmware file HERE and save it to your flash drive. 
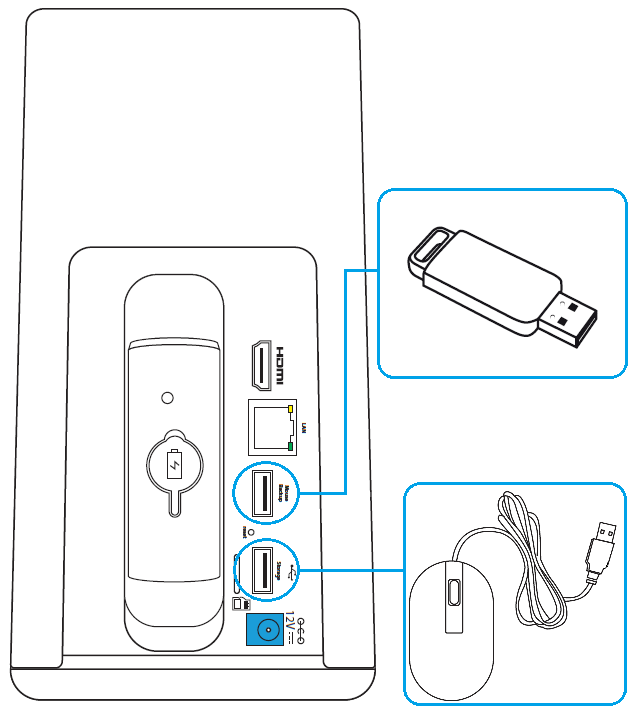
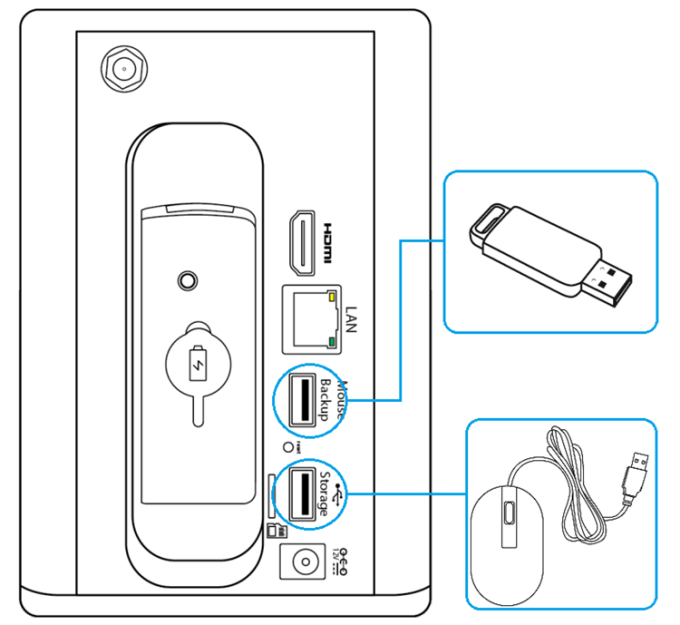
3.Plugin the flash drive to the top USB port of the NVW while the mouse can be connected to the bottom USB port as shown in the diagram below: 29224352659993 680w625h


Apply the firmware to the recorder:

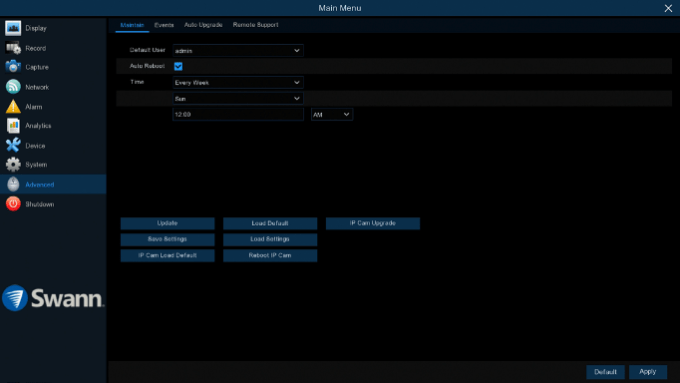
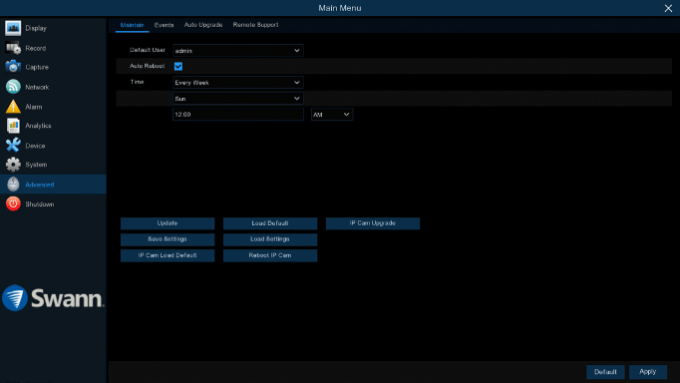
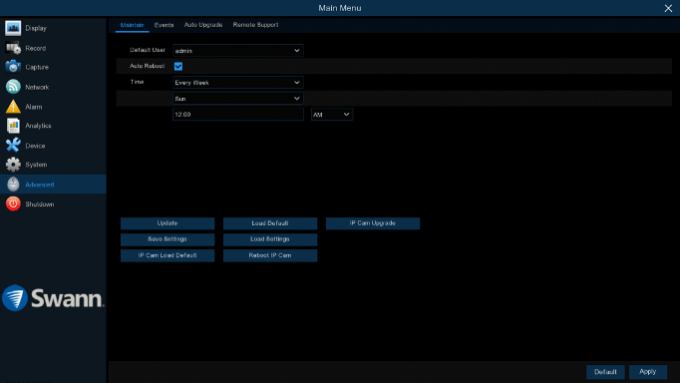
1.Access the Menu and go to Advanced > Maintain then click on Update.
menu advance maintain 680w383h
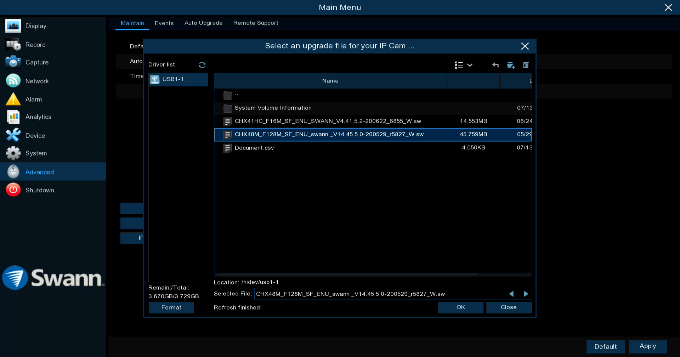
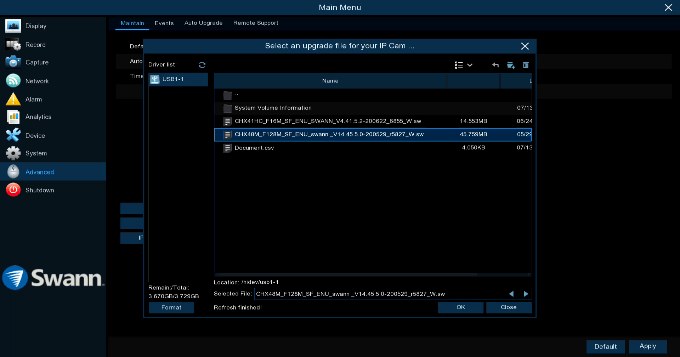
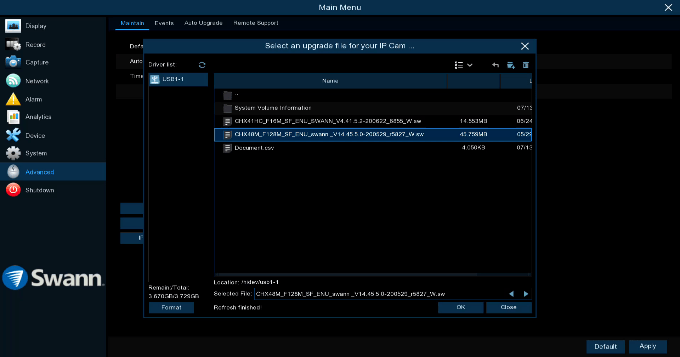
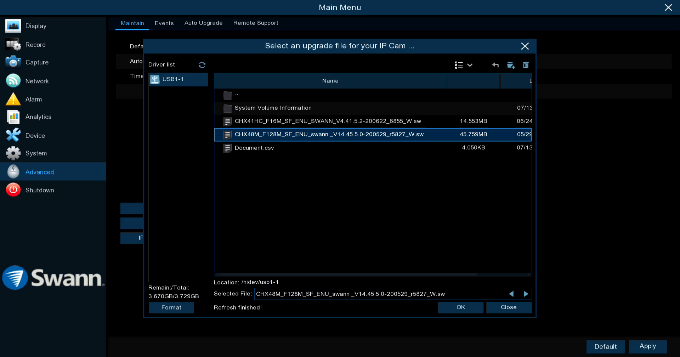
2.Select the file you downloaded from “Step no. 2” and click OK.
menu advance maintain ipcamupgrade
 Tip: If the recorder is unable to read the copied files but the drive is properly recognized, click the Format option on this screen and copy the firmware file again.
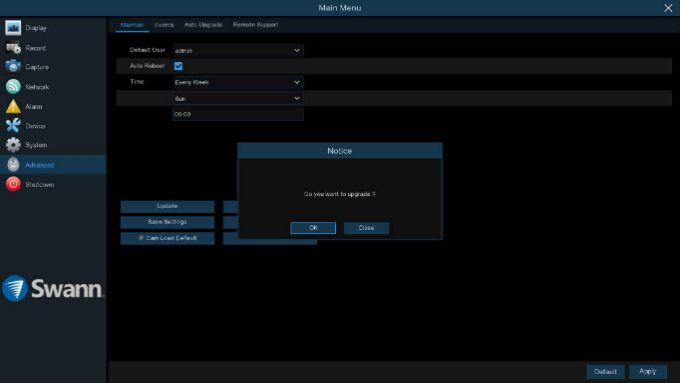
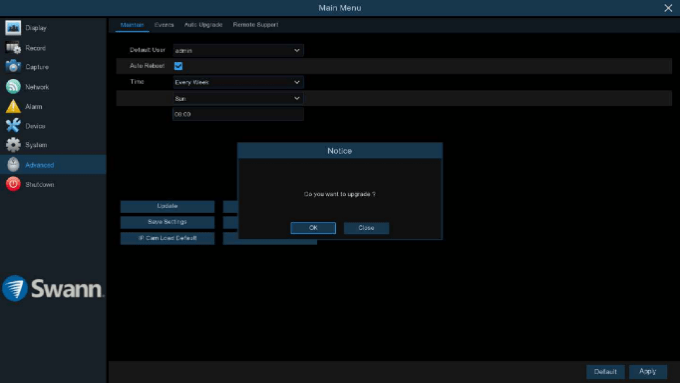
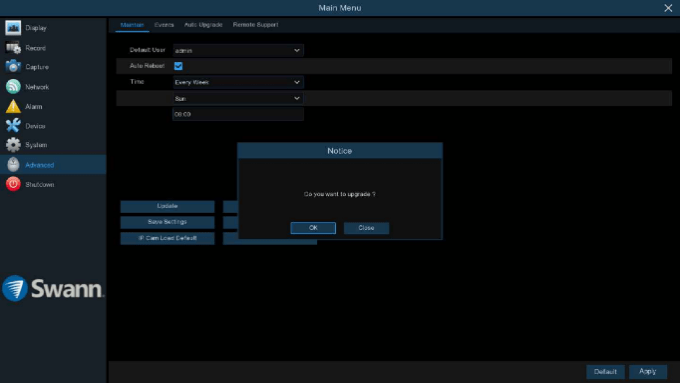
3.A confirmation window will appear, click on OK again.
4. mceclip0 680w
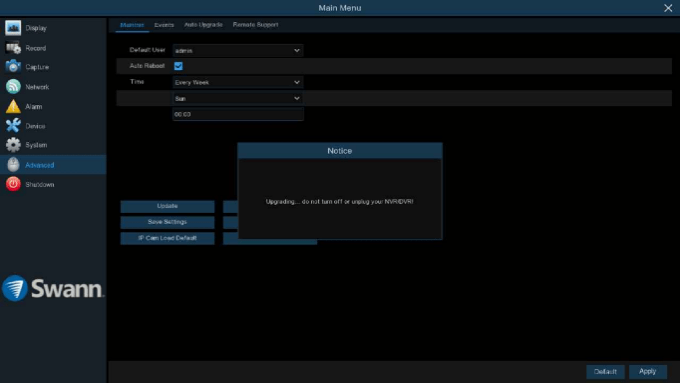
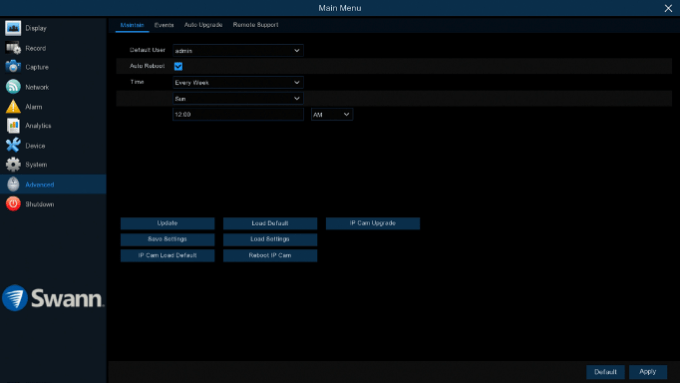
5.NVW will start to update. Make sure NOT to unplug the USB or turn off the NVW while it is updating. nvr fw update screen4 680w

6.The NVW will reboot automatically to apply the new firmware. Do NOT power cycle the NVW manually.

 To confirm if the Latest Firmware was successfully installed, navigate to Main Menu > System and under the Information tab, the Software Version should show V20240403

TIP: If updating the firmware via Menu fails, use Swann Security VMS on a Windows computer. Follow Firmware update for OS 5 recorders via Swann Security VMS (Windows)

.

A new firmware has been released for the following recorders:
DVR-1590, 1600, 4480, 4575, 4780, 4980, and NVR-7450 & 8580

Here are the new feature highlights:

 Updated P2P SDK library to improve connectivity and overcome more complex networks
 Changed e-mail sender name from using email address instead of DVR/NVR name
 Update the UI to be common on all DVRs and NVRs
 Updated the workflow for password recovery via email or entering MAC address directly
 NVRs now copy the NVR password to the IP camera and use it automatically
 Restart the P2P library every 24 hours to ensure any IP address changes are captured
 Updated the method of Dropbox authorization to use the new OAuth2 system and general improvements to Dropbox setup
 Add support for PIR IP cams to all NVR8-7450
 Add support for PIR 1080MSB/MSD to DVRx-1590 and 1600 with Push notifications
 Added full support to DVRx-4575 for PIR cams, Push and Dropbox
 Improved PIR detection for PIR cameras.

You can download the firmware from the links below; be sure to choose the right model based on your Device Type when you access Menu > System > Info.

 4 channels
 8 channels
 16 channels

You can then proceed to this article for steps on how to update your recorder:
How to manually update my recorder?


Latest Swann Firmware Updates 2024

.

NVR16-8580 USB Firmware Update

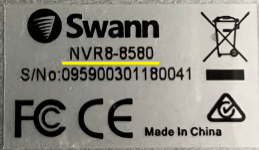
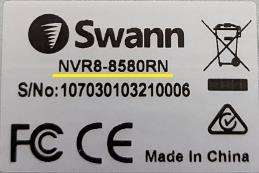
NOTE1: If you’re unit’s model number is NVR16-8580RN, follow this article instead: NVR16-8580RN USB Firmware Updates

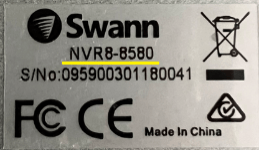
*Model number with suffix vs no suffix

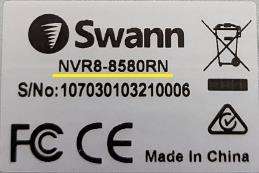
nvr8 8580 sticker 150h No suffix
nvr8 8580rn stickerWith suffix

ATTENTION: This article is for recorders that has Software Version starting with V8

NOTE2: If your device has a Firmware V7.1.0-20180810 or older, please follow this NVR16-8580 Transition Firmware Update article to apply the required transition firmware before installing the latest available firmware.

To check what is your current firmware, access the NVR’s Menu then go to System > Information and look for the Software Version. For a NVR16-8580, the latest Software Version is v8.1.0-20220419

Before you try the following steps below, read this article first: 
How to do OTA update?

If you are unable to use the automatic update service to update the recorder, you can use the following procedure to update manually.


Prepare the following:

1.Computer with internet connection
2.USB flash drive (preferably 32GB or below)
3.Mouse and monitor connected to the NVR

Quick install steps

Download the correct image file:

1.Prepare a FAT32 flash drive or USB – it needs to be on FAT32 for it to be read; there is no need for an external HDD as the files are small. 
2.Download the firmware file HERE and save it to your flash drive.
3.Plugin the flash drive and mouse to any of the available USB ports of the NVR (front or back).

Apply the firmware to the recorder:

1.
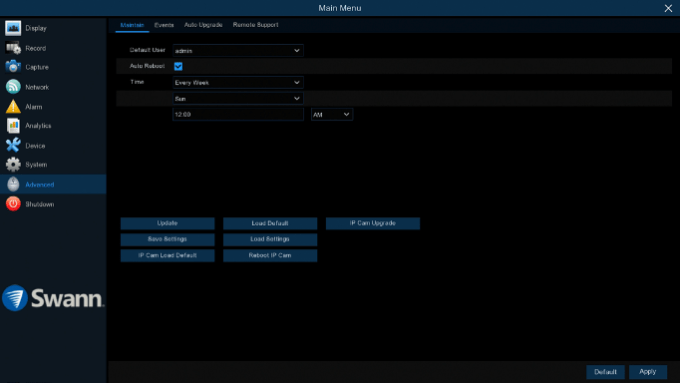
1.Access the Menu and go to Advanced > Maintain then click on Update.
mceclip0 680w383h
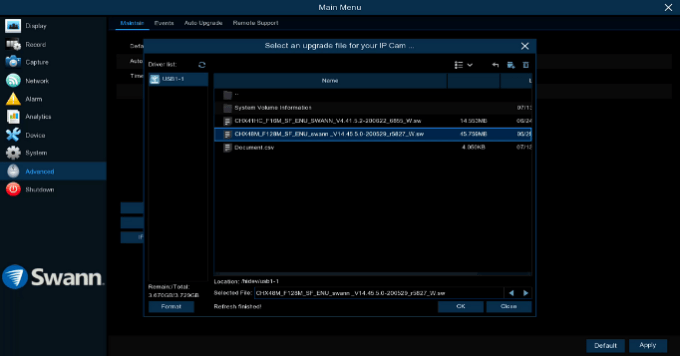
2.Select the file you downloaded from “Step no. 2” and click OK.
mceclip1 680w356h
 Tip: If the recorder is unable to read the copied files but the drive is properly recognized, click the Format option on this screen and copy the firmware file again.
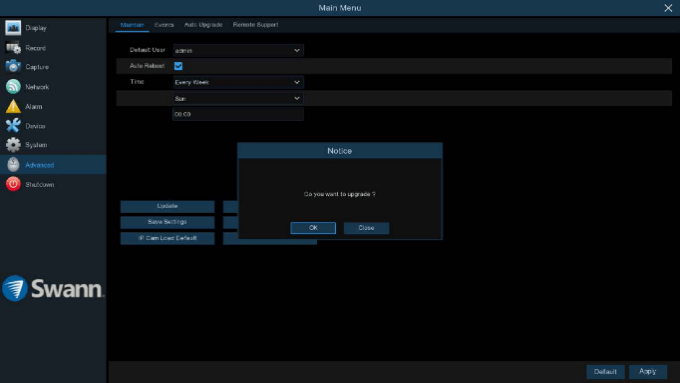
3.A confirmation window will appear, click on OK again. 
mceclip2 680w
4.NVR will start to update. Make sure NOT to unplug the USB or turn off the NVR while it is updating. 
mceclip3 680w
5.The NVR will reboot automatically to apply the new firmware. Do NOT power cycle the NVR manually.

NVR4-7000/7200 Firmware release

.

A new firmware has been released for the NVR4-7200. This firmware’s primary purpose is to address the changes to the Gmail service that rendered the email notifications inoperable.

New features:

 Email notifications should now be working
 Password requirement has been changed to 6-16 characters of any type (new models were more strict)
 Password entry now has password security estimate readout (visual change only)
 Compatibility with other email services has been increased. It may be possible to use email accounts other than Gmail to send email notifications

IMPORTANT NOTES:

The change to Gmail services has required a slight change to the outgoing email configuration on the recorder. Previously, the SMTP server port was entered as 465. This port will no longer work. The port number to enter now is 587.

Before you attempt to update the firmware, please export/download any footage that you require from the recorder. The new firmware updates the internal layout of storage on the recorder. This can mean that the recorder will no longer be able to access the currently stored recordings and the storage will need to be re-initialised before recording can continue.

It is best practice after a firmware update to clear the settings of the recorder (factory reset) to remove any old settings that may conflict with the new firmware. If you notice any unintended operation after the update, you should immediately note the settings that you have changed on the recorder and then factory reset to restore the settings to their defaults.


Quick instructions:
 

NVR4-7200 Firmware download


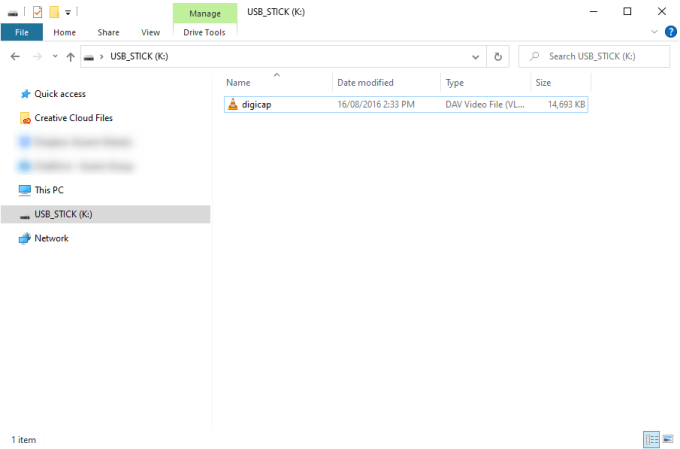
1.Extract the firmware from the zip file and place it on a USB memory stick. Unzip the downloaded file by following this guide.
19122900088857 680w449h
2.Insert the memory stick into a free USB port on the recorder.
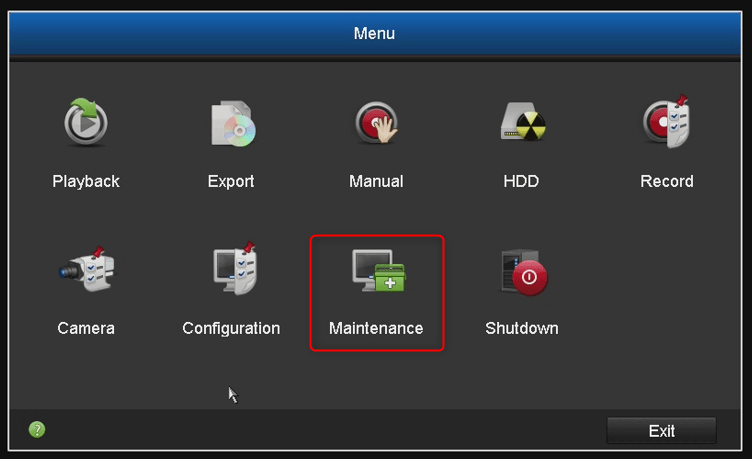
3.Open the recorder’s main menu and go to Maintenance > Upgrade.
19122871137305
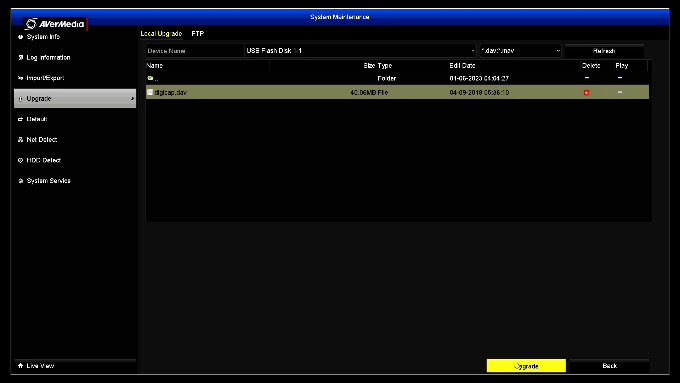
4.In the Local section, select the ‘digicap.dav’ file (that’s the firmware) and then select the Upgrade button at the bottom. DVR should then load the new firmware and reboot.
vlcsnap 2023 06 01 14h24m05s353
5.After reboot, you may be asked to create a new password and proceed through the wizard. You can check your email settings in the wizard.


NOTE: NVR4-7000 is no longer available for distribution.

.

NVR8-8580 Manual Firmware Update

If your recorder is an NVR8-8580 and for some reason, it fails to update over-the-air (OTA) to the latest Software Version of V8.1.0-20220418, here are the things you can do.

To check what is your current firmware, access the NVR’s Menu then go to System > Information and look for the Software Version.

For units that have a Software version prior to V7.1.0-20180723, check this article to first as we need the NVR to be at this firmware before we start: How to do OTA update? Proceed below once you have this firmware.

1.Prepare a FAT32 flash drive or USB – it needs to be on FAT32 for it to be read; there is no need for an external HDD as the files are small.
2.Download the firmware files HEREextract the files, and save it to your flash drive.
3.Unplug the Ethernet cable connected to the NVR then reboot.
4.Insert the flash drive into your NVR.
5.Access the Menu and go to Advanced > Maintain then click on Upgrade.
6.Select a file:
a.For NVRs with firmware version V7.1.0-20180723, choose this file: N4XXX_V190321V180620V180620V200829V180723V180724.sw and click OK.
b.For NVRs with firmware version V7.1.0-20180724, choose this file: N42XX_V190321V180620V190808V190810V190810V190810V190718.sw and click OK.
c.For NVRs with firmware version V8.1.0-20190810 or newer, you may now follow this article: NVR8-8580 USB Firmware Update
7.A confirmation window will appear, click on OK again.
8.NVR will start to update. Make sure not to unplug the USB or turn off the NVR while it is updating.
9.Repeat steps 5 to 9 until you reach the latest firmware V8.1.0-20220418

NVRx-7085 / NVRx-7285 Firmware Release (GA3.1)

A new firmware release for the 7085/7285 series of recorders is now available.


This release increases the camera compatibility to include selected 1080P cameras (NHD-810 Bullet, NHD-811 Dome, NHD-817PTZ). Playback compatibility with the phone apps is increased with recording now enabled for the internet stream to enable smooth playback over normal internet connections.


Also included is Swann’s first automatic update system. As new firmwares will become available you will be notified via the on-screen display on the recorder or a push message on the SwannView Link app. Downloading and updating can be accomplished directly from the recorder or app just by clicking on the notification and accepting the new update.


Please note we have combined the firmware for these models so that you can use the attached NVR8 file for both NVR8-7085 and NVR8-7285 models and also the NVR4 file for both NVR4-7085 and NVR4-7285 models.


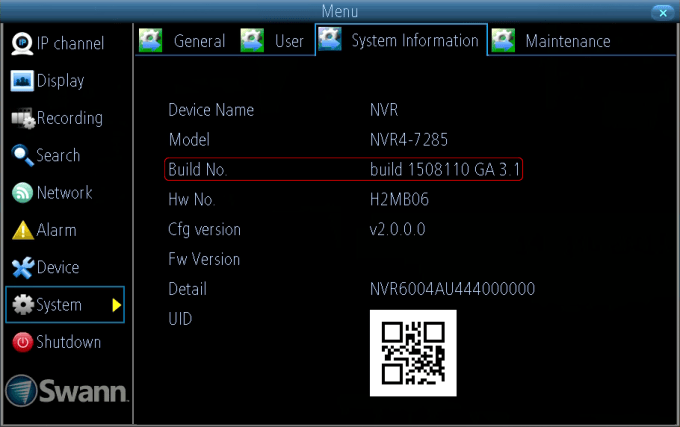
Check the attachments here and have a look at the file “Firmware_update_not_needed.png”. If your NVR system information screen already shows a version ending in “GA 3.1” as in this image, you are already on the latest file system and you don’t have to worry about the warning noted below.


NB: After updating to this firmware you MUST format your NVR’s Hard Disk to enable the new recording format. Failure to do this will prevent the NVR from recording anything from your cameras.


See the attached PDF for updating instructions. You will require a 4GB or smaller USB memory stick for the upgrade process.

NVR_Firmware_Upgrade_QSG.pdf

Firmware_update_not_neededfirmware update not needed 680w427h

NVR4-7285

NVR8-7285

.

How to do OTA update?

NOTE: This guide is for the following recorders : DVR-1590, 1600, 4575/4580/4590, 4780, 4980, NVR-7450

NOTE: This guide is for the following recorders : DVR-4480G, 4480RN, 4480V, 4580G, 4580RN, 4580V, 4680, 4680RN, 4680A, 4680X, 4680XN, 4685, 4685RN, 4780V, 4980, 5580, 5580A, 5580G, 5580G2, 5580RN, 5580RU, 5680, 5680A, 5680RN, 5680X, 5680XN, NVR-8580, 8580RN, 8780, 8780RN, NVW-MR4K, NVW-650, 800

YouTube video

To update your system over-the-air (OTA), you must make sure your recorder is connected to a modem or router with an internet connection. If you just connected it, give a minute or two before you proceed.

Once that’s done, do the following:

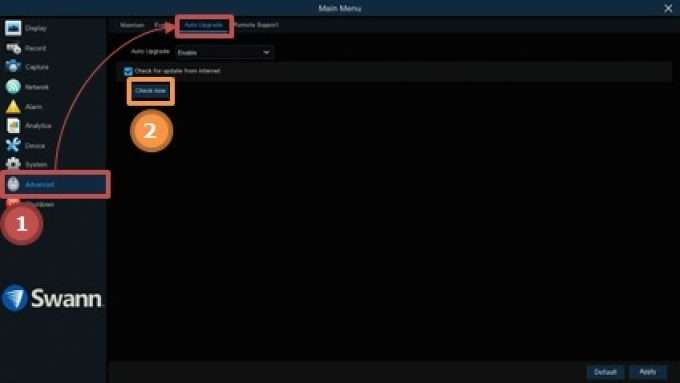
1.Access your recorder’s MENU then to go ADVANCE > AUTO UPGRADE.
2.Click Check Now.
3.If there’s an update available, read the changes to keep you posted what the update is all about, then click OK.
4.Read carefully all prompts that might appear and follow succeeding instructions properly.


!!! DO NOT TURN OFF the recorder while it is updating as this might brick the system !!!


menu advance autoupgrade 680w383h

960H (DVRx-3425 and variants) Firmware Release

A new major release for the 960H analogue recorders based on the x-3425 pattern has been released.


New features include substream recording to increase playback compatibility with the phone applications. Some minor bug fixes are included.


Also included is Swann’s first automatic updates system. New firmwares will be notified via the on-screen display on the recorder. Downloading and updating can be accomplished directly from the recorder just by clicking on the notification and accepting the new update.


This firmware is not compatible with DVRs that incorporate the wireless alarm sensor modules (internal module only, with antenna screwed to back panel). Please do not install this firmware on these units as the wireless alarm sensor modules will become inactive. An update will be provided soon for these models.


After updating to this firmware you MUST format your DVR’s Hard Disk to enable the new recording format. Failure to do this will prevent the DVR from recording anything from your cameras.


NB: This firmware is only for analogue recorders based on the x-3425 pattern (3450, 3520) displaying a Detail No. in System Information starting with ’52’. *DO NOT* attempt to apply this to analogue recorders displaying other information as you may make your DVR inoperable. Applying the wrong firmware to your system is not covered under warranty.


The firmware is packaged in a ZIP file and must be extracted before being applied. See the documentation for updating instructions. Unzip the downloaded file by following this guide.


960h_4ch_1224_GA_3.1.zip

960h_8ch_1224_GA_3.1.zip

DVR16-4580RN USB Firmware Update

NOTE: If your unit’s model number is DVR16-4580V, follow this article instead: DVR16-4580V USB Firmware Update

If your unit’s model number is 
DVR16-4580G, follow this article instead: DVR16-4580G USB Firmware Update

nvr8 8580 sticker 150h 1 No suffix
nvr8 8580rn sticker 1 With suffix

To check what is your current firmware, access the DVR’s Menu then go to System > Information and look for the Software Version. For a DVR16-4580RN, the latest Software Version is v8.1.0-20211109

Before you try the following procedure, read this article first: 
How to do OTA update?

If you are unable to use the automatic update service to update the recorder, you can use the following procedure to update manually.

1.Prepare a FAT32 flash drive or USB – it needs to be on FAT32 for it to be read; there is no need for an external HDD as the files are small.
2.Download the firmware file HERE and save it to your flash drive.
3.Unplug the Ethernet cable connected to the DVR then reboot.
4.Insert the flash drive to your DVR.
5.Access the Menu and go to Advanced > Maintain then click on Upgrade.
6.Select the fileD315X_V210804V210427V210817V211109V211109V211109V211014V210804V210804.sw and click OK.
7.A confirmation window will appear, click on OK again.
8.DVR will start to update. Make sure not to unplug the USB or turn off the DVR while it is updating.


NOTE2: If updating the firmware via Menu fails, use Swann Security VMS on a Windows computer. Follow Firmware update for OS 5 recorders via Swann Security VMS (Windows)

Firmware update for V8 recorders via Swann Security VMS (Windows)

This article will guide you on how to manually install the latest firmware of your Swann Security V8 recorder using the Swann Security VMS software. 

Click HERE to download the Swann Security VMS software. 

After installing the software, follow the instructions below:
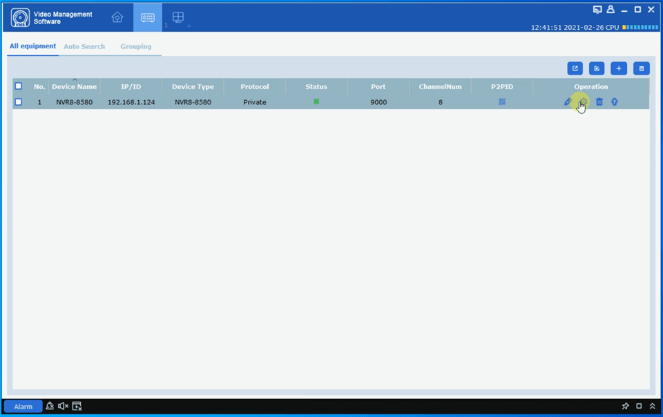
1.Open Swann Security software and go to Device Management
vms home 680w365h
2.Click the gear icon for that recorder
a.If you haven’t added your unit yet, follow this article: How to access V8 recorder on a computer? (Windows)
vms devices
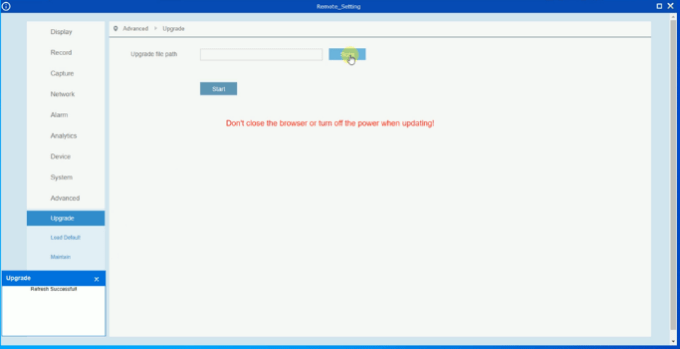
3.Once in Settings, go to Advanced (side) > Upgrade (submenu) then click on Scan
vms devices settings advanced upgrade 680w349h
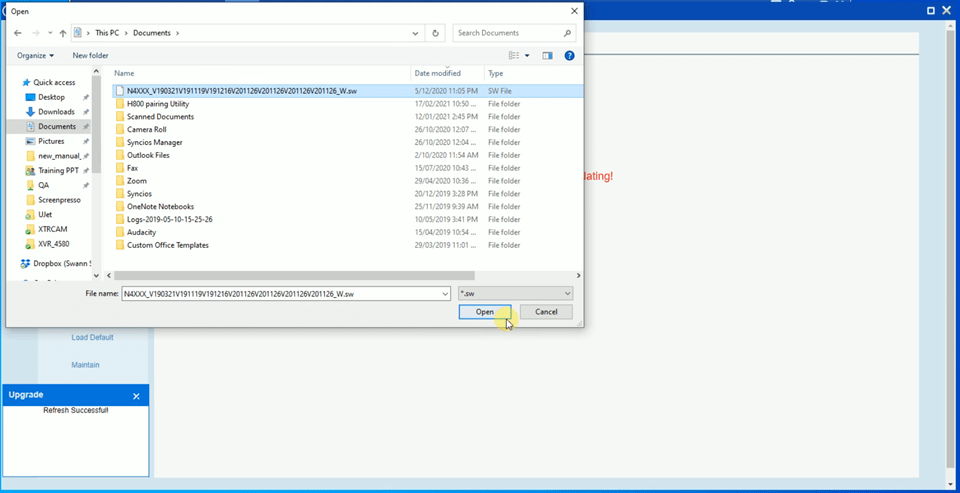
4.Browse for the fileselect it, then click Open
vms devices settings advanced upgrade scan
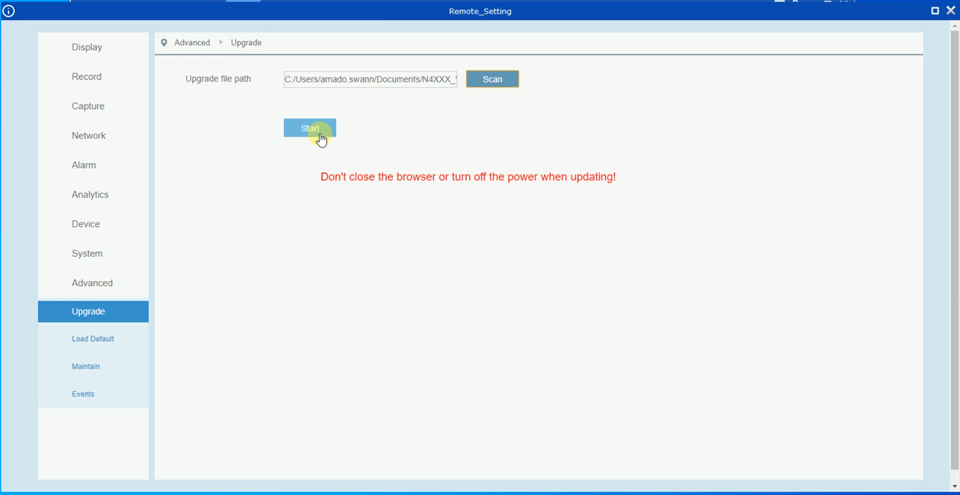
5.Click Start – Do NOT turn off the internet, PC, and recorder
vms devices settings advanced upgrade start
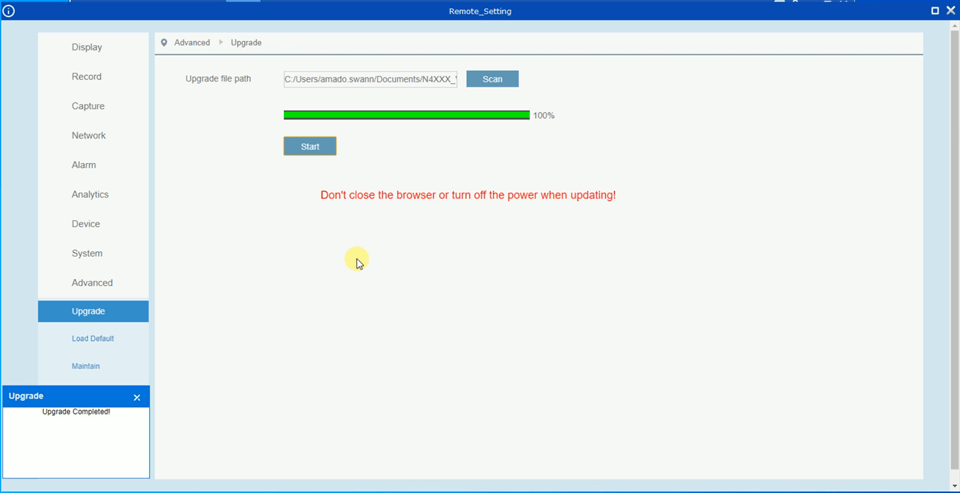
6.A prompt at the bottom-left will appear once upgrade is complete – “Upgrade Completed”
vms devices settings advanced upgrade completed
7.The recorder will reboot and may take few minutes before it appears online again in the software.
8.Once online, check the firmware if it was applied.

AllSecure 650™ USB Firmware Update

To check what is your current firmware, access the NVW’s Menu then go to System > Information and look for the Software Version. For AllSecure-650, the latest software version is V8.2.2-231013.

NOTE1: We strongly recommend performing the OTA update twice if your current firmware is V8.2.2-231013  or older. The latest firmware requires a transition firmware to be installed first before the final firmware can be applied.

Follow this guide 
to proceed with the OTA update.

If you are unable to use the automatic update service to update the recorder, you can use the following procedure to update manually. 


Prepare the following:

1.Computer with internet connection
2.USB flashdrive (preferably 32GB or below)
3.Mouse and monitor connected to the NVW

Quick install steps

Download the correct image file:

1.Prepare a FAT32 flash drive or USB – it needs to be on FAT32 for it to be read; there is no need for an external HDD as the files are small. 
2.Download the firmware file below based on your current fw. Save the files to your flash drive.
 Transition firmware file – Install this first if your unit has fw version V8.1.0-20220511 or older
 Latest firmware file – Install this without the Transition firmware if your current fw is V8.2.2-231013  or newer.
3.Plugin the flash drive to the top USB port of the NVW while the mouse can be connected to the bottom USB port as shown in the diagram below:
allsecure 650 usb update

Firmware files:

The firmware zip file contains both the Transition and Latest firmware.

Transition Firmware

H7004_V210616V210616V210624V221118V221118V221118V201120V210616V210616V191235.sw

Latest Firmware

H8XXX_V230131V230131V221128V230511V230511V230511V230428V230131V230131V191237.sw


Installation order:

NOTE2: Following the guide below, install the Transition Firmware first (see above file). Once the system has rebooted, repeat the process to install Latest Firmware (see above file). 

1.Access the Menu and go to Advanced > Maintain then click on Update.
menu advance maintain 680w383h 1
2.Select the file you downloaded from “Step no. 2” and click OK.
menu advance maintain ipcamupgrade 1
 Tip: If the recorder is unable to read the copied files but the drive is properly recognized, click the Format option on this screen and copy the firmware file again.
3.A confirmation window will appear, click on OK again.
4. mceclip0 680w 1
5.NVW will start to update. Make sure NOT to unplug the USB or turn off the NVW while it is updating.
6. nvr fw update screen4 680w 1
7.The NVW will reboot automatically to apply the new firmware. Do NOT power cycle the NVW manually.
 To confirm if the Transition Firmware was successfully installed, navigate to Main Menu > System and under the Information tab, the Software Version should show V8.1.0-20221118
 To confirm if the Latest Firmware was successfully installed, navigate to Main Menu > System and under the Information tab, the Software Version should show V8.2.2-20230511

NVW-800 USB Firmware Update

.

To check what is your current firmware, access the NVW’s Menu then go to System > Information and look for the Software Version. For NVW-800, the latest software version is V8.1.0-20221128.
.

NOTE1: We strongly recommend performing the OTA update twice if your current firmware is V8.1.0-20220826 or older. The latest firmware requires a transition firmware to be installed first before the final firmware can be applied.

Follow this guide to proceed with the OTA update.

If you are unable to use the automatic update service to update the recorder, you can use the following procedure to update manually. 

Prepare the following:

1.Computer with internet connection
2.USB flashdrive (preferably 32GB or below)
3.Mouse and monitor connected to the NVW

Quick install steps

Download the correct image file:

1.Prepare a FAT32 flash drive or USB – it needs to be on FAT32 for it to be read; there is no need for an external HDD as the files are small. 
2.Download the firmware file HERE and save it to your flash drive. Unzip the downloaded file by following this guide
3.Plugin the flash drive to the top USB port of the NVW while the mouse can be connected to the bottom USB port as shown in the diagram below:
mceclip0

Firmware files:

The firmware zip file contains both the Transition and Final firmware.

Folder 1 – Transition Firmware

H7004_V210616V210616V210624V221118V221118V221118V201120V210616V210616V191235.sw

Folder 2 – Final Firmware

H8XXX_V221109V220606V220606V221128V221128V221128V220920V221109V221109V191235.sw


Installation order:

NOTE2: Following the guide below, install the Transition Firmware first (see above file). Once the system has rebooted, repeat the process to install Final Firmware (see above file).

1.Access the Menu and go to Advanced > Maintain then click on Update.
menu advance maintain 680w383h 2
2.Select the file you downloaded from “Step no. 2” and click OK.
menu advance maintain ipcamupgrade 2
 Tip: If the recorder is unable to read the copied files but the drive is properly recognized, click the Format option on this screen and copy the firmware file again.
3.A confirmation window will appear, click on OK again.
4. mceclip0 680w 2
5.NVW will start to update. Make sure NOT to unplug the USB or turn off the NVW while it is updating.
6. nvr fw update screen4 680w 2
7.The NVW will reboot automatically to apply the new firmware. Do NOT power cycle the NVW manually.
 To confirm if the Transition Firmware was successfully installed, navigate to Main Menu > System and under the Information tab, the Software Version should show V8.1.0-20221118
 To confirm if the Final Firmware was successfully installed, navigate to Main Menu > System and under the Information tab, the Software Version should show V8.1.0-20221128

NVW Cameras (500CAM, 600CAM, 800CAM, AS4KCAM, MR4KCAM) Firmware Update for NVW Recorders (Wi-Fi NVR Systems)

1.This guide applies to cameras for NVW-800, AllSecure 600, AllSecure 650, AllSecure4K, and MaxRanger systems only.
2.NVW must have the latest firmware. To check, visit How to do OTA update? first.
3.Update one camera at a time to decrease the possibility of incomplete updates. Simply retry on the cameras that were incomplete and they should complete on the second attempt.
4.Check the live feed after each update to confirm if the camera is still working. In the event that you noticed an issue, STOP updating the rest.
5.Installing the update may reset the camera settings and affect motion detection settings. Verify your camera settings after the update process and reconfigure as required.


Prepare the following:

1.Computer with internet connection
2.USB flashdrive (preferably 32GB or below)
3.Mouse and monitor connected to the NVR

Quick install steps

Download the correct image file:

1.Download the firmware based on the camera’s model number (camera model can be found on the sticker of the camera body):
a.NVW-500CAM (V25.15.5.2_220516) – click HERE to download
b.NVW-500CAMT (V25.11.5.2.220407) – click HERE to download
c.NVW-800CAM (V14.45.5.2.210429) – click HERE to download
d.NVW-800CAMT (V21.15.5.2_220418) – click HERE to download
e.NVW-600CMB (V33.21.5.2.230224) – click HERE to download
f.NVW-AS4KCAM (V41.13.0.1.230928) – click HERE to download
g.NVW-MR4KCAM (V3.2.0.2403221614) – click HERE to download
2.Copy the files to a (preferably clean) USB memory stick.

Apply the firmware to the cameras:

1.Insert the USB memory stick into one of the recorder’s USB ports (Mouse / Backup).
2.Open the menu on the recorder and proceed to Advanced > Maintain.
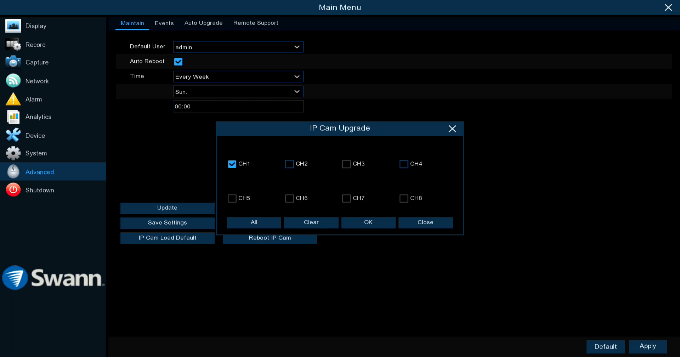
3.In the Maintain tab, click on IP Cam Upgrade button.
menu advance maintain 680w383h 3
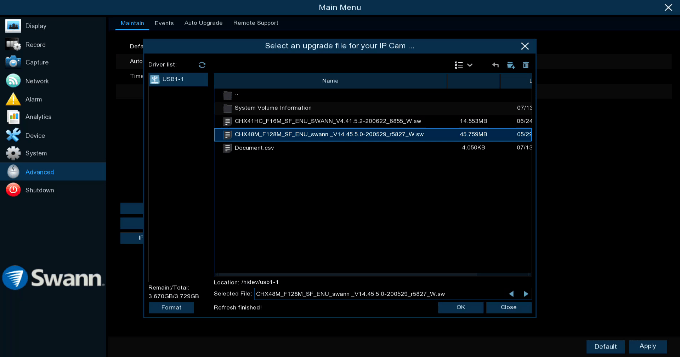
4.On the preparation screen, select the new firmware file (.sw) for each channel from the USB stick.
menu advance maintain ipcamupgrade 3
 Tip: If the recorder is unable to read the copied files but the drive is properly recognized, click the Format option on this screen and copy the firmware file again.
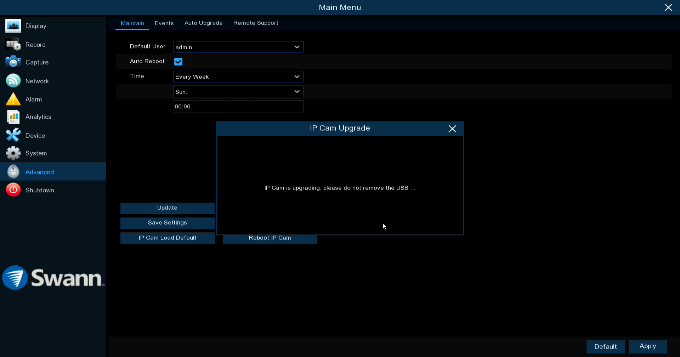
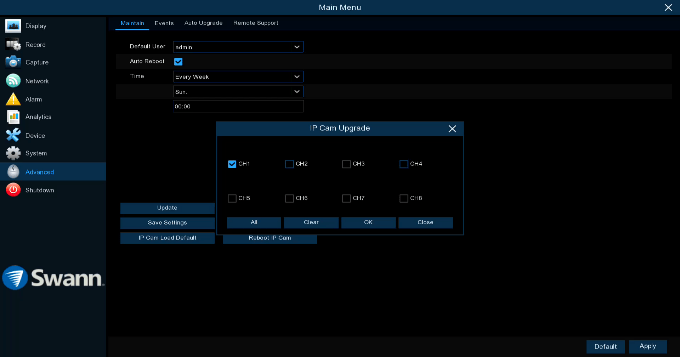
5.Once firmware file is specified, choose a Channel where firmware will be applied, then click OK.
menu advance maintain ipcamupgrade selectchannel
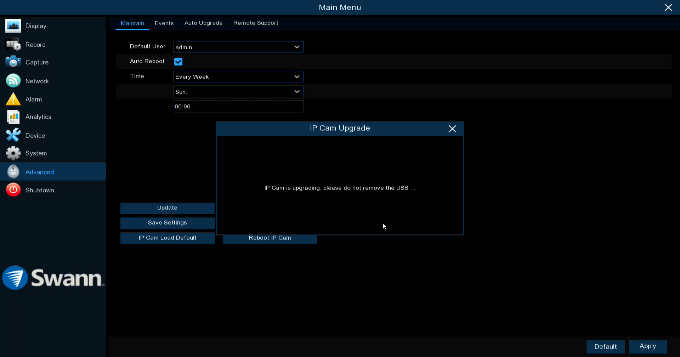
menu advance maintain ipcamupgrade selectchannel updating
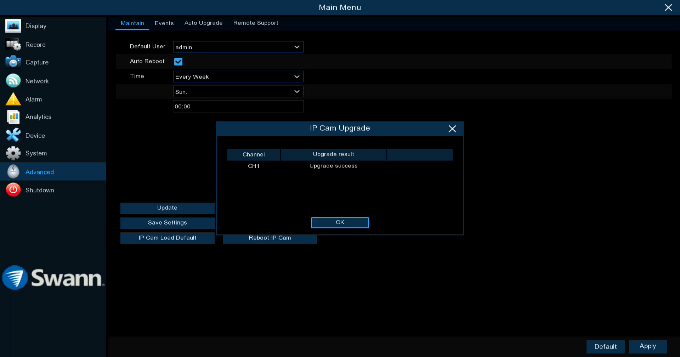
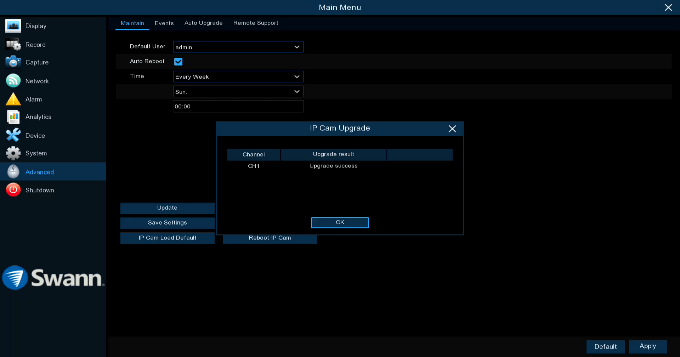
6.When firmware update is completed, you will receive this prompt:
menu advance maintain ipcamupgrade selectchannel updating success

*Tip: For any cameras that failed, reboot the device and repeat the process to try again. If this does not help, re-apply the current firmware and try upgrading again or contact Swann Support for further assistance.

.

How to update the firmware of an NHD-875xx/NHD-876xxx using the 87x Upgrade Tool?

This article will guide you on how to install the latest firmware using the 87x Upgrade tool for the following Swann NHD IP cameras:

NOTE: After upgrading your NVR and camera firmware to the version mentioned in this article, the subsequent camera firmware update will be possible via NVR operating system.

 NHD-875(WLB) bullet camera
 NHD-875ER (with SwannForce  lights version) bullet camera
 NHD-876(MSD) dome camera
 NHD-876DER (with SwannForcelights version) dome camera

IMPORTANT: You will need to connect a Windows PC or laptop via ethernet cable to one of the camera ports at the back of the NVR and use the 87x Upgrade Tool software to install the firmware update to the camera.

1.Click below to download the 87xUpgradeTool software.
https://www.dropbox.com/s/jjfhuh370ibfk5n/87x%20Upgrade%20Tool_20210816.zip?dl=1
2.Extract the file after downloaded.
3.Click below to download the firmware file for your NHD camera. Choose the appropriate firmware for your region.
 For USA and Canada (NTSC)
 NHD-875WLB bullet camera. Click HERE
 NHD-875ER (with SwannForce lights version) bullet camera. Click HERE
 NHD-876MSD dome camera. Click HERE
 NHD-876DER (with SwannForce lights version) dome camera. Click HERE

For Australia, UK, and New Zealand (PAL)

 NHD-875WLB bullet camera. Click HERE
 NHD-875ER (with SwannForce lights version) bullet camera. Click HERE
 NHD-876MSD dome camera. Click HERE
 NHD-876DER (with SwannForce lights version) dome camera. Click HERE
4.Extract the file (or files if you have multiple NHD 875/876 camera versions) after downloading. Unzip the downloaded file by following this guide.
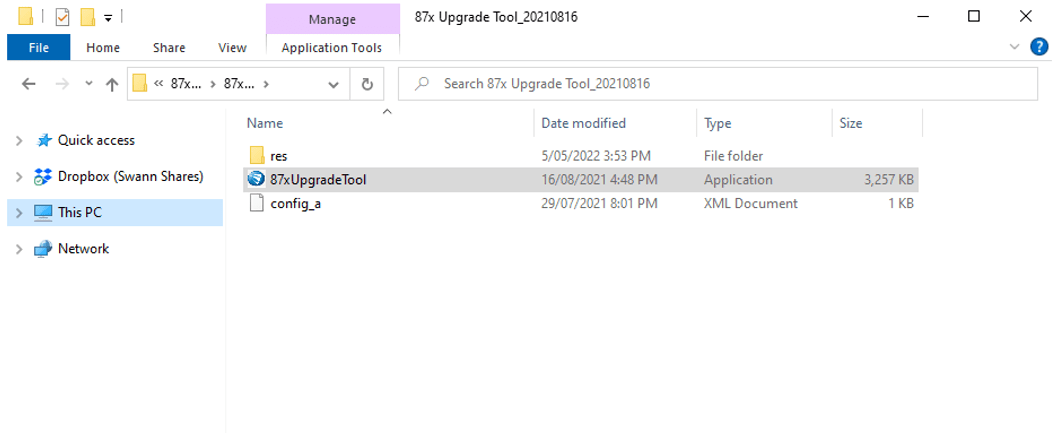
5.Locate the 87x Upgrade Tool_20210816 folder and run the 87xUpgradeTool software on your computer.
mceclip0 1
6.The 87xUpgradeTool software should be able to detect the NHD-875/NHD-876 camera under the Camera List section. (If the camera does not show up there, then check the ethernet connection between the PC/laptop and the NVR camera port)

7.Click the Browse button (icon above the Cancel button) and find the firmware “Disc image” file of your NHD camera.

mceclip1

8.Select the Open button.

mceclip2

9.Select the camera (or cameras) by placing a checkmark next to it and hit the Upgrade button to start the firmware update process.

mceclip3

10.The firmware upgrade process takes a few minutes. During this time, the camera (or cameras) will stop showing live video feed.

mceclip4

11.The camera will reboot after the update and then the update process is complete! Note that the Current firmware Version of the camera will show a different version number.

mceclip5

NHD Cameras Firmware Update for NVR Systems

NOTE :

1.This guide applies to cameras for NVR-8580, 8580RN, 8780, and 8780RN with Software version starting with V8.
2.NVR must have the latest firmware. To check, visit How to do OTA update? first.
3.Update one camera at a time to decrease the possibility of incomplete updates. Simply retry on the cameras that were incomplete and they should complete on the second attempt.
4.Check the live feed after each update to confirm if the camera is still working. In the event that you noticed an issue, STOP updating the rest.
5.Installing the update may reset the camera settings andaffect motion detection settings. Verify your camera settings after the update process and reconfigure as required.


Prepare the following:

1.Computer with internet connection
2.USB flashdrive (preferably 32GB or below)
3.Mouse and monitor connected to the NVR

Quick install steps

Download the correct image file:

1.Download the firmware based on the camera’s model number (camera model can be found on the sticker of the camera body):
a.NHD-855 (MSB or MSFB) or NHD-856MSD – click HERE to download
b.NHD-865 (MSB or MSFB) or NHD-866MSD – click HERE to download
c.NHD-885 (MSB or MSFB) or NHD-886MSD – click HERE to download
d.NHD-887 (MSB or MSFB) or NHD-888MSD – click HERE to download
e.NHD-887 (N or FN) or NHD-888N – click HERE to download
f.NHD-900 (BE or DE) – click HERE to download
g.NHD-900PT – click HERE to download
h.NHD-1200 (BE or DE or D or FB) – click HERE to download
2.Copy the files to a (preferably clean) USB memory stick.

Apply the firmware to the cameras:

1.Insert the USB memory stick into one of the recorder’s USB ports.
2.Open the menu on the recorder and proceed to Advanced > Maintain.
3.In the Maintain tab, click on IP Cam Upgrade button.
menu advance maintain 680w383h 4
4.On the preparation screen, select the new firmware file (.sw) for each channel from the USB stick.
menu advance maintain ipcamupgrade 4
 Tip: If the recorder is unable to read the copied files but the drive is properly recognized, click the Format option on this screen and copy the firmware file again.
5.Once firmware file is specified, choose a Channel where firmware will be applied, then click OK.
menu advance maintain ipcamupgrade selectchannel 1
menu advance maintain ipcamupgrade selectchannel updating 1
6.When firmware update is completed, you will receive this prompt:
menu advance maintain ipcamupgrade selectchannel updating success 1

*Tip: For any cameras that failed, reboot the device and repeat the process to try again. If this does not help, re-apply the current firmware and try upgrading again or contact Swann Support for further assistance.

TrackCam Firmware Update via SD card

You will need a PC with a Micro SD card reader to complete this procedure.

Download a copy of the firmware here.

Procedure:

1.Remove the Micro SD Card that came pre-inserted in the camera, and connect to a computer using a Micro SD Card adaptor.
2.Format the card to clear any existing data.
WARNING: This will also delete your recordings, so be sure to back up any you wish to save before you format.
3.Download the new firmware that Swann has provided, then extract the files from the zipped folder and save all files/folders to the root directory of the Micro SD Card. Unzip the downloaded file by following this guide.
The files as they should appear on the SD card
4.sdcard files.
5.Insert the Micro SD Card with new Firmware into camera.
Power on the camera and wait for the camera to boot, the camera will automatically start the upgrade process.
This should take around 2 minutes per camera. Whilst the firmware is updating, the LED on the front of the camera should flash 
Red.
6.When the camera has completed its firmware upgrade, you will know it is done because the LED light on the front of the camera will blink a steady Blue instead of Red. A blinking Blue LED indicates the camera has entered pairing mode.

After the firmware has successfully upgraded, the card will automatically delete the firmware files from the SD card and allow it to be used for normal camera clips from then on

Leave a Comment