Hinovision NVR DVR User Guide

Views: 0

Hinovision NVR DVR User Guide

Setup RTSP on NVR

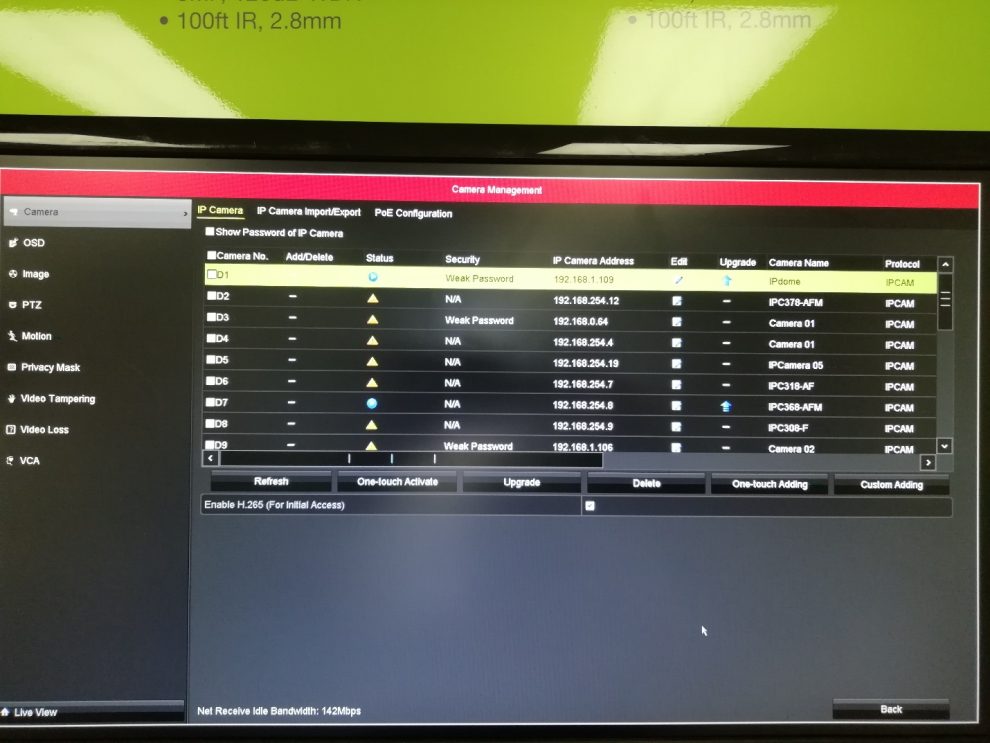
Step 1: On the NVR, right click and select Menu  Camera to open the the “Camera Management” page.

.

https://desk.zoho.com/DocsDisplay?zgId=647817451&mode=inline&blockId=544l2dbc86e28a54349a3b117d6dd9f2f89d2


Hinovision NVR DVR User Guide

Read More : Guarding Vision NVR First Setup

.

.

.

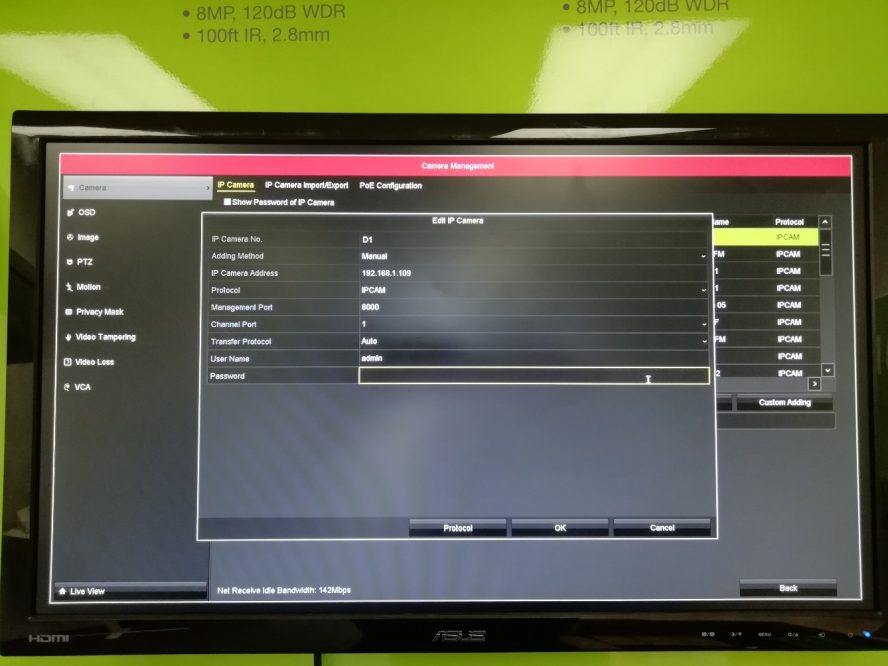
Step 2: Click on the notepad icon under edit for the channel you wish to add/edit the camera to open the “Edit IP Camera” page. Click on “Protocol”


https://desk.zoho.com/DocsDisplay?zgId=647817451&mode=inline&blockId=544l25f2db094cee040428c410089079f4c68

.

.

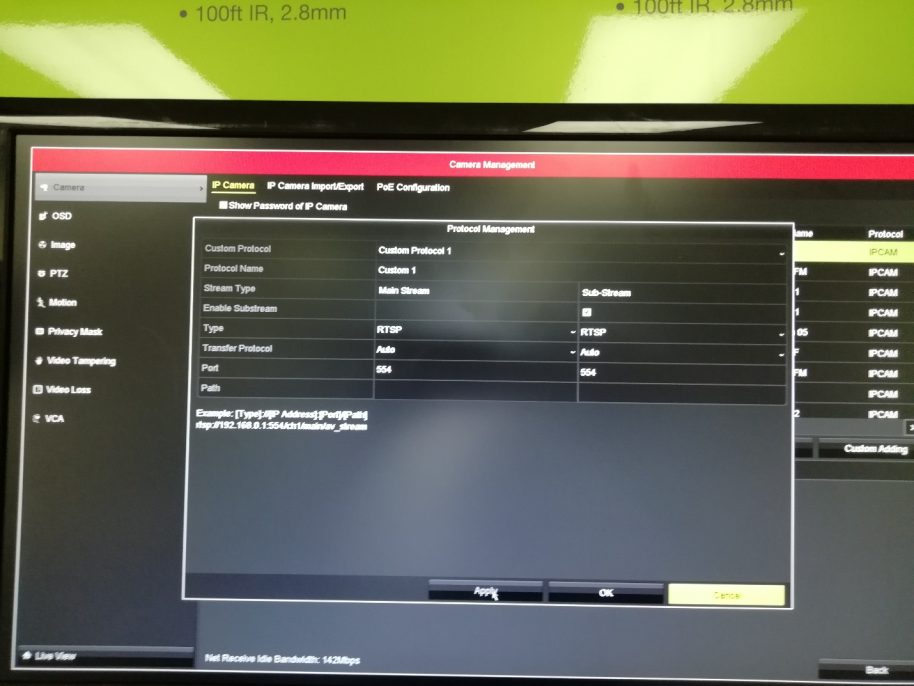
Step 3: In the “Protocol Management” page, select “RTSP” for “Type”. Enter the RTSP path. Click “Apply”. Click “OK”.

https://desk.zoho.com/DocsDisplay?zgId=647817451&mode=inline&blockId=544l2eb2428eb986b4c74875fd548b931977d

Access IP Camera Web Interface from NVR Web Interface


Step 1: Connect the NVR to the router or network switch.

Step 2: Connect your PC/MAC to the same network as the NVR.

Step 2: Find the IP address of the NVR. This can be done following ways:

        – Connect your PC/MAC to the same network as the NVR

        – Run the SADP Tool application. SADP will show the device name with IP address.

       – On the local menu, go to System –> Network –> IPV4

Step 3: Open the browser and input the NVR IP address. This will take you to the NVRs web interface.

Step 4: Login to NVR and go to Configuration –> Network –> Advanced settings –> Other –> Check the box for “Enable Virtual host” –> Save.

Step 5: Go to System –> Camera Management –> Click the blue link under “Join” to login to the camera directly.

Add Port Forwarded IP Camera to NVR

.

.

Step 1: Access the camera using the “SADP Tool” application and assign a static IP address.

.

Step 2: Login to the camera from browser(IE Preferred) with IP address and assign port numbers. To access the port page, go to Configuration –> Network –> Basic –> Port and change the HTTP Port, RTSP Port and Server Port.

.

For multiple cameras, perform this step with different port numbers for each camera. For example, for camera 1 use “80,554,8000”, for camera 2 use “81,555,8001” etc.

.

https://support.hinovision.com/DocsDisplay?zgId=647817451&mode=inline&blockId=g0at4eb32b5a718a74eda87a7e894501a8f53

.

.

Step 3: Login to the router and perform port forwarding of the assigned ports. Below is a screenshot from a Ubiquiti router port forward page. It varies from depending on the brand of router you use.

.

https://support.hinovision.com/DocsDisplay?zgId=647817451&mode=inline&blockId=g0at4d9cdf84c42084d559703d55a4cd0c49c

.

Step 4: go to https://canyouseeme.org/ to find your public IP address and check to see if the ports are open.

.

Step 5: Login to the NVR and go to Camera management page. 

.

Step 6: Select a channel and click “Modify” –> Change adding method to “Manual” –> Enter the Public IP Address –> Enter the new server port assigned to the camera –> Enter the password –> Click “OK”

.

https://support.hinovision.com/DocsDisplay?zgId=647817451&mode=inline&blockId=g0at406a22afa89bd446b914ab14f9ea8d77c

.

Step 7: Repeat the above steps for each camera if you have multiple cameras.

.

How to configure 

POS Connection for NVR?

.

.

.

Hinovision 5 Series and 7 Series NVR/DVRs support Point of Sale (POS) system integration. This tutorial will demonstrate how to retrieve POS data from Network with Hinovision iVMS-Pro client software.

.

Once the POS setting is configured on Hinovision NVR/DVR. NVR/DVR will be able to receive transaction data (Receipt) from POS, overlay the POS info on designated screen and store the info on hard drive for future reference. You can conduct video verification for the ongoing transaction and review the transaction with event play back feature.

.

POS data can be received from either RS232 port, USB port with RS232 converter or Network. You can also use Serial to Ethernet Converter to connect with multiple RS232 sources. Typically a 16-channel unit will support up to 8 POS connection and a 32-channel unit will support up to 16 POS connection.

.

POS configuration can be accessed through Hinovision iVMS-Pro client software and NVR screen.

.

Test Environment 

NVR Model: NVR532P16-I4

NVR Firmware: V3.4.82 build 161207

.

Simulation Software: TCP/IP NetAssistant

Software Version: V3.8

Download Link: https://app.box.com/s/szqqhflvymfolu5gmvp2iujkf1gzzq13

System Topology

https://support.hinovision.com/DocsDisplay?zgId=647817451&mode=inline&blockId=fs6z7ec2b0107c5df471c99e79993af3a0ccf

.

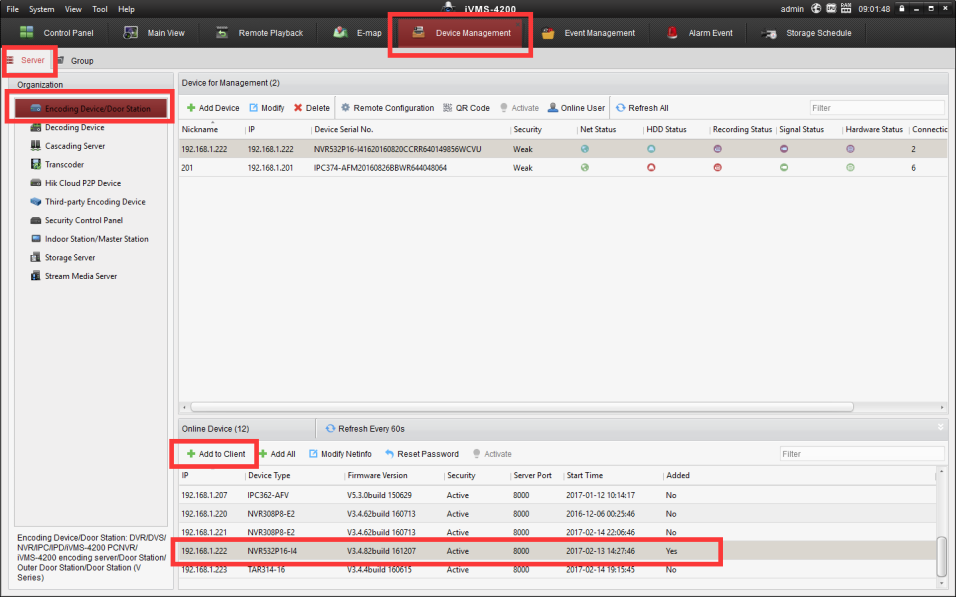
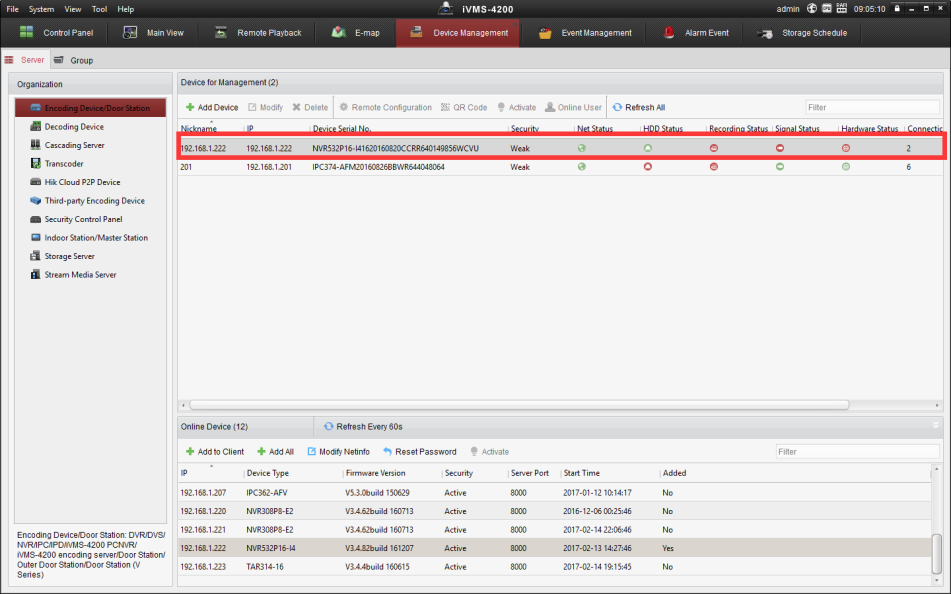
1.Open iVMS-Pro client, navigate to Device Management, Click on Server on the left, choose Encoding Device, Select the NVR you wish to configure and click on add to client.

https://support.hinovision.com/DocsDisplay?zgId=647817451&mode=inline&blockId=fs6z7b7c32140d43542c5be612cb522a7c7d6

2.Enter a Nickname for the NVR and correct credential, Check the Export to Group box and Click on Add

https://support.hinovision.com/DocsDisplay?zgId=647817451&mode=inline&blockId=fs6z7f60a44ec5ccf485498a2c707d646c45d

.

3.You will now see the NVR in Device List

https://support.hinovision.com/DocsDisplay?zgId=647817451&mode=inline&blockId=fs6z7aec9168fac3a4997a405884805e72799

.

4.On the PC side, Open TCP/IP Net Assistant, Select UDP, Enter the IP address of this PC, select a Port and click on Connect.  

https://support.hinovision.com/DocsDisplay?zgId=647817451&mode=inline&blockId=fs6z75a8dd453bd5a46559eb893f7490d2bd3

.

5.Enter the IP address of the NVR, also the port number you wish to use. For test purpose, check the Send Cyclic box so the program will keep sending the data. Enter the message in the Text box and Click on Send.

https://support.hinovision.com/DocsDisplay?zgId=647817451&mode=inline&blockId=fs6z7e14d65f795534763b0d6340961c045b3

.

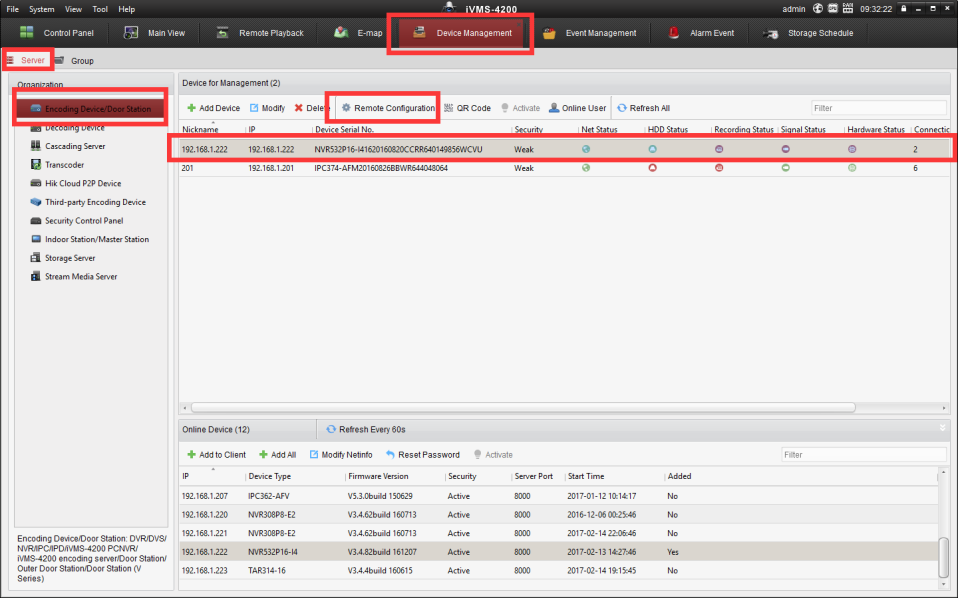
6.Back to the iVMS-Pro, in the Device Management tab, Select the NVR and click on Remote Configuration.

https://support.hinovision.com/DocsDisplay?zgId=647817451&mode=inline&blockId=fs6z7a2db906f1fba43f99e733fa6adf0828d

.

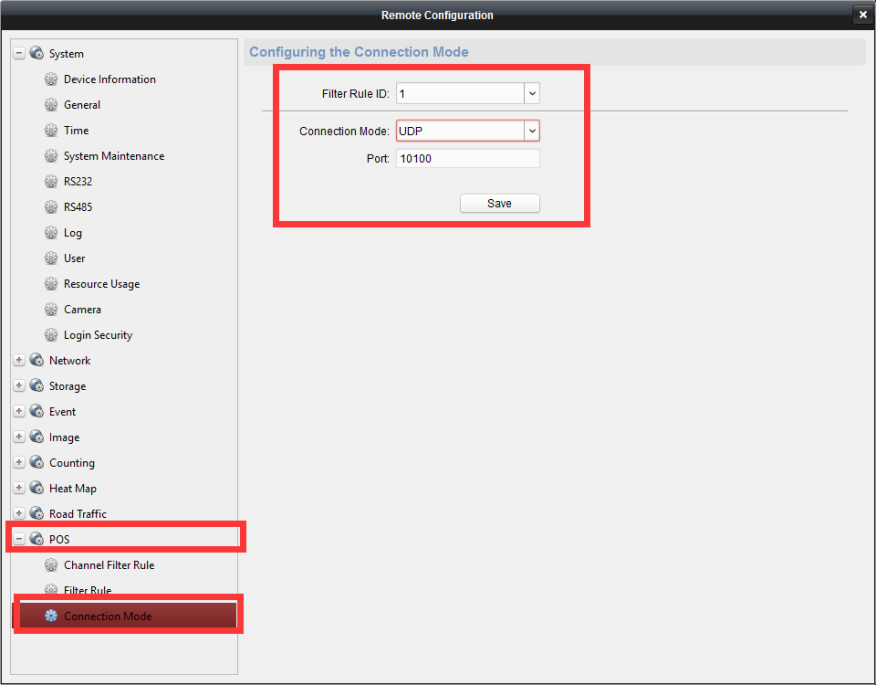
7.Select Connection Mode under POS, Choose Filter Rule ID (Typically a 16-channel unit will support up to 8 POS connection and a 32-channel unit will support up to 16 POS connection). Choose UDP for Connection mode and enter the Port number you set on the TCP/IP Net Assistant Remote Port. Click on Save. 

https://support.hinovision.com/DocsDisplay?zgId=647817451&mode=inline&blockId=fs6z7c11add772124427f883735c1b826519e

.

.

.

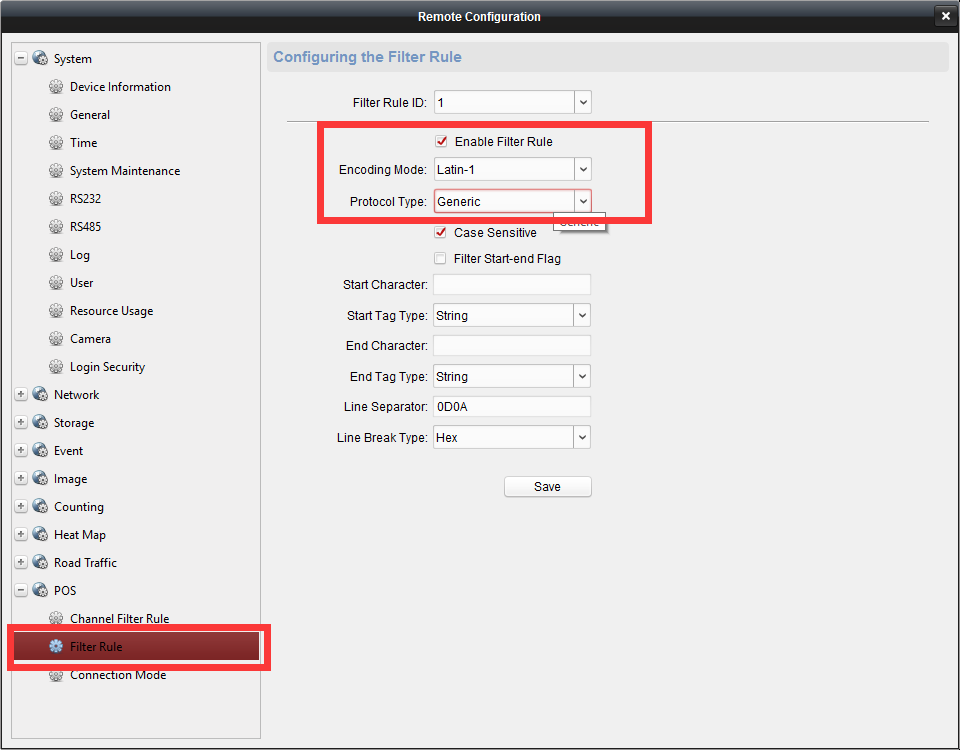
8.Click on Filter Rule, Choose Filter Rule ID you just set for Connection Mode, Check the Enable Filter Rules box, Select Latin-1 as Encoding Mode and Generic as Protocol Type. Click on Save. 

https://support.hinovision.com/DocsDisplay?zgId=647817451&mode=inline&blockId=fs6z7cbfa9e8df0374d9ba04917550ad29748

.

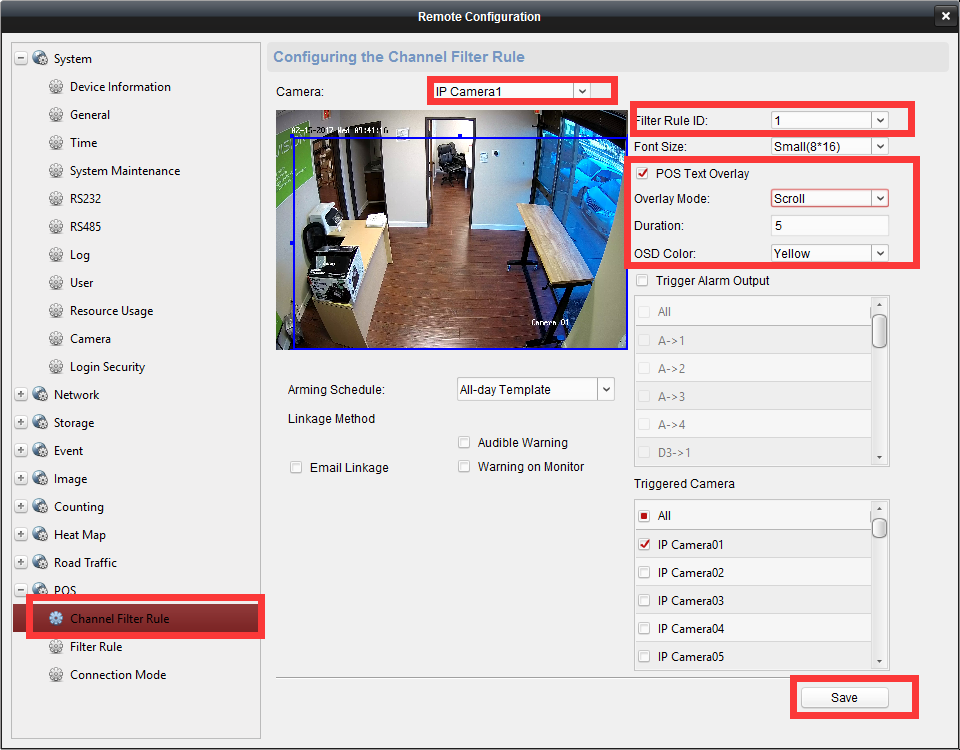
9.Select Channel Filter Rule, Choose a camera channel you wish to display the POS information, and then select the Filter Rule ID you just set in the previous steps, Check the POS Text Overlay box and change the settings according to your preference. Click on Save before exit.

https://support.hinovision.com/DocsDisplay?zgId=647817451&mode=inline&blockId=fs6z7bb3dff7aa94645ef97d56f6c1ff4c9a1

10.Verify the settings by click on Main View. If all the configuration is correct, after you choose the configured channel from NVR, you will see the POS information on the upper left corner of the image.

https://support.hinovision.com/DocsDisplay?zgId=647817451&mode=inline&blockId=fs6z71d00c32eedc648128d133c62b5f686a2

.

Note: If you are unable to see the POS information, try to access the POS configuration from the NVR configuration menu and enter the PC’s IP address in the UDP settings.

.

How to Configure No-IP DDNS on 

Hinovision NVR?

.

.

.

Hinovision NVR supports multiple popular DDNS such as DynDNS and No-IP, etc. This tutorial will demonstrate how to configure No-IP DDNS on Hinovision NVR.

.

Once the DDNS is configured on Hinovision NVR, you will be able to access the NVR directly from Internet instead of from Local Area Network. This provides the possibility for remote access anywhere in the world.

.

Instead of using a private IP address (192.168.x.x, 10.x.x.x) or Public IP address (which is quite expensive), you can use URL and domain name. And No-IP basic service is provided free of charge, yet you will have to confirm the hostname every 30 days.

.

NVR DDNS configuration can be accessed through NVR Screen, Web Interface or Hinovision iVMS-Pro/Lite client software.

.

Test Environment 

NVR Model: NVR516P16-I4

NVR Firmware: V3.4.82 build 161207

.

Router Model: RT-AC1900

Router Firmware:  V3.0.0.4.380_4164

.

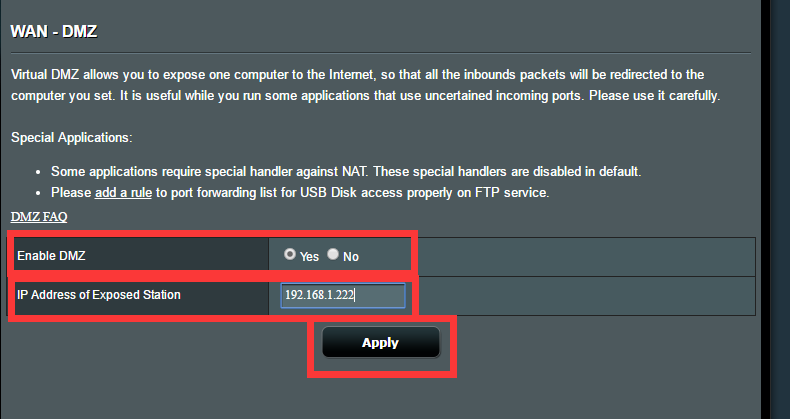
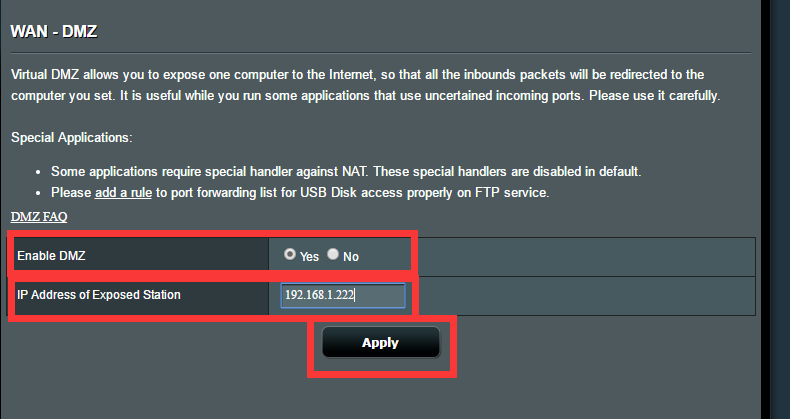
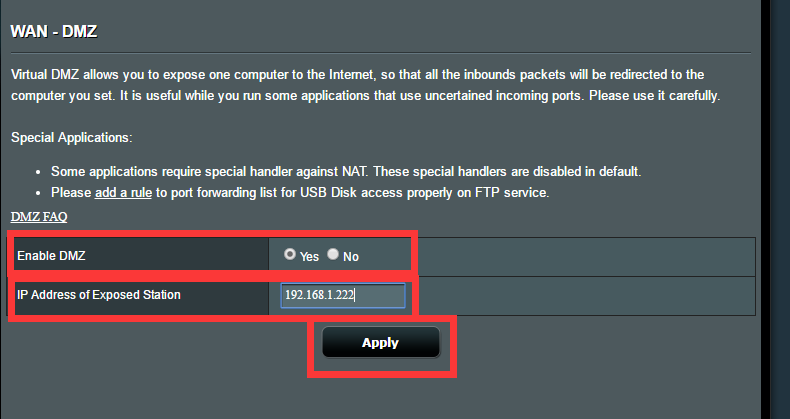
1.Configure the port forwarding/DMZ settings on the router, mapping the port for the NVR or put the NVR IP address in the DMZ zone. Router configuration differs from router to router, in this demonstration we will use RT-AC1900 from Asus.

.

Note:  

Currently most Hinovision NVR uses following 3 ports:

80(HTTP port), 8000 (control information), 554 (RTSP port)

Ports 80, 8000, 554 can be modified in the web configuration.

.

3.Click on Yes for Enable DMZ option
4.Enter the IP address of IP camera you wish to map
5.Click on Apply, wait  for the router to finish configuration

.

.

.

https://support.hinovision.com/DocsDisplay?zgId=647817451&mode=inline&blockId=19il22f62097b98bf4b94855728915535b370

.

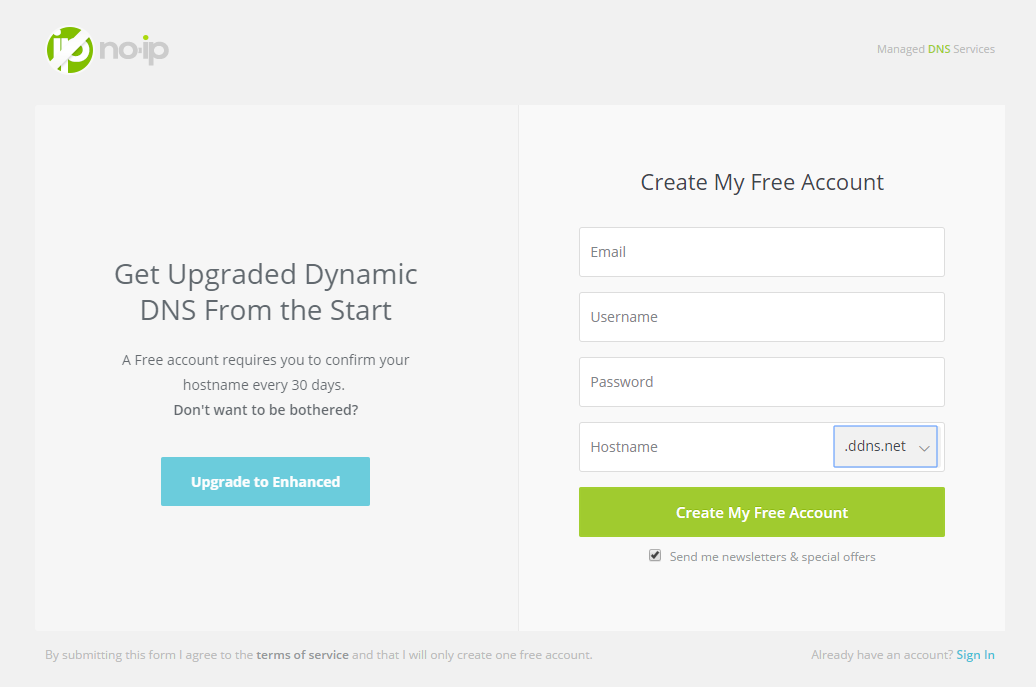
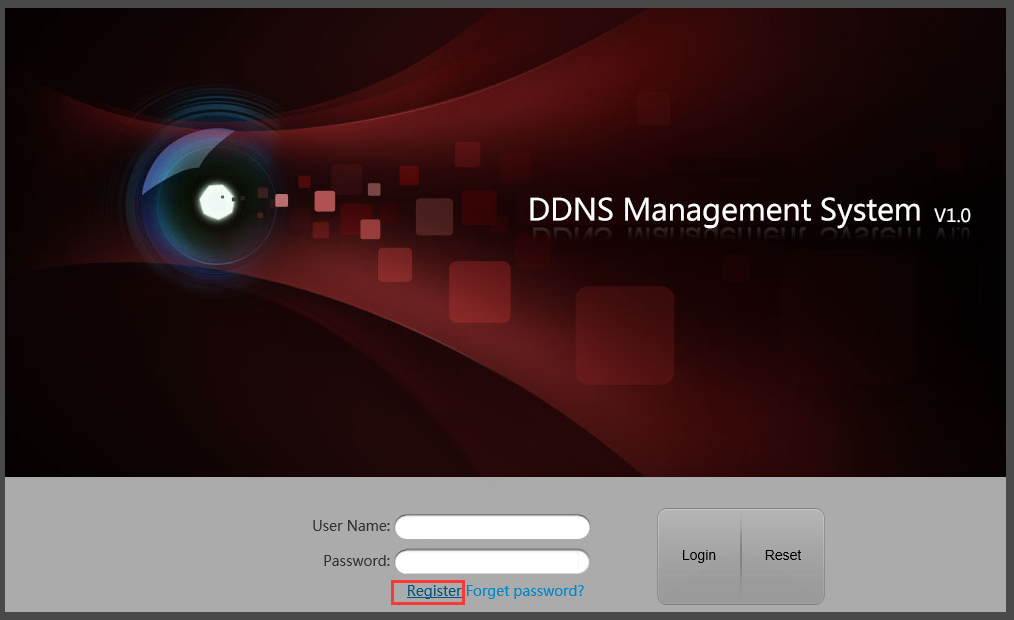
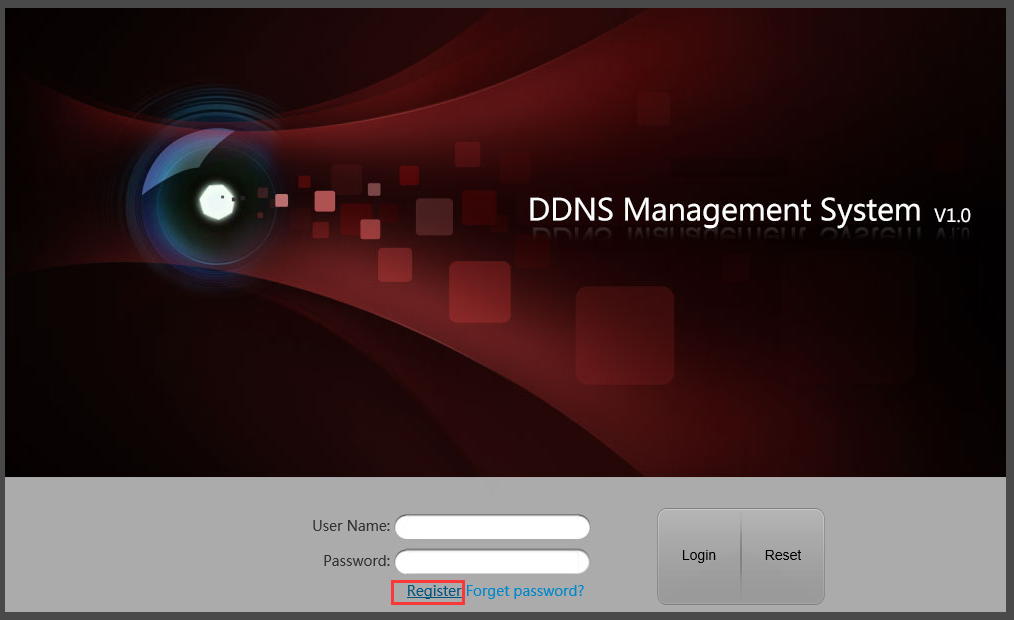
2.Go to No-IP website and register an Account

https://www.noip.com/sign-up

https://support.hinovision.com/DocsDisplay?zgId=647817451&mode=inline&blockId=19il2530108f19a8b441d860dec993a519d1d

.

During the account registration, you will be asked to create a hostname.

.

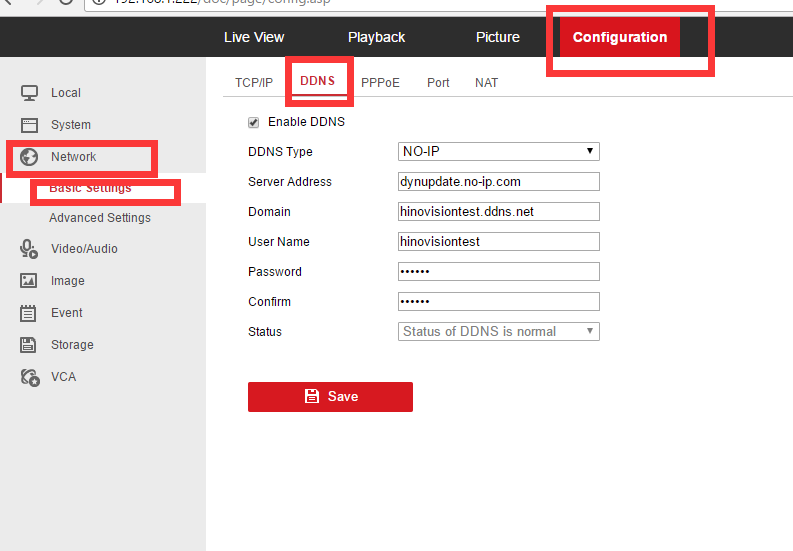
3.Go to NVR web interface, Click on configuration, and then click Network – Basic Settings, then click on DDNS.

https://support.hinovision.com/DocsDisplay?zgId=647817451&mode=inline&blockId=19il2cacc330bc9e346fc85116b630f4707ec

.

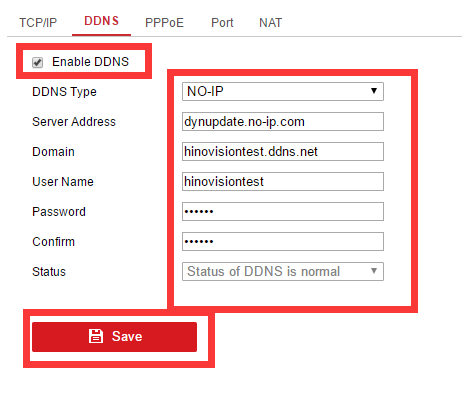
4.Configure the DDNS settings

.

https://support.hinovision.com/DocsDisplay?zgId=647817451&mode=inline&blockId=19il265ce2300270942999c4d52d827b0e4d8

5.Choose NO-IP for DDNS Type
6.Enter www.NO-IP.com  in the Server Address field
7.Enter the domain name you created during registration. You can always manage the domain name later in the NO-IP control panel.
8.Enter your username and password for www.NO-IP.com
9.Click on Save

Note: Please check the DNS status before configuring the DDNS, 8.8.8.8 is recommended

.

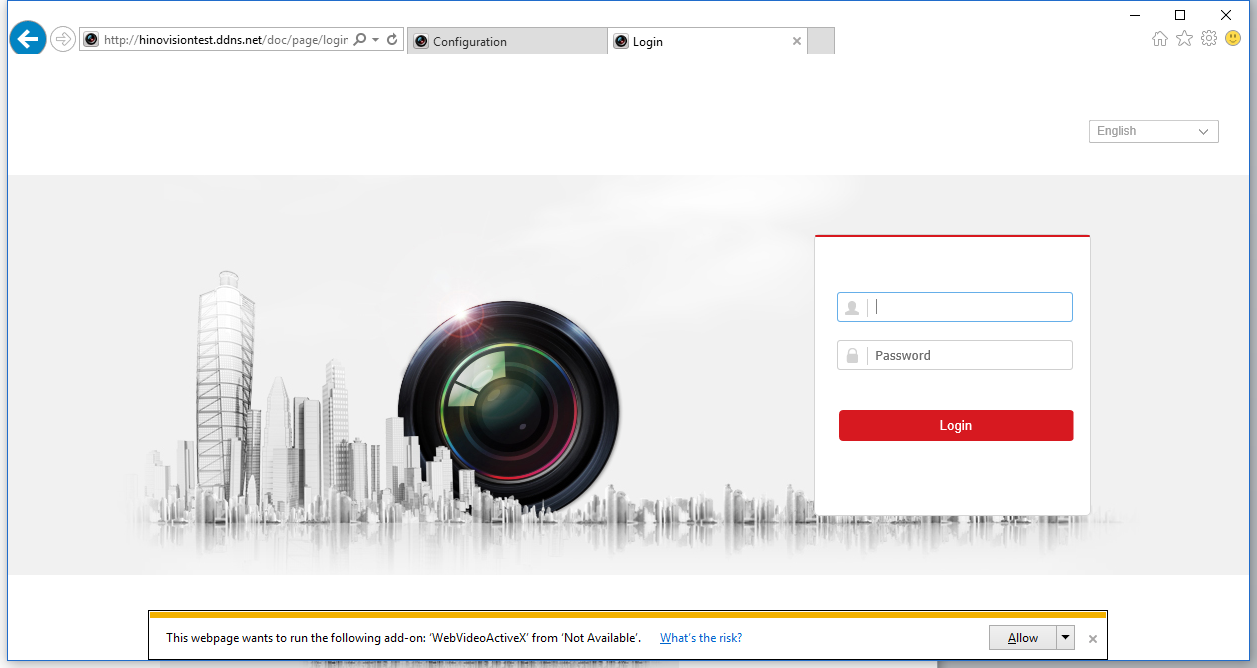
5.Verify the setting by visit [YourDomainName].[server]

https://support.hinovision.com/DocsDisplay?zgId=647817451&mode=inline&blockId=19il2d717dc42bf004aa382bbdad3f2e68b14

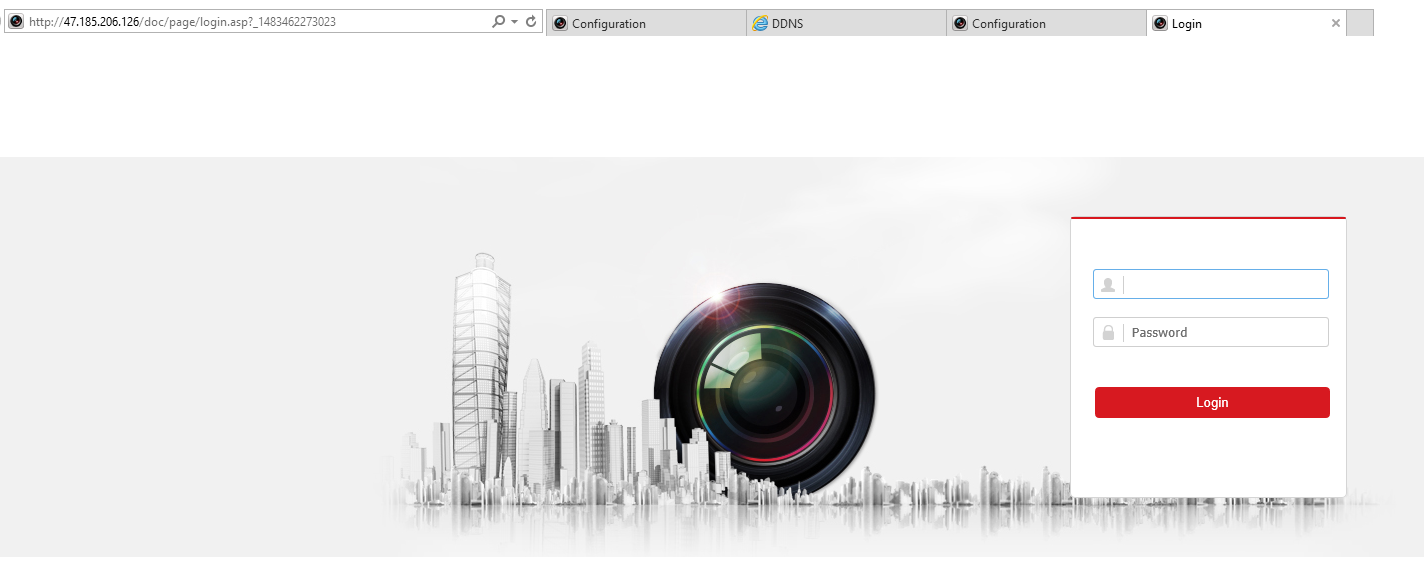
If the settings are correct, you will be redirect to the NVR login interface, the URL will start with your Public IP address.

https://support.hinovision.com/DocsDisplay?zgId=647817451&mode=inline&blockId=19il28ea954452fc94a5ab14f33e04795158a

.

How to Configure SimpleDDNS on 

Hinovision NVR?

.

.

.

Hinovision NVR supports multiple popular DDNS such as DynDNS and No-IP, in addition it also supports SimpleDDNS which provides exclusive free service for Hinovision products.

.

Once the DDNS is configured on Hinovision NVR, you will be able to access the NVR directly from Internet instead of from Local Area Network. This provides the possibility for remote access anywhere in the world.

.

Instead of using a private IP address (192.168.x.x, 10.x.x.x) or Public IP address (which is quite expensive), you can use URL and domain name. And SimpleDDNS service is provided free of charge.

.

NVR DDNS configuration can be accessed through NVR Screen, Web Interface or Hinovision iVMS-Pro/Lite client software.

.

Test Environment 

NVR Model: NVR516P16-I4

NVR Firmware: V3.4.82 build 161207

.

Router Model: RT-AC1900

Router Firmware:  V3.0.0.4.380_4164

.

1.Configure the port forwarding/DMZ settings on the router, mapping the port for the NVR or put the NVR IP address in the DMZ zone. Router configuration differs from router to router, in this demonstration we will use RT-AC1900 from Asus.

.

Note:  

Currently most Hinovision NVR uses following 3 ports:

80(HTTP port), 8000 (control information), 554 (RTSP port)

Ports 80, 8000, 554 can be modified in the web configuration.

.

3.Click on Yes for Enable DMZ option
4.Enter the IP address of IP camera you wish to map
5.Click on Apply, wait  for the router to finish configuration

.

.

.

https://support.hinovision.com/DocsDisplay?zgId=647817451&mode=inline&blockId=19il21c57a848511e467693dbf5809340a258

.

2.Go to SimpleDDNS website and register an Account

http://www.simpleddns.com/

https://support.hinovision.com/DocsDisplay?zgId=647817451&mode=inline&blockId=19il2db078085c899402aa691327a5fd6e244

.

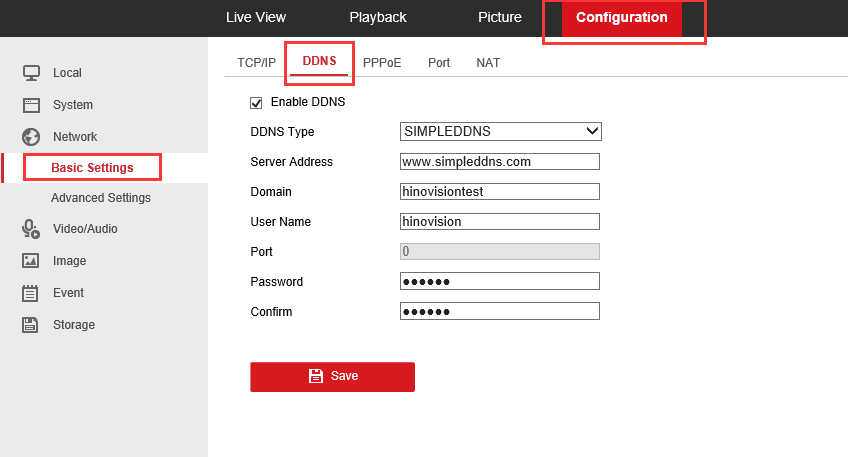
3.Go to NVR web interface, Click on configuration, then click Network – Basic Settings, then click on DDNS.

https://support.hinovision.com/DocsDisplay?zgId=647817451&mode=inline&blockId=19il280d52c8b42e548d2bf765595ab2ed928

.

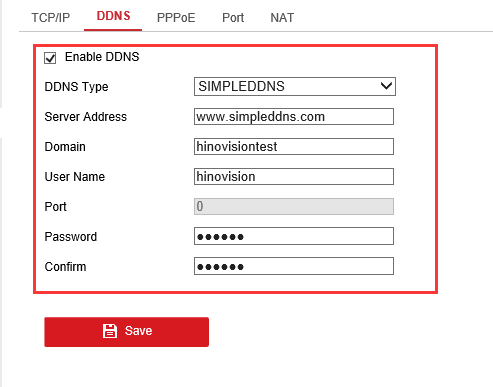
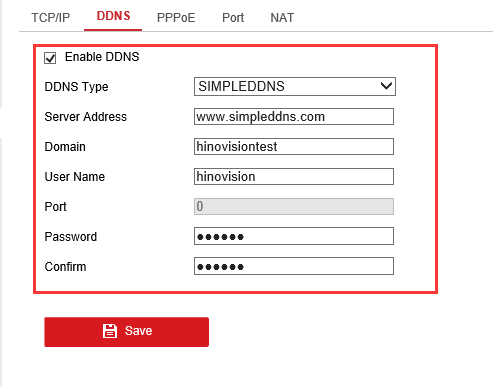
4.Configure the DDNS settings

.

https://support.hinovision.com/DocsDisplay?zgId=647817451&mode=inline&blockId=19il2707009e18b0c4c1f979b35769c788d38

5.Choose SIMPLEDDNS for DDNS Type
6.www.simpleddns.com will automatically populate in the Server Address field
7.Enter a unique domain name. If you are not sure about the domain name, you can visit www.simpleddns.com to see if you domain name is available.
8.Enter your username and password for www.simpleddns.com
9.Click on Save

.

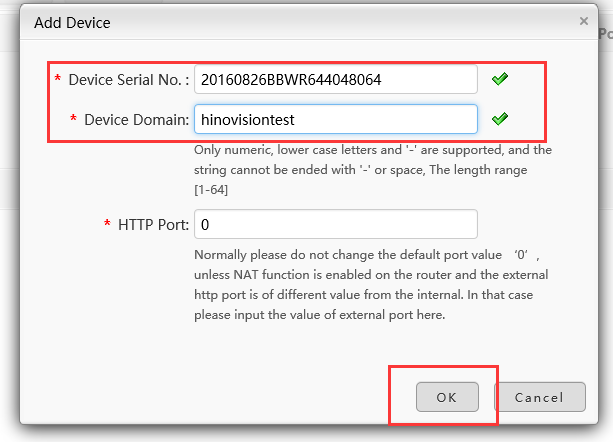
5.(Optional) Add your device on www.simpleddns.com
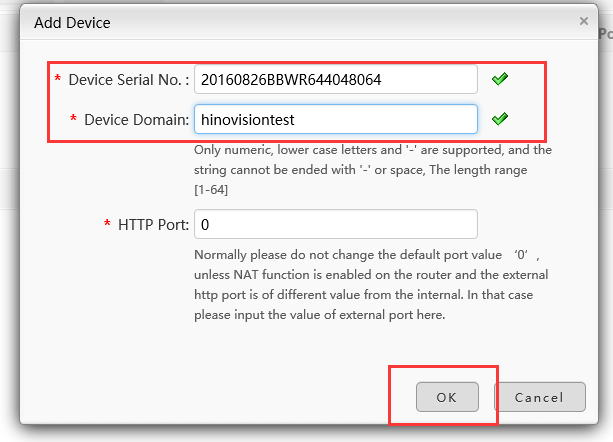
1.Click on Device Management, then Click on Add.

https://support.hinovision.com/DocsDisplay?zgId=647817451&mode=inline&blockId=19il2aff2d471d2e2409ba149323da833a7d9

2.Enter Device Serial Number and Domain Name of your choice, Click on OK to save.

https://support.hinovision.com/DocsDisplay?zgId=647817451&mode=inline&blockId=19il24db6648e3f004efebfda22b066b9a985

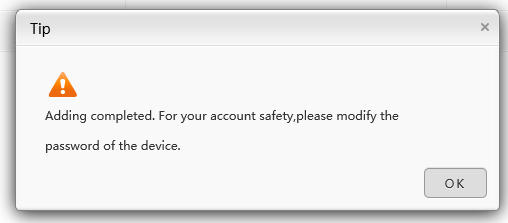
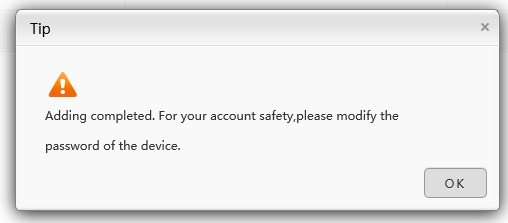
3.You will receive the following notification if successful

https://support.hinovision.com/DocsDisplay?zgId=647817451&mode=inline&blockId=19il2e15904762f78434daf3f6179afd7104d

.

.

6.Verify the setting by visit [YourDomainName].simpleddns.com.

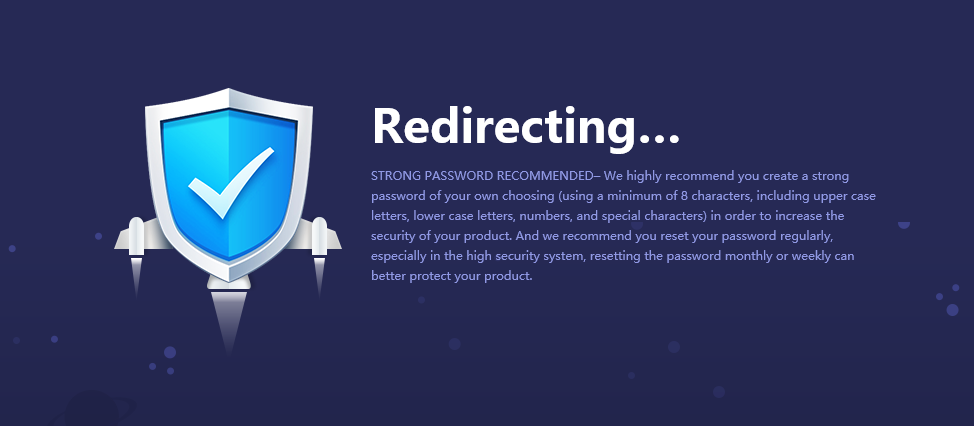
If the settings are correct, you will see the following image

https://support.hinovision.com/DocsDisplay?zgId=647817451&mode=inline&blockId=19il20fa3b95a78c0494cb5c919d1f87b7286

Then you will be redirect to the IPC login interface, the URL will start with your Public IP address.

https://support.hinovision.com/DocsDisplay?zgId=647817451&mode=inline&blockId=19il2a69b5109a50a4b9c8edb3f077bff91ec

How to 

Display POS information on Hinovision NVR with RS232 to Ethernet Server?

.

.

.

Hinovision 5-Series Professional Line NVR supports POS Information display. It supports multiple types of connection (RS-232, USB, and Ethernet).

.

Once the POS setting is configured on Hinovision NVR, you will be able to view POS information on Live View and Play Back. This provides the possibility to offer advanced level of integration for multiple scenarios.

.

The following demonstration will show you how to achieve POS info display on Hinovision NVR516P16-I4 with RS232 to Ethernet Server. Configuration is needed on both NVR and RS232 to Ethernet Server. 

.

Test Environment 

NVR Model: NVR516P16-I4

NVR Firmware: V3.4.82 build 161207

.

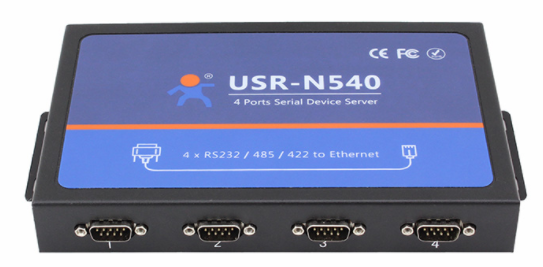
RS232 to Ethernet Server Brand: USR IOT

RS232 to Ethernet Server Model: USR-N540

RS232 to Ethernet Server Firmware: 3009

https://support.hinovision.com/DocsDisplay?zgId=647817451&mode=inline&blockId=19il2bda15d63f52e4156a87083ab6f95db8e

.

System Connection

Connect POS output to USR-N540 RS-232 Port1, Connect USR-N540 LAN to your Router/Switch with Ethernet Cable.

.

1.Configure the USR-N540 IP address
2.Connect the USR-N540 to LAN port on your switch or router with Ethernet cable, connect the power cord and make sure the unit is powered on.
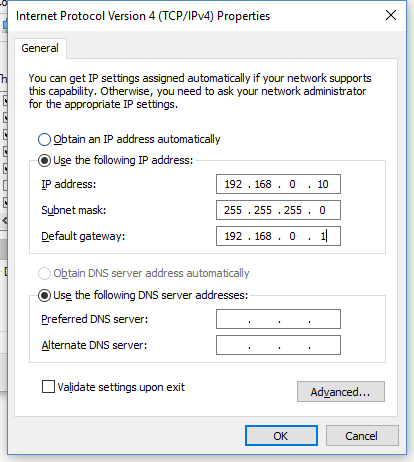
3.Change your PC network IP address to the same segment as the USR-N540 default address.(e.g. 192.168.0.10)

Note: USR-N540 default address (192.168.0.7) can be found on the sticker under the unit.

https://support.hinovision.com/DocsDisplay?zgId=647817451&mode=inline&blockId=19il24eff9a6f03af43498f5a5012dfe5025c

3.Visit USR-N540 default address (192.168.0.7), enter the username and password

Note: the default Username and Password for USR-N540 are listed below

UserName: admin

Password: admin

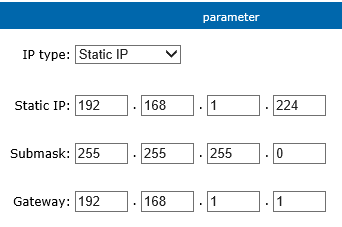
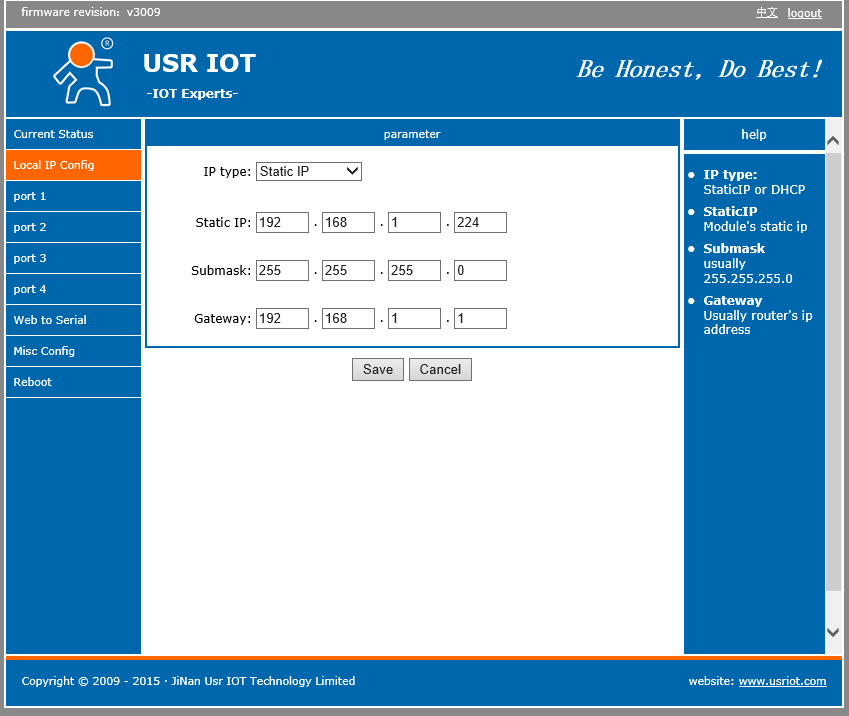
4.Change the IP address to the same segment as the Router IP. (e.g. 192.168.1.224)Save and Reboot USR-N540.

https://support.hinovision.com/DocsDisplay?zgId=647817451&mode=inline&blockId=19il2595a76afa2e3439e895f7dc79f1d82f0

https://support.hinovision.com/DocsDisplay?zgId=647817451&mode=inline&blockId=19il2dffd012a2a3a4c0ba5b3648f8add3c53

5.Restore the PC IP address. (e.g. 192.168.1.18)

.

2.Change Port setting on USR-N540
3.Access USR-N540 with the new IP address you just assigned (e.g. 192.168.1.224).
4.Login with UserName and Password
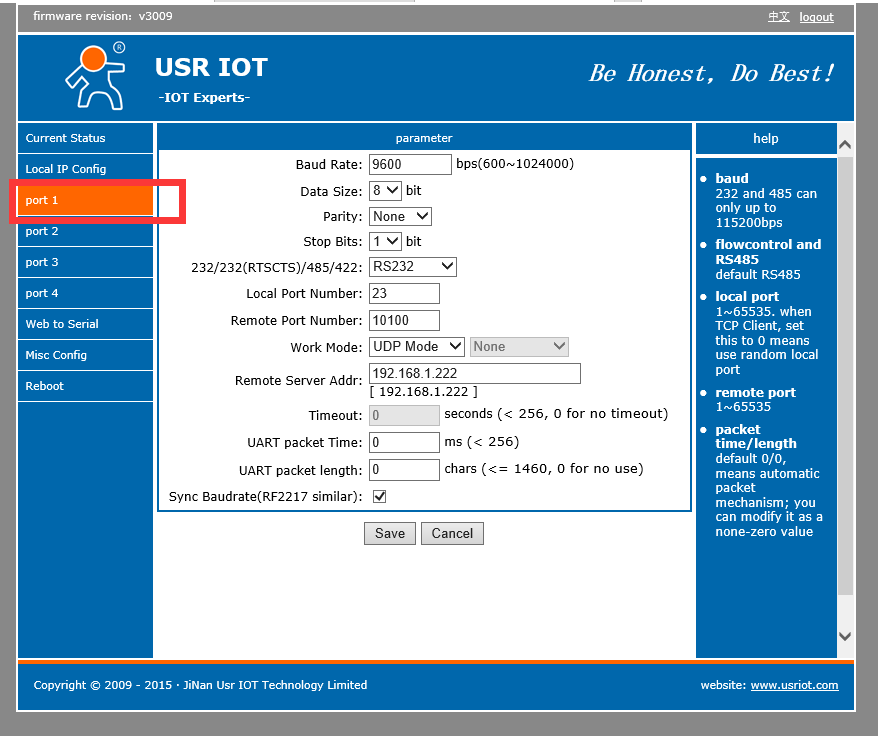
5.Go to the port your POS is connected with (e.g. Port1)

https://support.hinovision.com/DocsDisplay?zgId=647817451&mode=inline&blockId=19il2549dc81f86294e2b82b21118561dbe63

4.Change the Baund Rate, Data Size, Parity, Stop Bits and Type according to the configuration on your POS machine

https://support.hinovision.com/DocsDisplay?zgId=647817451&mode=inline&blockId=19il2ade990d0be734f6d99b7a5107891cbbc

5.Assign Local port Number, Remote Port Number (e.g. 10110), Choose UDP Mode for Work Mode, and Enter the NVR IP address (e.g. 192.168.1.222)

https://support.hinovision.com/DocsDisplay?zgId=647817451&mode=inline&blockId=19il2db729e76e805461c9fef19f89932ad79

6.Leave the rest of settings in default, Save and Reboot USR-N540.

.

3.Configure NVR POS setting
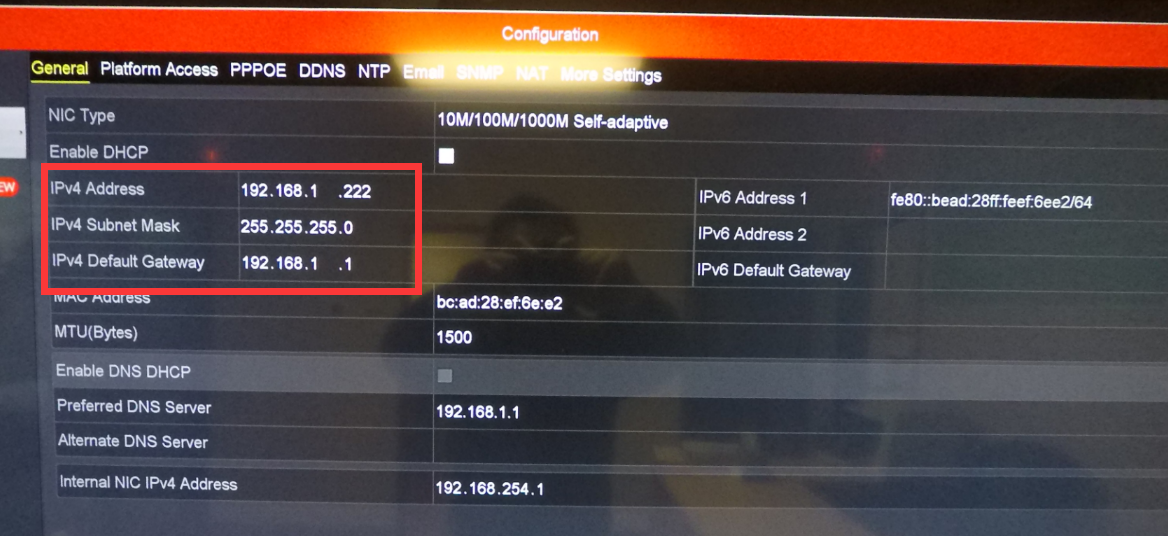
1.Make sure NVR is connect to the same Local Network as USR-N540, and they are under the same IP segment.

https://support.hinovision.com/DocsDisplay?zgId=647817451&mode=inline&blockId=19il2c9226dc621424897aa59f44cf870d931

.

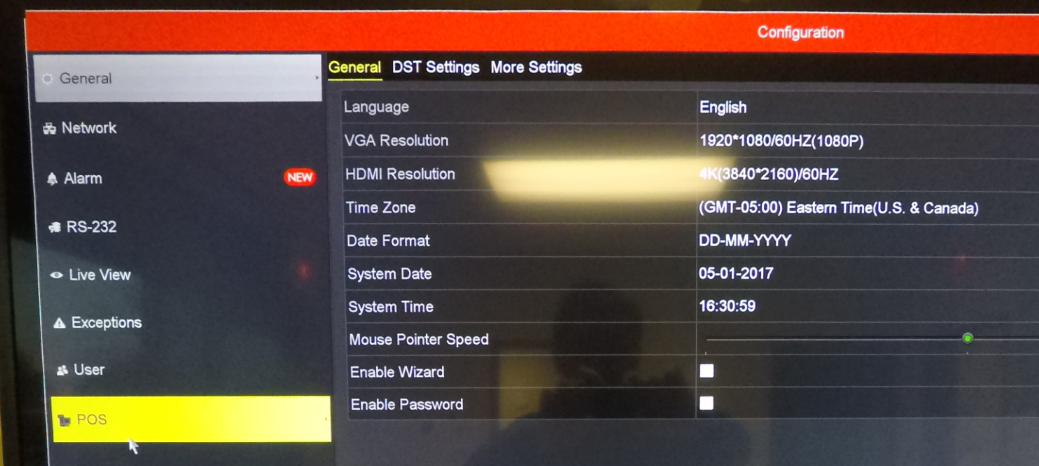
2.Right Click and open Menu, Click on Configuration and navigate to POS tab on the left.

https://support.hinovision.com/DocsDisplay?zgId=647817451&mode=inline&blockId=19il2e2e82c9072db4cfda82b8f5ea30a1005

.

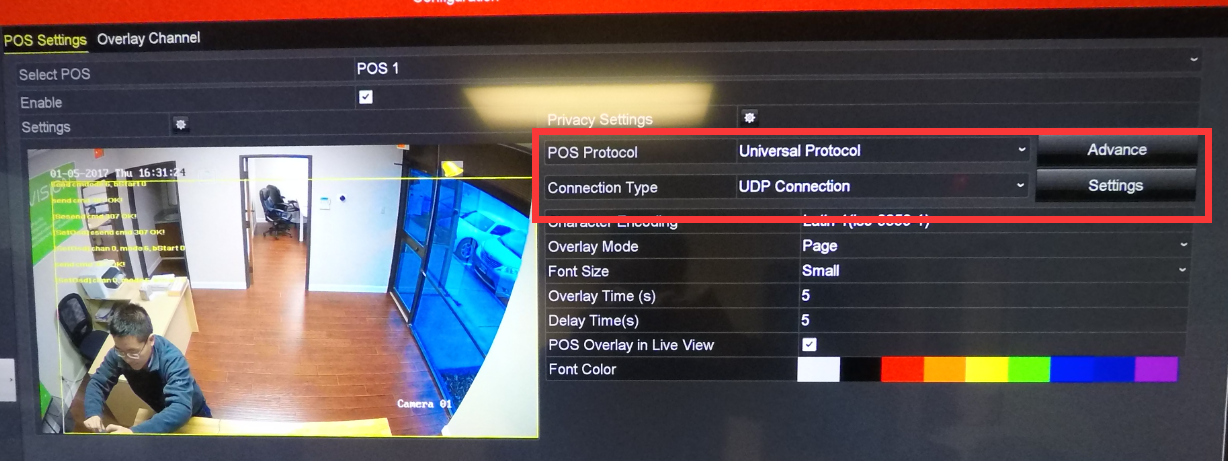
3.Configure POS Protocol as Universal Protocol, Connection Type as UDP Connection

https://support.hinovision.com/DocsDisplay?zgId=647817451&mode=inline&blockId=19il224984f1713af4ca78053f9dfc3698fb1

.

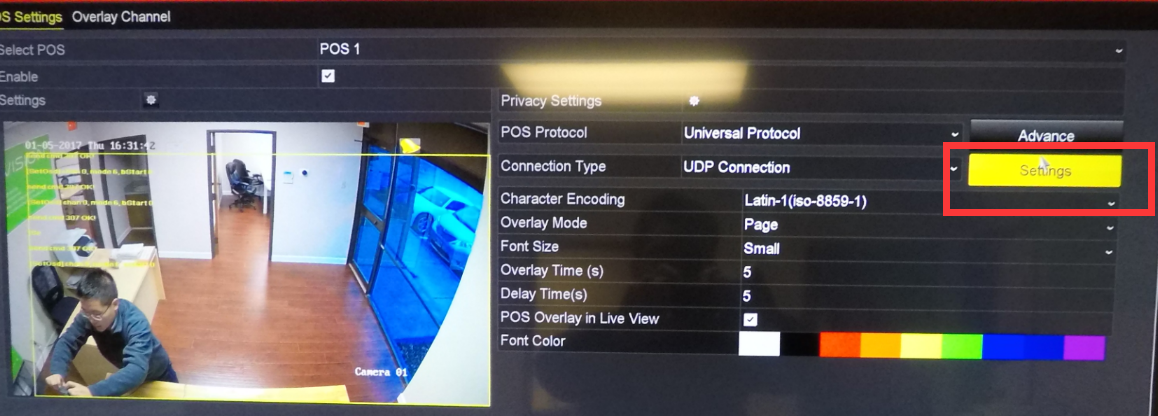
4.Click on Settings on the right

https://support.hinovision.com/DocsDisplay?zgId=647817451&mode=inline&blockId=19il2d2a3df569f614516a3787d86ecea1fc2

.

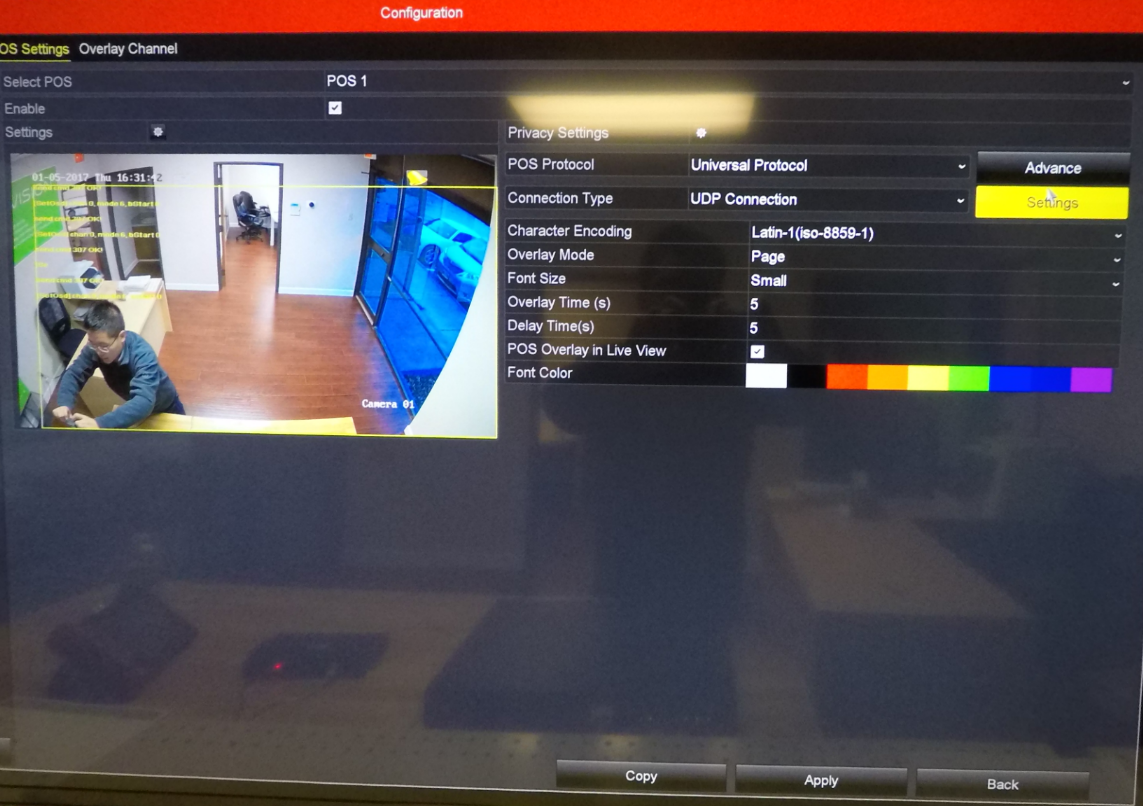
5.Enter the IP address you assigned for USR-N540 (e.g. 192.168.1.224) and the Remote Port Number you assigned on the USR-N540 port configuration page (e.g. 10110), click on OKhttps://support.hinovision.com/DocsDisplay?zgId=647817451&mode=inline&blockId=19il2ae6a1730d51445e89590893bb6043ff1

.

6.Click on Apply before exit

https://support.hinovision.com/DocsDisplay?zgId=647817451&mode=inline&blockId=19il2832a19764b104e1692a02628d99cbe4f

.

4.Verify the settings

With all the settings complete, once data is sent through RS-232 port, it will be displayed on NVR Live View screen.

.

https://support.hinovision.com/DocsDisplay?zgId=647817451&mode=inline&blockId=19il23280995e4a2d4a598120a01f93aec170

.

Note: POS information will only be displayed under main-stream, if NVR is displaying multiple Live View under sub-stream, POS information will not be displayed. 

How do I install Hard Drives to NVR?

Steps to Install Hard Drive on NVR

1.Remove the NVR cover by unscrew 8 screws on back and side panel.
2.Connect the Power and SATA cables to NVR logic board; Cables are included in the accessary box.
3.Connect Power and SATA cable to HDD.
4.Align the HDD to the mounting points and fasten the screws from the bottom panel.
5.Reinstall the cover.   

https://youtu.be/h9uEUatQgMA

Access IP Camera Configuration From NVR

.

.

.

.

.

.


.

.

.

.

.

Purpose:

.

To be able to access IP cameras connected to an NVR from the NVRs web client.

.

Note: Before we start make sure the computer and the NVR are in the same network

.

Enable the virtual host:

1.Open internet explorer.
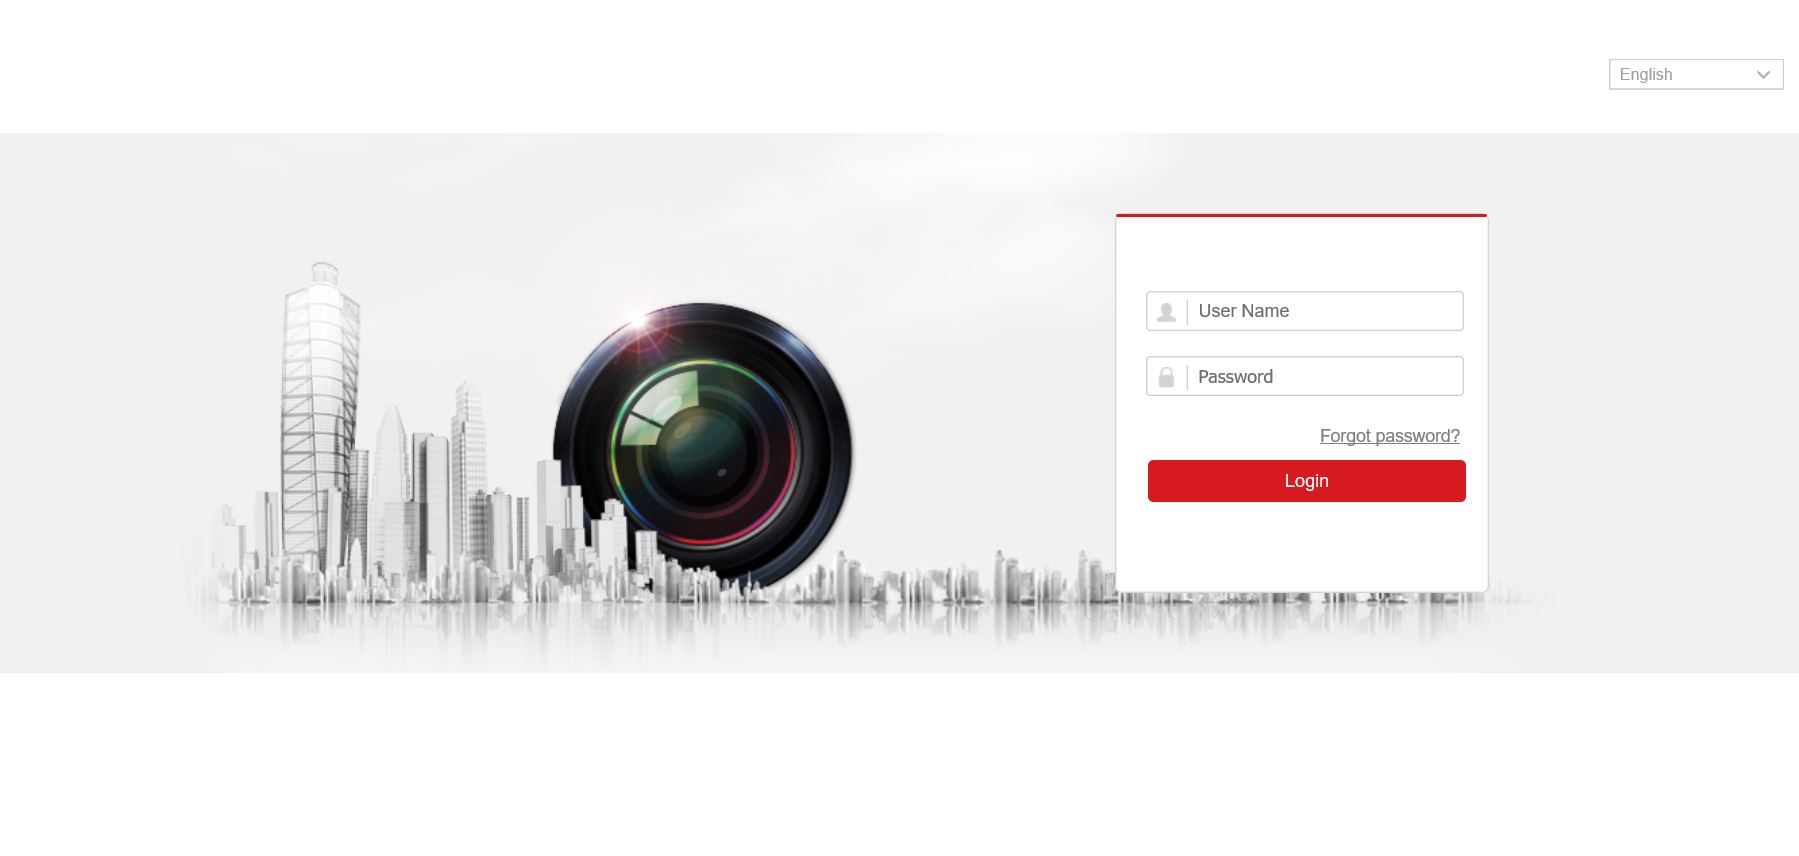
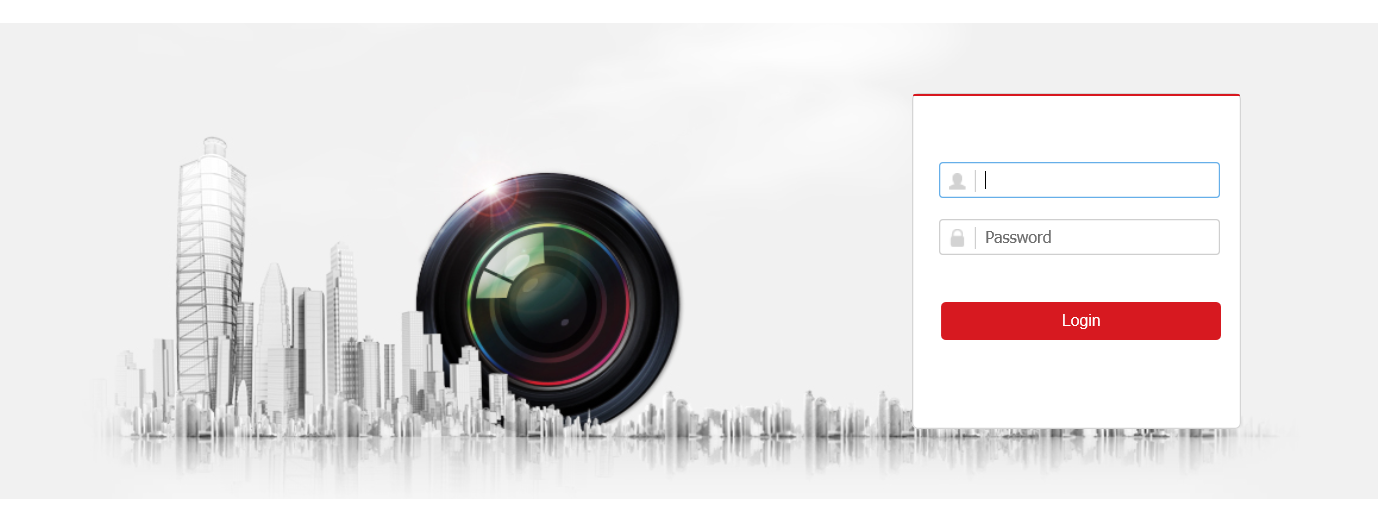
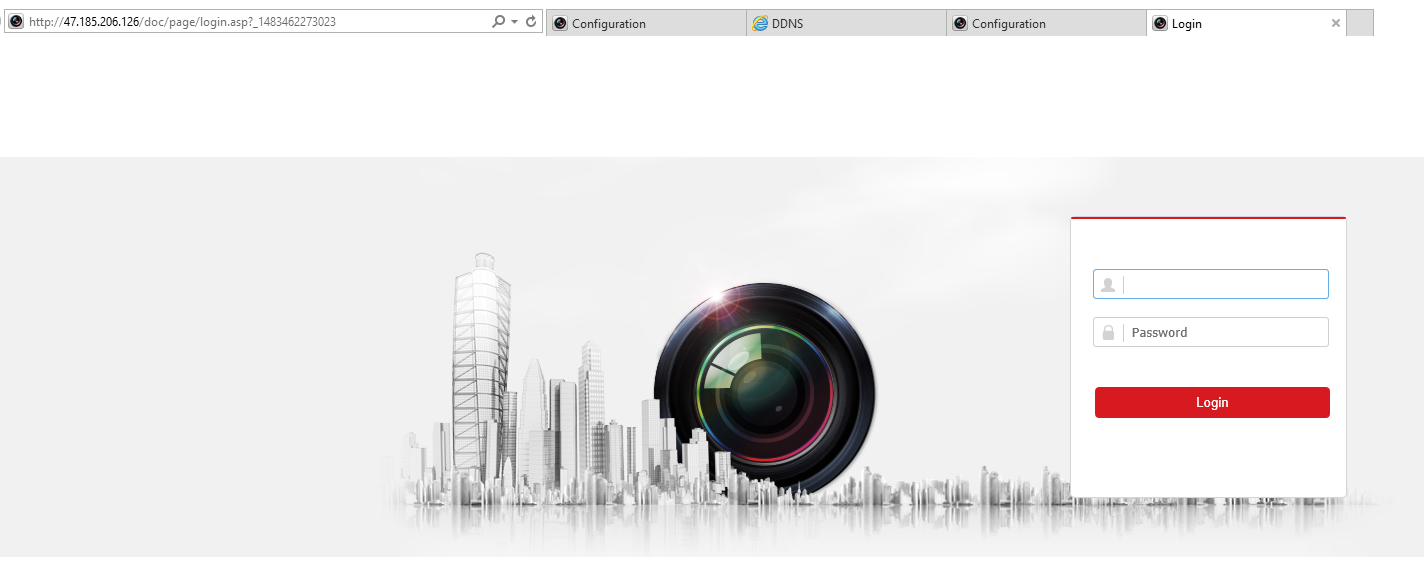
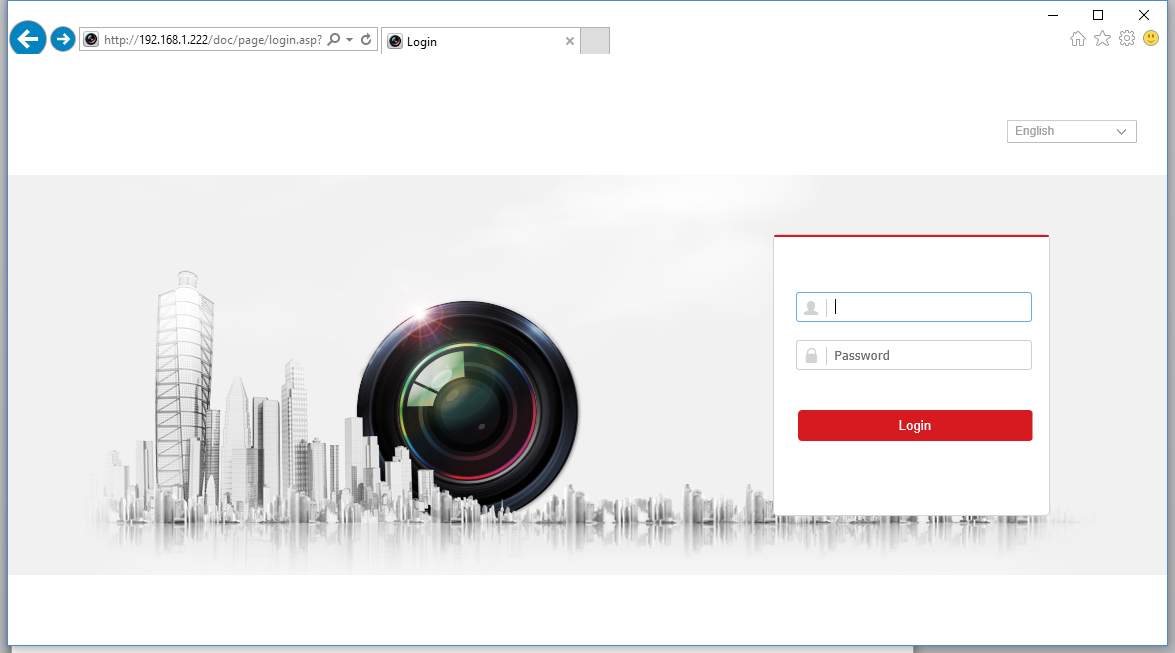
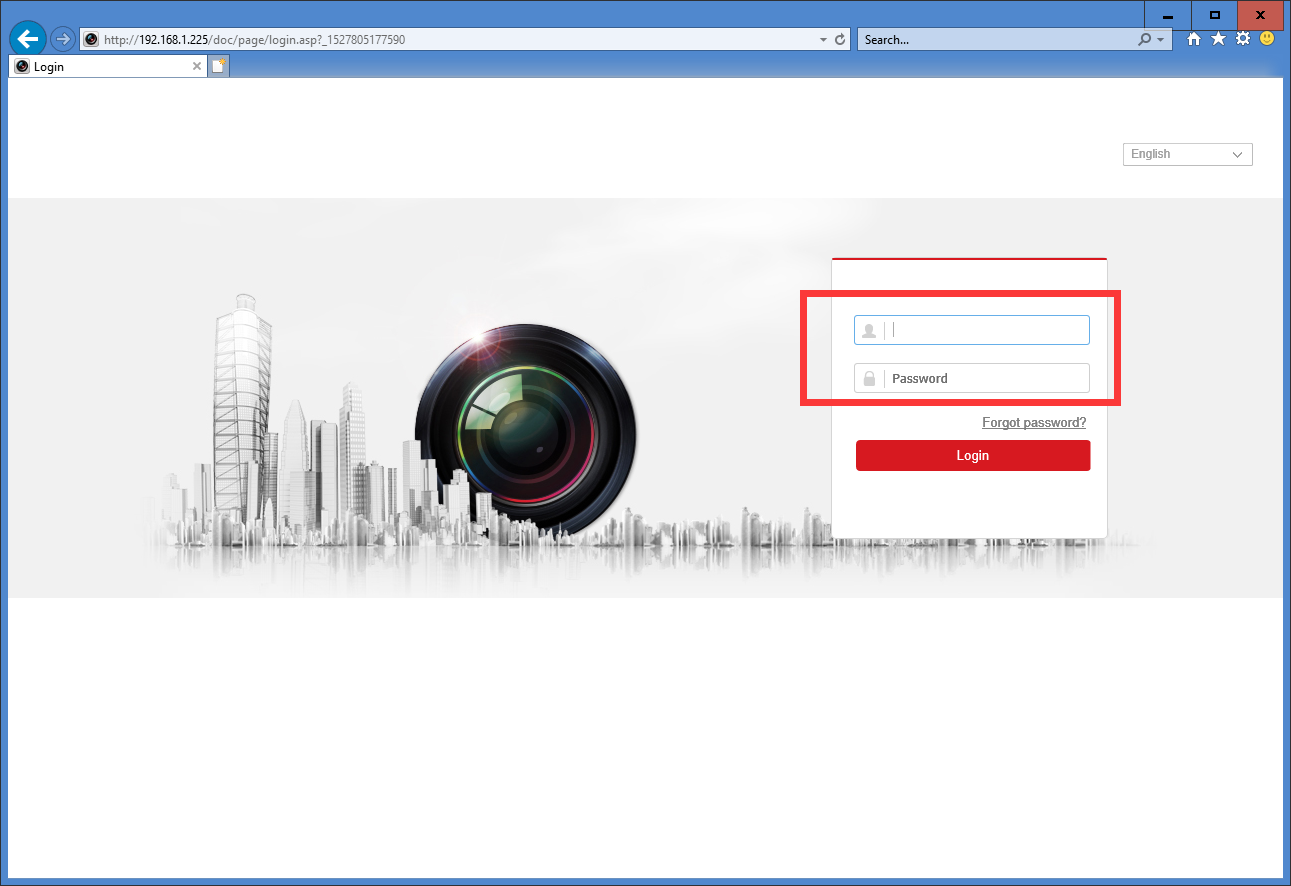
2.Input the IP address of the NVR into the address bar. You should be able to see the following page:

.

https://support.hinovision.com/DocsDisplay?zgId=647817451&mode=inline&blockId=d024u59d3c1318f4b4b5c9fe32defa982616e

.

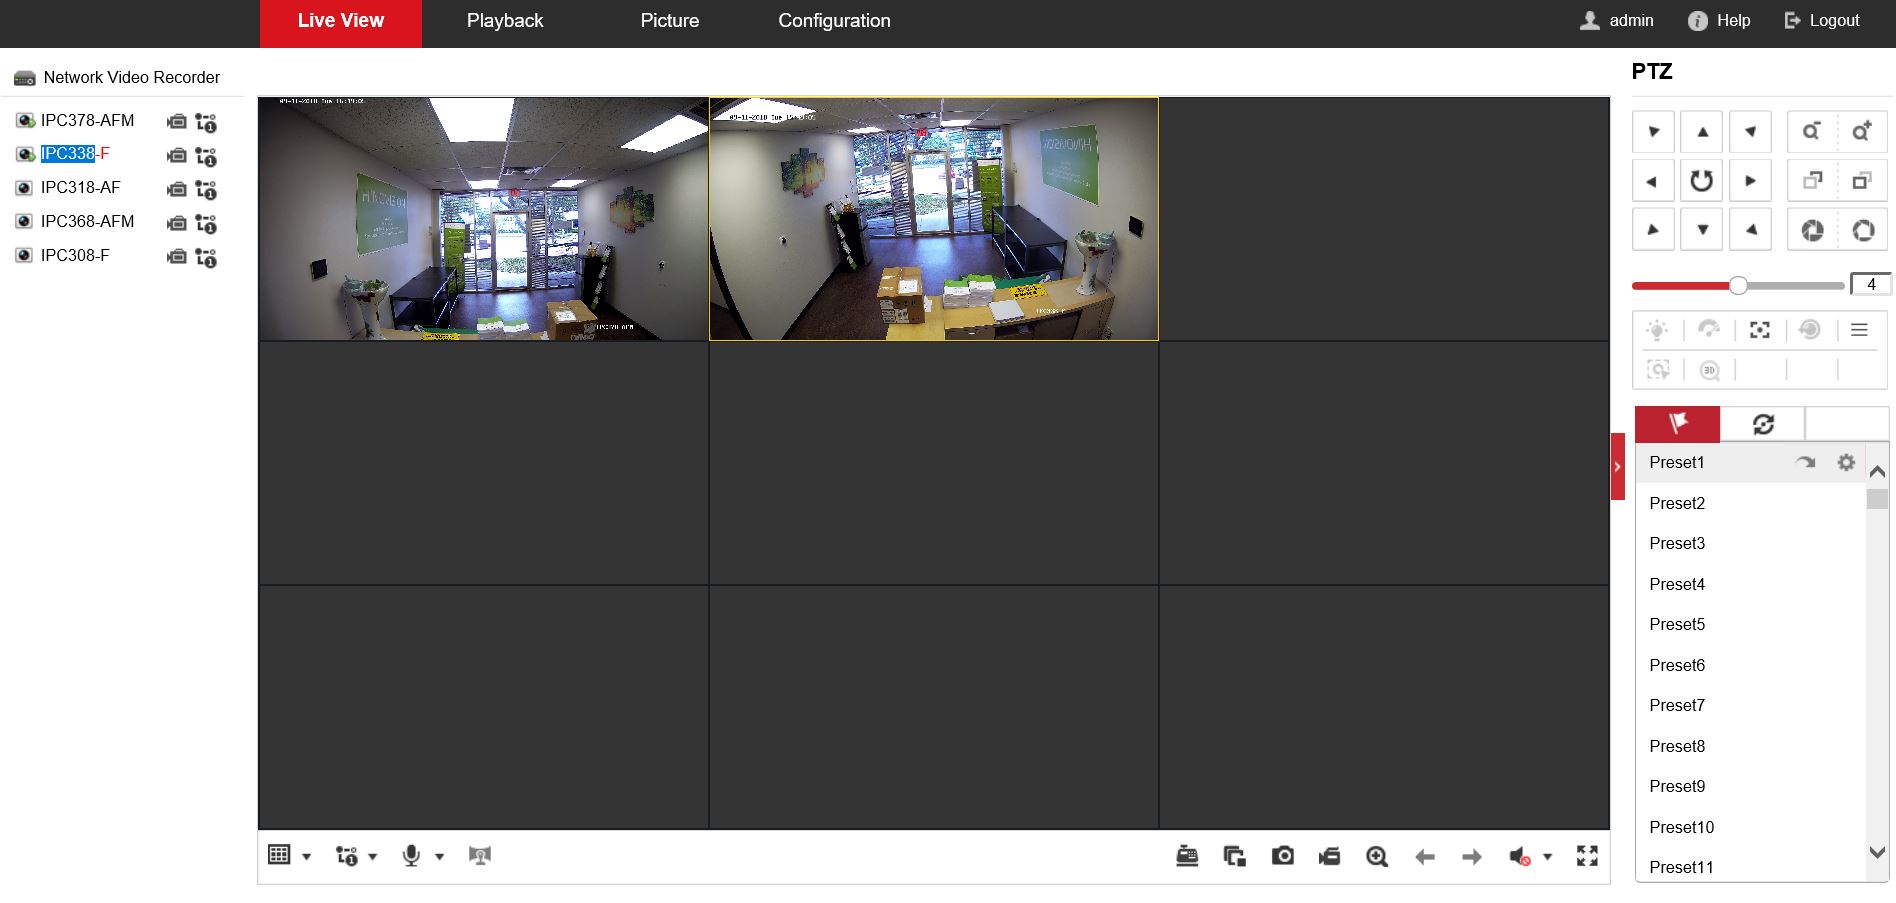
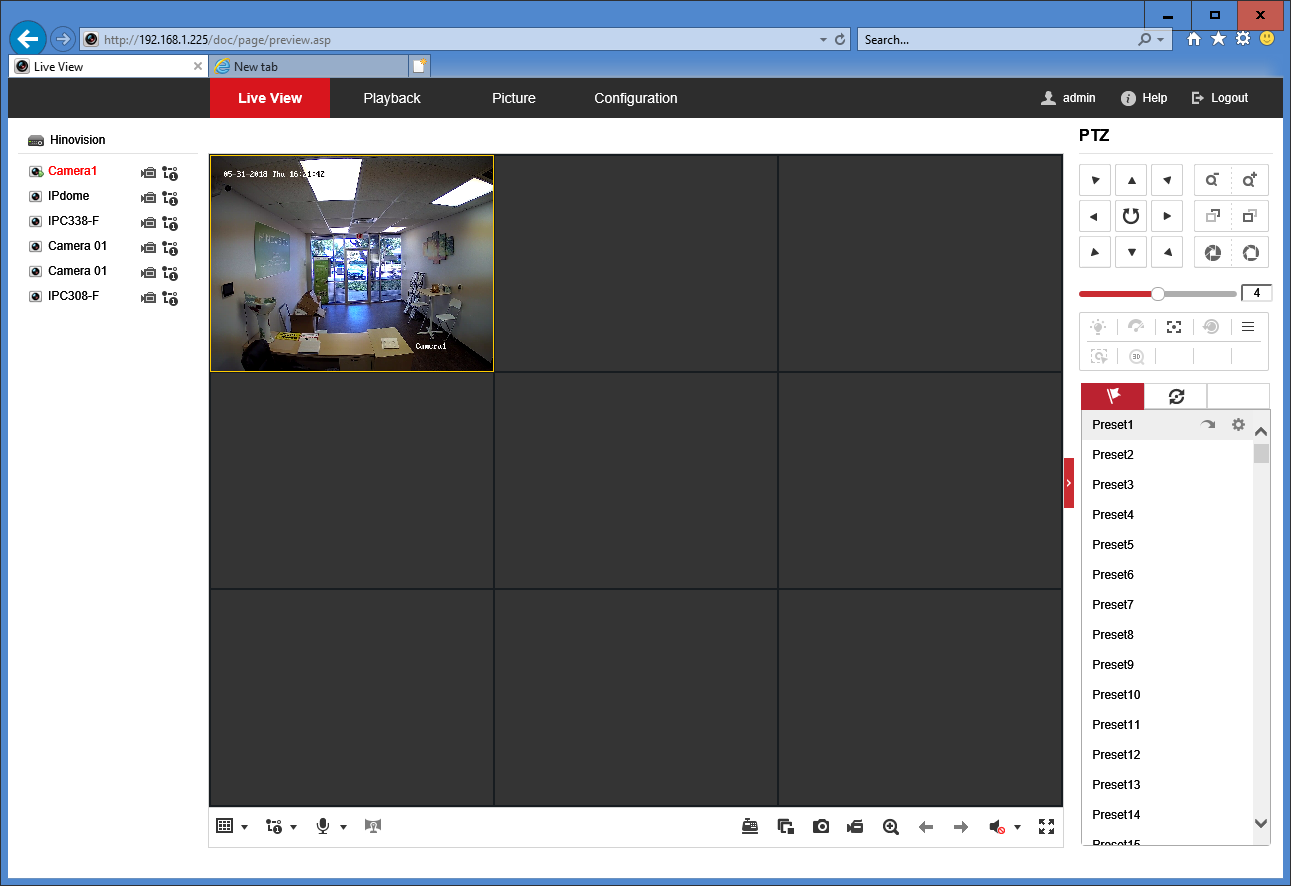
3.Input the User Name and Password. Click on “Login”. Now, the following page will be displayed:

.

https://support.hinovision.com/DocsDisplay?zgId=647817451&mode=inline&blockId=d024u6c8a4f248d6b4fb89725a331b083e828

.

4.Go to Configuration  Advanced  Other  Check “Enable Virtual Host”  Click “Save”. Please refer to the figure below:

.

https://support.hinovision.com/DocsDisplay?zgId=647817451&mode=inline&blockId=d024ua146ff7b7a3f4dcebb868e0b88e3bf78

.

.

.

.

.

.

Follow the steps below to see if the setting was successfully performed:

.

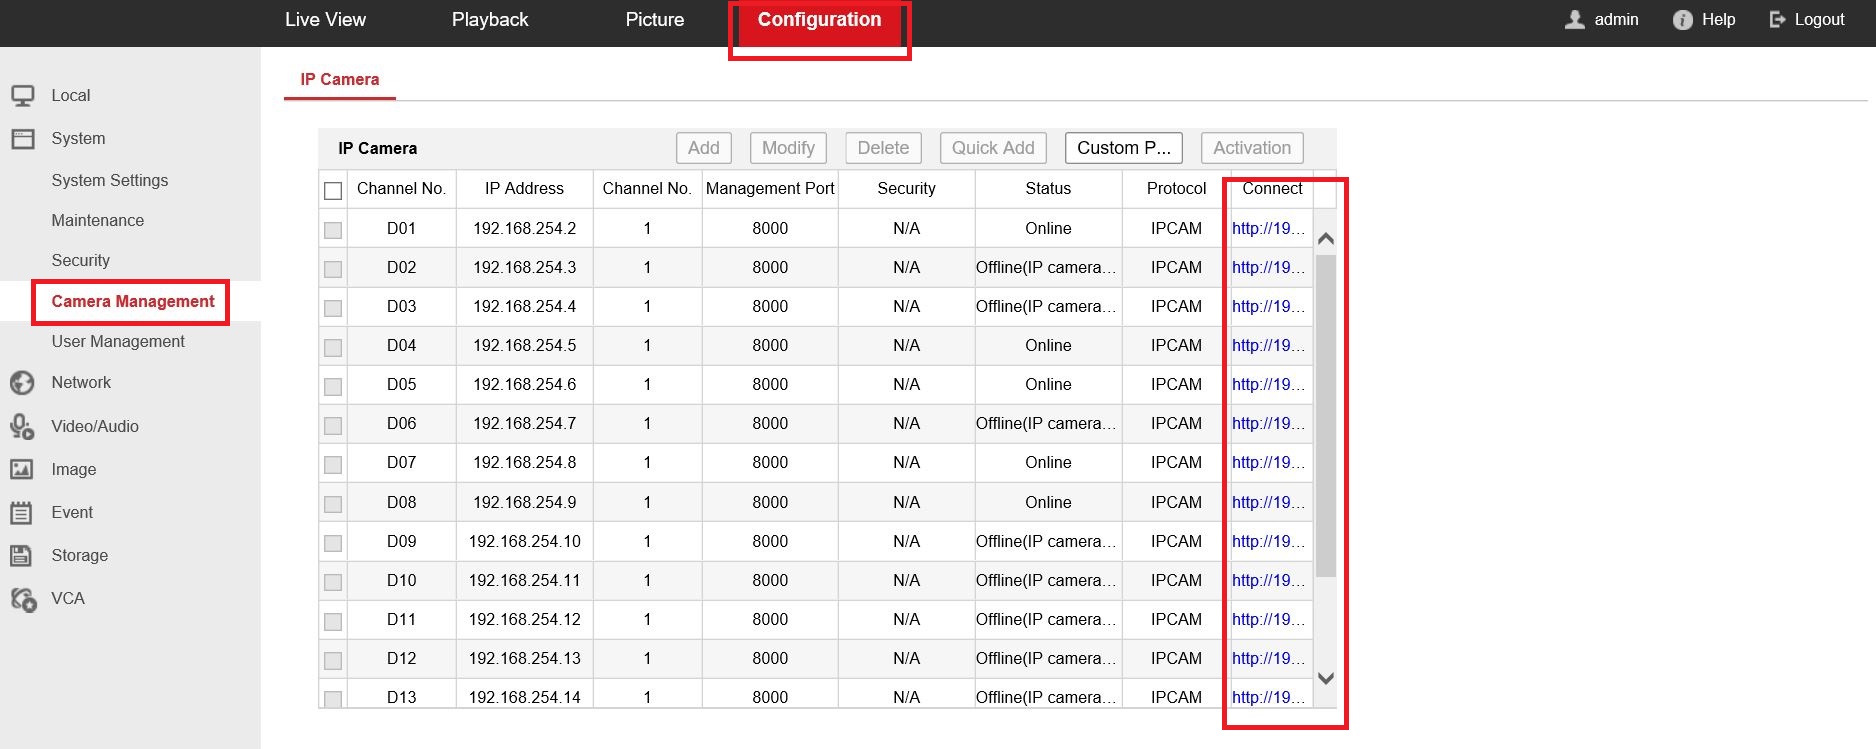
Go to ‘Configuration’  ‘Camera Management’. The links for accessing the IP camera will be shown as follows:

.

https://support.hinovision.com/DocsDisplay?zgId=647817451&mode=inline&blockId=d024u6ebefd53666842ecbd06b066283dde08

.

Configure NVR 

with Multiple LAN

.

.

Hinovision High End NVRs supports more than 1 LAN port; please see the table below for more port information:

Model

LAN Port Number

NVR732-I4

2

NVR764-I8

2

NVR7128-I16

4

NVR7256-I16

4

NVR732-K8

2

NVR764-K8

2

.

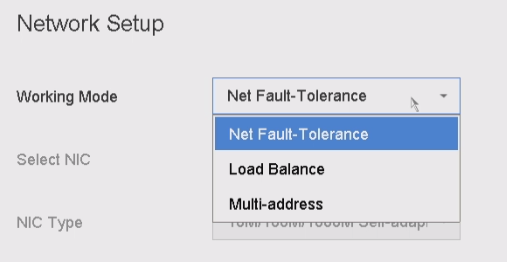
With more than 1 LAN port, they support following network mode:

https://support.hinovision.com/DocsDisplay?zgId=647817451&mode=inline&blockId=d024u83befc02618c44388c0cb99a66a9cdf0

Net Fault-Tolerance mode will set all ports to same IP, if one port fails, other port will take over.

Load balance mode will balance the load between all Port, please make sure the switch support link aggregation when you use this mode.

Multi-address mode allows you to have different IP for each of the port and thus you can have the device connect to different network.

.

How to configure 

Intrusion Detection 

on Hinovision IPC?

.

Hinovision Technical Team

Ver.1.0

.

Hinovision IPC supports multiple VCA (Video Content Analysis) features such as Intrusion Detection, Line Crossing Detection, etc. This tutorial will demonstrate how to configure Intrusion Detection on Hinovision IP Camera.

.

Once the Intrusion Detection on is configured on Hinovision IPC, you will be able to receive audible warning on NVR once alarm is triggered, you can set the NVR to do full screen viewing for the triggered channel, the IPC can send you email with event picture attached, you can also control other PTZ camera to focus on certain area for a more detailed shot. This provides a new way for video surveillance.

.

IPC Intrusion Detection configuration can be accessed through Web Interface, Hinovision iVMS-Pro/Lite client software, if the IPC is connected with NVR, you can also configure it from the NVR screen.

.

Test Environment 

NVR Model: NVR516P16-I4

NVR Firmware: V3.4.82 build 161207

.

IPC Model: IPC314-F

IPC Firmware:  V5.4.1 build 160810

.

1.Access your NVR Web Interface, Login with your credential.

https://desk.zoho.com/DocsDisplay?zgId=647817451&mode=inline&blockId=f46qj707a06d053b14bf59b26f0f412f55dd4

Note: You can find your NVR IP address in the NVR on Screen menu, go to menu, then click Configuration and then click on Networks.

.

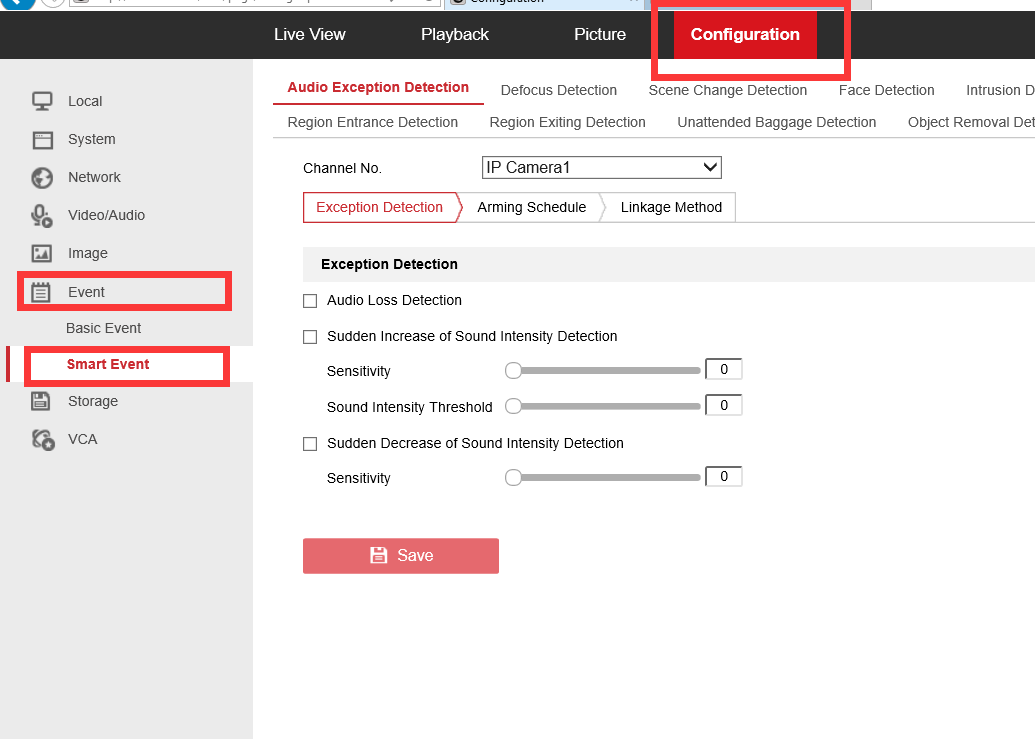
2.Click on Configuration, and then select Smart Event under Event.

https://desk.zoho.com/DocsDisplay?zgId=647817451&mode=inline&blockId=f46qjf9969f4ec4ea4cdd94e9f46212a499bf

.

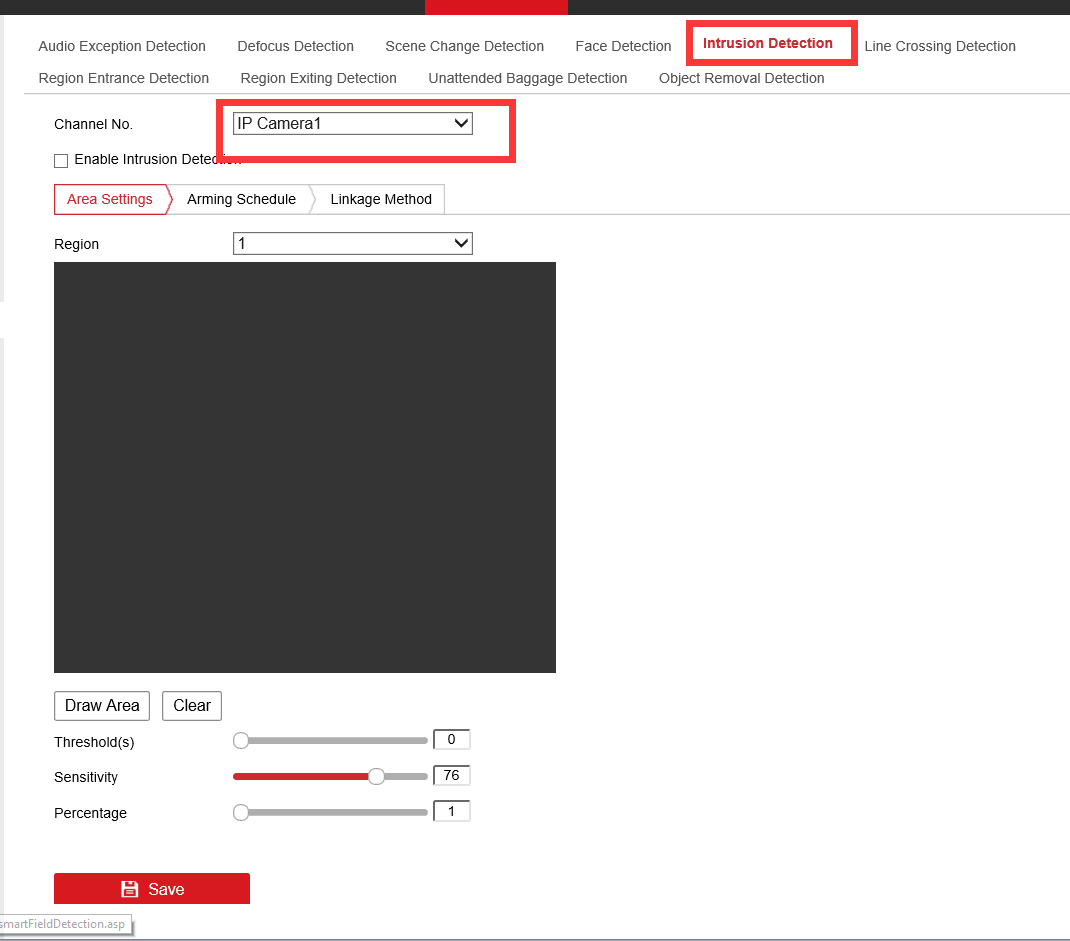
3.Select Intrusion Detection, Select the camera you wish to configure and check the Enable intrusion Detection box

https://desk.zoho.com/DocsDisplay?zgId=647817451&mode=inline&blockId=f46qj441dd339aa3c43b895ac768293be0aa7

.

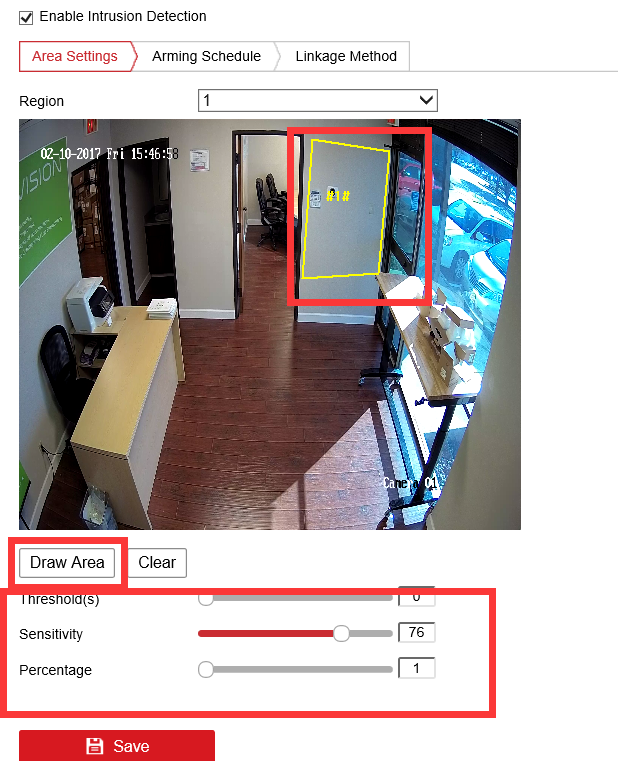
4.Click on Draw Area, and then adjust the area on the above screen by outline the diction area with up to 4 lines. You can adjust the Thresholds (time object allow to stay the detection area before triggering the alarm), Sensitivity (Size of the object), and Percentage(Percentage of the object into the detection area)

.

https://desk.zoho.com/DocsDisplay?zgId=647817451&mode=inline&blockId=f46qj6cac25ad6f6046c283399190c46d0dc6

.

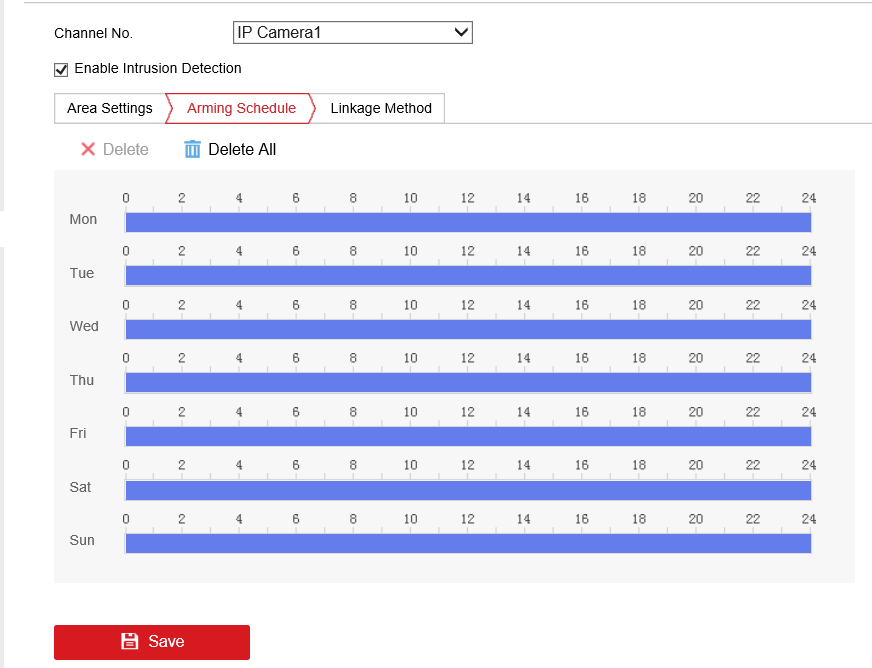
5.Click on Arming Schedule, adjust the time you want the alarm to function by drag and drop on the time line for every day of the week.

https://desk.zoho.com/DocsDisplay?zgId=647817451&mode=inline&blockId=f46qjb5126f36c1654218b8f3d19e23df0bfd

.

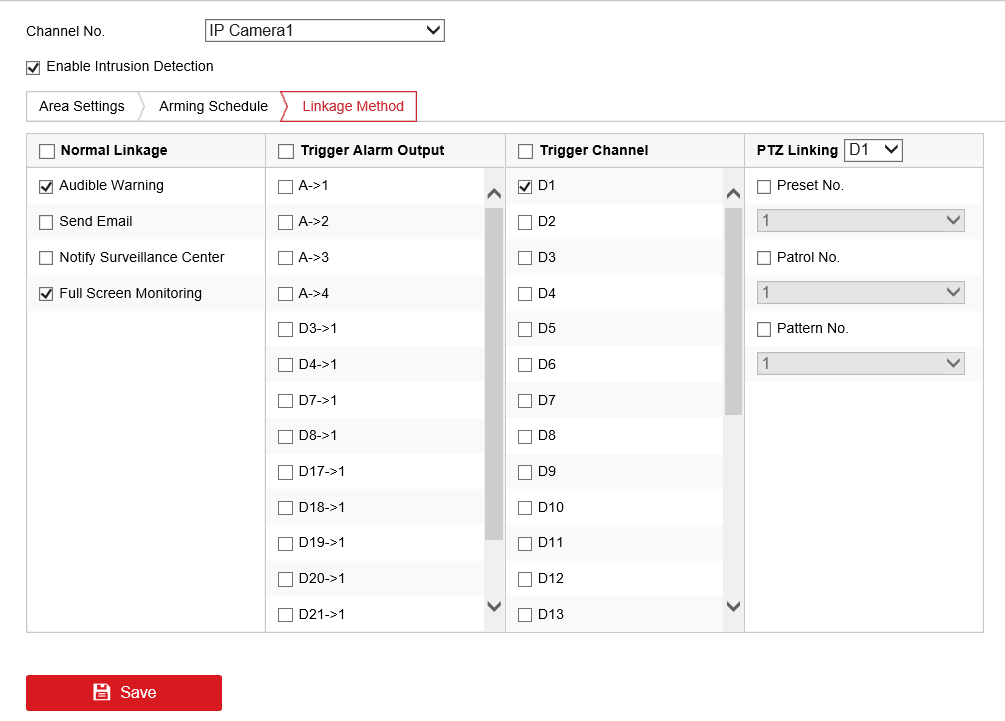
6.Click on Linkage Method and select the action you want once alarm is triggered. Audible warning will cause NVR to make loud beep sound; Full Screen Monitoring will set the Triggered channel into Full Screen mode for several seconds. You can also trigger alarm output on NVR and IPC with Alarm I/O interface. Trigger Channel will enable the recording function on selected camera. PTZ allows you to move PTZ camera to Preset position or Patrol certain area.

https://desk.zoho.com/DocsDisplay?zgId=647817451&mode=inline&blockId=f46qje9d2480ef7a24b8bb854728dea8d7595

.

7.Click Save before exit

.

How to 

Configure Device Startup Wizard

on Hinovision NVR/DVR?

Ver.1.0

.

Startup wizard helps you configure device basic settings quickly during the device initial boot.

Please follow the steps listed below for the wizard configuration.

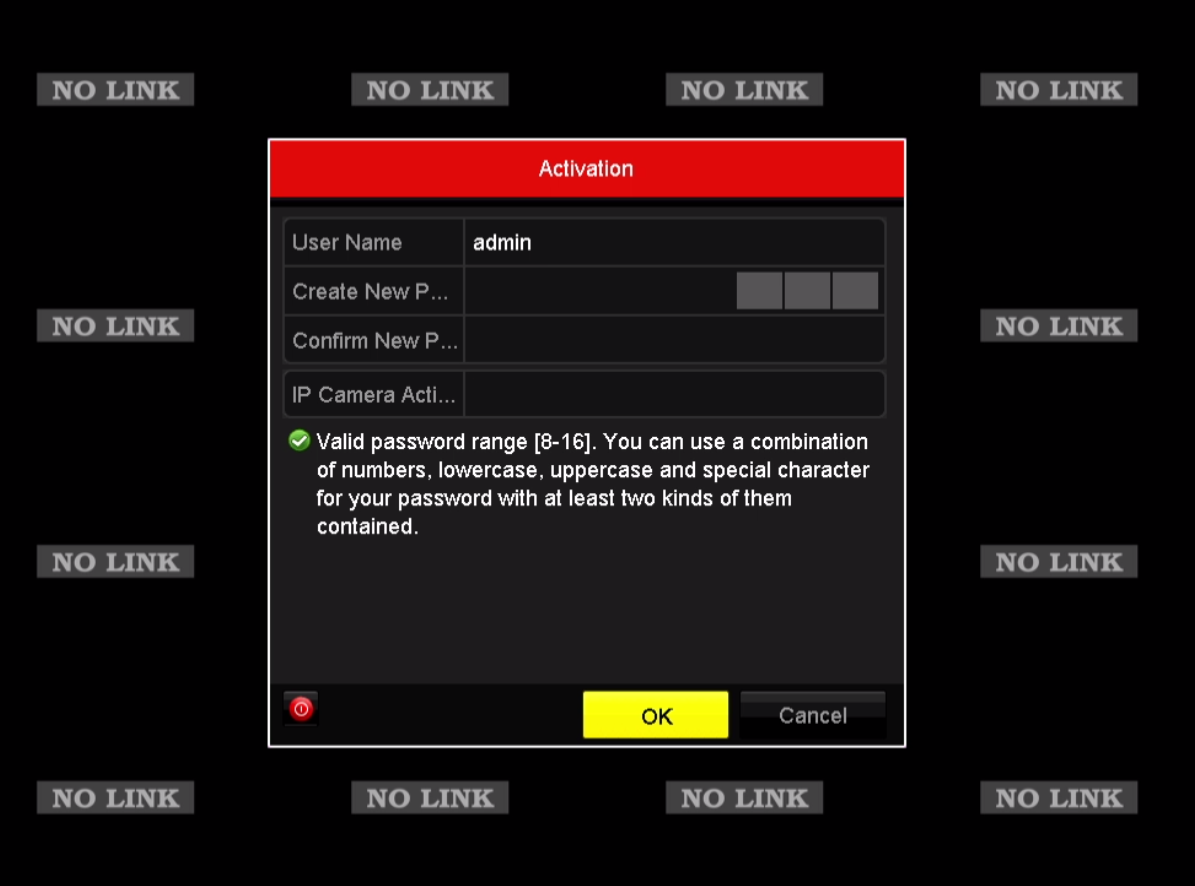
1.Setup device password and IP Camera password. Please follow the password requirement listed below.

https://desk.zoho.com/DocsDisplay?zgId=647817451&mode=inline&blockId=f46qj65d6c9f7f87149c0beaf3cecbb0b69e0

.

https://desk.zoho.com/DocsDisplay?zgId=647817451&mode=inline&blockId=f46qj57e90a60a4504165bb8891119b3375c2

.

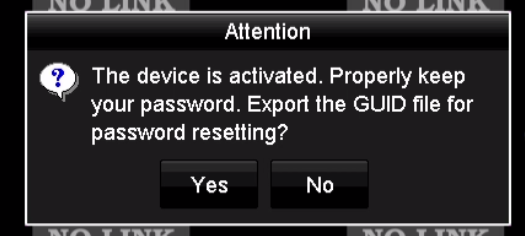
2.Once you finish setting up the password, the system will ask you if you want to save GUID file for password recovery.

GUID file allows you to reset the device password if you happened to forgot the password.

Click yes to save the GUID file, Click No to skip. You need to insert a flash drive to NVR/DVR in order to save the file.
https://desk.zoho.com/DocsDisplay?zgId=647817451&mode=inline&blockId=f46qj64adf3440c19465196bfccda8534e2bf

.

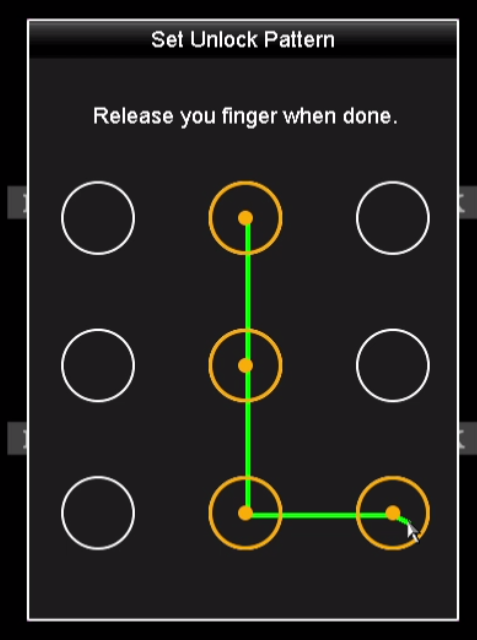
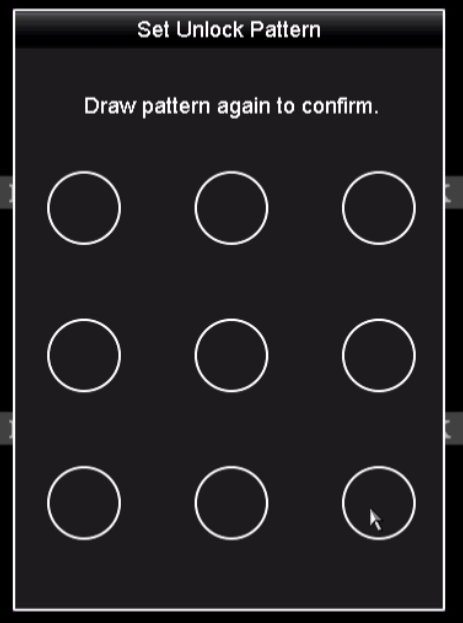
3.You will be asked to setup a device unlock pattern for quick access, draw again to confirm

https://desk.zoho.com/DocsDisplay?zgId=647817451&mode=inline&blockId=f46qj8c9d0f8b68024bc8b649f248502afeaahttps://desk.zoho.com/DocsDisplay?zgId=647817451&mode=inline&blockId=f46qj299dedcc5ffe495ab122dd6a837abf63

.

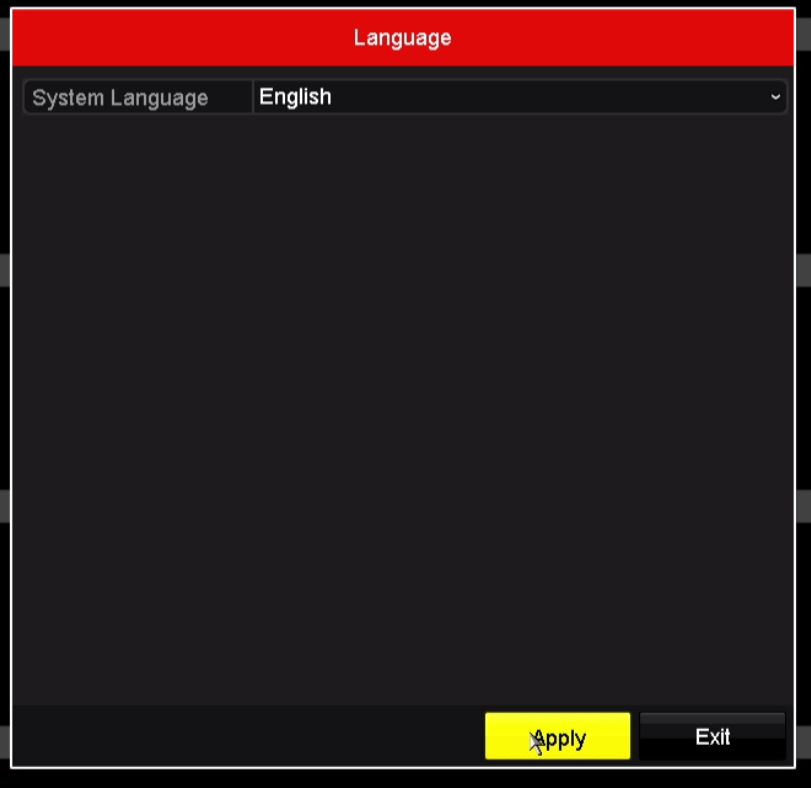
4.Choose the system language and click on apply

https://desk.zoho.com/DocsDisplay?zgId=647817451&mode=inline&blockId=f46qj19c92cbaaef546e492f4f250e85faa42

.

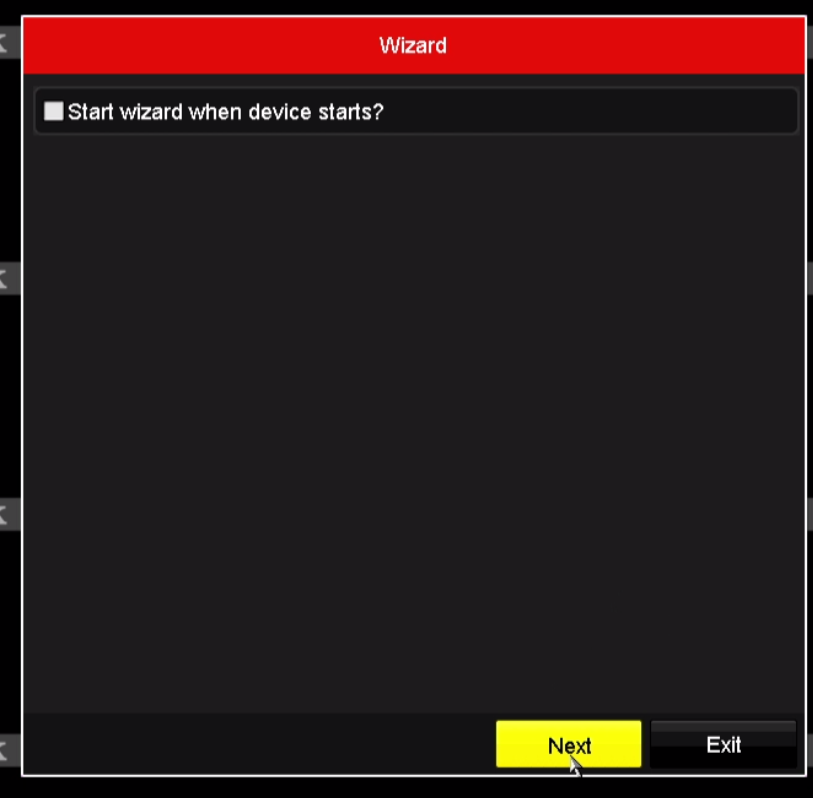
5.Uncheck the check box if you don’t want to see the wizard again. Click on Next.

https://desk.zoho.com/DocsDisplay?zgId=647817451&mode=inline&blockId=f46qje22f50ad125a48288cd398d1f6d6cce0

.

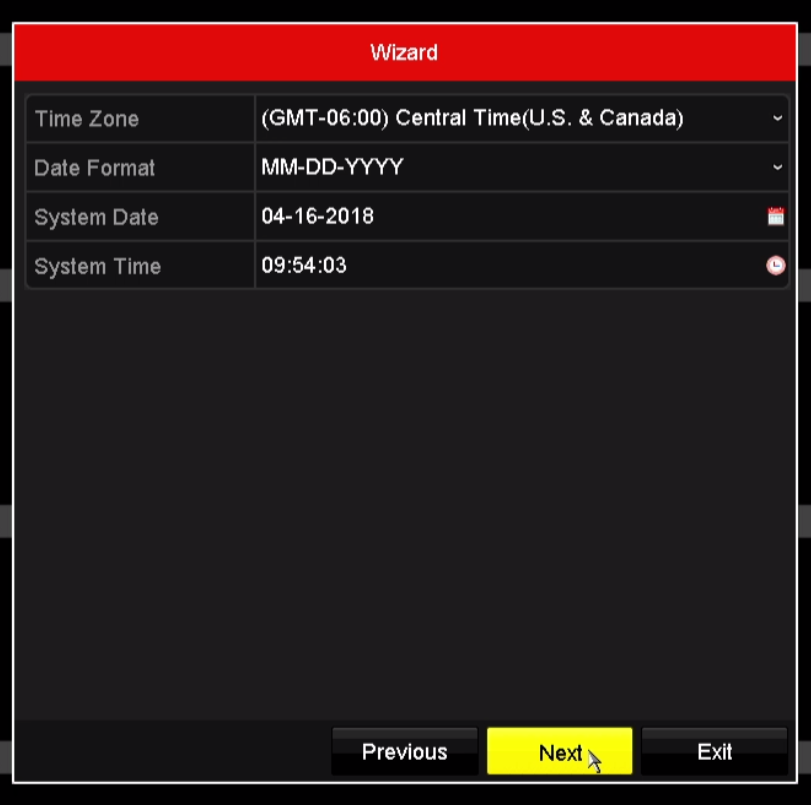
6.Adjust your time zone, date and time. Click on Next.
https://desk.zoho.com/DocsDisplay?zgId=647817451&mode=inline&blockId=f46qj10e37c32a5e7463886b9857f592cce71

.

7.Adjust device IP and DNS

Static IP address is recommended.

Please test the IP address before assign to NVR/DVR to avoid conflict.

https://desk.zoho.com/DocsDisplay?zgId=647817451&mode=inline&blockId=f46qj43bec03a73a44319b124007677b0c255

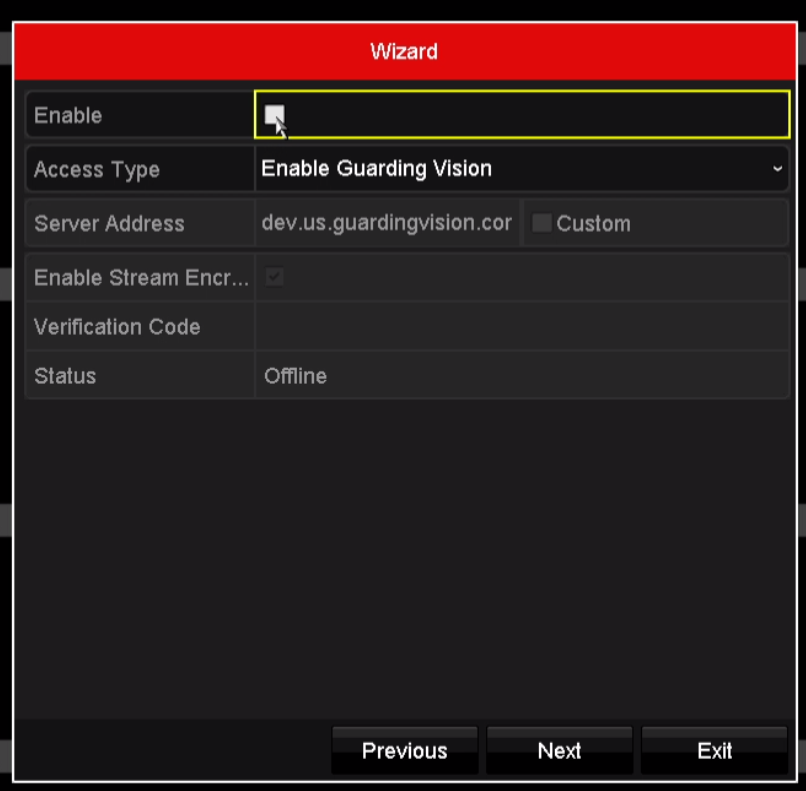
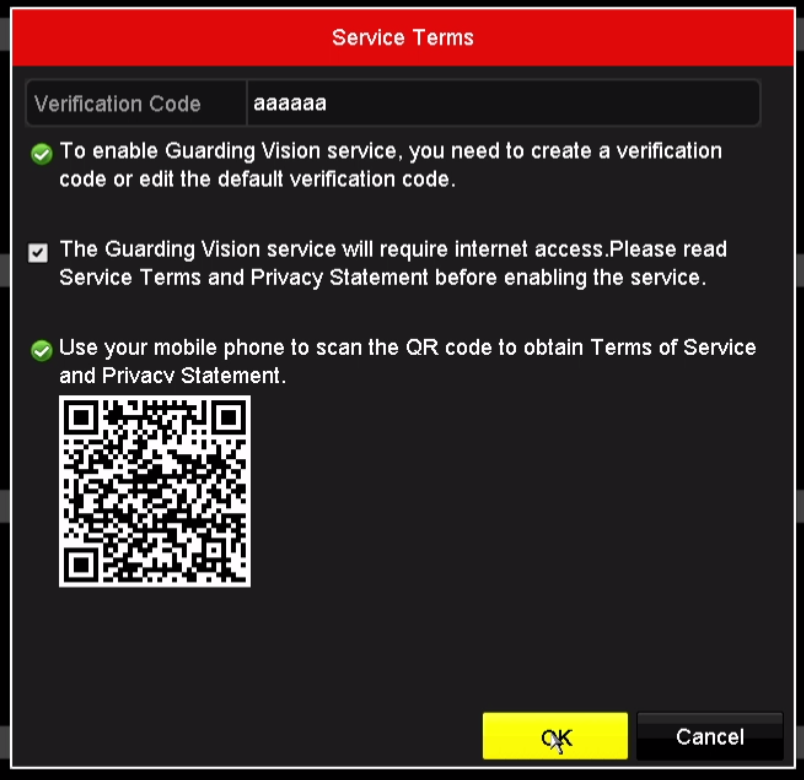
8.Enable Guarding Vision feature so you can access device from your mobile phone without DDNS and port forwarding

https://desk.zoho.com/DocsDisplay?zgId=647817451&mode=inline&blockId=f46qj4a1a8f3279b94114a3f43b29b828aa28

https://desk.zoho.com/DocsDisplay?zgId=647817451&mode=inline&blockId=f46qj9ff86a4386834429b89c6385b09f2263

.

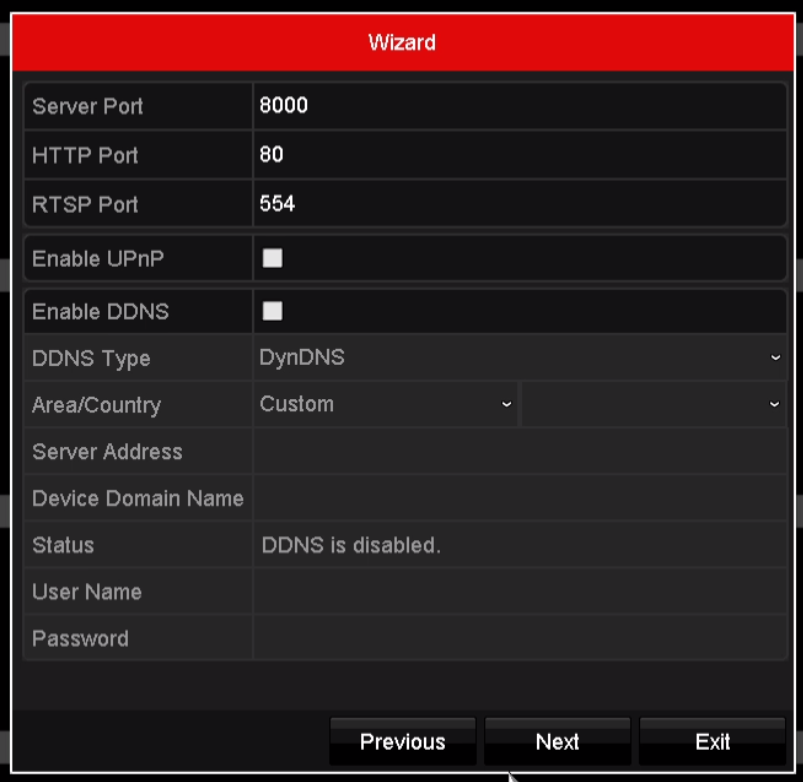
9.Change device port number

Default Http port 80, Server port 8000, RTSP port 554

https://desk.zoho.com/DocsDisplay?zgId=647817451&mode=inline&blockId=f46qj971475c440444cf88142996a7b396c91

.

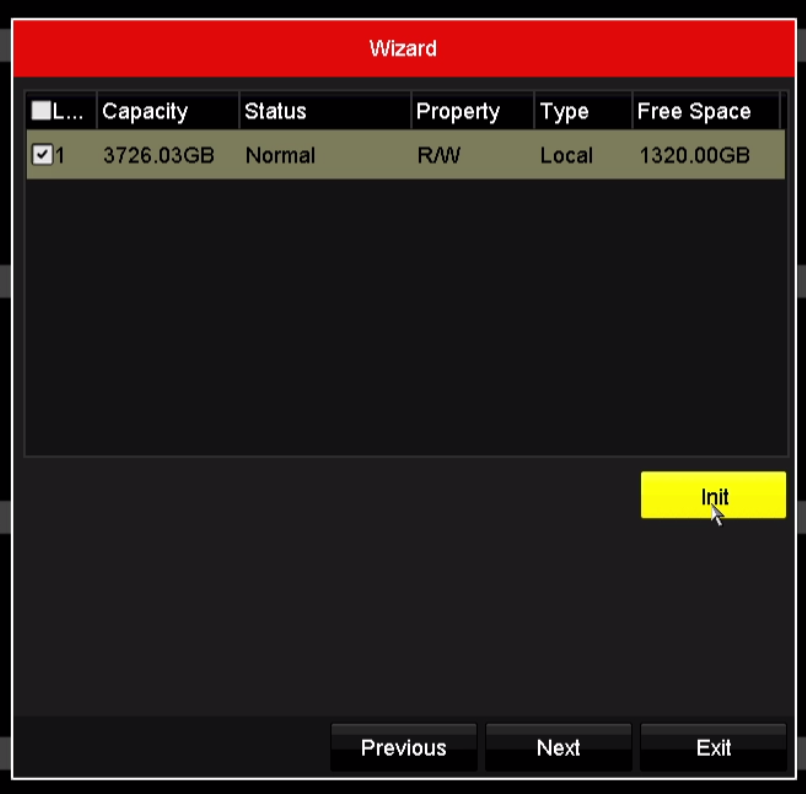
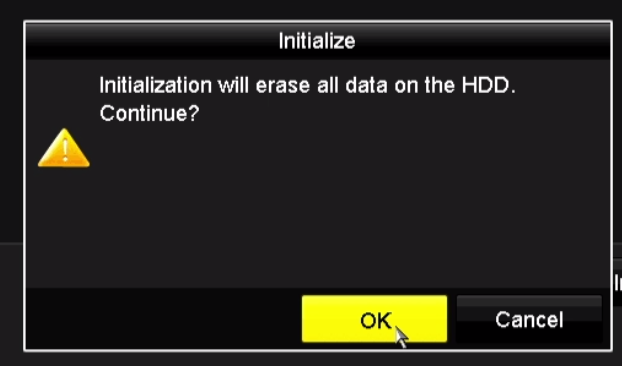
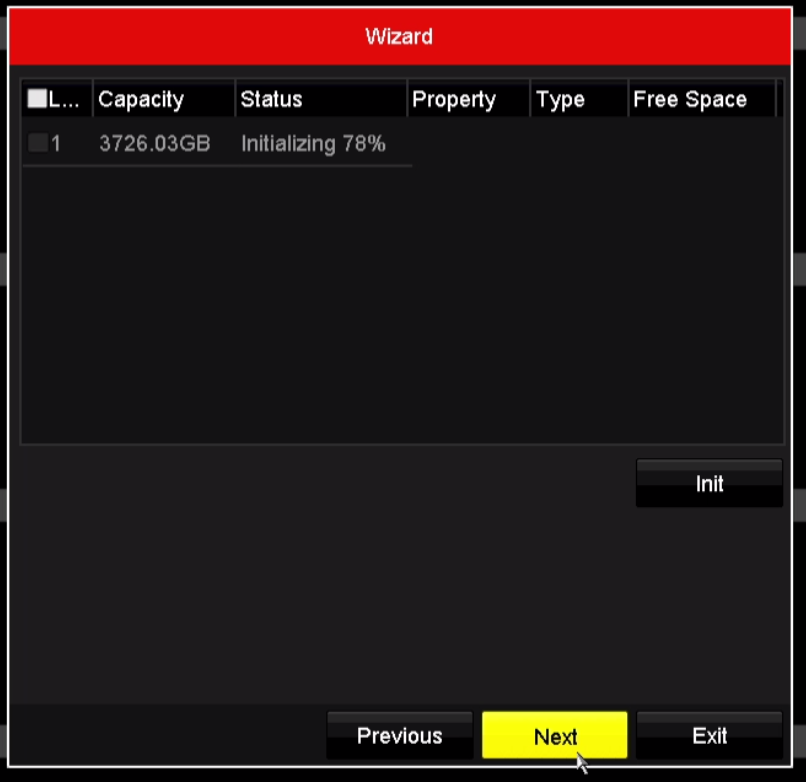
10.Initialize Hard Drive

Select the Hard Drive check box and click on Init.

https://desk.zoho.com/DocsDisplay?zgId=647817451&mode=inline&blockId=f46qj5a8a67efb7c34b7ca3a330088423b0d0

https://desk.zoho.com/DocsDisplay?zgId=647817451&mode=inline&blockId=f46qj35e978699f7d44eebe1a9e345eb1ad28

https://desk.zoho.com/DocsDisplay?zgId=647817451&mode=inline&blockId=f46qj6df0186bf79c410cb5a61bc92bdfc4af

.

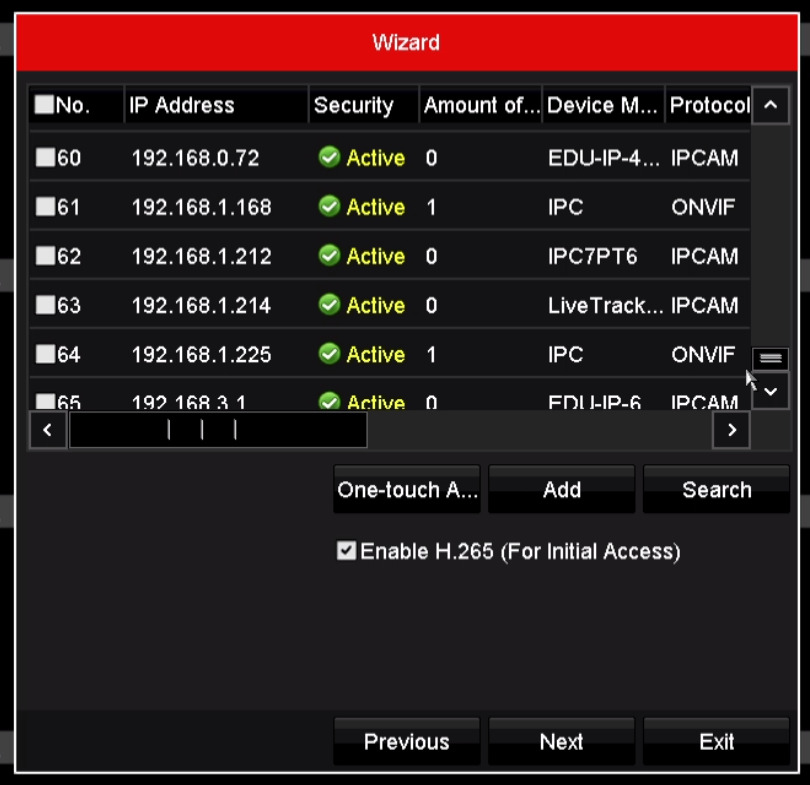
11.Add any additional IP cameras from local network

Select the Camera you wish to add and click on One-touch add

https://desk.zoho.com/DocsDisplay?zgId=647817451&mode=inline&blockId=f46qj2ad7f599611a4063b78e0ba459de0485

.

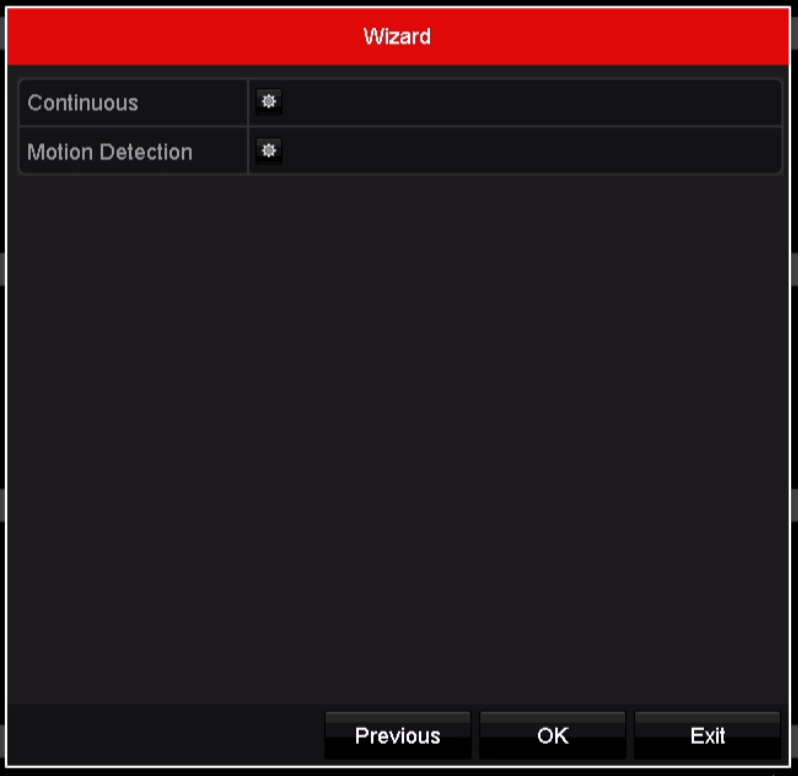
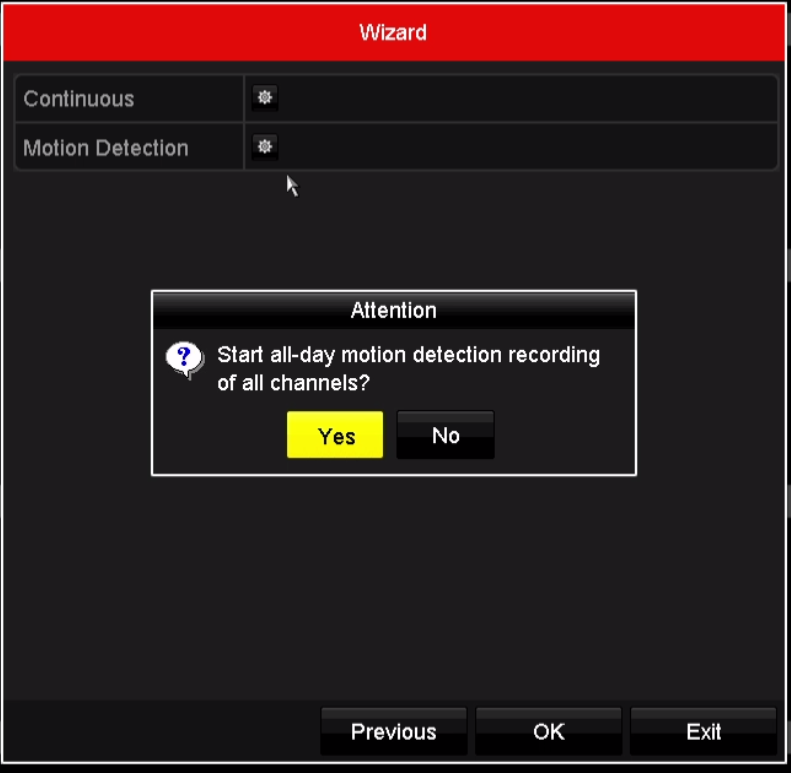
12.Setup recording schedule, you can choose between continuous recording and motion detection recording

https://desk.zoho.com/DocsDisplay?zgId=647817451&mode=inline&blockId=f46qj6acade1ed0314a8aa202e32d5bd8a115

https://desk.zoho.com/DocsDisplay?zgId=647817451&mode=inline&blockId=f46qj813fe10e2f804b99b6cff63c57dd0beb

.

Now you have finished the device startup wizard configuration.

How to Configure SimpleDDNS on 

Hinovision NVR?

.

Hinovision Technical Team

Ver.1.0

.

Hinovision NVR supports multiple popular DDNS such as DynDNS and No-IP, in addition it also supports SimpleDDNS which provides exclusive free service for Hinovision products.

.

Once the DDNS is configured on Hinovision NVR, you will be able to access the NVR directly from Internet instead of from Local Area Network. This provides the possibility for remote access anywhere in the world.

.

Instead of using a private IP address (192.168.x.x, 10.x.x.x) or Public IP address (which is quite expensive), you can use URL and domain name. And SimpleDDNS service is provided free of charge.

.

NVR DDNS configuration can be accessed through NVR Screen, Web Interface or Hinovision iVMS-Pro/Lite client software.

.

Test Environment 

NVR Model: NVR516P16-I4

NVR Firmware: V3.4.82 build 161207

.

Router Model: RT-AC1900

Router Firmware:  V3.0.0.4.380_4164

.

1.Configure the port forwarding/DMZ settings on the router, mapping the port for the NVR or put the NVR IP address in the DMZ zone. Router configuration differs from router to router, in this demonstration we will use RT-AC1900 from Asus.

.

Note:  

Currently most Hinovision NVR uses following 3 ports:

80(HTTP port), 8000 (control information), 554 (RTSP port)

Ports 80, 8000, 554 can be modified in the web configuration.

.

3.Click on Yes for Enable DMZ option
4.Enter the IP address of IP camera you wish to map
5.Click on Apply, wait  for the router to finish configuration

.

.

.

https://desk.zoho.com/DocsDisplay?zgId=647817451&mode=inline&blockId=f46qj5e2b029ea966425dba4d3281ca53ed37

.

2.Go to SimpleDDNS website and register an Account

http://www.simpleddns.com/

https://desk.zoho.com/DocsDisplay?zgId=647817451&mode=inline&blockId=f46qjd8f60eaf6caa4eb1b63621453aeb1d3a

.

3.Go to NVR web interface, Click on configuration, then click Network – Basic Settings, then click on DDNS.

https://desk.zoho.com/DocsDisplay?zgId=647817451&mode=inline&blockId=f46qj4c319eeb765f4f02ae0b0ea0505cc1e3

.

4.Configure the DDNS settings

.

https://desk.zoho.com/DocsDisplay?zgId=647817451&mode=inline&blockId=f46qj052fa435b6e74d87af6940457bf0f7f7

5.Choose SIMPLEDDNS for DDNS Type
6.www.simpleddns.com will automatically populate in the Server Address field
7.Enter a unique domain name. If you are not sure about the domain name, you can visit www.simpleddns.com to see if you domain name is available.
8.Enter your username and password for www.simpleddns.com
9.Click on Save

.

5.(Optional) Add your device on www.simpleddns.com
1.Click on Device Management, then Click on Add.

https://desk.zoho.com/DocsDisplay?zgId=647817451&mode=inline&blockId=f46qjc77a394d45c64e5c8b1d1abb72862309

2.Enter Device Serial Number and Domain Name of your choice, Click on OK to save.

https://desk.zoho.com/DocsDisplay?zgId=647817451&mode=inline&blockId=f46qj0f97bfb474954221a3416573d455878b

3.You will receive the following notification if successful

https://desk.zoho.com/DocsDisplay?zgId=647817451&mode=inline&blockId=f46qj22e06722805e42aea72175e9604a668c

.

.

6.Verify the setting by visit [YourDomainName].simpleddns.com.

If the settings are correct, you will see the following image

https://desk.zoho.com/DocsDisplay?zgId=647817451&mode=inline&blockId=f46qj3410684117eb4956836b4a674d8220f1

Then you will be redirect to the IPC login interface, the URL will start with your Public IP address.

https://desk.zoho.com/DocsDisplay?zgId=647817451&mode=inline&blockId=f46qjeb344aa7067a49df9543c0cd073ba3f8

How to Adjust 

Recording Frame Rate

on NVR

Ver.1.0

.

Recording in a low frame rate allows you to use less bandwidth and thus save disk space.

You can adjust frame rate on a NVR from either NVR local screen or from the web interface.

.

Setup from NVR local screen:

1.From the NVR local screen, right click and select menu

https://desk.zoho.com/DocsDisplay?zgId=647817451&mode=inline&blockId=f46qjf1cec2e563fa4cd793ca67f0ea332b0f

.

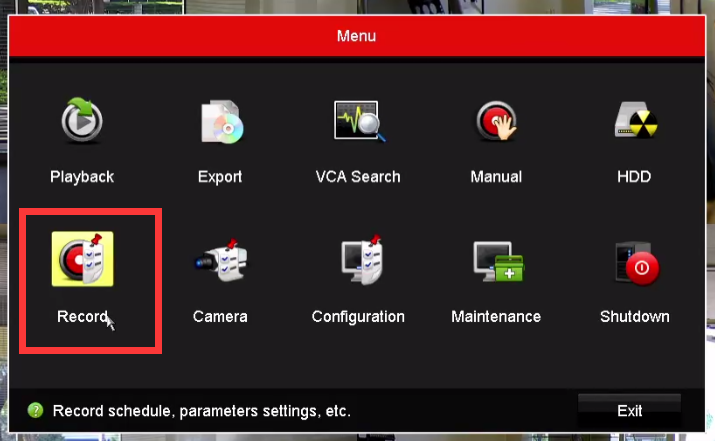
2.Click on Record

https://desk.zoho.com/DocsDisplay?zgId=647817451&mode=inline&blockId=f46qj27da95c024b349ae939b21c4e1e57a95

.

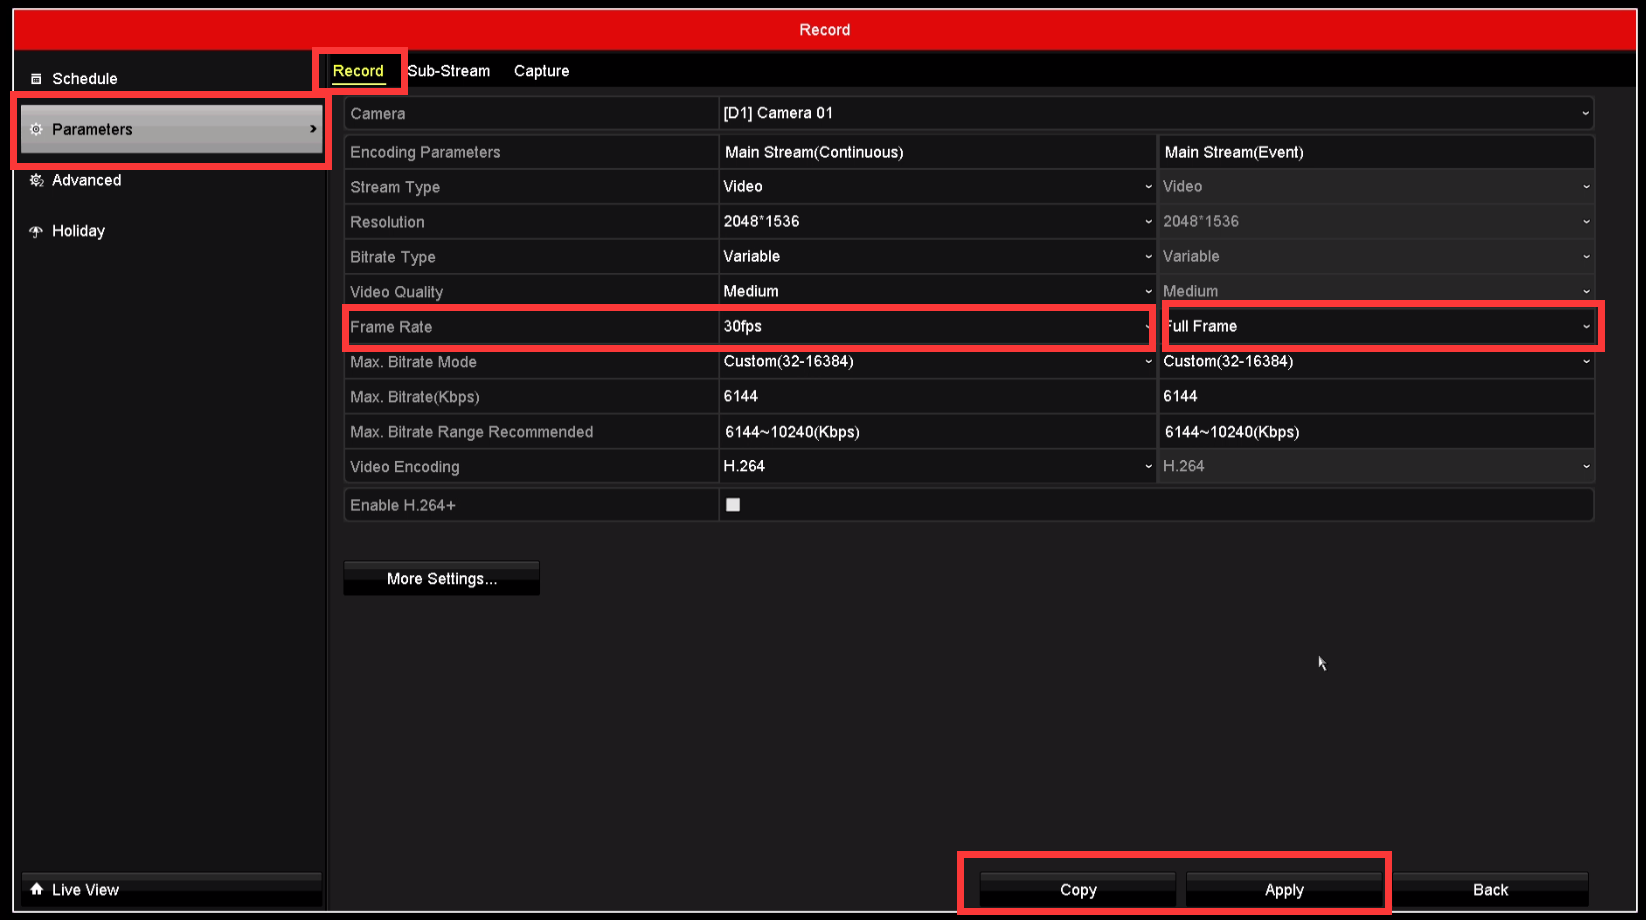
3.Click on Parameters, Record, select the camera you want configure, and adjust the frame rate for both. Apply before exit. 

https://desk.zoho.com/DocsDisplay?zgId=647817451&mode=inline&blockId=f46qj5971720c3edb48eb8a72cb5a5294157f

.

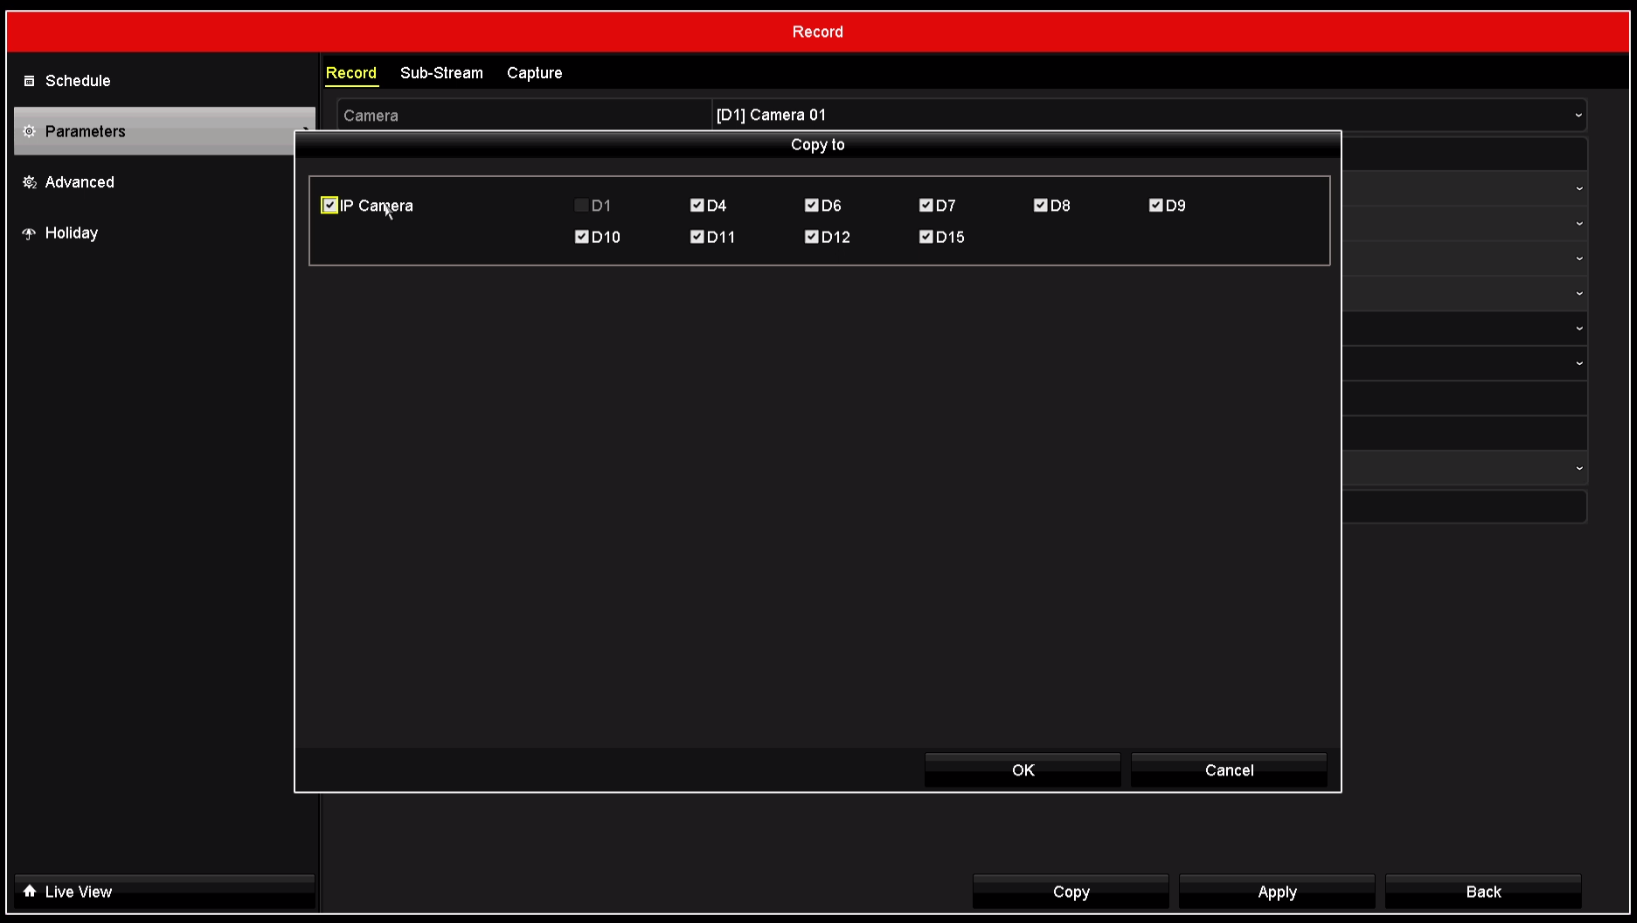
Note: you can apply the current camera configuration to other cameras by click on copy, thus you don’t need to configure each of the cameras.

https://desk.zoho.com/DocsDisplay?zgId=647817451&mode=inline&blockId=f46qj1fb194f4b9d84899b4733b6983f85aa6

.

.

.

Setup from Web interface

1.Login your NVR with Internet Explorer
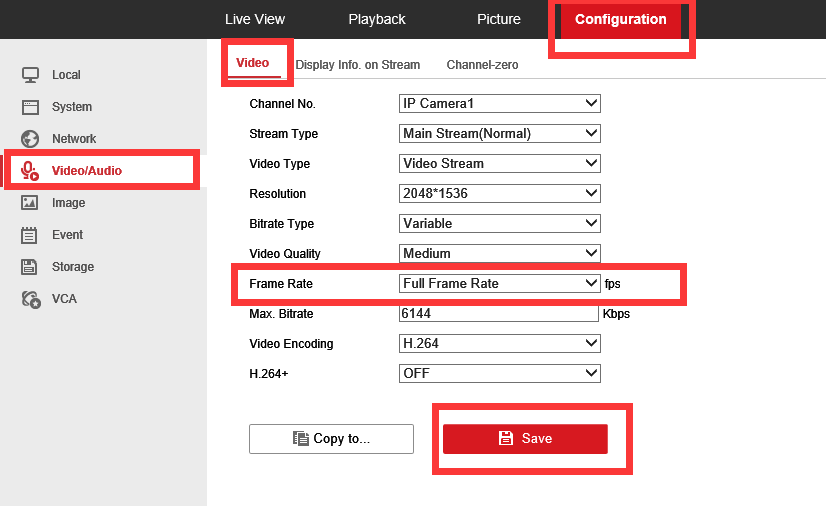
2.Go to Configuration, then Video/Audio, Video, you can adjust Frame Rate under Frame Rate.

Do the Same for Main Stream (Event).

Save before exit.

https://desk.zoho.com/DocsDisplay?zgId=647817451&mode=inline&blockId=f46qja5605d843bfd4edf8e044556c566ff7a

.

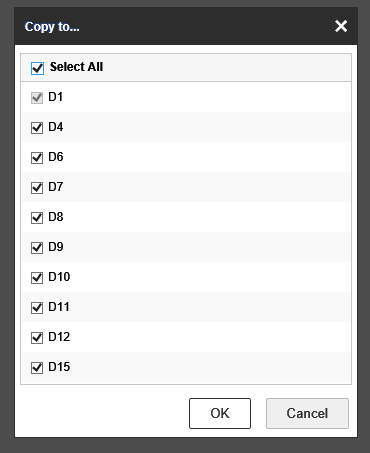
Note: you can apply the current camera configuration to other cameras by click on copy to, thus you don’t need to configure each of the cameras.

https://desk.zoho.com/DocsDisplay?zgId=647817451&mode=inline&blockId=f46qjf2716c43485949f69cdbbf8ce1a7dde7

.

How to Enable Email Notification 

on Hinovision DVR?

.

Hinovision Technical Team

.

.

Hinovision DVRs supports Email notification function, this function allows you to receive email notifications once preconfigured alarms on connected IP cameras are triggered or DVR received alarm input from build-in alarm panel. 

.

Once enabled, DVR will send notification to preconfigured email list. You can also configure the DVR to include photos from designated IP Camera in the Email.

.

DVR Email notification configuration can be accessed through DVR screen, Web Interface, or Hinovision iVMS-Pro/Lite client software

.

The following steps will demonstrate the Email notification configuration process via web interface.

.

Test Environment 

DVR Model: TAR314-16

DVR Firmware: V3.4.4 build 160615

.

1.Configure DVR Network settings, make sure the NIC on DVR is correctly configured and can be access by client workstation. Verify this by access the DVR IP address on client workstation via IE or Safari.

https://desk.zoho.com/DocsDisplay?zgId=647817451&mode=inline&blockId=f46qj8d1c2373eec94b8286299f2f834e900a

.

.

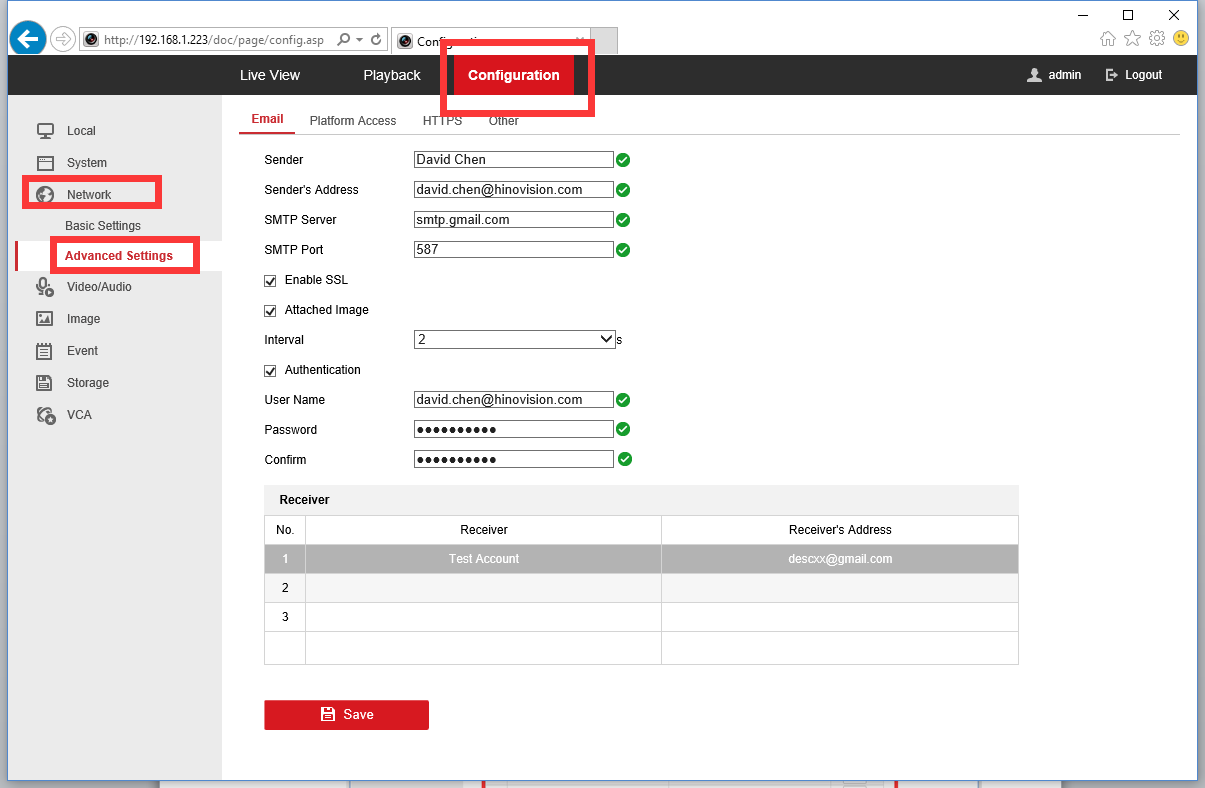
2.Login the DVR, Click on Configuration Tab on the top, then select Network and Advanced Settings

https://desk.zoho.com/DocsDisplay?zgId=647817451&mode=inline&blockId=f46qj89a00212f8f54b8d8a31e379f8bdb5ad

.

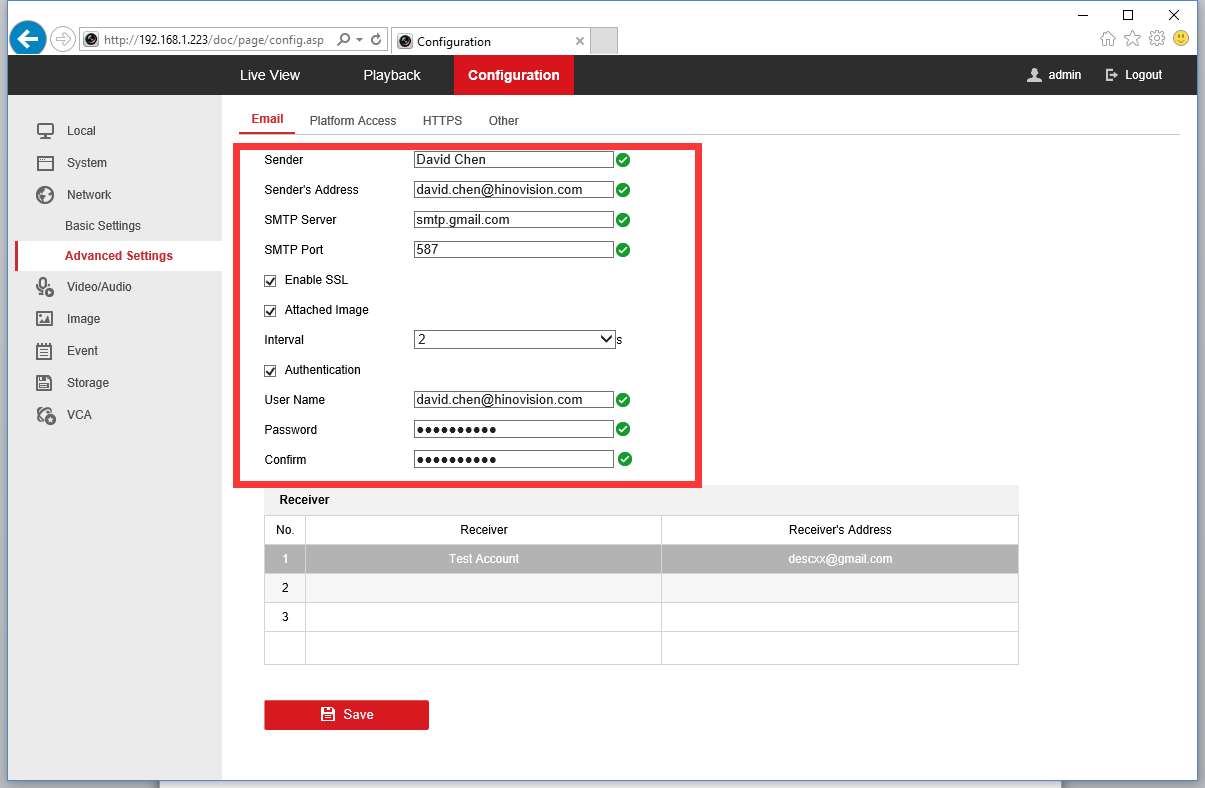
3.Enter the credentials for the email account, here’s an example for Gmail.

Always check the settings with your Email Providers 

https://desk.zoho.com/DocsDisplay?zgId=647817451&mode=inline&blockId=f46qj3ba6c33be2a94e52ae7161a8cb9b6664

.

Check the Attached Image box if you want Image captured during alarm attached in the Email.

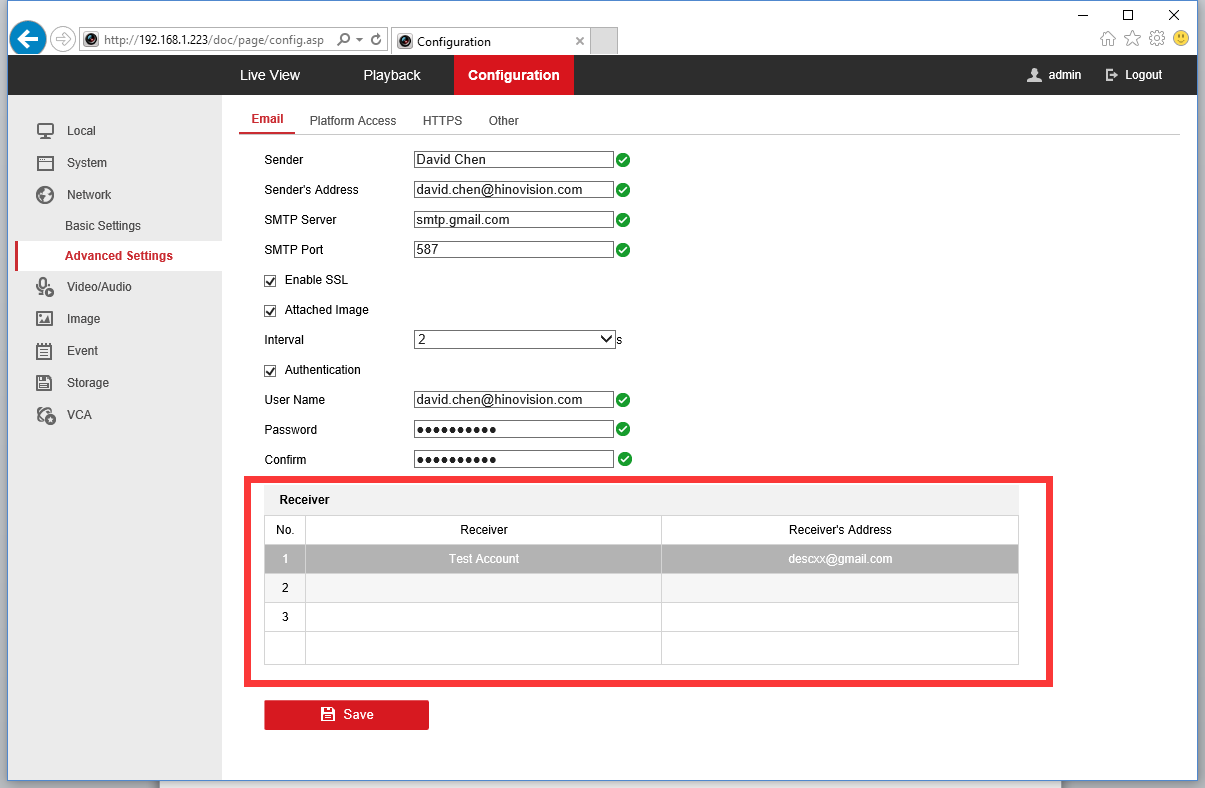
4.Enter Name and Email address in the receiver box for each receiver you wish to send notification to. You can add a maximum of 3 receivers in this list.

Once added, you can click on Test button on the right to verify the settings.

https://desk.zoho.com/DocsDisplay?zgId=647817451&mode=inline&blockId=f46qj8903cfa3dc7f420bb1ca8a28b587b084

.

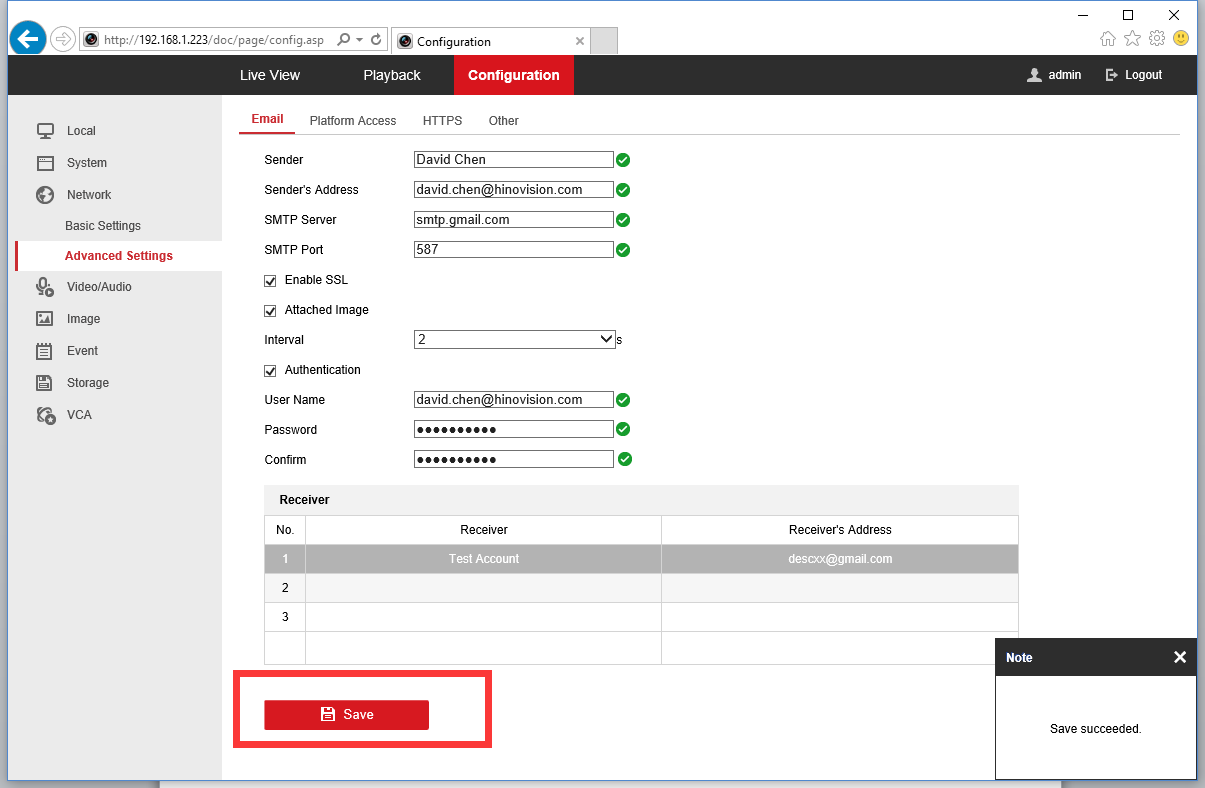
5.Click on Save before exit

https://desk.zoho.com/DocsDisplay?zgId=647817451&mode=inline&blockId=f46qjdcd320b145414ac8addc552ab83e140f

.

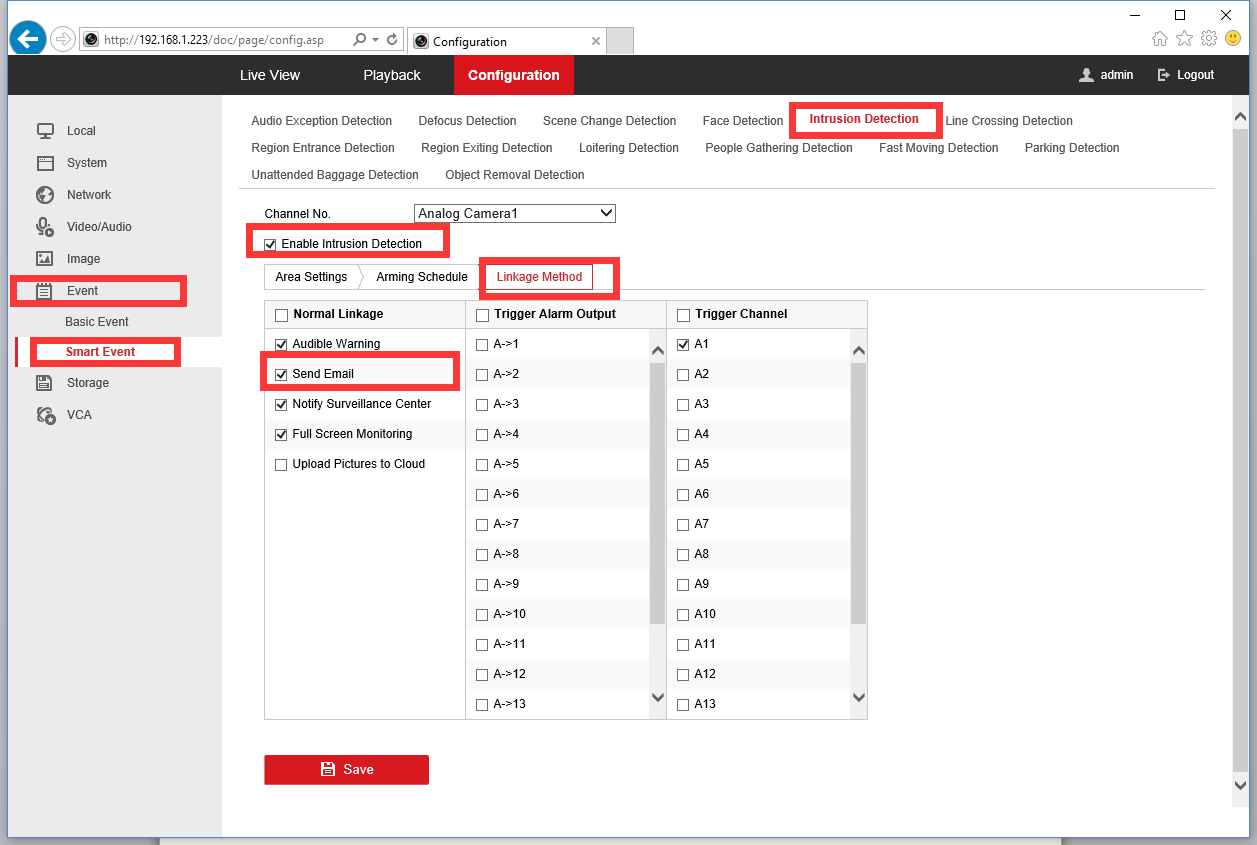
6.Check Send Email box in the Smart Event Linkage action settings, click on Save

https://desk.zoho.com/DocsDisplay?zgId=647817451&mode=inline&blockId=f46qj706d9fa43b82469a999c668537beb30d

.

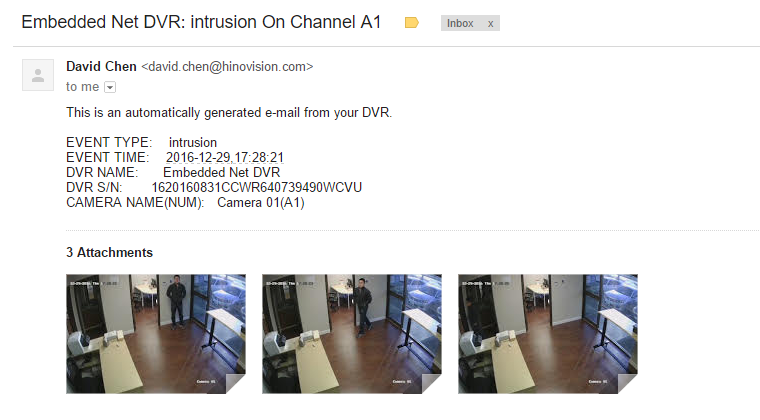
7.You will now receive Email notification from your DVR.

https://desk.zoho.com/DocsDisplay?zgId=647817451&mode=inline&blockId=f46qj6f9ef4fd89cb43729d6c48b15c3e4be3

How to Access NVR Web Interface

May. 25th, 2018

Ver.1.0

.

You can access NVR/DVR web interface and perform live view, play back and configuration.

To access the web interface, please follow the steps listed bleow:

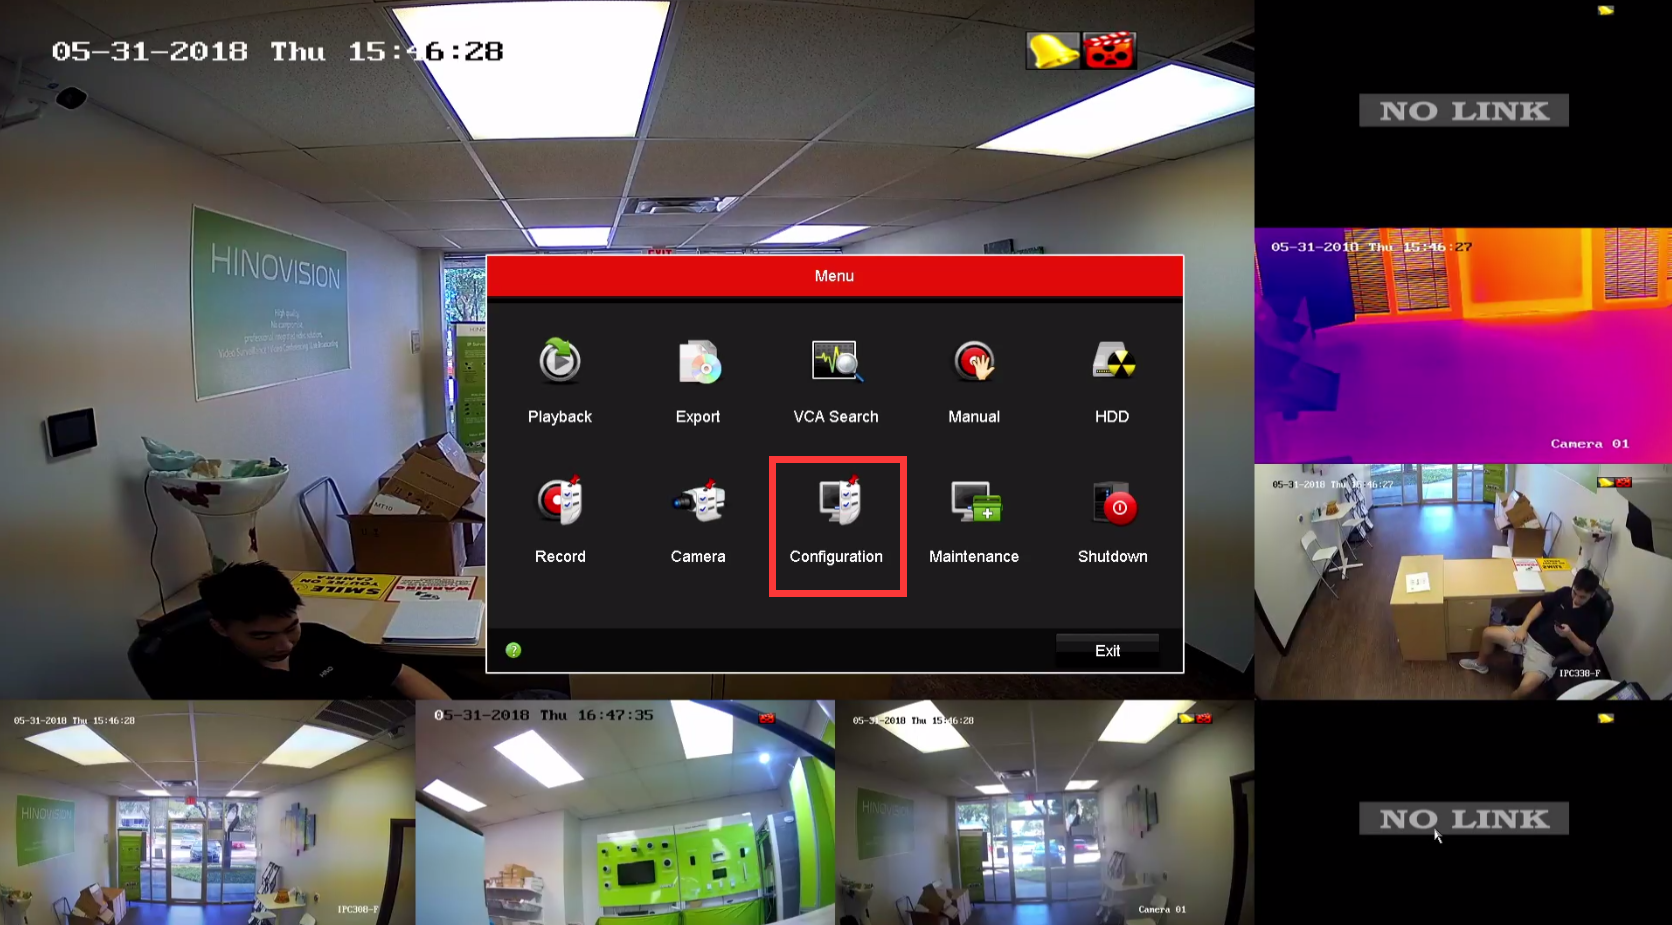
1.Go to NVR menu and then configuration

https://desk.zoho.com/DocsDisplay?zgId=647817451&mode=inline&blockId=f2k5k17ef2c2f465a4069bb7bf09b5c3fd852

.

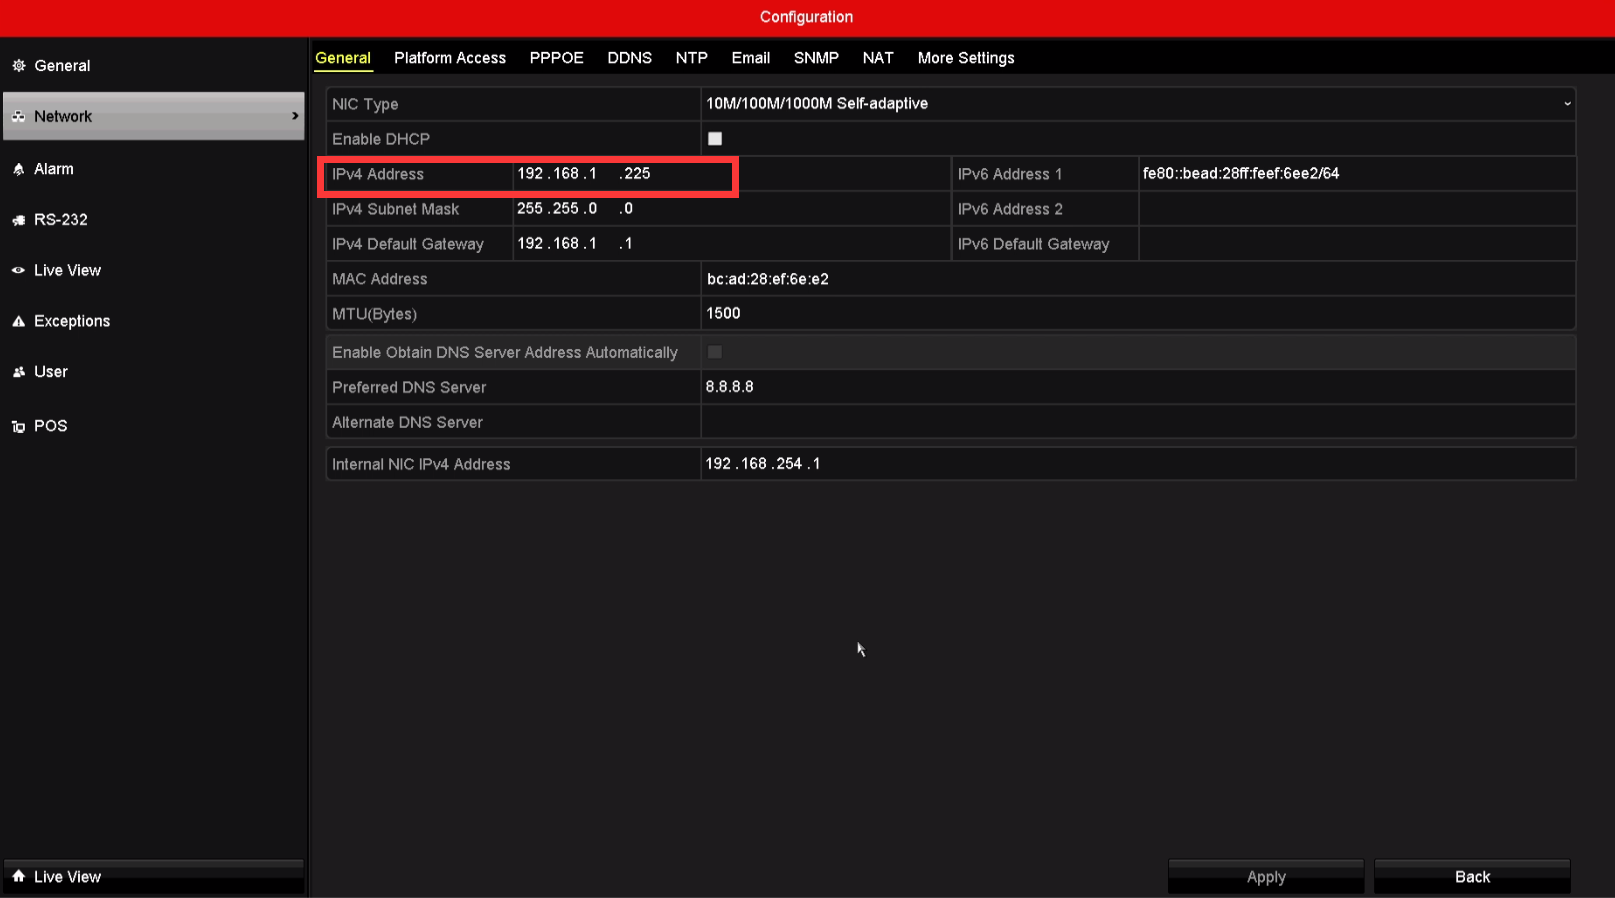
2.Click on Network and find the NVR IP address

https://desk.zoho.com/DocsDisplay?zgId=647817451&mode=inline&blockId=f2k5kb159e4b309114a888a31fcd25ba4f219

.

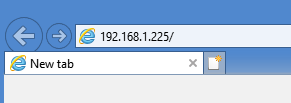
3.Open Internet Explorer and enter the IP in the URL bar

https://desk.zoho.com/DocsDisplay?zgId=647817451&mode=inline&blockId=f2k5kd4ef44032c96436ea0ebad3a4237cf9b

Note: Please use Internet Explorer, NOT Microsoft Edge

Note2: If this is the first time access the web interface, you will need to follow the screen prompt and install the plugin
https://desk.zoho.com/DocsDisplay?zgId=647817451&mode=inline&blockId=f2k5k0e0e8defccee4f6394496557f3d4c0fd

.

.

4.Type in your credentials
https://desk.zoho.com/DocsDisplay?zgId=647817451&mode=inline&blockId=f2k5k46f2983e81fc4f2ca11a2d56ed709fdc

.

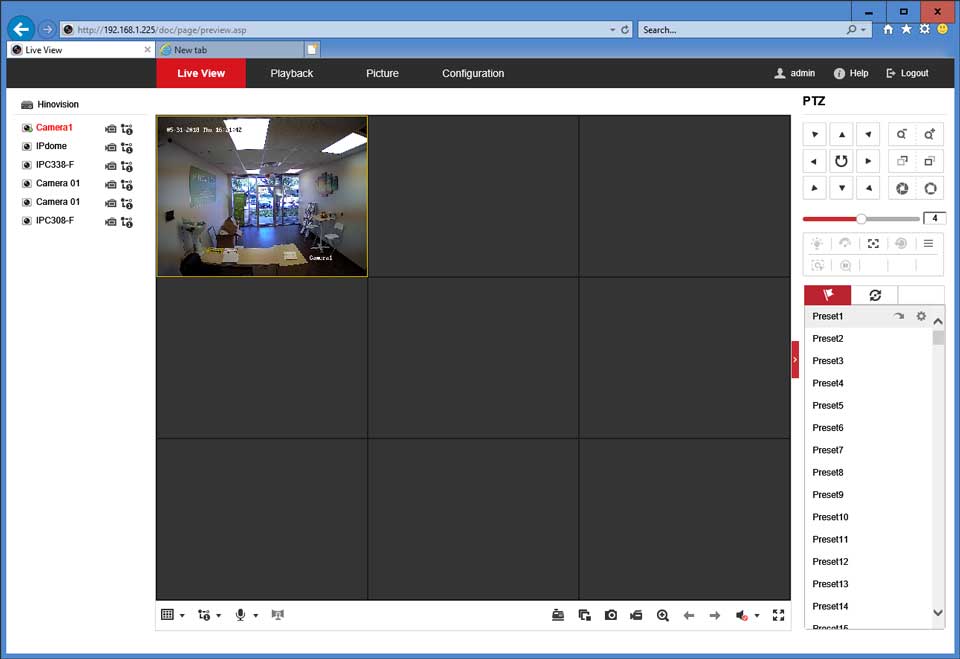
5.You can now access the NVR from Web interface
https://desk.zoho.com/DocsDisplay?zgId=647817451&mode=inline&blockId=f2k5k2c5c3a77b3384624a213e7ad6dc9c283

.

Leave a Comment