Views: 8
How do I add a Hikvision device to my NVR?
There are a couple of methods for getting your IP camera connected and recording to your NVR:
Plug and Play – This is the most popular and simplest method for smaller setups, as all you need to do is plug your camera straight into the PoE ports in a Hikvision NVR. The NVR will then do the rest of the work. Please note that for Plug and Play to work, the device will need to be inactive or activated with the same password as the NVR.
Remote connection via IP – If you can’t have a wired connection to the NVR, you can instead remotely add a camera on the same network as your NVR to it using the camera’s IP address. For this to work, you will need to make sure to do two things:
1. Replace the power supply that would normally come from the NVR’S PoE ports. Using a PoE switch or injector is usually the best way, as it means you can still add power to the device over the same ethernet cable used for everything else. If not, most will let you connect to a separate PSU.
2. You have connected the camera and NVR to the same LAN and that its network settings are correct for the LAN’s range.
The following steps will guide you through adding new devices using both of these methods. Part 1 covers doing this on the NVR’s local interface (GUI) and part 2 covers how to do this remotely using a web browser.
Method 1 – Via the NVR’s GUI:
Step 1:
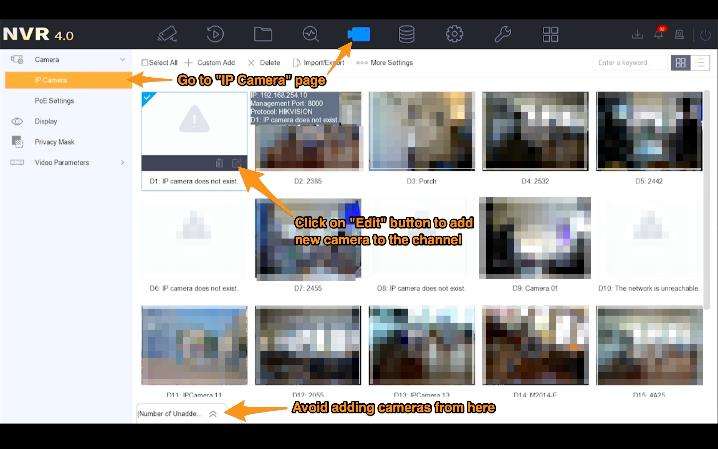
On the NVR 4.0 menu at the top of the screen, go to:
Camera → Hover over the desired channel → Click on ‘Edit‘ (small icon in the bottom-left corner of channel thumbnail)
Step 2:
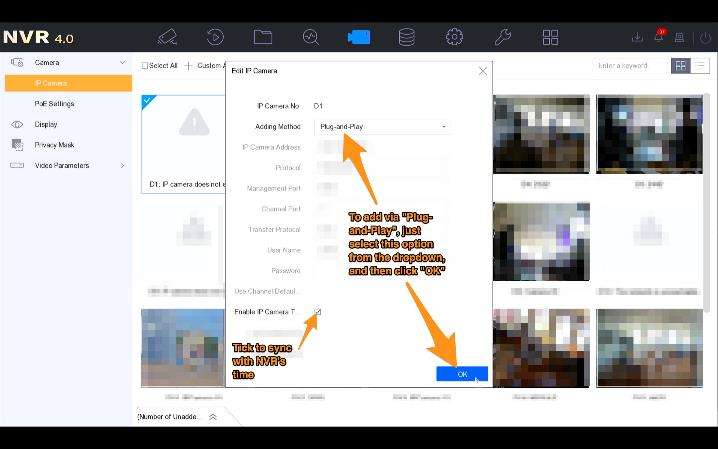
An edit window should appear, fill out the fields to add your camera as follows:
Option 1 – Using “Plug and Play”
Connect the camera to the corresponding PoE port number on the NVR (I.e. D1 corresponds to port 1). Then, just select “Plug-and-Play” from the “Adding Method” dropdown, and then click OK to add the camera to that channel – the camera feed should appear after a few seconds to confirm that it’s been picked up.
Note – If you haven’t activated and set a password on the device in SADP, then the IP address should automatically work. The password will be the Activation Password set on your NVR in the initial setup.
Option 2 – Adding manually via IP
Change the “Adding Method” to “Manual”, which will let you alter the other fields.
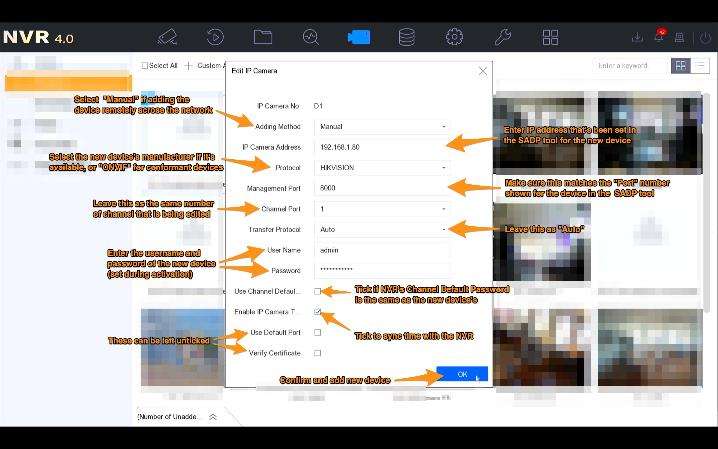
Now edit the other fields to point your NVR to the camera’s location on the network, like below:
Adding Method – Select “Manual”.
IP Camera Address – Enter your camera’s IP address here (as explained in the introduction, this will need to match the range of your LAN).
Protocol – Select the device’s manufacturer if it is on the list, or “ONVIF” if it is an ONVIF conformant product.
Management Port – “8000” by default will work fine, or whatever you’ve set the device’s Server Port to if it’s been changed.
Channel Port – This refers to the channel that you want to add the camera to, so leave this as the corresponding number for the channel that you would like to edit.
Transfer Protocol – Set this to “Auto”.
Username – The username you set up when activating the device, usually “admin”.
Password – The camera’s password, which you will have set when it was first activated.
Use Channel Default Password – If you have assigned the NVR and camera the same password during their activation, then you tick this box. This will use the NVR’s password to add the camera and will save you from entering it again in the future.
Enable IP Camera Time Sync – Tick this, as it means the camera will synchronise with the time set on the NVR.
Use Default Port – You can leave this unticked, as you have specified the management port already.
Verify Certificate – Leave this box unticked too.
Click OK to save your changes, the NVR should pick the camera up after a few seconds and show the feed on that channel’s thumbnail to confirm this.
Step 3:
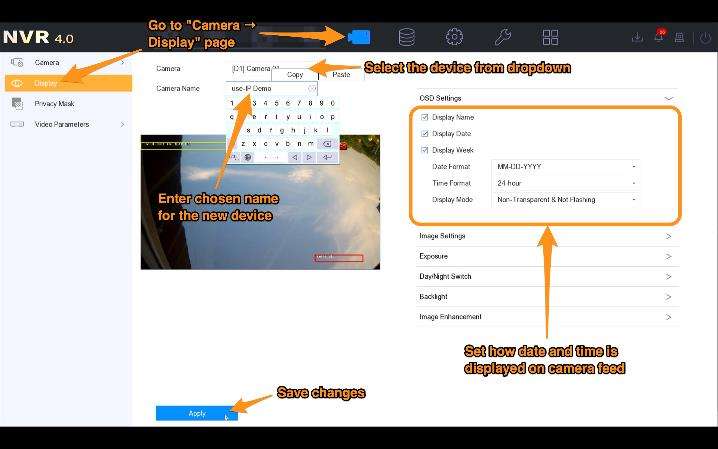
To rename the camera, go to:
Camera → Display
Then, select the camera’s channel from the dropdown, and use the field below to set a new name.
Click “Apply” to save your changes.
Step 4:
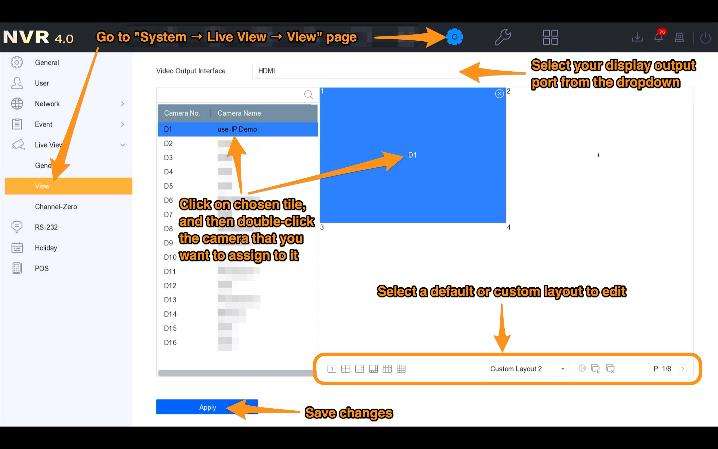
You may want to rearrange the Live View screen to show the new camera on a particular tile. To do this, first, go to:
System → Live View → View
Then, select the output port for your connected display that you would like to show the camera on, click on the selected tile and then double-click on the new camera to add it to that tile.
You can select different layout options, or create a customised layout using the toolbar at the bottom of the page.
Click “Apply” to save the new layout.
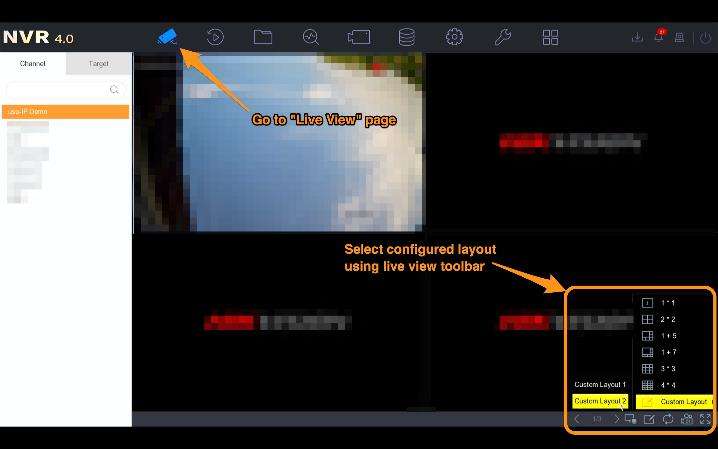
To check the new layout, launch “Live View” using the NVR’s main menu, and then select that layout using the toolbar in the bottom right-hand corner.
Method 2 – In a web browser:
Step 1:
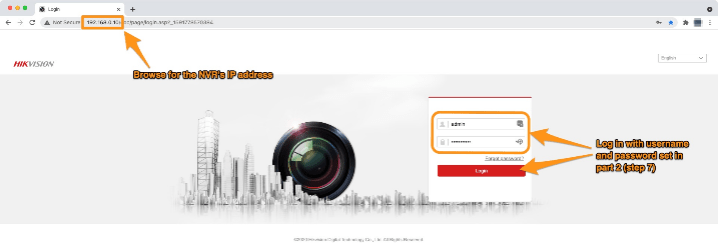
Browse for NVR’s IP address in a web browser, and log in with your username and password for it.
Step 2:
Now, navigate to:
Configuration → System → Camera Management → IP Camera
You’ll be shown a table of all the NVR’s channels, showing which are occupied by cameras, and which aren’t.
These channels normally correspond to the same-numbered PoE ports on the back of the NVR.
Click on the channel that you want to add your device to, and then the “modify” button above the table.
Step 3:
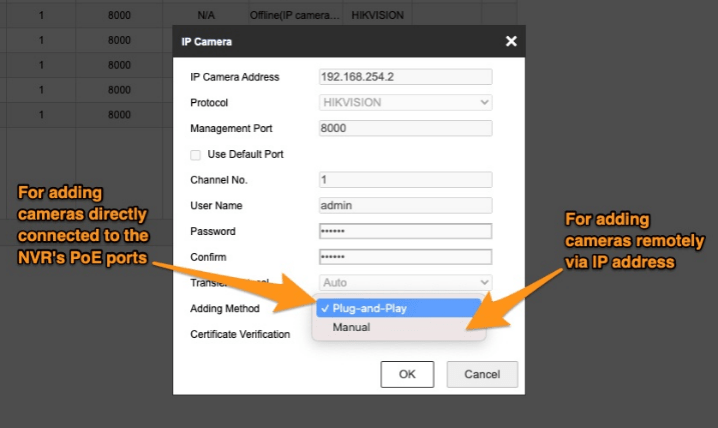
A window titled “IP Camera” should appear allowing you to change the “Adding Method” and “IP Camera Address” set for that channel.
If you haven’t already, you will need to make sure that the camera has a valid IP address and correct network settings for your LAN’s range.
Option 1 – using “Plug and Play”:
You just need to make sure that:
Note – If you haven’t activated and set a password on the device in SADP prior to connecting it to the NVR, then the IP address should automatically work and the password will be the “Channel Default Password” set on your NVR in the initial setup (see step 7 here)
Option 2 – Adding manually via IP:
Change the Adding Method to Manual, which should let you alter the other fields.
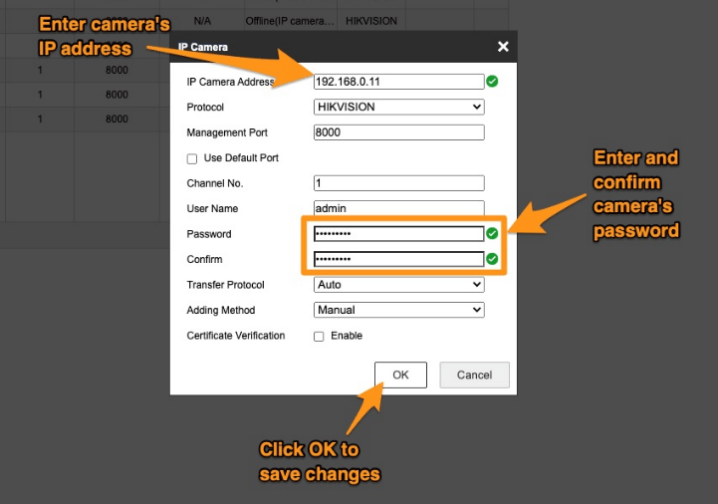
Now alter the other fields to point your NVR to the camera’s location on the LAN, like below:
IP Camera Address – Insert the camera’s IP address
Protocol – Select the brand of your camera here, or ONVIF if it is ONVIF conformant and the manufacturer doesn’t appear in this list.
Management Port – This is the camera’s network port, which is usually 8000 by default.
Username – The username that you set for the camera, which is usually “admin”.
Password – The password assigned to the camera upon activation in SADP. If you have automatically activated the camera by plugging it into your NVR’s PoE ports, this will the the “Channel Default Password” set during the NVR setup.
Confirm: Retype this password.
Transfer Protocol: This is fine for you to leave as “Auto”.
Green ticks should appear beside each field to indicate that what’s inside is valid. Once completed, you can click “OK”:
The “Security” column should be “Strong” and “Status” should change to “Online” on the “IP Camera” page – If they do, then you’re finished, just return to the Live View page to check that the camera’s feed is now visible.
Note – Clicking the “Start All Live View” button in the toolbar at the bottom of this page will show all of your working cameras feeds at the same time.
