Views: 8
How do I update the firmware on my Hikvision device?
It is vital that you keep the firmware of your Hikvision devices up-to-date, which means installing the newest version as soon as it becomes available. The best and easiest way to do this is to use the device’s web browser interface. The below steps will show you where to find the newest firmware for your Hikvision device, and how to use the browser interface to install new firmware onto it.
Step 1: Check the current firmware version installed on the device.
Using SADP:
NB – This will not work for any device that is directly connected to an NVR’s PoE ports, or if you have a partitioned network setup.
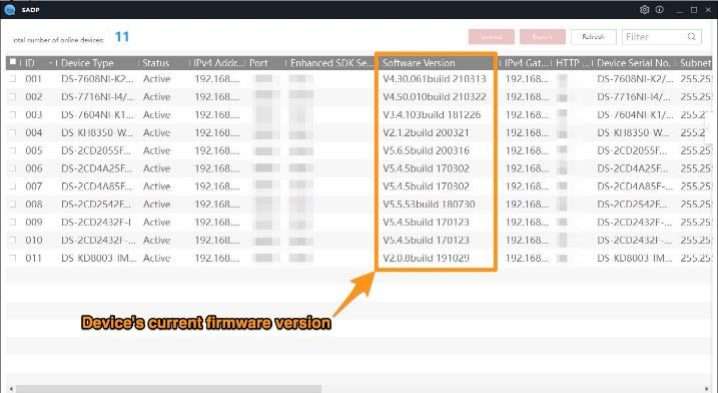
Install the SADP Tool on your computer, and run it while the computer is connected to the same LAN / network as the Hikvision device.
This will scan your network for all the Hikvision devices connected to is, and show their network information, you should see a table similar to the one below.
The current firmware version of a device is shown in the 8th column on its row under the heading “Software Version”.
Using a web browser:
Open a web browser (Internet Explorer tends to work best on older devices), and log into the device by either using its IP address or virtual host links if it’s directly connected to an NVR.
Now, click on the “Configuration” tab at the top, which should take you straight to the device’s “Basic Information” page – this can also be found by following the path:
Configuration → System → System Settings → Basic Information
Your current firmware version is shown in the 5th row:
Step 2: Find the latest firmware available for your device in the Hikvision Download Portal and download it to your computer
Go to the Hikvision Download Portal for your region:
We’ll use the UK portal in this example. Once on the portal, go to:
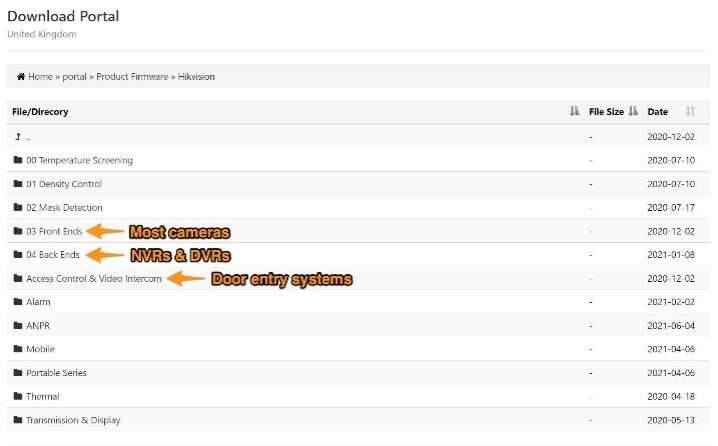
Portal → Product Firmware → Hikvision
Click on your device type from the list on this page – “Back Ends” here refers to NVRs and “Front Ends” refers to the majority of cameras.
Then, select the platform that your device is from. For instance, to find the firmware of an I-Series NVR, such as the DS-7608NI-I2-8P, then you’ll need to follow the path:
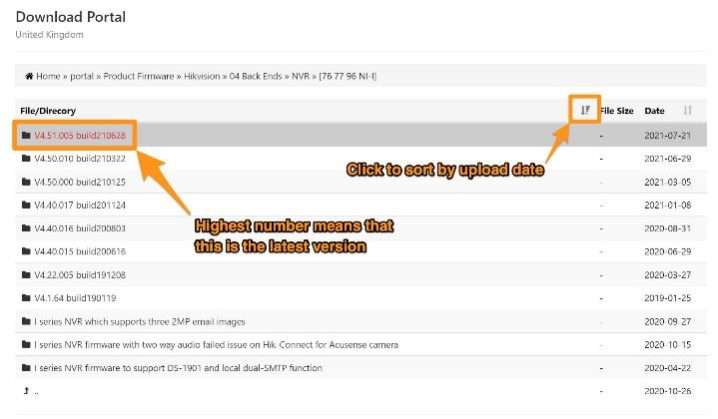
Back Ends → NVR → [76 77 96 NI-I]
You’ll then be shown the range of firmware versions for that device. To find the latest, just look for the largest number – using the sorting icon marked below can help as it will chronologically arrange the firmware date.
Note – Be cautious if using the sorting icon – it will not always put the latest version at the top, as Hikvision sometimes reuploads older firmware.
In this case, the newest version is “V4.50.010 build210332”:
Once you click on the link, you’ll be taken to a page that usually has both the release notes as a PDF file, as well as a ZIP file, which will contain the firmware itself.
Note – As well as explaining the purpose of / improvements made with the specific firmware version, the release notes will also list all of the devices to which that firmware applies to. It is always worth checking that your device’s model number appears here to confirm that you are about to download the correct firmware file if you have any doubts.
Now, download the ZIP file to your PC:
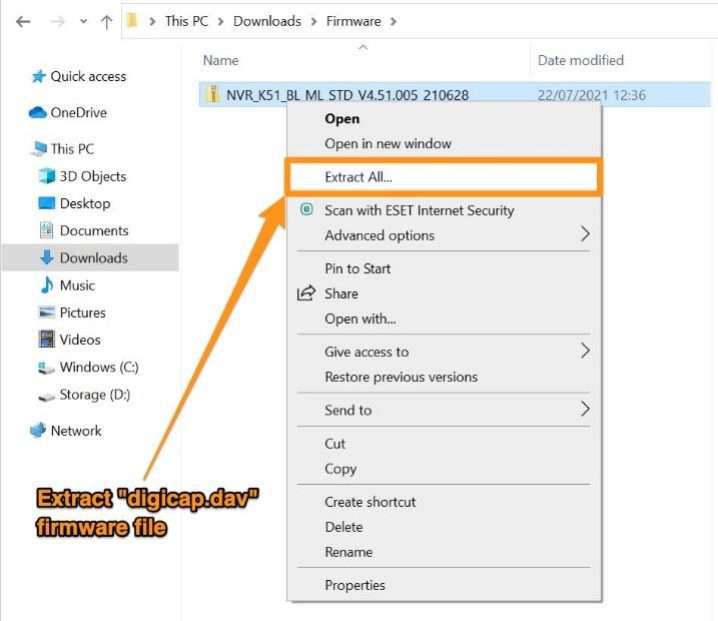
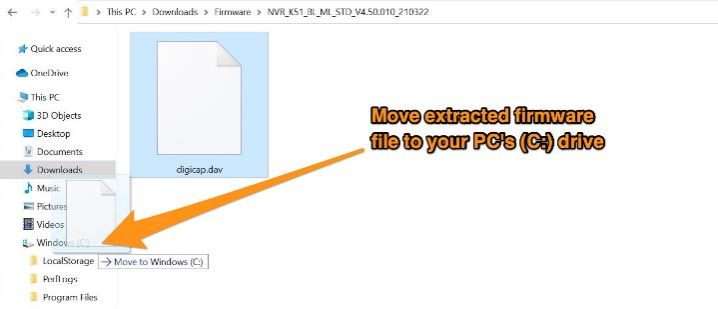
Extract the “digicap.dav” file from it, and copy this to your computer’s C: drive.
..
You’ll be asked to either enter an administrator password or to click continue to confirm that you want to move the file here. Do whichever applies – it’s safe to move your firmware file to this folder:
Step 3: Install the downloaded firmware onto your device
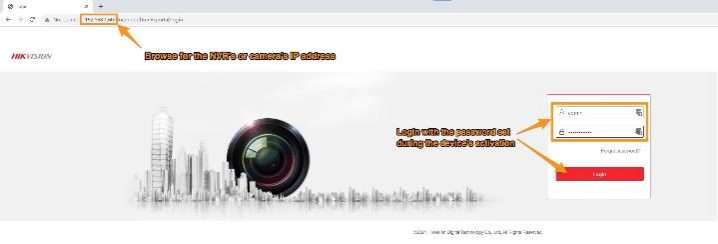
Log into your device again in a web browser, and go to:
Configuration → Maintenance → Upgrade & Maintenance
You’ll see an “Upgrade” tab at the bottom of the page, click “Browse” here:
Select the “digicap.dav” saved in your root folder from Step 2, and then click “Open”:
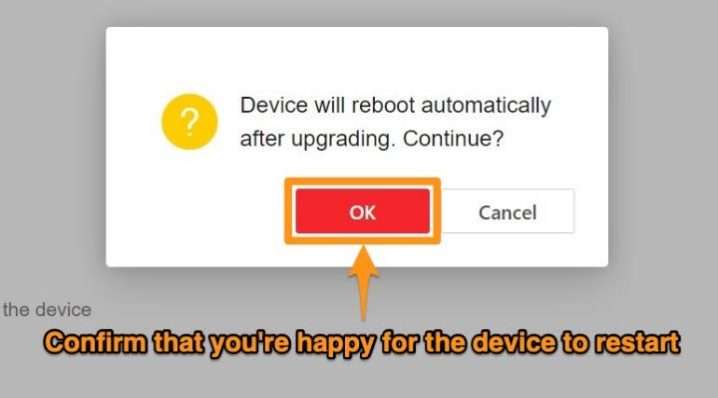
Click “Upgrade” and wait for the upgrade and then “OK” on the popup reminding you that the device will reboot after the firmware is installed:
If you get an error message at this point, check the following:
The update process will begin if you have done everything correctly and then log you out while the device reboots. If you want to double-check that the update was successful, use step 1 again to verify that the new firmware has been installed and showing on the device.
How do I set up the recording schedule of my Hikvision Device
You will now need to set up your recording schedule to something that suits your needs for each camera, which is key to have set correctly. If it isn’t, you might miss key sections of footage, which could, of course, prove very costly.
There is a range of recording types to choose from. You will need to understand what each means before you begin, these are explained below:
Continuous – The camera will record continuously. If you want the camera to record 24/7, you would fill the grid for the whole week with this option.
Motion – Any time period filled out with this option will only be set to record during instances of motion detection.
Alarm – The camera will only record during instances when an alarm is triggered. This applies to both alarms that you have set up on your IP CCTV system that you have connected to the device’s alarm in ports, such as the VCA Events, or external alarms.
Motion | Alarm – This means that recording will be triggered when either motion detection is triggered, or an alarm device connected to an alarm in port is triggered.
Motion & Alarm – This option just means that the camera will only record when motion detection and a device connected to the alarm in ports are triggered simultaneously.
Event – This is for event-based recording only, so the footage will only be recorded during any VCA event trigger, except motion detection.
POS – This is only supported by I-Series NVRs. You would select this option if you had a “Point of Sale” alarm set up and only want a camera’s footage to be recorded when this is triggered.
Method 1 – In a web browser:
Step 1:
Browse the IP address of the device that will be managing/storing your recordings in an internet browser and log in to it. If you are using an NVR and recording to the onboard hard drives for each camera that’s connected, then this is the device that you will need to log in to.
If your cameras are not connected to an NVR, then you will need to log into the camera directly to set its recording schedule. You will need to use the virtual host feature on your NVR to log into any camera that is connected to its PoE ports, or the camera’s IP address if it is connected to your local network instead.
Step 2:
Navigate to:
Configuration → Storage → Schedule Settings → Record Schedule
You should see your recording schedule in the form of a grid for the week, which is divided into hours.
Select the camera that you want to configure the schedule for from the dropdown menu if on an NVR.
Step 3:
Tick the “Enable” box, which is how you turn the shown schedule on or off:
Step 4:
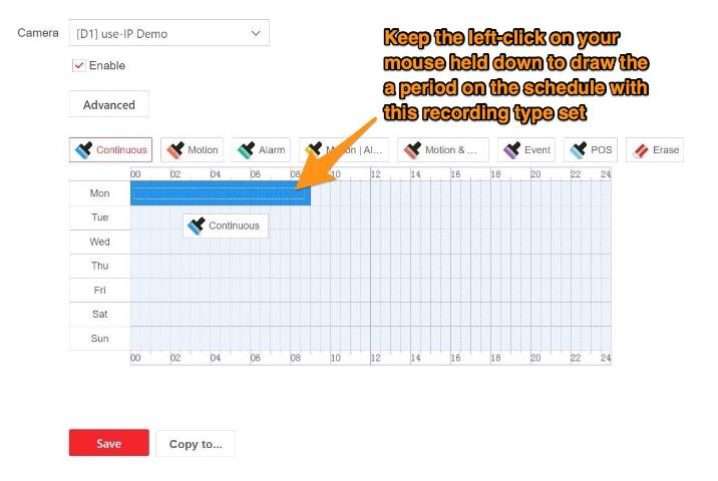
Now, select the recording option you would like to use for a period from the following options:
Step 5:
Click and drag across the section that of the schedule to which you want to apply the chosen recording option. You can use as many different recording options as you like here.
Step 6:
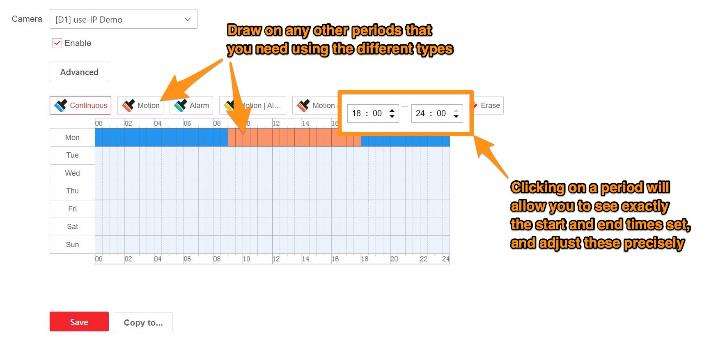
Finish drawing on the recording schedule for the rest of your week like this.
If you click on a period once it’s drawn, you can see the exact start and end time for it, and more precisely adjust these if need be.
Step 7:
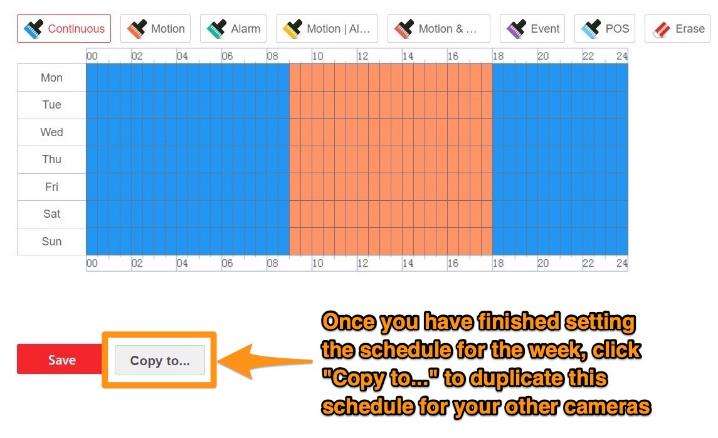
Click “Copy to…” if you would like to use this same schedule for any of your other cameras.
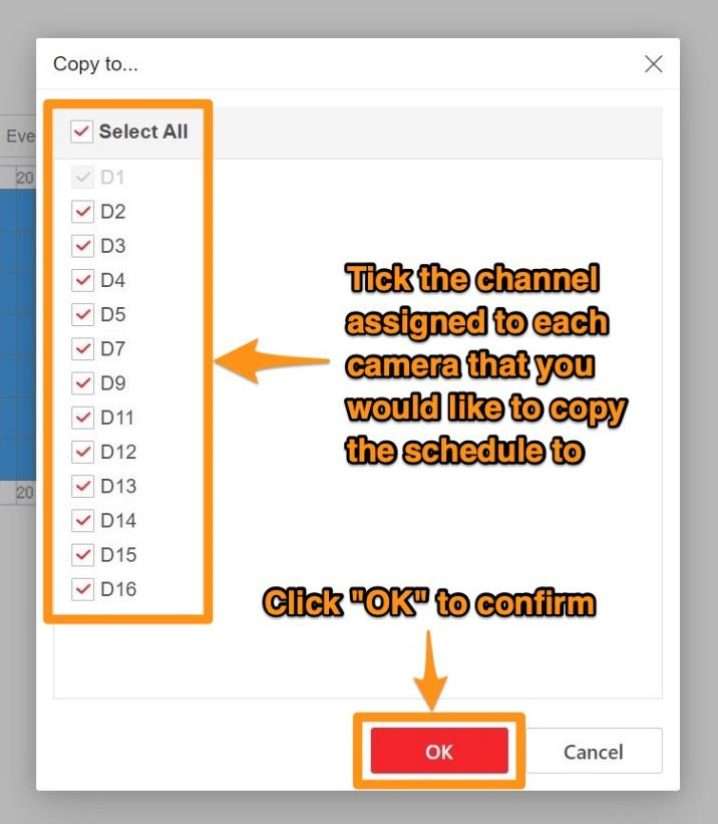
Select these in the popup that appears, and then click “OK”.
…..
Step 8:
Once you’re happy with how your schedule looks, click “Save” to finish and apply the schedule to your camera(s).
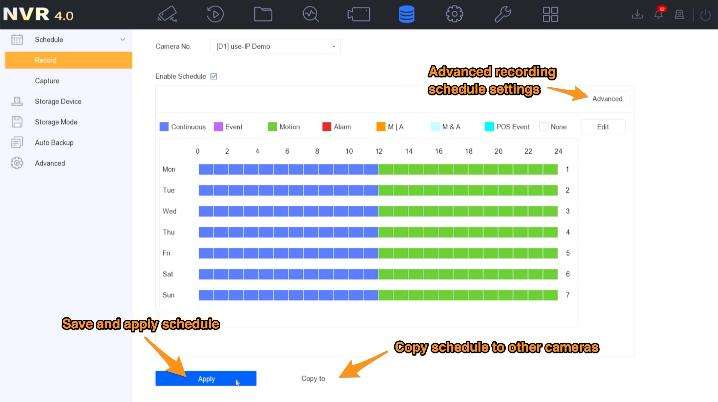
Method 2 – In the NVR’s local GUI:
Step 1:
Using the menu at the top of the screen, go to:
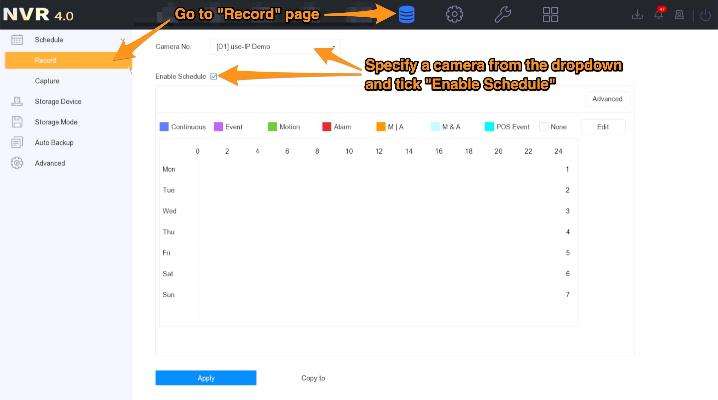
Storage → Schedule → Record
You will see your recording schedule as a grid for the week that’s segregated into hours.
Select your camera’s channel from the “Camera No.” dropdown, and then tick the “Enable Schedule” box.
Step 2:
You have a couple of options here for actually establishing your schedule…
Option 1:
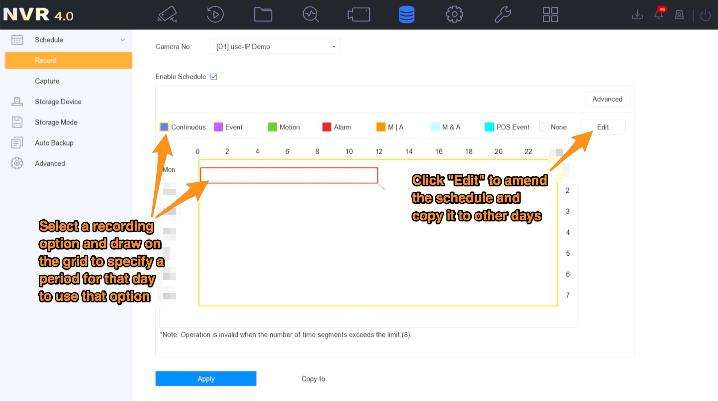
Drawing on your schedule is the quickest way.
You will need to click on one of the colour-coded recording options, and then click and drag your mouse across your desired time period to draw your schedule on this timeline.
When you’re done setting up your schedule for the week, click “Apply” to save it. Make sure you have not left any small gaps in the schedule.
Option 2:
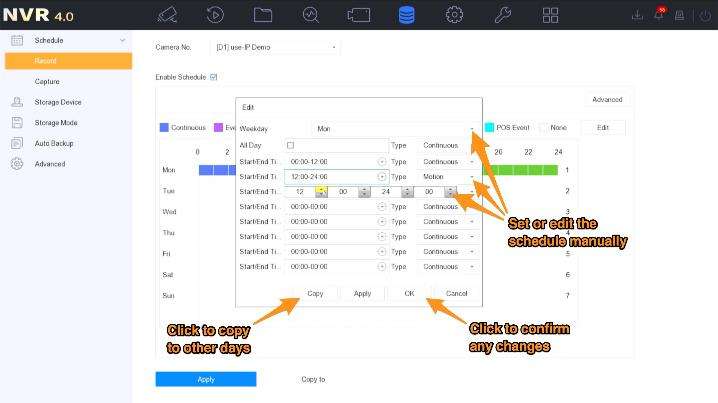
Click “Edit” on the right-hand side of your schedule.
This will bring up a window in which you can set your schedule for each day by using the top dropdown.
Ticking “All Day” means that the recording “Type” that you select will be used for the entire day.
Unticking “All Day” will allow you to configure your times in the eight boxes below. Each of these boxes represents a different recording type and time period for that type to be active.
For example, to set the camera to record continuously from midnight and midday, and during periods of motion detection only for the rest of the day, you should:
Set box one’s “Start/End Time” to “0:00-12:00”, with “Continuous” set as the “Type”
Set box two’s “Start/End Time” to “12:00-24:00”, with “Motion” set as the “Type”
You can then use the “Copy” button to quickly copy the schedule for this day across to others in the week by ticking the box for that day, and then clicking “OK”.
When finished, click “Apply”, then “OK” to return to the main recording schedule page.
Step 3:
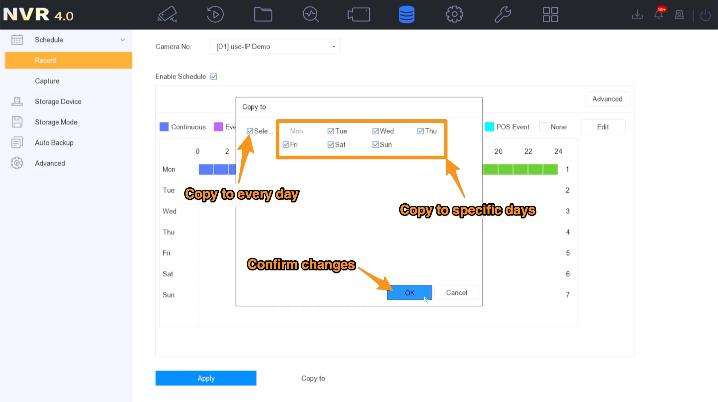
If copying the schedule to other days, then specify which in the “Copy to” window by ticking the boxes for those days, or “Select all”, which will copy it to every other day in the week.
Click OK to confirm this and return to the “Edit” page, and then “OK again” to apply these changes and return to the main “Record” menu.
Step 4:
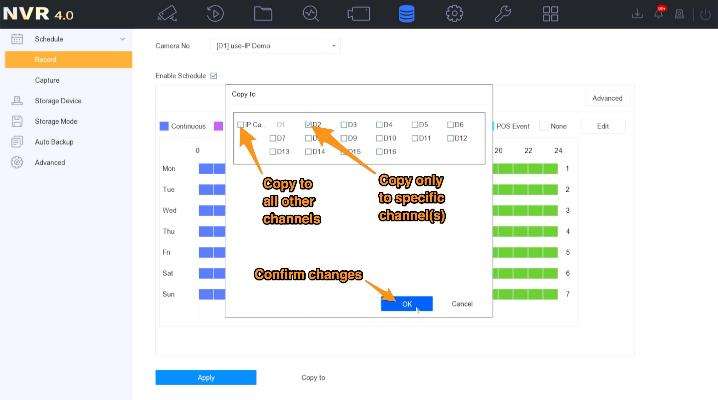
To save time by copying this same schedule to other cameras connected to the NVR, click “Copy to” on the “Record” page.
Alternatively, If you need different schedules for the other cameras, then just click “Apply”, which will save your new schedule for that camera.
Step 5:
In the “Copy to” window, use the tick boxes to specify the channel assigned to each of the cameras to which you would like to copy your new schedule.
Ticking the “IP Camera” box will select all of the NVR’s other channels.
Click “OK” to apply the schedule to the selected channels, and then “Apply” on the record page to save these changes.
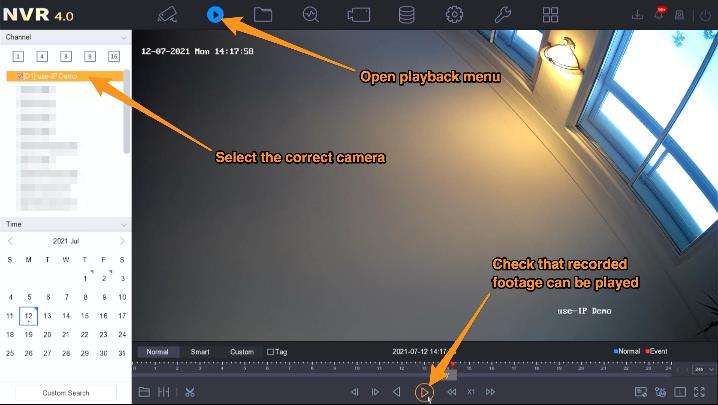
Finally, it’s always wise to check the “Playback” menu to confirm that the cameras are recording as you’ve set them to…
Advanced recording schedule settings:
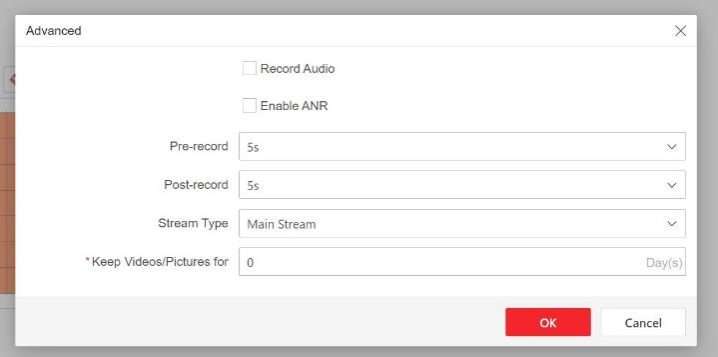
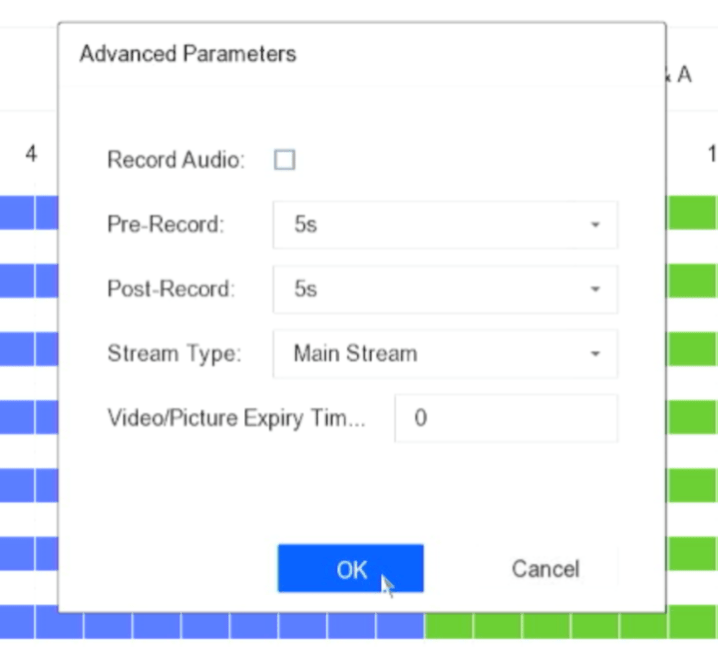
On both interfaces, you will see an “Advanced” button for access to further settings. A window with a list of options will appear when you click this, all of these are explained below:
Record Audio – Select this box if your camera has a microphone set up and you would like its audio feed to be recorded as well as the video. Bear in mind this will eat into storage space and bandwidth, so make sure you have enough available if you’re considering enabling this option.
Enable ANR – This is a nice security feature, but will need an onboard microSD card installed in your camera for this setting to work. If ticked, your camera will automatically continue recording to this memory card if it loses connection to your network or NVR at any point.
Pre-Record – This option allows you to set the period of time before a VCA event or alarm trigger that your camera will record for. E.g. If “Motion” is chosen for the recording type, “5s” means that the camera will record for 5 seconds before any motion is detected.
Post-Record – Similar to above, but instead refers to the length of time after said event or alarm that the camera will continue to record.
Stream Type – This is the stream type that you would like to be recorded. The “Main Stream” is typically used here as it is can be set to the highest video quality.
Video/Picture Expiry Time – This just refers to the length of time that you would like any recorded footage to remain saved to the NVR’s HDD before it is automatically deleted. If “Os” is selected, the footage will be stored on the HDD indefinitely, or until the drive fills up and begins to overwrite the oldest recordings on it.
Once you’re happy with these advanced settings, click “OK” followed by “Apply” to save them.
.
……
