Views: 8
There is Audio from Live Feed, No Audio During Playback
There are following possibilities:
• It is possible that the audio feature for that channel was not enabled. Please enable audio function
• Usually there are a limited number of channels that can be accessed for audio recording. Should one of the cameras that you are wanting to be recorded with audio and it is connected later in the channels, you WILL need to disconnect every camera and connect that camera in the limited selection of channels.
1. Make Sure your camera with a microphone is working via live stream, please follow the NoAudio guide for details.
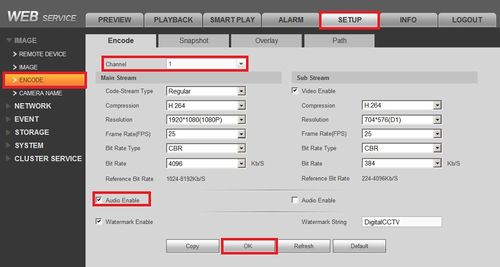
2. After ensuring you are receiving an audio feed, log onto your NVR and make sure your encoding setup is correct (Setup>Image>Encode>) and make sure your are on the right channel where the camera has a working microphone. Now make sure audio is enabled for either or both the Main Stream and Sub Stream (whichever you are recording on)
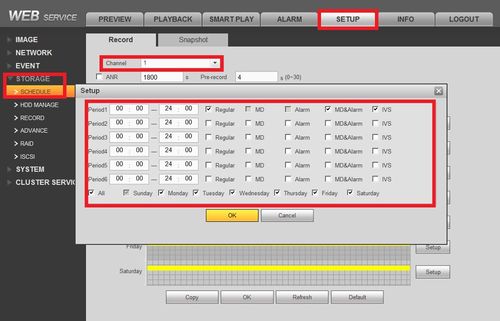
3. Also make sure your camera is scheduled to record during specified operation.
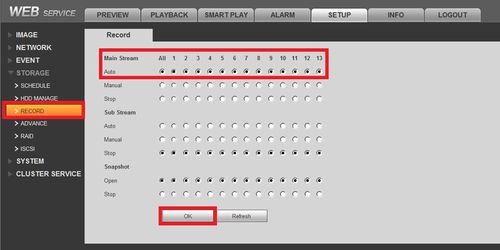
4. Also make sure your camera is set to record
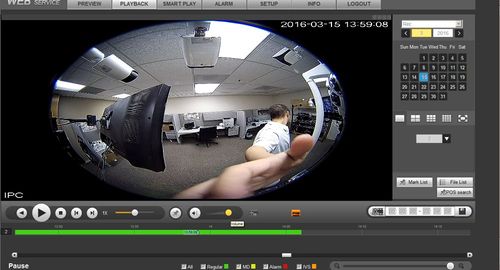
5. Now playback a recording of a camera that had picked up audio, you can also simulate this by making noise by the microphone and playing that segment back. Also make sure that the Volume button is not on mute and is turned all the way up during playback.
HDMI Troubleshoot
Namespaces
•
Page actions
•
There is no HDMI output.
• If Display is not set in HDMI mode then set to HDMI.
• If The HDMI connection is not fully set in the connection then configure and reconnect HDMI.
• If The HDMI connector is damaged then change the HDMI Cable.
• If HDMI Cable is damaged then change HDMI Cable.
• If Check if monitor is on the correct source setting then set to the correct source.
• If DVR / NVR is set to a resolution that is unsupported by monitor then reset resolution.
Video Loss 1 Camera
Namespaces
•
Page actions
•
Video Loss 1 Camera
There are following possibilities:
• Firmware is not compatible. You will need to upgrade to the latest version.
• Brightness is 0. Please restore factory default setup.
• There is no video input signal or it is too weak.
• You will need to check the network cable.
• DVR hardware malfunctions.
Video Loss All Cameras
Namespaces
•
Page actions
•
Video Loss on Multiple Cameras
There are following possibilities:
• Firmware may be old. Please upgrade to the latest version.
• Brightness is 0. Please restore factory default setup.
• If There is no video input signal or it is too weak, due to the length of cable, find shorter cable.
• Check privacy mask setup or your screen saver and remove them if possible.
• If DVR hardware malfunctions then change hardware.
• If Not enough bandwidth then check internet.
• If Insufficient power then check and change power supply.
• Check if you are using You are using aluminum braid or copper braid cable and change if not.
Troubleshoot Blurry Camera
Namespaces
•
Page actions
•
Camera Feed is Blurry or Distorted
There are following possibilities:
• It maybe that the camera is out of focus. The real*time video becomes black and white.
• If DVR and monitor resistance is not compatible then use a different monitor/DVR.
• If Video transmission is too long or degrading is too huge then shorten the distance.
• If DVR color or brightness setup is not correct then readjust setup or default.
• If Resolution or stream is on low then adjust resolution or stream.
• If Image sensor is bad then replace image sensor.
• Direct Sunlight can cause image sensor to go bad. So place image sensor out of direct sunlight.
• Try to avoid mounting camera on a metal surface. Electrical bleeding from a power source can cause image distortion.
• Indoor Camera being used as an outdoor camera which might not have an IR cut filter.
Troubleshoot Blurry Camera Playback
Namespaces
•
Page actions
•
Video is distorted when searching local records.
There are following possibilities:
Explanation:
1. If Video quality setup is too low then reconfigure video quality setup.
2. If Program read error, bit data is too small. There is mosaic in the full screen. Please restart the DVR to solve this problem.
3. If HDD data ribbon error then replace ribbon.
4. If HDD malfunction then replace HDD.
5. If DVR hardware malfunctions then replace hardware.
Remote control does not work.
There are following possibilities:
Explanation:
1. If Remote control address is not correct then find the correct address.
2. If Distance is too far or control angle is too small then shorten the distance or fix control angle.
3. If Remote control battery power is low then replace battery power.
4. If Remote control is damaged or DVR front panel is damaged then replace remote control or DVR front panel.
System does not boot
• Disconnect, reconnect power and video cables to system.
• Disconnect HDD and boot system. If system boots without HDD, then HDD has failed or is not compatible.
There are following possibilities:
• If Input power is not correct then switch input power.
• If Power connection is not correct then switch power connection.
• If Power switch button is damaged then replace power switch.
• If Program upgrade is wrong then install correct program upgrade or send to RMA.
• If HDD malfunction or something wrong with HDD ribbon then replace HDD or Ribbon.
• If Seagate DB35.1, DB35.2,SV35 or Maxtor 17*g has compatibility problem. Please upgrade to the latest version to solve this problem.
• If Front panel error then replace front panel.
• If Main board is damaged then replace main board.
NVR Randomly Rebooting or Shutting Down
Issue: NVR Randomly Rebooting or Shutting Down
• Disconnect HDD and boot NVR. If NVR boots without HDD, then HDD has failed or is not compatible.
There are following possibilities: Explanation:
1. If Input voltage is not stable or it is too low, then change the power supply and cable.
2. If HDD malfunction or something wrong with the ribbon, then replace the HDD or the ribbon.
3. Button power is not enough, then add more button power.
4. If Front video signal is not stable then check and adjust front video signal.
5. If Working environment is too harsh, too much dust then clean it.
6. If Hardware malfunction then replace hardware.
How to set the date and time
Time display is not correct.
There are following possibilities: Explanation:
• Setup is not correct
• Battery contact is not correct or voltage is too low.
• Crystal is broken.
Step by Step Instructions
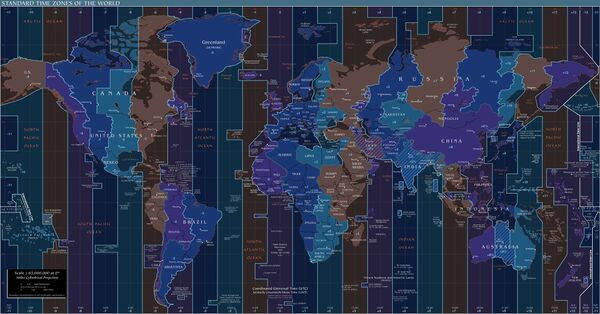
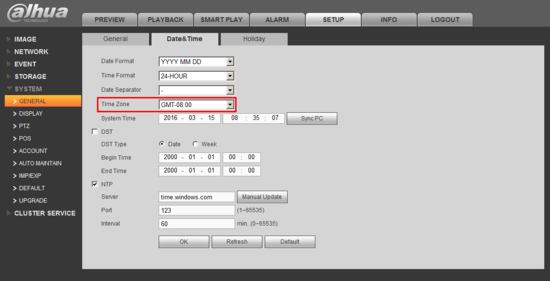
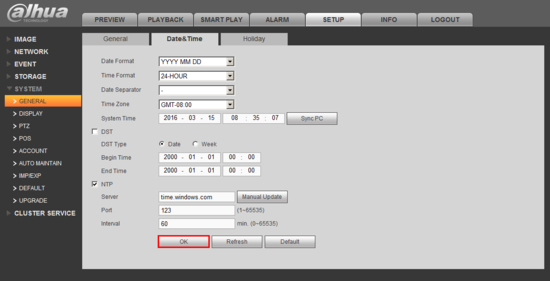
1. Make sure the “Time Zone” is set correctly.
GMT stands for Greenwich Mean Time.
• Eastern Standard Time: GMT – 05:00
• Central Standard Time: GMT – 06:00
• Mountain Standard Time: GMT – 07:00
• Pacific Standard Time: GMT – 08:00
• Alaskan Standard Time: GMT – 09:00
• Hawaii-Aleutian Standard Time: GMT – 10:00
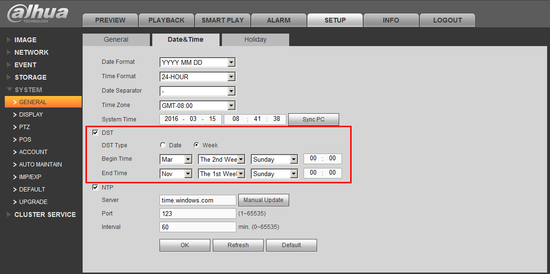
2. Setup DST, if applicable.
• Daylight Savings Time begins the 2nd week of March
• Daylight Savings Time ends the 1st week of November.
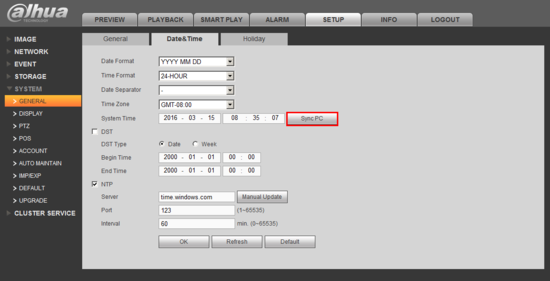
3. “Sync PC” if all else fails.
4. Click, “OK” to save your changes.
Burn Error Troubleshoot
Namespaces
•
Page actions
•
Burn error /USB back error.
Explanation:
1. If Burner and NVR are in the same data cable, then separate them.
2. If System uses too much CPU resources. Then please stop record first and then begin backup.
3. If Data amount exceeds backup device capacity which may result in burner error. Then please delete data.
4. If Backup device is not compatible, please change backup device.
5. If Backup device is damaged, please change backup device.
How to Change Camera Order of Connected Cameras
Description
This allows you to change camera order on the view.
Prerequisites
• HCVR or NVR
• Mouse and Monitor
• IP, Analog, or HDCVI cameras connected to the recorder
Video Instructions
Step by Step Instructions
• If you are using a NVR:
1. Look at the order the cameras were added and keep track of the IP’s of the cameras you want to re-arrange.
2. Delete the cameras and add them in that specified order.
.
• If you are using a HCVR:
1. Keep track of what channels you want to switch. The recorder’s channels are assigned by the numbered BNC ports on the back of the unit. Labeling the channels might help when switching the ports around to the specific order you want.
2. Unplug the BNC connectors and move the correct camera to the correct channel.
.
• If you are using a Tribrid (HCVR) with HD-CVI/Analog and IP cameras:
• On the HCVR the BNC channels come first, then the IP channels (when allocated). To work around this the tour function must be used to rearrange the camera order.
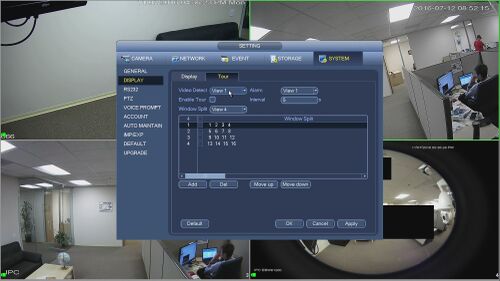
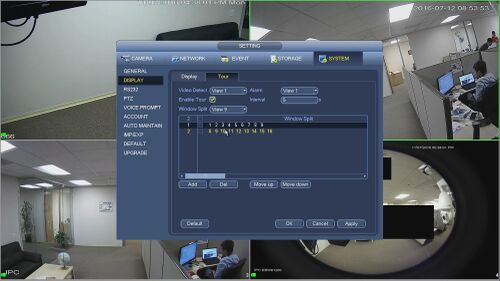
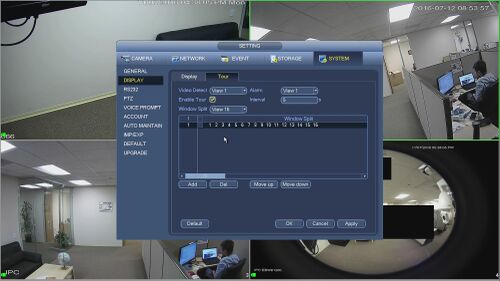
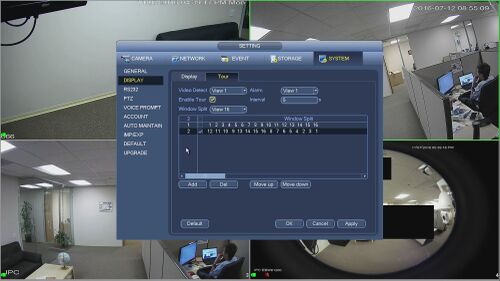
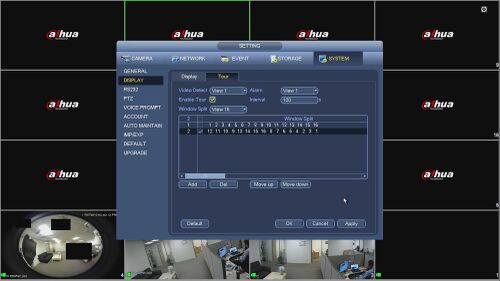
1. The cameras are prioritized by the BNC ports for the first set of channels. If you want the IP channels to appear first you will need to setup a tour mode on only one tour setting. Open the menu on the NVR and select SYSTEM(under SETTING)->DISPLAY->TOUR
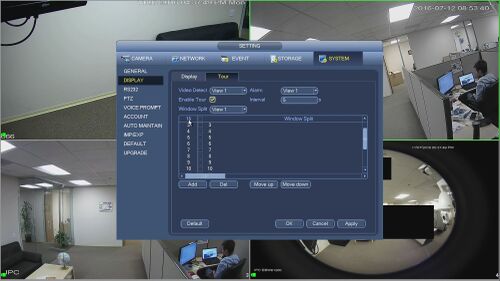
2. Check the Enable Tour box.
3. Make sure all of the Window Split Views (1,4,8,9,16) are left unchecked, otherwise this will initiate a tour of the checked views.
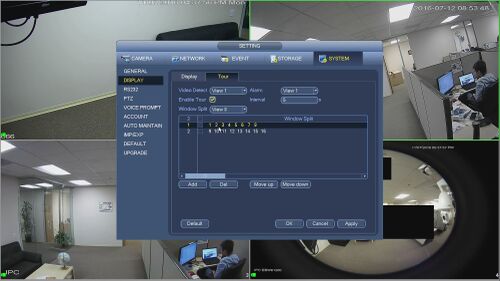
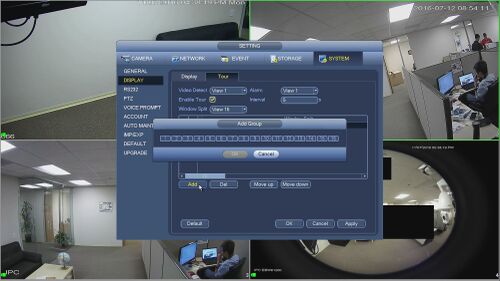
4. Now setup one tour under the grid view you want to look at, this demo is 16 views.
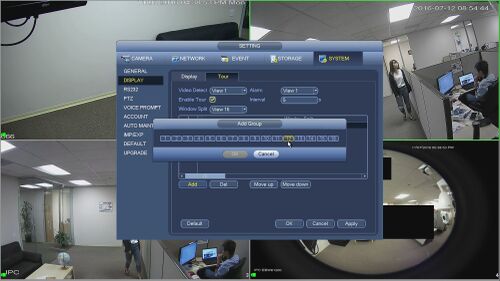
5. Select Add, and highlight the channels in the order you want to see them on the screen and click OK when finished.
6. Make sure the custom tour that was setup is checked and then enter 120s (or the maximum) on the Interval area.
7. Select apply
How to Change Camera Order of Connected Cameras Using Sequence
Description
This allows you to change camera order on the view. This features differs from the previous rendition because the changes stay after a reboot.
Prerequisites
• HCVR or NVR with 3.215 or newer firmware.
• Mouse and Monitor
• IP, Analog, or HDCVI cameras connected to the recorder
Video Instructions
Step by Step Instructions
Quick Reference
|
NVR FAQ |
|
|
Problem |
Solution |
|
NVR will not boot. |
Input power is not correct. |
|
Power connection is not correct. |
|
|
Power switch button is damaged. |
|
|
Program upgrade is wrong. |
|
|
HDD malfunction or something wrong with HDD ribbon. |
|
|
Seagate DB35.1, DB35.2,SV35 or Maxtor 17-g has compatibility problem. Please upgrade to the latest version to solve this problem. |
|
|
Front panel error. |
|
|
Main board is damaged. |
|
|
NVR often automatically shuts down or stops running. |
Input voltage is not stable or it is too low. |
|
HDD malfunction or something wrong wit the ribbon. |
|
|
Button power is not enough. |
|
|
Front video signal is not stable. |
|
|
Working environment is too harsh, too much dust. |
|
|
Hardware malfunction. |
|
|
System is unable to detect hard drive. |
HDD is broken. |
|
HDD ribbon is damaged. |
|
|
HDD cable connection is loose. |
|
|
Main board SATA port is broken. |
|
|
Video loss from 1, multiple, or all channels. |
. |
|
Program is not compatible. Please upgrade to the latest version. |
|
|
Brightness is 0. Please restore factory default setup. |
|
|
Check your screen saver. |
|
|
NVR hardware malfunctions. |
|
|
I can not search local records. |
. |
|
HDD ribbon is damaged. |
|
|
HDD is broken. |
|
|
Upgraded program is not compatible. |
|
|
The recorded file has been overwritten. |
|
|
Record function has been disabled |
|
|
Video is distorted when searching local records. |
. |
|
Video quality setup is too low. |
|
|
Program read error, bit data is too small. There is mosaic in the full screen. Please restart the NVR to solve this problem. |
|
|
HDD data ribbon error. |
|
|
HDD malfunction. |
|
|
NVR hardware malfunctions. |
|
|
Time display is not correct. |
. |
|
Setup is not correct |
|
|
Battery contact is not correct or voltage is too low. |
|
|
Crystal is broken. |
|
|
NVR can not control PTZ |
. |
|
Front panel PTZ error |
|
|
PTZ decoder setup, connection or installation is not correct. |
|
|
Cable connection is not correct. |
|
|
PTZ setup is not correct. |
|
|
PTZ decoder and NVR protocol is not compatible. |
|
|
PTZ decoder and NVR address is not compatible. |
|
|
When there are several decoders, please add 120 Ohm between the PTZ decoder A/B cables furthest end to delete the reverberation or impedance matching. Otherwise the PTZ control is not stable. |
|
|
The distance is too far. |
|
|
Unable to login to WebGUI |
. |
|
For Windows 98 or Windows ME user, please update your system to Windows 2000 sp4. Or you can install client-end software of lower version. Please note right now, our NVR is not compatible with Windows VISTA control. |
|
|
ActiveX control has been disabled. |
|
|
No dx8.1 or higher. Please upgrade display card driver. |
|
|
Network connection error. |
|
|
Network setup error. |
|
|
Password or user name is invalid. |
|
|
Client-end is not compatible with NVR program. |
|
|
There is only mosaic no video when preview or playback video file remotely. |
. |
|
Network fluency is not good. |
|
|
Client-end resources are limit. |
|
|
Current user has no right to monitor. |
|
|
Network connection is not stable. |
. |
|
IP address conflict. |
|
|
MAC address conflict. |
|
|
PC or device network card is not good. |
|
|
Keyboard can not control NVR. |
. |
|
NVR serial port setup is not correct |
|
|
Address is not correct |
|
|
When there are several switchers, power supply is not enough. |
|
|
Transmission distance is too far. |
|
|
Alarm signal can not been disarmed. |
. |
|
Alarm setup is not correct. |
|
|
Alarm output has been open manually. |
|
|
Input device error or connection is not correct. |
|
|
Some program versions may have this problem. Please upgrade your system. |
|
|
Alarm function is null. |
. |
|
Alarm setup is not correct. |
|
|
Alarm cable connection is not correct. |
|
|
Alarm input signal is not correct. |
|
|
There are two loops connect to one alarm device. |
|
|
Record storage period is not enough. |
. |
|
Camera quality is too low. Lens is dirty. Camera is installed against the light. Camera aperture setup is not correct. |
|
|
HDD capacity is not enough. |
|
|
HDD is damaged. |
|
|
Can not playback the downloaded file. |
. |
|
There is no media player. |
|
|
No DXB8.1 or higher graphic acceleration software. |
|
|
There is no DivX503Bundle.exe control when you play the file transformed to AVI via media player. |
|
|
No DivX503Bundle.exe or ffdshow-2004 1012 .exe in Windows XP OS. |
|
|
Forgot local menu operation password or network password |
. |
|
Please contact your local service engineer or our sales person for help. We can guide you to solve this problem. |
|
|
There is no video. The screen is in black. |
. |
|
IPC IP address is not right. |
|
|
IPC port number is not right. |
|
|
IPC account (user name/password) is not right. |
|
|
IPC is offline. |
|
|
The displayed video is not full in the monitor. |
. |
|
Please cheek current resolution setup. If the current setup is 1920*1080, then you need to set the monitor resolution as 1920*1080 |
|
|
There is no HDMI output. |
. |
|
Displayer is not in HDMI mode. |
|
|
HDMI cable connection is not right. |
|
|
The video is not fluent when I view in multiple-channel mode from the client-end. |
. |
|
The network bandwidth is not sufficient. The multiple-channel monitor operation needs at least 100M or higher. |
|
|
Your PC resources are not sufficient. For 16-ch remote monitor operation, the PC shall have the following environment: Quad Core, 2G or higher memory, independent displayer, display card memory 256M or higher. |
|
|
I can not connect to the IPC |
. |
|
Please make sure the IPC has booted up. |
|
|
IPC network connection is right and it is online |
|
|
The device has connected to the too many IPC. It can not transmit the video. |
|
|
Check the IPC port value and the time zone is the same as the NVR. |
|
|
Make sure current network environment is stable. |
|
|
After I set the NVR resolution as 1080P, my monitor can not display. |
. |
|
Shut down the device and then reboot. When you reboot, please press the Fn button at the same time and then release after 5 seconds. You can restore NVR resolution to the default setup. |
|
|
After I login the Web, I can not find the remote interface to add the IPC. |
. |
|
Please clear the Web controls and load again. |
|
|
I use the VGA montior. If I use the multple-window mode, I see the video from the main stream or the sub stream. |
. |
|
For 32-channel series product, the 9/16-window is using the sub stream. |
|
|
For 4/8/16 series product, system is using the main stream no matter you are in what display mode. |
|
.
